“It’s summer outside,
but winter in my cup.”
- Unknown
CLEANING AND MAINTENANCE
DAILY CLEANING AND SANITIZING PROCEDURES
ASSEMBLING PROCEDURES
In order to maintain the machine in like-new operating condition and to respect current regulations, it’s absolutely necessary to
frequently and carefully perform the cleaning and sanitizing operations as described below.
In case of prolonged shutdown (winter storage), the machine must be disassembled, washed and sanitized according to the
instructions in this manual before start-up to ensure the best possible cleanliness.
• Empty the bowl of any
remaining product.
• After unlocking the main cover
with its key, remove it.
• Fill the bowl with lukewarm
water to help melt off any sugar
residuals and drain this water
before proceeding with the
next step.
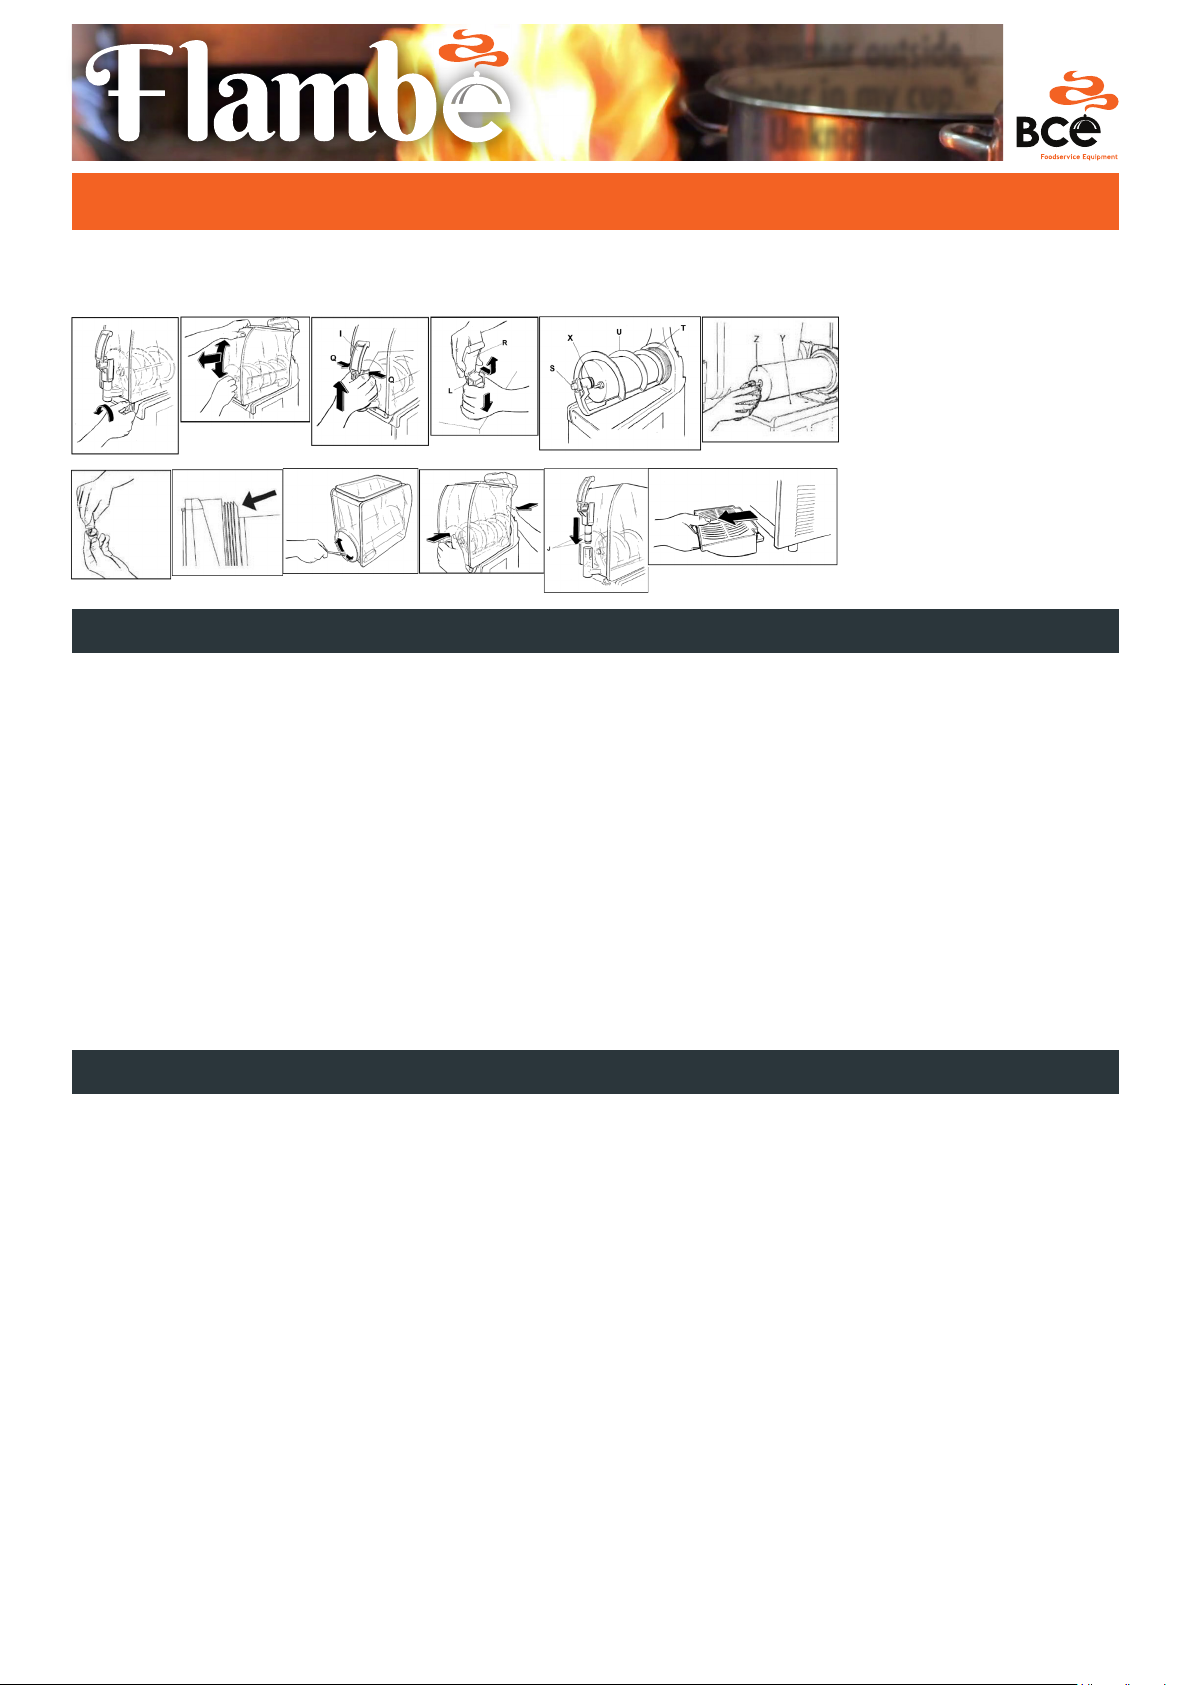
• Unscrew and slip off the knobs (fig. 1) then lower the bowl to eliminate any product residue through the dispensing tap.
• Slightly move up and down the bowl as shown in (see fig. 2) while pulling it outwards, this operation will help fully removing it from its seating.
• Simultaneously apply pressure to the two securing tabs (Q), and lift the dispensing tap (I) to pull it out of its fixed position (see fig.3).
• Disassemble the dispensing tap by keeping the indicated part (R) pressed down and slipping off the dispensing lever (L) (see fig.4).
• Thoroughly wash each single part with hot water and mild dish washing detergent, rinse well, and reassemble the parts.
CAUTION: TO PREVENT BACTERIA GROWTH, REMOVE ALL O-RINGS WHEN CLEANING. FAILURE TO DO SO COULD CREATE
A HEALTH HAZARD.
• Unscrew the securing bolt (S) in the direction of the arrow (threading on the left), pull off of the mixing unit (U), and remove the
sealing washers (X) and (T) (see fig.5).
CAUTION: AVOID THE USE OF ABRASIVE CLEANERS WHICH CAN DAMAGE THE FINISH. DO NOT PUT THE PARTS IN A
DISHWASHER. DISHWASHER MAY DAMAGE SOME PARTS SUCH AS THE CLEAR PLASTIC BOWLS AND AUGER GEARS.
• Thoroughly wash all the removed components with hot water and mild dish washing detergent, but do not use abrasive
detergents or powders that can damage the bowl.
• Provide yourself with a sanitizer suitable for plastic, rubber and stainless steel objects (AMUCHINA®).
• Rinse well and then place all the components in the sanitizer solution; for proper sanitizing the parts must remain fully plunged as
recommended by the sanitizer manufacturer.
IMPORTANT: CAREFULLY FOLLOW THE SANITIZER PRODUCER PRESCRIPTIONS IN TERMS OF TIME AND MODES OF USAGE.
• After respecting the correct sanitizing period, rinse well all the components with clean water and dry them up with a clean cloth.
• Thoroughly wash the evaporator and the drip tray surfaces with a sponge soaked with the sanitizer (see fig.6).
• Repeat all these operations with a clean sponge soaked with water and carefully dry up all the surfaces with a clean cloth.
Once performed all these cleaning and sanitizing procedures, it’s possible to reassemble all the components.
The correct assembly of the device is essential to prevent leakage of product and damage of the machine. To assemble the machine
you will need an approved lubricant (such as Vaseline). Make sure all parts have been washed and sanitized before assembling.
Persons assembling the machine must first wash and sanitize their hands and forearms with an approved sanitizer.
• Mount the mixing system back together (fig.5), according to the following procedures:
- Spread the suction gaskets (X) with Vaseline grease to reduce friction and thus limit wear (fig.7).
- Mount the bowl seal (T) making sure it faces the right direction (fig.8).
- Assemble the scraper auger (U), making sure the head is perfectly engages with the driving shaft.
- Secure all the parts into place by screwing the bolt (S) in a counter clockwise direction.
• Mount the bowl back on, positioning it into place, and making sure that it has a tight hold on its gasket (see fig.10). To facilitate
this procedure, we also suggest that the rear part of the bowl be moistened at the point in which it fits together with its sealing (fig.9).
• Secure the bowl by tightening the two knobs, without exerting excessive pressure.
IMPORTANT: DO NOT OVER TIGHTEN THE BOWL KNOBS. EXCESSIVE FORCE COULD DAMAGE THE THREAD AND/OR THE
BOWL ITSELF.
• Reassemble the parts of the dispensing tap, making sure that the gaskets (J) are lubricated with Vaseline grease so that the tap
slides smoothly back into its fixed position, until it’s completely inserted (see fig.11).
IMPORTANT: THE NOT PERFECT SLIDING OF THE TAP COMPROMISES ITS OWN SEAL.
• Remove the drip tray and pulling it forward (see fig.12). Wash each part thoroughly, then reassemble the parts by inversely
following the procedures described above.
• Plug the unit back into appropriate power supply.
• After the cleaning and reassembly as per above instructions, fill the bowl with a mix of water and an approved sanitizer (example
AMUCHINA®), according to the measures specified.
• Start the mixing part of the machine to sanitize all the parts following the cleaning solution specifications.
• Drain the cleaning solution as follows:
- Unscrew the two knobs;
- Then lower the bowl to drain out any remaining product through the dispensing valve.
• Screws the knobs to fix the bowls.
Fig. 1
Fig. 7
Fig. 2
Fig. 8
Fig. 3
Fig. 9
Fig. 4
Fig. 10
Fig. 5
Fig. 11
Fig. 6
Fig. 12


