Sun-Mar MOBILE User manual

Serial No.______________
MOBILE/SPACESAVER TOILET
OWNER’S MANUAL
MOBILE SPACESAVER
Certified to NSF/ANSI Standard 41 US COAST GUARD
RATED CAPACITY
CERTIFIED Residentia & Continuous Use
Standard 41 Issued 09/05/97 MOBILE: 1 Adu ts
SPACESAVER: 1 Adu t
Certified for iquid containment, Weekend & Vacation Use
odors, and so id end products in MOBILE: 3 Adu ts
both residentia and cottage use SPACESAVER: 3 Adu ts

Mode s for which the manua app ies:
CSES-01601W Spacesaver
CSAS-01500B Mobi e
CSAS-01502B Mobi e 12 Vo t
Do not stand on the toi et.
E ectric toi ets must be insta ed so that e ectrica components in base of unit are
protected from rain, f ooding, and me ting snow.
Meta too s wi damage the toi et.

OWNER’S MANUAL
CONTENTS
How Composting Wo ks
2 Sp ing Time Sta t Up 12
Winte Use
The MOBILE / SPACESAVER toilet
3 Removing Compost f om
The Patented Bio-Drum 3 the Bio-D um 13
Compost Finishing Drawer 3 Compost T oubleshooting 14
Evaporation Chamber 3 Compost Too Wet 14
Waste not Breaking Down 14
Inspection 4 Large Lumps In Drum 14
Check for Damage 4 Drum Too Fu 14
Whats in the Box 4 F ies Present 14
Fami iarise Yourse f with the
MOBILE / SPACESAVER 4 Mechanical T oubleshooting 15-24
Attaching the Footrest 4 Urine Odor In Washroom 15
Occasiona Urine Odor Outside 15
Installation 5-9 Sewage Odor when drum turns 15
MOBILE / SPACESAVER Fan Noisy 15
Rough in Dimensions 5 Fan Not Working 16
MOBILE Installation 6-7 Liquid Bui dup/
‘S’ Bracket 6 Lack of Evaporation 16
‘L’ Bracket 6 Liquid Overf ow 16-17
Space Required 7 Heating System Not Working 17
Vent Pipe Insta ation 7 Liquid In Finishing Drawer 17
Insta ing the Fan Fi ter Box 7 Drum Wi Not Turn 17
Leading the Vent Through the Roof 7 Drum Door Not Opening/ C osing 17
Leading the Vent Through the Wa 7
The Deck or Roof Vent 7 Basic Inst uctions 18
Drain Insta ation 7
SPACESAVER Installation 8-9 Composting Toilet Accesso ies 19
Space Required 8
Vent Pipe Location 8
Leading the Vent Through the Roof 9 MOBILE / SPACESAVER
Drain Insta ation 9 Specifications 21
Hand ing Eff uent 9
Sta t-Up and Use 10
Ongoing Toilet Maintenance 11
- 1 –

HOW COMPOSTING WORKS
Composting is the natura process of decomposition that can be he ped a ong by
providing the idea conditions to he p your composting toi et work at peak performance.
The idea conditions for decomposition to occur depend on severa factors: oxygen,
temperature, moisture content, and the carbon/nitrogen ratio.
Oxygen
Oxygen is very important in composting. Your compost shou d be aerated in order to
encourage aerobic bacteria growth. Aerobic bacteria are bacteria that grow and ive in
the presence of oxygen and are very efficient in breaking down waste. To aerate the
compost and encourage the growth of these bacteria, the compost drum shou d be
turned three times per week (6 comp ete turns of the drum).
Tempe atu e
Temperature is another important consideration when composting. Optima composting
temperatures range between 70-100 ° F (21-38 ° C). Decomposition wi s ow
significant y or stop comp ete y if the compost becomes too co d (be ow 55 ° F or 13 °
C). If you are in an area that experiences temperatures be ow 55 °F (13 ° C) additiona
heat is required if the composting toi et wi be used continua y or frequent y. If used
for intermittent cottage app ication (3 - 4 weekends throughout the co d season) no
additiona heat is required. The unit wi function as a ho ding tank unti the temperature
warms up.
Moistu e
Moisture is necessary to achieve good compost. Your compost shou d a ways be
damp, ike your garden after you have watered it. This moisture a ows the bacteria to
trave around in the compost so that they can speed decomposition by digesting the
waste. If the compost is too dry, the bacteria cannot survive and decomposition wi
s ow or cease. When adding water to the compost, you are aiming for damp compost,
not saturated. Too much iquid in the compost imits the amount of oxygen that aerobic
bacteria require to survive. If norma urination is not enough to maintain the correct
moisture eve in the compost, we encourage you to add additiona water to the drum.
Ca bon/Nit ogen Ratio
A most a organic materia wi compost. The proper bu king materia and human waste
shou d be added to the composting toi et. In order to maintain a good ba ance between
carbon-rich materia s, SUN-MAR Compost Sure Green and nitrogen-rich human waste
shou d on y be added to the toi et.
- 2 –

THE SUN-MAR MOBILE/SPACESAVER TOILET
The key to the success of the MOBILE / SPACESAVER ies in its three chamber
design. Each of the three chambers; patented Bio-drum, compost finishing drawer, and
evaporation chamber, have their own independent environments for optimum
efficiency. The MOBILE / SPACESAVER features a thermostatica y contro ed
heater and fan assemb y to he p evaporate iquid and shou d be used where there is a
constant e ectrica supp y.
The Patented Bio-D um
Unique to Sun-Mar, the patented bio-drum provides the necessary mass to maintain
good compost and a ows easy aeration of the compost by simp y turning the drum.
Excess iquid wi exit through a screen in the bottom of the drum into the evaporation
chamber. Mixing the Bio-drum is accomp ished by rotating the hand e in a c ock-wise
direction. Compost is removed from the drum by pu ing out the white drum ock button
(under the footrest) and rotating the hand e in a counter c ock-wise direction.
The Compost Finishing D awe
The compost finishing drawer sits in an opening under the footrest. Compost in the
drawer is iso ated from mixing with new waste whi e resting for 4 weeks so that it can
finish composting.
The Evapo ation Chambe
The evaporation chamber is the f oor
of the unit under the compost finishing
drawer. This is the area where any
excess iquid wi gather for
evaporation. A safety drain exits from
the back of the composting toi et
which wi drain over-f ow iquid that is
not evaporated to an approved faci ity.
- 3 –

Inspection
We recommend an inspection of the MOBILE/SPACESAVER toi et prior to insta ation and to make sure you have
received a of the parts required as isted be ow.
- 4 –
Inspecting the
unit fo
Damage
What’s in the
Box
Familia ize
You self with
the
MOBILE/
SPACESAVER
Toilet
Attaching
and
Detaching
the
foot est
1. If there is any visib e damage to the carton-
The contents of the carton shou d be inspected before signing the bi of
ading. Damaged units shou d be refused. Ca Sun-Mar immediate y.
2. If the shipper has eft-
Report the damage immediate y to the transport company and ca Sun-Mar.
3. Soon after de ivery, remove the MOBILE/SPACESAVER Toi et carefu y
from the carton- If there is hidden damage, or for any service questions,
contact Sun-Mar to determine the best course of action.
1- Owners Manua 1 - Fi ter Box (MOBILE)
1- Warranty Card 1- Bow Liner 1 - Rake
1- Hardware Kit 1- 2” Pipe Insu ation (SPACESAVER)
1- Footrest 2 - 3”x 31” Vent pipe (MOBILE)
1- 1” x 8’4” Drain Hose 1- 4” Diffusor (SPACESAVER)
1- Compost Sure Green 4- 2”x31” Vent pipe (SPACESAVER)
1. Turn the drum hand e c ockwise to rotate the patented Bio-Drum for mixing
and aeration. (The drum rotates counter-c ockwise and the drum door
c oses). This is how you wi rotate the drum during regu ar operation.
2. Pu the drum ocker button, ( ocated under the footrest) and turn the hand e
counter-c ockwise to simu ate remova of compost. This is how you wi
remove compost during regu ar operation.
3. (110 vo t AC units) P ug the unit’s e ectrica cord into a standard three-prong
e ectrica out et, and fee the air movement from the vent out et at the top of
the unit to ensure the vent system is working proper y.
4. Pu out the compost finishing drawer at the bottom front of the unit. After the
unit has been p ugged in for ten minutes, p ace a hand on the f oor of the
evaporating chamber (the area under the finishing drawer) to check it is
warm to the touch, and that the heater is working proper y.
MOBILE: The fo d up footrest attaches to the unit with hinges. To attach
the footrest, a ign the pin on the footrest hinge with the bracket above
the finishing drawer opening. S ide the pin into the bracket. Once the
footrest is attached it is easi y fo ded against the unit and c ipped into
p ace.
SPACESAVER: The footrest attaches to the unit
with the meta track above the finishing drawer
opening. To attach the footrest, inc ine the footrest at
a 45 degree ang e to the f oor as shown. Insert the
round top edge of the track on the footrest into the
round top edge of the meta track on the unit and
then ower the footrest to the f oor. Note: Foot est
must be co ectly attached befo e stepping on it.

Installation
MOBILE ROUGH IN DIMENSIONS
SPACESAVER ROUGH IN DIMENSIONS
- 5 –

MOBILE Toilet Installation
- 6 –
Anchoring the
Mobi e
“S” Shaped
Bracket
‘L’ Shaped
Brackets
The mobi e shou d be anchored if the unit wi be insta ed in a vehic e that wi move. There
are three anchoring brackets supp ied with the unit which shou d be used to secure y
anchor the toi et.
The ‘S’ shaped mounting bracket -
The ‘S’ shaped mounting bracket, (pictured be ow) is for attaching the top of the toi et to
the wa . (see diagram be ow)
1. Locate the ‘S’ Bracket (shown above), 2 nuts, 2 washers and
2 bo ts.
2. Locate the two dimp es (guides where to dri ho es) that are just
eft of centre, near the top of the unit.
3. P ace the ‘S’ Bracket over the dimp es to make sure the ho es ine
up. Using an e ectric dri with the dri bit(provided), dri a ho e
through each of the 2 dimp es on the top of the unit.
4. P ace the ‘S’ bracket over the ho es so that the top end of the
bracket is above the top of the unit (as shown in diagram eft).
Once the bracket is in p ace, insert a bo t through each ho e so that it is visib e through the
vent ho e in the top of the unit (see diagram be ow). Run a thin bead of si icone around the
stain ess stee washer (provided) and p ace over the protruding bo t, on the inside of the
unit. P ace a stain ess stee nut over each protruding bo t and tighten.
Fastening the bracket to the wa :
1. P ace the MOBILE against the wa where it wi be mounted.
2. With a penci , mark the ocation of the ho es in the mounting
bracket.
3. Dri a sma ho e in each of the penci markings to accept
anchoring screws. Use a #8 x 1” screw to anchor the
unit to the wa . Once insta ed, the vent pipe wi hide the
bracket.
The ‘L’ bracket, (pictured eft) is for attaching the toi et to the f oor. (see diagram be ow)
1. Locate the ‘L’ Bracket in the desired ocation.
2. Remove the finishing drawer. Using the ho es in the ‘L’ bracket as a guide, mark the
ocation of the two ho es with a penci . Use a dri with the dri bit (provided) to create
sma ho es in the side of the MOBILE tank being carefu not to dri downward toward
the heating e ement.
3. Make sure the dri ed ho es ine up with the ho es in the
‘L’ bracket..
4. P ace a sma bead of si icone over the ho e between
the ‘L’ bracket and the Mobi e tank. Dip the bo t into
si icone and insert the bo t into the ho e in the bracket
and through the corresponding ho e in the Mobi e tank.
5. P ace a sma amount of si icone into the centre of the
nut and fasten over the bo t to fasten the bracket.
Impo tant: Ensu e all bolts used fo b ackets a e
sealed with silicone to p event leakage.

- 7 –
Space
Requi ed and
othe
Installation
Conside ations
Vent Pipe
Location
Installing the
Fan Filte Box
Leading the
Vent
Th ough the
Roof
The Deck o
Roof Vent
D ain
Installation
1. Compost is removed from the finishing drawer. Ensure that there is at east 15” in front of
the MOBILE Toi et so that the drawer may be removed from the unit.
2. Insta the unit in a ocation where the safety drain can be connected. This drain exits from
the back of the unit and must s ope downward at a points.
3. Insta in a ocation where the vent pipe can be attached as per the instructions isted
on page #9.
4. Insta in a ocation that is not air tight.
5. Ensure that there is a three-pronged p ug with a GFI (ground fau t interrupter) or 12 Vo t
connection insta ed within 5 feet of the unit.
6. Ensure the MOBILE Toi et is protected from precipitation.
7. The toi et must be insta ed on a eve surface or s oping s ight y towards the back.
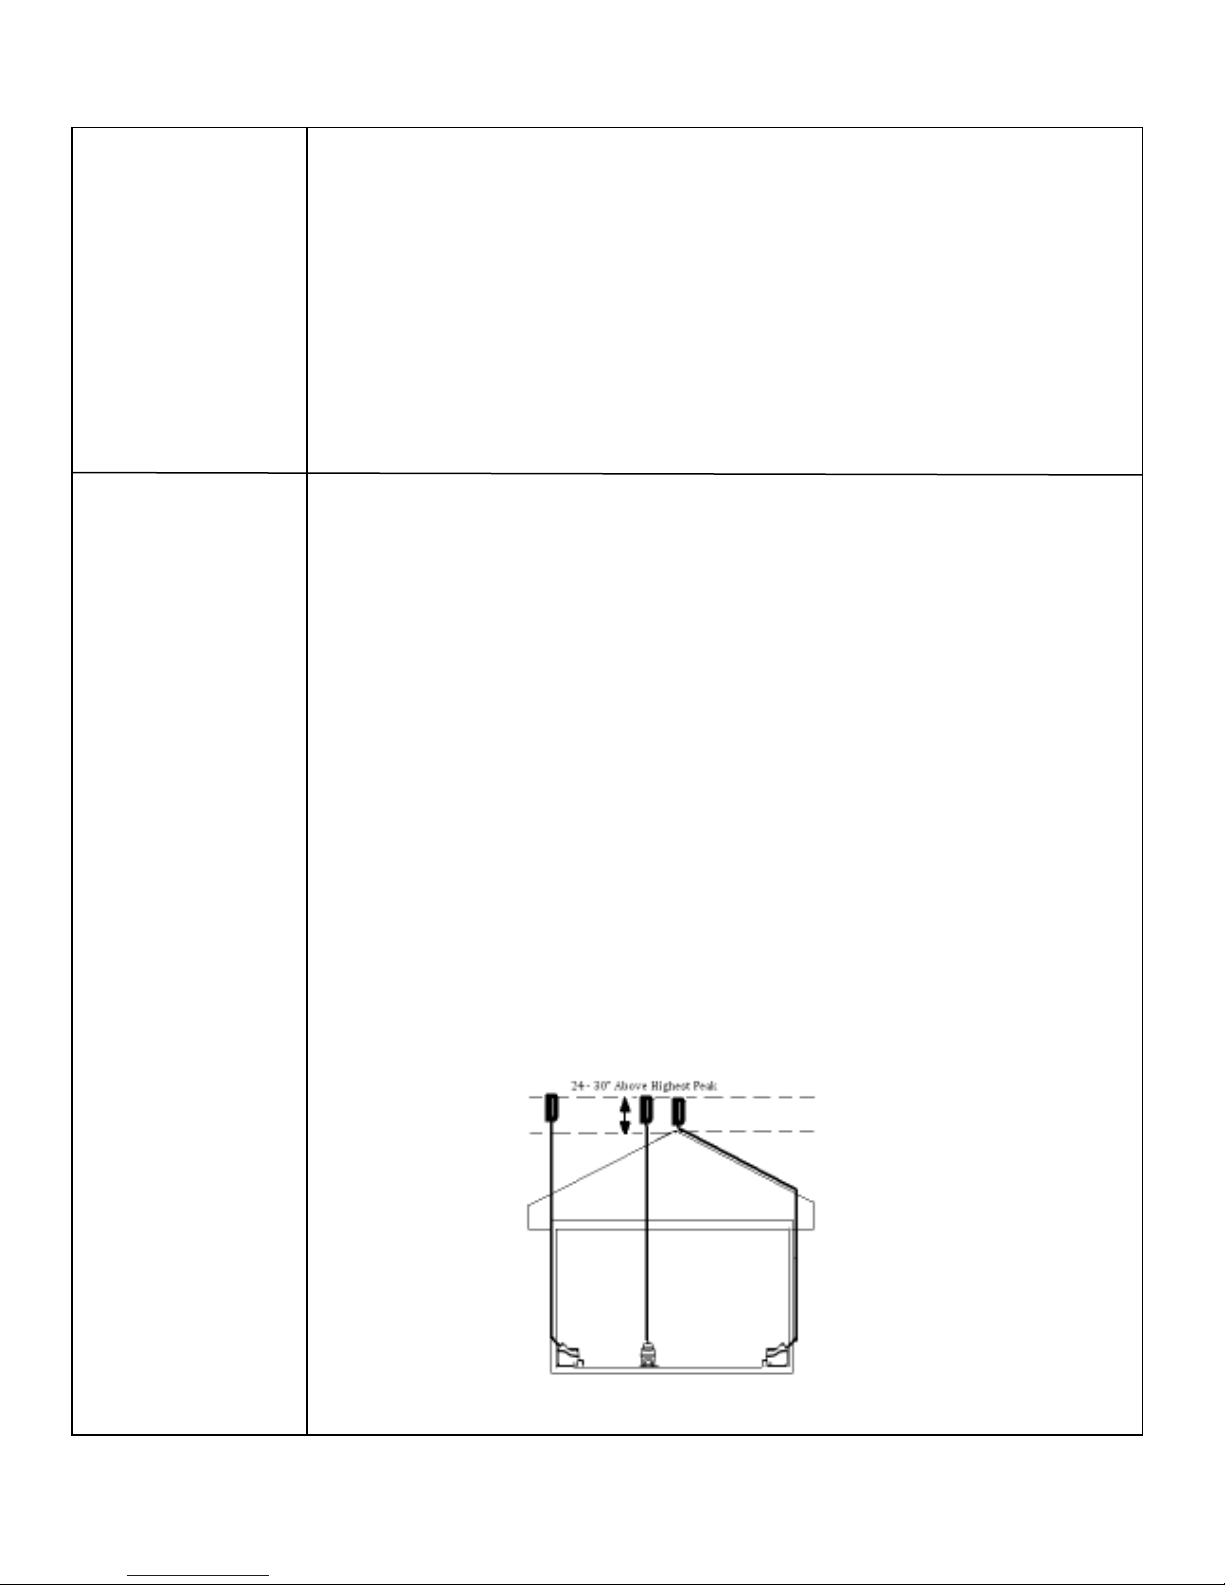
1. The vent stack shou d be insta ed as near to vertica as possib e. Maximum of two 45°
bends. DO NOT RUN THE VENT HORIZONTALLY AT ANY POINT.
2. Insert the 3” vent in et coup ing into the 3” ho e on the top of the unit.
3. Position the fan box in the vent stack where maintenance can be carried out
convenient y.
4. If using the f exib e hose, use at the top of the fi ter box so that moisture does not co ect
in the corrugations.
5. A connectors in the vent pipe shou d be sea ed with si icone cau king.
6. Minimize the number of sharp ang es as each reduces vent efficiency. Do not use
any 90 degree e bows, since this wi reduce air f ow substantia y.
7. Where the piping is taken through the roof, a roof f ashing shou d be used to sea the
insta ation.
1. P ace the fan fi ter box in the vent stack where it is easi y accessib e to
rep ace fi ter materia s.
2. Remove enough of the fi ter materia s (carbon and zeo ite) so that you wi
on y have about 1/2” (12mm) of carbon in one fi ter bag and 1/2” (12mm) of
zeo ite in the other fi ter bag (too much fi ter materia s wi stop the air-f ow in
the composting unit).
3. P ace the zeo ite and carbon fi ters on top of the p astic mesh inside of the
fi ter box. P ace the top of the fi ter box into the bottom of the fi ter box (part
with p astic mesh).
4. When attaching the fi ter box to the vent, use the f exib e vent hose to
connect to the vent from the top of the fi ter box and a rigid coup ing at the
bottom of the fi ter box.
1. Locate the area on the roof where the vent wi be insta ed.
2. Cut a 3” diameter ho e through the roof where the toi et wi be ocated.
3. Insta the 3” vent through the roof and ibera y app y the se f- eve ing roof sea ant
around the edges of the vent. Comp ete y sea a seams and areas where water can
penetrate. Let this cure before inspecting the vent and app ying more sea ant as
necessary.
4. Insta deck or roof vent according to the manufacturer’s instructions.
DECK VENT NOT SUPPLIED: Purchase a deck vent which fits the decor and function of
your mobi e vehic e. The deck fitting shou d discourage downdraft and a so prevent iquid
(especia y sea-water) from entering the toi et. It shou d a so encourage venti ation of the
toi et at a times.
The safety drain must be connected as it wi be required in a insta ations.
- Remove the orange cap from one side of the overf ow drain assemb y.
- P ace a 1” hose c amp over the end of the drain hose that wi be connected to the
overf ow drain assemb y.
- Push the drain hose over the ribbed end of the over-f ow drain and c amp with the 1” SS
hose c amp.
- Connect the 1” hose to an approved drainage faci ity.
- The safety drain is gravity fed. The drain hose must be be ow the eve of the safety drain
in order to function.

SPACESAVER Insta ation
- 8 –
Space
Requi ed and
othe
Installation
Conside ations
Vent Pipe
Location
1.Compost wi be removed from the finishing drawer. Ensure that there is at east
15” in front of the SPACESAVER Toi et so that the drawer may be removed from
the unit.
2. Insta the unit in a ocation where the safety drain can be connected.
This drain exits from the back of the unit and must s ope downward at a points.
3. Insta in a ocation where the vent pipe can be attached as per the instructions
isted be ow.
4. Insta in a ocation that is not air tight.
5. Ensure that there is a three-pronged p ug with a GFI (ground fau t interrupter)
insta ed within 5 feet of the unit.
6. Ensure the SPACESAVER Toi et is protected from precipitation.
7. Ensure that the unit is insta ed on a eve surface or s oping s ight y towards the
back.
1. If running a vent through a wa , it shou d be done at a 45° ang e to prevent con-
densation from accumu ating in the vent pipe, causing a constriction. NO
HORIZONTAL SECTIONS OF VENT. Venting shou d be insta ed vertica y.
2. A vent pipe that is exposed to the outside or in a non-heated space, shou d be in-
su ated if using the unit during co d weather.
3. INSTALL VENT SO THAT IT TERMINATES 24” - 30” ABOVE HIGHEST PEAK OF THE
ROOF.
4. If you wi be insta ing venting on a steep y pitched roof where snow shear may occur;
Insta a heavier pipe through the roof and feed the enc osed vent through the heavier
pipe. Sea between the pipes with expandab e foam or other such water-tight sub-
stance. The heavier pipe shou d be ab e to withstand the weight of s iding snow.
5. If there is more than 36” of vent needed above the roof ine to reach 24-30” above the
highest peak of the roof (diffusor inc uded in measurement), use guy wires to secure
the vent above the roof.
6. Limit bends in the vent stack to no more than 4 that have a combined tota of 180 °.
7. The vent must be insta ed separate y from ALL other househo d vents. Venting cannot
be merged with other venting. Doing so wi prevent the unit from operating odor ess y.
8. A connectors in the vent pipe shou d be sea ed. Use si icone cau king to sea the
connection between the vent and the fan. PVC cement may be used for a other vent
connections.
9. The diffusor shou d be g ued vertica y on to the top of the vent pipe. This assemb y
he ps draw air up the vent pipe.
Possible venting configurations for the 2” electric vent pipe.

- 9 –
Leading the
vent th ough the
oof
Leading the
vent th ough the
wall
The Diffuso
D ain
Installation
Handling
Effluent
Elect ical
Conside ations
The vent stack (shown in diagram) shou d end
approximate y 30” above the peak of the roof so that
it is ess subject to downdraft. Where the pipe is
taken through the roof, a roof f ashing may be
required to sea the insta ation. If you are in an area
where snow shear is a danger, you may wish to
insta a heavier pipe around the vent pipe where it
exits from the roof. If you do choose to do this,
ensure that you sea the area between the pipes
with a waterproof substance to prevent eaks.
When it is necessary to ead the vent through a wa ,
connect one 45° e bow on the vent out et on the unit.
Using a 2” ho e saw or other appropriate too , cut a
ho e through the wa board behind the unit so that
the vent pipe can be inserted into the 45° e bow. Cut
a simi ar ho e on the other side of the wa that is
s ight y higher than the inner ho e so that the vent
pipe wi be ang ed upward at 45°. If insta ing
through an exterior wa , waterproof sea ant wi be
required around the vent pipe where it emerges from
the bui ding.
The diffusor provided with the unit is a simp e device
to be insta ed at the top of the vent stack with the
arger pipe protruding above the sma er. To insta ,
simp y g ue the diffusor vertica y on the topmost
section of vent pipe. The diffusor design encourages
updraft, and discourages wind and weather from
going down the vent stack. We do not recommend
insta ing anything e se on the top of the vent as it
cou d impede the venting. Un ike wind
turbines,
diffusors are ess ike y to freeze in winter, and are
more effective in ca m weather.
The safety drain shou d be connected as it wi be required.
- Remove the orange cap from one side of the overf ow drain assemb y.
- P ace a 1” hose c amp over the end of the drain hose that wi be connected to
The overf ow drain assemb y. Push the drain hose over the ribbed end of the
over-f ow drain and c amp with the 1” SS hose c amp. Connect the 1” hose to an
approved drainage faci ity.
- Drain hose insta ation is required for a app ications.
The fo owing are possib e options to take care of the iquid :
- Feed into a ined pit fi ed with grave and sand. Such a
recyc ing bed a so ensures a c osed oop system.
- Feed into a sma cesspit or “French drain”.
- P umb into an existing septic or ho ding tank ine.
Insta ation shou d be in accordance with app icab e oca
regu ations.
The fan wi run continuous y 24 hours per day. A ground fau t interrupter (GFI) circuit is
recommended for any unit insta ed in an environment where it wi be exposed to
moisture. This may be insta ed direct y on the wa socket or at the circuit breaker. If
you are in an area where you experience power f uctuations, you may wish to insta a
surge protector.

Initial Sta t Up and Use
These steps are on y used when starting up your MOBILE/SPACESAVER toi et for the
first time or when you have emptied the drum and need to re-start the compost.
After insta ation is comp eted, do the fo owing:
Step 1 :
Spray Compost Quick: Remove the finishing drawer
and spray the who e inner f oor of the unit under the
finishing drawer. Spray Compost Quick into the patented
bio-drum and the inside of the finishing drawer.
Step 2:
Pour 1/3 bag of Compost Sure Green into a bucket and add 2 quarts of
warm water. Add 1/2 of the Microbe Mix packet to the bucket. A ow
the Compost Sure Green to absorb the water (about an hour).
Step 3:
Scoop the Compost Sure Green mixture into the patented Bio-Drum
through the opening under the toi et seat on the MOBILE/SPACESAVER
toi et. Rotate the drum to mix. The opening in the drum must remain open
under the toi et seat. The MOBILE/SPACESAVER toi et is now ready for
use.
Step 4:
For e ectric units on y. The fan wi run continuous y 24 hours per day.
120 Vo t Use: P ug it in to a three prong e ectrica out et.
When you first start up the MOBILE/SPACESAVER toi et, it wi take approximate y 6 weeks at optimum temperatures (70-
90 ° F) before you wi have sufficient quantities of microbes in the drum to actua y achieve good compost. During this
time, the contents of the patented Bio-Drum start out as Compost Sure Green and waste. Over the first 6 weeks, you wi
notice that the compost wi ho d moisture and wi become more uniform y dark in co or.
During the first 6 weeks, you may notice that some Compost Sure Green has fa en through the drum screen onto the
evaporation chamber to the eft of the finishing drawer. This shou d be raked out and removed with the rake too provided
with the unit.
NOTE: Regula toilet pape may be used. Toilet pape is a good sou ce of ca bon fo you compost so it may be
added to the Bio-D um™
- 10 –

Ongoing Toilet Maintenance
Once your MOBILE/SPACESAVER toi et is insta ed and you have gone through the initia start-up
procedure, fo ow the steps out ined be ow to keep your composting toi et working optima y.
CAUTION
1) Do NOT add or c ean the toi et bow iner with chemica s. Chemica s wi ki the bacteria. INSTEAD, c ean the bow
iner with Compost Quick.
2) Do NOT add p astic, g ass, meta , c eaning f uids, cigarettes. Add on y waste and bu king materia .
3) Kitchen or garden waste, are NOT recommended.
4) Do NOT add baby wipes, diapers or feminine paper as they wi not compost.
- 11 -
Add one cup of
Compost Su e G een
pe pe son pe day of
use
Sp ay Compost Quick
on the su face of the
compost
Tu n the handle
clockwise eve y
second day to mix the
compost
Make su e that the
opening in the d um
is cente ed unde the
toilet seat.
Eve y two weeks
Eve y th ee months
Twice pe yea
Pe iodic maintenance
Even if you on y use the toi et for urination then at east one cup of
Compost Sure Green shou d be added per person per day of use.
Add the Compost Sure Green through the ho e under the toi et seat
of the MOBILE/SPACESAVER toi et.
Every second day before turning the hand e, spray 3-4 sprays of
Compost Quick on the surface of the compost. Compost Quick is an
enzyme that wi speed up the composting process.
Turn the hand e in a c ockwise direction to mix and aerate the
compost. When mixing, ensure that the drum rotates 6 comp ete
revo utions (36 turns of the hand e).
The ho e in the drum must be open under the toi et seat, ready to
receive waste.
Add one scoop of Microbe Mix to the patented bio-drum to ‘recharge’
the pi e. This wi he p to ensure your microbe co ony stays constant
and hea thy.
Rake the evaporation chamber: Remove the finishing drawer. Rake
any so id debris from the f oor of the unit under the drawer
(evaporation chamber), paying extra attention to the two back
corners of the unit as this is where debris may accumu ate. Remove
the so id debris.
C ean the drum screen. Spray the drum screen with Compost Quick
and et sit for 15 minutes (this wi he p to oosen the debris if the
screen is not too encrusted). Scrub the screen vigorous y with the
wire brush. If
brushing the screen does not c ear it and iquid is sti
not draining through the screen, you may have to resort to having to
use a screwdriver or nai to puncture each ho e in the drum screen.
Remove compost from the drum. When the drum is ha f fu (even
with the midd e of the drum hub at the front of the drum) it is time to
remove compost. To remove compost from the drum:
See page 13 of your Owner’s Manua

Seasonal Use and Sp ingtime Sta t Up
Empty Compost f om Last Season
Before your first use of the unit, extract compost from the drum by re easing the drum ocker ( ocated
above the drawer opening), then rotate the hand e counter-c ockwise giving the drum one comp ete
revo ution on y. Compost from the drum wi drop into the finishing drawer. Empty the drawer and
repeat this procedure unti most of the compost is removed, eave 3-4” of compost. This wi be your
“starter base” for the coming season.
Rake
Remove the finishing drawer comp ete y and use the rake too to rake any oose materia from the
f oor of the unit. Pay carefu attention to the back two corners of the unit (near the safety drain), to
ensure that your drains do not get c ogged.
Add Wate & Mic obe Mix
Add some warm water to the remaining compost, enough to ensure that it is quite moist. A so, add
some Sun-Mar Microbe Mix (two of scoops) to give the compost pi e a “kick-start” and rotate the drum
severa times to mix. If your composting toi et is e ectric, p ug it in and use for another season.
Winte Use
No Winte Use
Just add water, ots of water. Soak the compost in the drum to prevent it from drying out before
Spring. Make sure to unp ug the unit if e ectric.
Occasional Winte Use
If the unit wi be used for 3-4 weekends throughout the winter season then it is considered occasiona
use. A of the same considerations shou d be taken with these units to winterize them. When the
temperature dips be ow 55 ° F (13 ° C), composting activity wi decrease dramatica y. These units do
not need to be kept warm and wi act on y as a ho ding tank during the winter months unti they warm
up enough in the spring to begin composting again. During the winter, the compost wi freeze into a
so id mass so the drum shou d not be turned as it may damage the composting toi et. With this in
mind, it is a good idea to remove enough compost before it gets too co d to make room in the drum
for winter use.
Heavy o Residential Winte Use
These units shou d be kept in a heated area and a winterization tips shou d be fo owed, inc uding
the fo owing:
1) Vent Pipe - a vent pipe shou d be insu ated if they are exposed to the outside or in an unheated
area. If you are in an area that experiences extreme winter conditions, we recommend that heat
tape shou d be app ied to the exposed vent pipe to prevent ice b ockages.
2) Safety Drain - a mode s; we recommend that the safety drain shou d be insta ed and insu ated
above the frost ine. There wi be ess evaporation in the winter so this wi he p with any excess
iquid. If possib e, heat tape can be app ied to the safety drain to prevent ice b ockage.
3) Keep it warm; If the composting toi et is used frequent y in the winter then the composting part of
the unit shou d be kept in a warm p ace. Be ow 55 ° F (13 ° C), composting actions s ows
dramatica y so if it is in a p ace that fa s be ow this temperature, a source of heat shou d be
provided for the unit so that it can keep up with constant use.
- 12 –

Removing Compost f om the patented Bio-D um
The eve of compost in the patented Bio-drum shou d never be more than ha f fu . As a guide, the
compost in the drum shou d be at east 4 inches from the bottom of the drum door. Compost must be
removed from the drum by fo owing the steps out ined in this section.
Compost may be removed at any time that you may need more space in the drum and wi need to be
removed more frequent y for heavi y used units or where the MOBILE/SPACESAVER toi et is the
primary residentia toi et.
- 13 -
Pull the
d um lock
Button
Tu n the
handle
counte -
clockwise
Level the
compost
in the
d awe
Allow the
compost
to est
Remove the footrest from
the front of the toi et. Pu
the drum ock button out
and ho d it out whi e
turning the hand e.
Whi e ho ding the drum
ock button out, turn the
hand e counter-c ockwise
for three revo utions of
the hand e. Re ease the
drum ock button and
continue to turn the
hand e counter-c ockwise
unti the opening in the
drum is under the seat.
Open the drawer and use
rake to eve the
Compost.
Compost shou d now be
a owed to rest in the
drawer for 3 - 4 weeks to
finish
the composting
process.
The drum ock button
is attached to a bar
that sits in a mo ded
depression in the
drum. When the
button is pu ed, the
bar is pu ed out of the
depression which
a ows the drum to
turn in the opposite
direction.
The drum door wi
stay open a owing
compost to fa into
the finishing drawer.
Fresh and composted
materia wi be
deposited into the
drawer.
Leve ing the compost
wi prevent compost
from soi ing the
patented bio-drum.
This compost wi be
iso ated from any new
waste and shou d
be eft in the drawer
for a minimum of 4
weeks or onger to
finish composting.

Compost T oubleshooting
- 14 –
- 14 –
Symptom Cause Remedial Action P evention
Compost
Too Wet
Waste not
Breaking
Down at a
(the drum
wi fi up
quick y)
Large
Lumps
in
Compost
Drum Too
Fu
F ies
Present
Compost porosity
is poor.
Drum screen
c ogged
Insufficient
moisture in
compost
Insufficient
Microbes
Room
Temperature
Under 55 °
F
/13
°C
Compost Too Dry
Compost not
emptied into
finishing drawer
in a time y fashion
Kitchen/Garden
Waste added
-compost too
dry
-compost
anaerobic
-foreign materia
added
Change bu king materia to Compost Sure
Green.
Spray the drum screen with Compost
Quick. Scrub the drum screen with wire
brush.
A moisture content of 40-60% is idea for
aerobic microbes to thrive.
Add Sun-Mar Microbe Mix.
Insta heat source to increase temperature.
Temperature shou d be kept above 55 °
F
/13
°C
constant y to ensure the composting
action does not stop comp ete y.
Add 1/2 to 1 ga on of warm water to
compost in order to bring it up to
appropriate moisture eve .
Remove umps or break them apart.
Remove compost unti drum is on y ha f fu
or ess. Rotate compost thorough y to
aerate, and add compost acce erant
(Compost Quick and Microbe Mix) if
avai ab e.
We do not recommend adding kitchen or
garden scraps.
1.To e iminate f ies, you can use any
pesticide that is used on your garden.
Pesticides used for garden use are not
anti-bacteria so are safe to use on your
compost.
2. The a ternative to using pesticides is to
comp ete y c ean the toi et out, wash the
inside with soap and water
IMPORTANT:
App ication of a pesticide in a SUN-MAR
toi et is not a hea th concern because a
SUN-MAR units are vented.
If using pesticides, avoid spi ing on the
outer she of the composter
Use Sun-Mar Compost Sure
Green
Add water to patented bio-
drum
Be sure to add microbe packet
at start up.
Insta unit in warm area. The
warmer the area, the better
your compost wi be!
Use proper bu king materia
and add warm water if
necessary.
When drum is 1/2 fu , remove
some compost to the finishing
drawer. Do NOT et drum get
above 1/2 fu . This wi ead to
ack of aeration, and anaerobic
compost.
Do Not add kitchen or garden
waste.
1. Keep compost moist. In
order to determine a good
eve of moisture, shine a
f ash ight into the drum. The
compost shou d have a s ight
g oss or shine. If it does not,
add warm water to it unti it
reaches this consistency.
Fungus gnats tend to be
attracted to a dry compost,
due to the fungus which
begins to form on the surface
when it dries out. A good,
moist compost wi not be
attractive to f ies.
2. Do not add topsoi from the
ground, composted matter, or
kitchen scraps to the toi et.
F ies may be present in, or
attracted to these items.
3
.
Use “Compost Sure Green”.

MECHANICAL TROUBLE SHOOTING
- 15 –
Symptom
Cause
Remedial Action
P evention
Urine
Odour in
Washroom
Occasiona
Urine Odor
Outside
Strong
Sewage
Odor
Fan Noisy
Horizonta runs or
downward s opes
on vent pipe
Fan has fai ed
Downdraft
Competing
app iances
Incorrect insta ation
of
fi ter box (MOBILE)
Too much carbon
or zeo ite in fi ter
box (MOBILE)
1. Vent stack not
insta ed above
peak of roof.
2. If vent stack is
insta ed above
roof ine, natura
obstructions, such
as ta trees, being
ocated in a va ey
or c ose to a hi
may be causing
downdraft.
Compost is
anaerobic
Fan damaged in
shipping or
bearings are
beginning to wear.
Re-insta the vent so there are no hor-
izonta or ow points where condensation
can co ect.
Have your seria number ready and ca
SUN-MAR for a rep acement. Instructions
are inc uded with the rep acement fan.
If you be ieve that there may be a down-
draft outside of the bui ding, it may be a
good idea to remove your fan assemb y
prior to insta ation and set the fan gate to
‘0’ to prevent urine odor in the bathroom.
(SPACESAVER)
Ensure that fi ter box is insta ed with fan in
the top portion of the box.
Remove some fi ter materia to a ow
unobstructed venting of unit.
1. Check that the vent is insta ed above
the peak of the roof. If not, extend the
vent. Guide wires may be necessary.
2. Add ime to the evaporation chamber –
as much as you think necessary. You
wi have to rake more often if you do
this.
3. (SPACESAVER) SUN-MAR has a fi ter
box avai ab e which wi fi ter the
ammonia out of the vented air in a
downdraft situation. Ca SUN-MAR for
detai s.
Begin fo owing: “Compost troub eshooting”
suggestions.
1. If it is ratt ing, it may need to be c eaned
or the bearings are worn and the fan
needs to be rep aced.
2. A hum is the norma sound the fan wi
make. If you are in a very quiet setting it
wi be more noticeab e.
Insta wa brackets on vent
pipe to prevent sett ing. DO
NOT insta horizonta runs
as iquid wi co ect and
b ock venti ation, causing
odor.
The fan is a constant y
moving part and has a finite
service ife.
Large amounts of carbon or
zeo ite wi prevent air f ow.
Initia y, insta the vent
above the peak of the roof.
If symptoms occur, add ime
or a fi ter box.
(SPACESAVER)
Fo ow “Ongoing Main-
tenance” and use proper
bu king materia .
C ean the fan with a sma
brush and/or compressed
air nozz e once a year.
This wi prevent wear and
engthen the ife of your fan.

- 16 –
Symptom Cause Remedial Action P evention
Fan Not
Working
Liquid
Bui d up/
Lack of
Evaporat-
ion
Liquid
Overf ow
Debris in fan or
mechanica fai ure.
Increased usage.
C imactic
conditions
Minera sa ts may
have accumu ated
in the evaporation
chamber over time,
reducing
evaporation rates.
Drains B ocked
Overf ow drain not
hooked up
Unit tipped forward
Remove the fan assemb y from the unit and
vacuum any dust out of the fan b ades.
Check the power source. If this does not
remedy the prob em, have your seria
number ready and ca SUN-MAR
The amount of iquid varies substantia y
between insta ations. The overf ow drain
must be insta ed.
Evaporation rates vary substantia y with
c imatic conditions. Expect faster
evaporation rates during warm dry weather.
To remove these, fi the evaporation
chamber with very hot water and 1/3 bott e
of “Compost Quick” enzyme iquid. Leave
overnight.
1. Rake peat moss away from the safety
drains. This is the “bui d up” area. If
drains are sti c ogged, proceed to step
3.
2. Check drain ine for kinks, b ockages or
upward bends. Remove and f ush if
b ockages present, un-kink if bent and
ensure that the drain pipe is s oping
downward. If your drain pipe is in order,
proceed to step 3.
3. Use a wire to poke b ockage out of the
Drain assemb y. A brown spot wi be
visib e through the opaque assemb y.
Connect overf ow safety drain
Check and ensure that the unit is eve .
The fan is a continuous y
moving part which wi
eventua y have to be
changed. Do Not turn on
and off dai y.
Insta the overf ow drain.
Rake evaporating chamber
at spring start ups for
cottage use, and once
every other month for
residentia use.
1. A c ogged drain is not
very ike y to happen if
evaporating chamber is
raked every 3-4 months.
2. Use premium 1”ID hose
for the drain ine. A good
hose wi be ess ike y to
kink. Use e bows or
fittings around bends to
prevent kinks.
3. Use Compost Sure
Green as a bu king
materia .
Evaporation wi s ow during
damp weather, make sure
drain hose is insta ed.

- 18 -
jkgkjhgjk
- 17 -
Symptom Cause Remedial Action P evention
Heating
System Not
Working
Liquid in
Finishing
Drawer
Drum Wi
Not
Turn
Drum Door
Not
Opening/
C osing
Proper y
Test to determine
whether fai ure has
occurred
Thermostat Fai ure
Heating E ement
Fai ure
Drum Screen
C ogged
Set screw securing
hand e to shaft has
broken
Stee ro -pin
securing gear
whee to shaft has
broken
Drum too fu
Hinges Stuck
Pu finishing drawer out and put your hand
in the evaporation chamber (NOT in the
iquid). If there is no warmth rising from the
f oor of the unit, your heating system is not
working. It is most common y the
thermostat that has fai ed. If you notice a
Lack of evaporation, but there is sti
warmth in the heating chamber, see “Liquid
Bui d up” for so utions.
Have your seria number ready and ca
SUN-MAR for a rep acement. (Detai ed
instructions are inc uded with the
rep acement part)
If the insu ation behind the e ectric box is
moist or disco ored, or heating does not
work after the new thermostat has been
connected, then the heating e ement has
fai ed.
Rotate the drum 180 ° so that the drum
screen is on top - you wi just be ab e to
see the edge of it if you take out the bow
iner.
Dri out set screw and rep ace, or have
your seria number ready and ca SUN-
MAR for a hand e rep acement kit
(instructions inc uded).
Have your seria number ready and ca
SUN-MAR for a rep acement sma gear kit.
Spray hinges with Compost Quick. Scrub
hinges with toothbrush or other soft ny on
brist ed brush.
A ground fau t interrupter
circuit is recommended to
protect your MOBILE/
SPACESAVER Toi et from
power surges that cou d
cause your heating system
to ma function.
Your thermostat and fan are
the two constant y moving
parts on the unit, and so are
the most ike y to fai .
If you ever remove the unit
from the bathroom for
c eaning, DO NOT use a
water hose around the base
of the unit.
Scrub drum screen with a
wire brush.
Drum shou d never be more
than ½ fu .

MOBILE/SPACESAVER Toilet Basic Ope ating Inst uctions
These instructions are not to rep ace the owner’s manua , but are intended as simp e instructions for
dai y use.
1) USING THE TOILET If it’s ye ow, et it me ow. Good advice! If you simp y urinate in the toi et,
deposit your toi et paper in the toi et, c ose the id and wa k away…your job is done! If the toi et is
being used predominant y for urination, be sure to add at east one cup of bu king mixture per
average amount of users per day. If you make a more substantia contribution, deposit your toi et
paper and one cup of Compost Sure into the drum of the toi et. C ose the id and wa k away!
2) Every other day, turn the hand e to mix and aerate the compost.
Pu the hand e from under the seat and tu n in a clock-wise di ection only. Open the id of the
toi et
seat. Watch as the drum turns. The opening in the drum shou d come to the top of the drum 6
times. Once you have comp eted turning the drum, make sure the opening for the drum is centered
under the toi et seat. Fo d the hand e back under the seat, c ose the toi et seat id and you are
done. Only tu n the d um eve y othe day!
Bulking Mate ial
When you run out of our Compost Sure bu king materia , more Compost Sure through your Sun-Mar
dea er, on ine at www.sun-mar.com. Do not use 100% peat moss as this wi c og your drum screen
and drains.
Pe iodic Maintenance
Rake out evaporation chamber with rake provided (the area be ow the finishing drawer). C ean the
drum screen. Remove the bow iner and ift the toi et seat. Turn the hand e 3 revo utions to bring the
drum screen to the top of the drum. Access can be gained by reaching through the ho e under the
toi et seat. Spray the drum screen with Compost Quick and et sit for 15 minutes (this wi he p to
oosen the debris if the screen is not too encrusted).
Scrub the screen vigorous y with the wire brush. If brushing the screen does not c ear it and iquid is
sti not draining through the screen, use a screwdriver or nai to puncture each ho e in the drum
screen.
Attention: the MOBILE/SPACESAVER Toilet elect ic model must emain plugged in to an
elect ical outlet continuously to function odo lessly. If you will be away f om the esidence
whe e the composting toilet is installed fo longe than th ee days, the powe may be
disconnected while the composting toilet lays do mant.
- 18 –
This manual suits for next models
1
Table of contents
Other Sun-Mar Other manuals