Sunbeam GCSBES-100 User manual

GCSBES-100
Fabric Handheld Steamer
Owner’s Guide
READ AND SAVE THESE INSTRUCTIONS
www.sunbeam.com P.N. 199715
®
GCSBES-100
Vaporizador de prendas portátil
Guía del Usuario
LEA Y CONSERVE ESTAS INSTRUCCIONES
www.sunbeam.com P.N. 199715
®

-E2-
-S2-
IMPORTANT SAFEGUARDS
When using electrical appliances, basic precautions should always be
followed, including the following:
1, READ ALL INSTRUCTIONS BEFORE USE.
2, Use appliance only for its intended use.
3, To reduce the risk of electric shock, do not immerse the appliance in
water or other liquids.
4, Always turn the appliance to “Off” before plugging or unplugging the
appliance from the electrical outlet. Never yank cord to disconnect from
outlet; instead, grasp plug and pull to disconnect.
5, Do not allow cord to touch hot surfaces. Let appliance cool completely
before putting away. Loop cord loosely around appliance when storing.
6, Always disconnect appliance from electrical outlet when filling with water
or emptying, and when not in use.
7, Do not operate appliance with a damaged cord, or if the appliance has
been dropped or damaged. To reduce the risk of electric shock, do not
disassemble or attempt to repair the appliance, take it to a qualified
service center for examination and repair. Incorrect reassembly or repair
could cause a risk of fire, electric shock, or injury to persons when the
appliance is used.
8, Close supervision is necessary for any appliance being used by or near
children. Do not leave appliance unattended while connected.
9, Burns could occur from touching hot metal parts, hot water, or steam.
Use care when you turn a steam appliance upside down – there may be
hot water in the reservoir.
10, To reduce the risk of contact with hot water emitting from steam vents,
check appliance before each use by holding it away from body and
operating steam button.
11, To reduce the likelihood of circuit overload, do not operate another high
wattage appliance on the same circuit.
PRECAUCIONES IMPORTANTES
Cuando se utilizan aparatos eléctricos, siempre se deben seguir
precauciones básicas de seguridad, incluyendo las siguientes:
1. LEA TODAS LAS INSTRUCCIONES ANTES UTILIZAR EL PRODUCTO.
2. Utilice el aparato solo con el fin para el que ha sido diseñado.
3. A fin de reducir el riesgo de descarga eléctrica, no sumerja el aparato en
agua ni ningún otro líquido.
4. Siempre apague el aparato (“Off”) antes de enchufar o desenchufar
del tomacorriente. Nunca le dé un tirón al cable para desconectarlo del
tomacorriente; sujete firmemente el enchufe y hálelo para desconectarlo.
5. No permita que el cable toque las superficies calientes. Deje que el
aparato se enfríe completamente antes de guardarlo. Enrolle el cable de
manera holgada alrededor del aparato para guardarlo.
6. Siempre desenchufe el aparato del tomacorriente para llenar o vaciarlo y
cuando no esté en uso.
7. No utilice un aparato con un cable dañado, o si se ha dejado caer
o dañado de manera alguna. A fin de reducir el riesgo de descarga
eléctrica, no desensamble ni intente reparar el aparato, llévelo a un centro
de servicio autorizado para su revisión y reparo. El reensamblaje o reparo
incorrecto podría ocasionar un riesgo de incendio, descarga eléctrica o
lesiones personales cuando el aparato esté en uso.
8. Todo aparato utilizado por los niños o cerca de los mismos, requiere la
supervisión cercana de un adulto. No deje el aparato desatendido cuando
esté enchufado.
9. Pueden producirse quemaduras por el contacto con las partes de metal
calientes, el agua o vapor caliente. Tanga cuidado cuando invierta un
aparato de vapor – el tanque de agua puede contener agua caliente.
10. A fin de reducir el riesgo de entrar en contacto con el agua caliente
que sale de los escapes de vapor, revise el aparato antes de cada uso,
sosteniéndolo alejado del cuerpo y utilizando el botón de vapor.
11. Para reducir la posibilidad de una sobrecarga del circuito, no utilice otro
aparato de alta potencia en el mismo circuito.

-E3-
-S3-
IMPORTANT SAFEGUARDS CONT.
12, Never steam clothes while someone is wearing.
13, If an extension cord is absolutely necessary, a (ampere rating of the
appliance) ampere rated cord should be used. Cords rated for less
amperage may overheat. Care should be taken to arrange the cord so
that the cord cannot be pulled or tripped over.
14, Care should be taken when using the appliance due to the emission of
steam.
15, Unplug the appliance during filling and cleaning.
16, When filling the water tank, watch for water that can drip onto the floor
and cause you to slip and fall.
PRECAUCIONES IMPORTANTES CONT.
12. Nunca aplique vapor en la ropa que se lleve puesta en el cuerpo.
13. Si es absolutamente necesario utilizar un cable de extensión, se debe
utilizar un cable de (el mismo amperaje del aparato) amperios. Los cables
con menor amperaje pueden recalentarse. Se debe tener la precaución de
colocar el cable de extensión de manera que no se pueda halar o tropezar
con él sin darse cuenta.
14. Debido a la emisión de vapor, se debe tener cuidado al utilizar el aparato.
15. Desenchufe el aparato para llenarlo de agua y limpiarlo.
16. Cuando llene el tanque de agua, preste atención al agua que pueda
gotear sobre el piso y provocar un resbalo o caída.
SAVE THESE INSTRUCTIONS
CONSERVE ESTAS INSTRUCCIONES
HOUSEHOLD USE ONLY
Thank you for purchasing the Sunbeam®Fabric Steamer. With powerful
continuous steam technology and powerful shot of steam, this Steamer
will bring out the best in garments, linens, drapes and more--quickly and
efficiently! .
SOLO PARA USO DOMÉSTICO
Gracias por la compra del Vaporizador de Prendas Portátil Sunbeam®. Con
una tecnología de vapor que provee vapor potente continuo y un poderoso
golpe de vapor, este vaporizador le dará vida a las prendas, la ropa de cama,
las cortinas y mucho más—¡rápidamente y eficientemente!

BEFORE FIRST USE
• Unpack your Steamer; remove and peel off any labels adhered to the unit.
• Remove and save instruction manual.
• Wipe outside of the unit with a damp cloth or sponge to remove any dust.
Dry thoroughly.
• Keep unit on a flat, leveled surface.
• When using your Steamer for the first time, you may notice a small amount
of smoke and a slight odor. This is normal when heating the appliance for
the first time and there is no reason for concern.
ANTES DEL PRIMER USO
• Desempaque su vaporizador, retire y despegue cualquier etiqueta de la
unidad.
• Retire y conserve el manual de instucciones.
• Limpie el exterior de la unidad con un paño húmedo o una esponja para
remover el polvo. Seque bien.
• Mantenga la unidad sobre una superficie plana, nivelada.
• Cuando utilice su vaporizador por primera vez, podría notar un poco de
humo y un lígero olor. Esto es normal cuando el aparato se calienta por
primera vez y no debe ser motivo de preocupación.
-E4-
-S4-
POLARIZED PLUG
This appliance has a polarized plug, (one blade is wider
than the other). As a safety feature to reduce the risk of
electrical shock, this plug is intended to fit in a polarized
outlet only one way. If the plug does not fit fully in the
outlet, reverse the plug. If it still does not fit, contact a
qualified electrician. Do not attempt to defeat this safety feature or modify
the plug in any way. If the plug fits loosely into the AC outlet or if the AC
outlet feels warm do not use that outlet.
North American models with polarized plugs:
ENCHUFE POLARIZADO
Este artefacto cuenta con un enchufe polarizado (una
clavija es más ancha que la otra). Como una característica
de seguridad para reducir el riesgo de una descarga
eléctrica, este enchufe está diseñado para encajar de
una sola una manera en un tomacorriente polarizado.
Si el enchufe no encaja correctamente en el tomacorriente, invierta el
enchufe. Si todavía no encaja, comuníquese con un electricista calificado.
No intente anular esta característica de seguridad ni modificar el enchufe
de ninguna manera. Si el enchufe queda flojo en el tomacorriente o el
tomacorriente está caliente, no use ese tomacorriente.
Modelos norteamericanos con enchufes polarizados:
-E5-
-S5
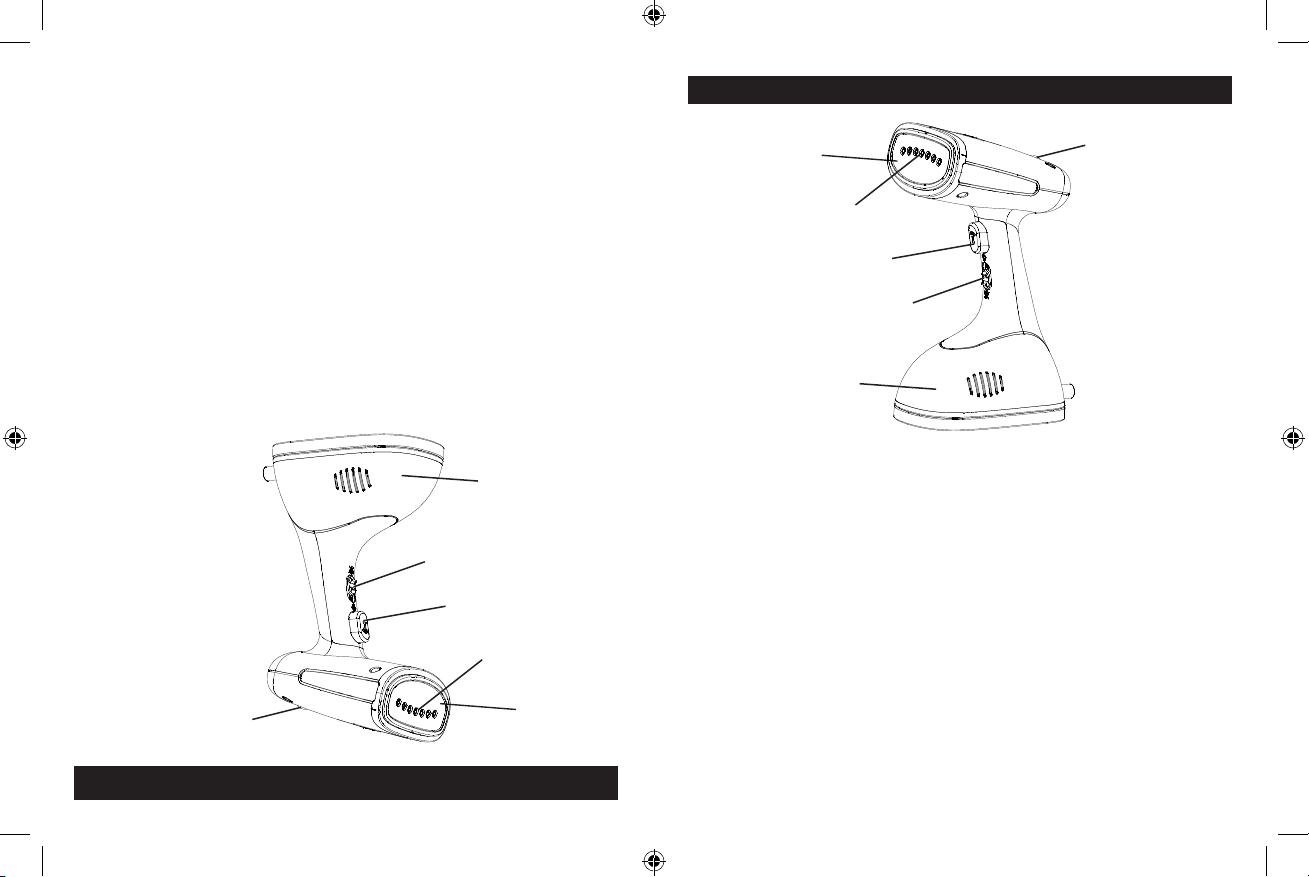
LEARNING ABOUT YOUR SUNBEAM®FABRIC STEAMER
VAPORIZADOR PORTÁTIL
1. Heated press plate
2. Steam exit
3. Shot of Steam button
4. Continuous Steam Switch
5. Removable water tank with water inlet
tube
6. Red ready indicator light
1. Barra de planchado
2. Salida de vapor
3. Botón de Golpe de Vapor
4. Interruptor de vapor contínuo
5. Tanque de agua removible con tubo de
entrada de agua
6. Luz Roja indicadora de funcionamiento
3
2
6
1
4
5
3
2
6
1
4
5

-E6-
-S6-
ACERCA DE SUS CARACTERÍSTICAS
Barra de planchado, con temperatura – Simula la suela de una plancha para
eliminar las arrugas.
Salida de vapor amplia – Provee amplia cobertura de vapor para sus prendas
y tejidos.
Interruptor de vapor contínuo – Brinda la opción de utilizar el vapor según
lo necesite.
Tanque de agua removible con tubo de entrada de agua – Fácil de remover,
permite llenar el tanque con rápidez. Un tubo de entrada de agua transmite
el agua desde el tanque hasta la boquilla del vaporizador. Un ruido alto
vibratorio es indicativo de que el nivel de agua está bajo y es momento de
rellenar el tanque de agua.
Luz roja indicadora de funcionamiento - se apaga cuando la unidad esta lista
para ser utilizada .
Luz roja indicadora de encendido - se ilumina cuando la unidad se enchufa a
un tomacorriente.
Golpe de Vapor - Poderoso golpe de vapor para arrugas dificiles.
ABOUT YOUR FEATURES
Heated press plate – Works like an iron soleplate to press wrinkles out.
Wide steam exit – Provides wide coverage of steam for your garments and
fabrics.
Continuous Steam switch, gives you the option to steam on demand.
Removable water tank with water inlet tube – Easy to remove for quick
refills. A water inlet tube inside the water transmits the water from the tank
to steamer head. A loud vibrating noise indicates that the water is low in the
water tank and time to refill.
Red power indicator light – Lights up when unit is plugged in to an electrical
outlet.
Red ready indicator light – Turns off to indicate the unit is ready for use.
Shot of Steam – Powerful targeted steam for though wrinkles.
FILLING WATER TANK
Warning: To avoid personal injury and damage to the unit, only add water
to the water tank. NEVER add cleaning solutions, perfumes, oils or any other
chemical additives.
Note: Your Steamer is designed to be used with tap water. However, if you
have hard water, we recommend using distilled water for better results.
1. Place Steamer on a flat surface.
2. Hold the water tank with one hand while pulling the tank away from the
steamer body.
Figure 1
OPERATING INSTRUCTIONS
INSTRUCCIONES DE OPERACIÓN
LLENADO DEL TANQUE DE AGUA
Advertencia: para evitar daños personales o a la unidad, solo añada agua
al tanque de agua. NUNCA añada soluciones de limpieza, perfumes, aceites
ni otros aditivos químicos
Nota: Su vaporizador está diseñado para ser utilizado con agua de la llave.
Sin embargo, si usted tiene agua densa, es recomendado utilizar agua
destilada para obtener mejores resultados.
1. Coloque el vaporizador sobre una superficie plana.
2. Sujete el tanque de agua con una mano mientras retira el tanque del
cuerpo del vaporizador.

-E7-
-S7-
3. Take the water tank to a sink. Pull the rubberized water-fill cover to open
and pour tap water from the faucet into the water-fill opening until it
reaches the Max water level in water tank (Figure 2). If water spills outside
of the tank, or within the center water tank cavity, wipe it dry with a
paper towel or cloth.
3. Lleve el tanque a un fregadero. Tire de la tapa de goma del orificio de
llenado para abrirla y vierta agua de la llave en el orificio hasta que el
agua alcance el nivel Max en el tanque (Figura 2). Si el agua se derrama
por fuera del tanque o dentro del centro de la cavidad del tanque, seque
con papel de toalla o un paño.
Figure 2
Warning: When filling the water tank, watch for water that can drip
onto the floor and cause you to slip and fall.
Tip: It is not necessary to have a full tank of water for the Steamer to
generate steam. For best results, just make sure the water tank is at least
half full.
4. Close the water-fill cover, push the water tank into the steamer body until
a ‘click’ sound is heard.
Note: If you need to add water while steaming, unplug the steamer, wait
until it cools and follow above steps. If a loud vibrating noise is heard,
then the water level is low and needs to be refilled.
Figura 2
Advertencia: Cuando llene el tanque de agua, vigile el agua que pueda
gotear y caer en el suelo ya que esto puede provocar un resbalo y una
caida.
Consejo: No es necesario que el tanque esté lleno para que el
vaporizador genere vapor. Para mejores resultados, solo asegúrese de que
el tanque esté lleno por lo menos hasta la mitad.
4. Cierre la tapa del orificio e inserte el tanque dentro del cuerpo del
vaporizador hasta escuchar un clic.
Nota: Si necesita agregar agua mientras aplica el vapor, desenchufe el
vaporizador, espere a que se enfríe y siga los pasos más arriba.

-E8-
-S8-
USING YOUR STEAMER VERTICALLY
You can use your Steamer in the vertical position to press with steam
hanging garments and drapes.
Caution: Heated press bar gets hot. Do not touch!
1. Hang your garment to be steamed on a clean, rust-free hanger.
2. Plug unit into a standard electrical outlet.
Warning: Care should be taken to arrange the cord so that it cannot
be pulled or tripped over. Always make sure you can move freely
without getting tangled with the cord.
3. The red ready indicator light turns off and will cycle on and off as the
temperature is maintained.
Caution: Burns could occur from touching hot metal parts, hot water,
or steam. Use care when you turn a steam appliance upside down –
there may be hot water in the reservoir.
4. You are now ready to start steaming!
5. Turn the continuous steam switch on
6. Hold your Steamer by the handle in vertical position with the head
pointing toward the fabric and away from you and your body.
Warning: Steam is hot. Always point steamer exit away from yourself,
other persons, pets, plants and walls. Never steam clothes while they
are being worn.
7. With your free hand, pull the fabric tight.
8. Press the shot of steam button to generate bursts of steam.
Caution: do not press the shot of steam button before the ready
indicator light turns off or if the unit is off.
9. Touch the fabric lightly with the heated press bar, moving it in a
downward motion, beginning at the top of the garment and moving
downward.
Caution: The heated press bar gets hot, do not touch.
10. Repeat this step until fabric is wrinkle free.
Tip: For more difficult wrinkles, try steaming from the underside of the
fabric.
11. When finished, move trigger switch on the back of the steamer to the
Off position.
12. Place Steamer on a flat surface and unplug from electrical outlet.
13. Wait until Steamer has cooled and empty water tank.
Note: Always unplug the Steamer when not in use.
USO DE SU VAPORIZADOR EN POSICIÓN VERTICAL
Usted puede utilizar su vaporizador en posición vertical para planchar
prendas y cortinas colgadas.
Precaución: La barra de planchado se calienta. No la toque.
1. Cuelgue su prenda en una percha limpia que no esté oxidada.
2. Enchufe la unidad a un tomacorriente estándar.
Advertencia: Asegúrese de enchufar el cable de manera que no
pueda ser jalado o provocar tropiezos. Asegúrese siempre de que pueda
moverse libremente sin indicadora con el cable, causando una caida y
lesión personal.
3. La luz roja de funcionamiento se apaga y alterna entre prendido y
apagado para mantener la temperatura.
Precaución: Pueden ocurrir quemaduras al tocar las partes metálicas
calientes, el agua caliente o el vapor. Proceda con precaución cuando
invierta el aparato ya que podría haber agua caliente en el tanque.
4. Ahora ya está listo para comenzar a aplicar vapor a sus prendas!
5. Encienda el interruptor de vapor contínuo
6. Sostenga su vaporizador por el mango en posición vertical con la
boquilla dirigida hacia la tela y lejos de usted y su cuerpo.
Advertencia: El vapor está caliente. Siempre diriga la boquilla en
dirección contraria a su persona, otras personas, mascotas, plantas y las
paredes. Nunca aplique vapor a las prendas que se lleven puestas.
7. Con la mano libre, tire del tejido mientras que mueve la boquilla sobre
el tejido.
8. Presione el Botón de Golpe de Vapor para generar rafagas de vapor.
Advertencia: no presione el botón de Golpe de Vapor hasta que la
luz roja indicadora de funcionamiento se apague o si la unidad está
apagada.
9. Toque el tejido ligeramente con la barra de planchado, moviéndola
hacia arriba y hacia abajo, comenzando en la parte superior de la
prenda y moviendose hacia abajo.
Precaución: La barra de planchado se calienta, no la toque.
10. Repita este paso hasta que el tejido no tenga arrugas.
Consejo: Para las arrugas más difíciles, trate de aplicar el vapor en la
parte de adentro del tejido.
11. Una vez que termine, mueva el interruptor en la parte de atras del
vaporizador a la posición de apagado.
12. Coloque el vaporizador sobre una superficie plana y desenchufe del
tomacorriente.
13. Espere a que la unidad se haya enfriado y vacie el tanque de agua.
Nota: Siempre desenchufe el vaporizador cuando no esté en uso.

-S9-
-E9-
Steam trigger with locking mechanism- Integrated switch
gives you the option to steam on demand, or set the switch
in the lock-down position for up to 15 minutes of contini-
ous steam from a full water tank on the High Setting
STEAMING HORIZONTALLY
You can also use your Steamer as an iron to refresh sheets, pillows, mattress,
sofas and more.
1. Ensure water tank is filled.
2. Plug unit into a standard electrical outlet.
Warning: Care should be taken to arrange the cord so that it cannot
be pulled or tripped over. Always make sure you can move freely
without getting tangled with the cord.
3. Once the Steamer has reached set temperature, press turn the
continuous steam switch on and in a horizontal position, move the
steamer continuously over the fabric being steamed.
Caution: The heated press bar gets hot, do not touch.
4. The red power indicator light illuminates and will cycle on and off as
the temperature is maintained.
Caution: Burns could occur from touching hot metal parts, hot water,
or steam. Use care when you turn a steam appliance upside down –
there may be hot water in the reservoir.
5. Once you finish, move trigger switch on the back of the steamer to
the Off position. Wait for unit to cool completely before emptying the
water tank or removing accessory.
TIPS FOR APPLYING STEAM
• Improper use of the Steamer can cause property damage due to the
steam. Always read the instructions in this manual before using your
Steamer.
• Do not operate the Steamer with an empty water tank. To add water
during operation, turn steamer off, wait for it to cool down then
remove water tank and refill.
• Always read the fabric care labels to help determine fabric type to be
steamed. If unsure of fabric’s fiber, test a small hidden area, such as an
inside seam or hem, before steaming.
• For more difficult wrinkles, try steaming from the underside of the
fabric.
• When steaming, touching fabric lightly with the steam nozzle can help
in wrinkle removal. It is important to make contact with the garment
and/or fabric.
• Heavier fabrics require more steam.
• To sanitize and refresh fabrics, steam the treated area for at least 30
seconds.
• Only use water in the unit. Do not add cleaning solutions, scented
perfumes, oils or any other chemicals to the water that can cause
damage to the appliance.
• Do not use steam against wall or doors.
USO DE SU VAPORIZADOR EN POSICIÓN HORIZONAL
También puede usar su vaporizador como una plancha tradicional para
refrescar las sábanas, almohadas, colchones, sofás y más.
1. Asegurese que su tanque de agua este lleno.
Precaución: La barra de planchado se calienta, no la toque.
2. Enchufe la unidad a un tomacorriente estándar.
Advertencia: Asegúrese de enchufar el cable de manera que no
pueda ser jalado o provocar tropiezos. Asegúrese siempre de que pueda
moverse libremente sin interponerse con el cable, causando una caida y
lesión personal.
3. Una vez que el vaporizador haya alcanzado la temperatura
seleccionada, encienda el interruptor de vapor contínuo y en posición
horizontal, mueva el vaporizador continuamente sobre la pieza a
planchar.
Precaución: La barra de planchado se calienta, no la toque.
4. La luz roja de funcionamiento se ilumina y alterna entre prendido y
apagado para mantener la temperatura.
Precaución: Pueden ocurrir quemaduras al tocar las partes metálicas
calientes, el agua caliente o el vapor. Proceda con precaución cuando
invierta el aparato ya que podría haber agua caliente en el tanque.
5. Una vez que termine, mueva el interruptor en la parte de atras del
vaporizador a la posición de apagado. Espere a que la unidad se enfríe
por completo antes de vaciar el tanque de agua y retirar el accesorio.
Consejos Para Aplicar Vapor
• El uso incorrecto del vaporizador puede causar daños a su propiedad
debido al vapor. Siempre lea las instrucciones en este manual antes de
utilizar su vaporizador.
• No opere el vaporizador con un tanque de agua vacio. Para agregar
agua durante el funcionamiento, apague el vaporizador, espere a que
se enfríe, luego remueva el tanque de agua y llénelo de nuevo.
• Siempre lea las etiquetas sobre el cuidado del tejido para ayudarle a
determinar el tipo de tejido para aplicarle vapor. Si no está seguro de
la fibra del tejido, pruebe primero sobre una pequeña área y aplique
vapor en una costura o ruedo interior.
• Para las arrugas más difíciles, trate de aplicar vapor desde la parte de
adentro de la tela.
• Cuando esté aplicando vapor, el tocar el tejido ligeramente con la
boquilla de vapor puede ayudar a eliminar las arrugas. Es importante
hacer contacto con la prenda y/o el tejido.
• Los tejidos más gruesos requieren más vapor.
• Para sanitizar y refrescar la ropa, necesita aplicar vapor por 30 segundos
o más.
• Solo use agua en la unidad. No añada soluciones de limpieza,
perfumes, aceites ni ninguna otra sustancia química que pueda dañar el

-E10-
-S10-
• When hanging garment on a door while steaming, be careful not to
damage the door with steam.
• After use, empty water tank by turning it upside down to ensure all
water empties out and avoid leaks.
• When steaming, move the steamer continuously over the item being
pressed. Do not keep steamer over an area for any period of time to
avoid damage to the fabric.
CLEANING
1. Make sure unit is off, unplugged and allow it to cool completely before
cleaning.
2. If there is water in the water tank, remove the tank and turn it upside
down to ensure all the water empties out.
3. Wipe exterior surfaces with a soft, damp cloth. Dry thoroughly.
Warning: Never immerse steamer, cord or plug in water or any other
liquid.
• Do not use abrasive cleaners or scouring pads that can scratch the
surface.
• Do not place in the dishwasher.
CLEANING WITH VINEGAR AND WATER
It is recommended to clean your Steamer every two months to reduce
mineral buildup that can affect the performance of your unit.
1. Turn off the unit and let it cool completely.
2. Remove water tank and make sure it is empty.
3. Fill water tank with a solution of 50% white vinegar and 50% water up
to the max level.
4. Plug unit into electrical outlet and press the continuous steam trigger
to run a full steaming cycle.
5. Once steaming is finished, fill with clean water and repeat process until
the vinegar odor is eliminated.
This appliance has no user serviceable parts. Any servicing beyond that
described in the Cleaning Section should be performed by an Authorized
Service Representative only. See Warranty Section.
STORAGE
Fold the cord in loops and store the unit in upright position, in a clean dry
place with a flat, sturdy surface. Make sure the water tank is empty. If not,
remove it and turn it upside down to ensure all the water empties out and
avoid leaks.
LIMPIEZA
1. Asegúrese de que la unidad esté apagada, desenchufada y deje que se
enfríe completamente antes de limpiar.
2. Si queda agua en el tanque de agua, remueva el tanque e inviértalo
para asegurar que toda el agua se vacie.
3. Limpie las superficies exteriores con un paño suave, humedecido.
Seque bien.
Advertencia: Nunca sumerja el vaporizador, el cable ni el enchufe en
agua ni en ningún otro líquido.
• No utilice limpiadores abrasivos ni almohadillas de fregar que puedan
rayar la superficie.
• No coloque el vaporizador en la máquina lavaplatos.
LIMPIEZA CON VINAGRE Y AGUA
Es recomendado limpiar su vaporizador cada dos meses para reducir los
depósitos minerales que pueden afectar el desempeño de su unidad.
1. Apague la unidad y deje que se enfríe completamente.
2. Remueva el tanque de agua y asegúrese de que esté vacio.
3. Llene el tanque de agua con una solución de 50% de vinagre blanco y
50% de agua hasta el nivel que marca Max.
4. Enchufe la unidad a un tomacorriente y presione el interruptor de
vapor continuo para procesar un ciclo completo de vapor.
5. Una vez que el ciclo de vapor termine, llene el tanque con agua limpia
y repita el proceso hasta que el olor a vinagre desaparezca.
Este aparato no contiene piezas que deban ser reparadas por el usuario.
Cualquier servicio que se extienda más allá de lo descrito en la sección de
Limpieza y Mantenimiento, debe realizarse solo por un Representante de
Servicio Autorizado. Ver la sección de Garantía.
ALMACENAMIENTO
Doble el cable en forma de lazos y almacene la unidad en posición vertical,
en un lugar limpio y seco con una superficie estable. Asegúrese de que
el tanque de agua esté vacio. Si no lo está, remuévalo e inviértalo para
asegurar que toda el agua se vacie y evitar goteos.
CARE AND CLEANING
CUIDADO Y LIMPIEZA
aparato.
• No use vapor en las paredes ni las puertas.
• Cuando cuelgue una prenda en la puerta mientras aplica vapor, tenga
cuidado de no dañar la puerta.
• Después de cada uso, vacíe el tanque de agua invirtiéndolo para
asegurar que toda el agua se vacie y evitar goteos.
• Cuando aplique vapor, mueva el vaporizador constantemente sobre
la pieza que está vaporizando. No mantenga el vaporizador sobre la
misma área por ningún período de tiempo para evitar daños al tejido.
-E11-
-S11-
Problem Possible Cause Solution
The steamer does
not produce any
steam.
The steamer has
not heated up
sufficiently.
The water level in
the water tank is
too low.
The steamer is not
plugged in.
Electrical outlet is
not working.
The steamer is not
turned on.
Let the steamer heat up for
about 45 seconds before using
it.
Unplug the steamer, let it cool
completely and refill the water
tank.
Make sure the steamer is
plugged into an electrical
outlet.
Plug into another electrical
outlet.
Make sure the power indicator
light is on.
The steamer makes
a rattling noise and
vibrates.
The water pump
inside the unit
detects the water
level is low.
Unplug the unit, let it cool
completely and refill water
tank.
The steamer leaves
water drops on the
garment.
You may have
pressed the shot
of steam too many
times before the
steamer ready
indicator light
turned off.
Allow the ready indicator light
to turn off before pressing the
shot of steam button or sliding
the switch to the on position.
The steamer is
making a buzzing
noise while
steaming.
The water pump is
running. This noise is normal.
Problema Causa Posible Solución
El vaporizador no
produce vapor. El vaporizador no
se ha calentado lo
suficientemente.
El nivel de agua en
el tanque de agua
está muy bajo.
El vaporizador no
está enchufado a
un tomacorriente.
El tomacorriente
no está
funcionando.
El vaporizador no
está encendido.
Deje que el vaporizador
se caliente por un tiempo
aproximado de 45 segundos
antes de utilizar.
Desenchufe el vaporizador, deje
que se enfríe completamente
y vuelva a llenar el tanque de
agua.
Asegúrese de que el
vaporizador esté enchufado a
un tomacorriente.
Enchufe a otro tomacorriente y
verifique que funciona.
Asegurese que la luz roja de
funcionamiento esta prendida.
El vaporizador hace
un ruido vibrante. La bomba de
agua dentro de la
unidad detecta que
el nivel de agua
está bajo.
Desenchufe el vaporizador, deje
que se enfrie completamente y
llene el tanque de agua.
El vaporizador deja
gotas de agua en
la prenda.
El botón de Golpe
de Vapor ha
sido presionado
demasiada
veces antes que
la luz roja de
funcionamiento se
apague.
Deje que la luz roja de
funcionamiento se agague
antes de presional el botón de
Golpe de Vapor o encender el
interruptor de vapor continuo.
El vaporizador
hace un ruido de
zumbido mientras
expulsa el vapor.
La bomba de agua
está funcionando. Este ruido es normal.
TROUBLESHOOTING
RESOLUCIÓN DE PROBLEMAS

-E12-
1-Year Limited Warranty
Sunbeam Products, Inc. (“Sunbeam”) warrants that for a period of one (1) year
from the date of initial retail purchase, this product will be free from defects in
material and workmanship, when used in accordance with the instructions provided.
Sunbeam, at its option, will repair or replace this product or any component of the
product found to be defective during the warranty period.
Replacement will be made with a new or remanufactured product or component. If
the product is no longer available, replacement may be made with a similar product
of equal or greater value. This is your exclusive warranty. Do NOT attempt to repair
or adjust any electrical or mechanical functions on this product. Doing so will void
this warranty.
This warranty is valid for the original retail purchaser from the date of initial retail
purchase and is not transferable. Keep the original sales receipt. Proof of purchase
is required to obtain warranty performance. Sunbeam dealers, service centers, or
retail stores selling Sunbeam products do not have the right to alter, modify or any
way change the terms and conditions of this warranty.
This warranty does not cover normal wear of parts or damage resulting from any
of the following: negligent use or misuse of the product, use on improper voltage or
current, use contrary to the operating instructions, disassembly, repair or alteration
by anyone other than Sunbeam or an authorized Sunbeam service center. Further,
the warranty does not cover: Acts of God, such as re, ood, hurricanes and
tornadoes.
What are the limits on Sunbeam’s Liability?
Sunbeam shall not be liable for any incidental or consequential damages caused
by the breach of any express, implied or statutory warranty or condition. Except
to the extent prohibited by applicable law, any implied warranty or condition of
merchantability or tness for a particular purpose is limited in duration to the
duration of the above warranty. Sunbeam disclaims all other warranties, conditions
or representations, express, implied, statutory or otherwise. Sunbeam shall not be
liable for any damages of any kind resulting from the purchase, use or misuse of, or
inability to use the product including incidental, special, consequential or similar
damages or loss of prots, or for any breach of contract, fundamental or otherwise,
or for any claim brought against purchaser by any other party. Some provinces,
states or jurisdictions do not allow the exclusion or limitation of incidental or
consequential damages or limitations on how long an implied warranty lasts, so
the above limitations or exclusion may not apply to you. This warranty gives you
specic legal rights, and you may also have other rights that vary from province to
province, state to state or jurisdiction to jurisdiction.
-S12-
Garantía Limitada de 1 Años
Sunbeam Products Inc. (“Sunbeam”) garantiza que, por un período de tres años a
partir de la fecha de compra, este producto estará libre de defectos de materiales
y mano de obra. Sunbeam, a su elección, reparará o reemplazará este producto
o cualquier componente del mismo que presente defectos durante el período de
garantía. Sunbeam reemplazara el producto o cualquier componente que este
defectuoso dentro del periodo de garantía. Si el producto ya no estuviera disponible,
se lo reemplazará por un producto de similar, igual o superior valor. Ésta es
su garantía exclusiva. No intente reparar o ajustar ninguna función eléctrica
o mecánica de este producto. Al hacerlo eliminaría ésta garantía. La garantía
es válida para el comprador minorista original a partir de la fecha de compra
inicial y la misma no es transferible. Conserve el recibo de compra original. Para
solicitar servicio en garantía se requiere presentar un recibo de compra. Los
agentes y centros de servicio de Sunbeam, o las tiendas minoristas que venden
productos de Sunbeam no tienen derecho a alterar, modicar ni cambiar de ningún
otro modo los términos y las condiciones de esta garantía. Esta garantía no cubre
el desgaste normal de las piezas ni los daños que se produzcan como resultado
de uso negligente o mal uso del producto, uso de voltaje incorrecto o corriente
inapropiada, uso contrario a las instrucciones operativas, y desarme, reparación
o alteración por parte de un tercero ajeno a Sunbeam o a un Centro de Servicio
autorizado por Sunbeam. Asimismo, la garantía no cubre actos fortuitos tales como
incendios, inundaciones, huracanes y tornados.
¿Cuál es el límite de responsabilidad de Sunbeam?
Sunbeam no será responsable de daños incidentales o emergentes causados por el
incumplimiento de alguna garantía o condición expresa, implícita o legal. Excepto
en la medida en que lo prohíba la ley aplicable, cualquier garantía o condición
implícita de comerciabilidad o aptitud para un n determinado se limita, en cuanto
a su duración, al plazo de la garantía antes mencionada. Sunbeam y queda exenta
de toda otra garantías, condiciones o manifestaciones, expresa, implícita, legal o
de cualquier otra naturaleza. Sunbeam no será responsable de ningún tipo de daño
que resulte de la compra, uso o mal uso del producto, o por la imposibilidad de usar
el producto, incluidos los daños incidentales, especiales, emergentes o similares,
o la pérdida de ganancias, ni de ningún incumplimiento contractual, sea de una
obligación esencial o de otra naturaleza, ni de ningún reclamo iniciado contra el
comprador por un tercero. Algunas provincias, estados o jurisdicciones no permiten
la exclusión o limitación de los daños incidentales o emergentes ni las limitaciones
a la duración de las garantías implícitas, de modo que es posible que la exclusión

How to Obtain Warranty Service
In the U.S.A.
If you have any question regarding this warranty or would like to obtain warranty
service, please call 1-800-458-8407 and a convenient service center address will be
provided to you.
In the U.S.A., this warranty is offered by Sunbeam Products, Inc. located in Boca
Raton, Florida 33431.
PLEASE DO NOT RETURN THIS PRODUCT TO ANY OF THESE
ADDRESSES OR TO THE PLACE OF PURCHASE.
o las limitaciones antes mencionadas no se apliquen en su caso. Esta garantía le
otorga derechos legales especícos y es posible que usted tenga otros derechos que
varían de un estado, provincia o jurisdicción a otro.
En los Estados Unidos - Si tiene alguna pregunta sobre esta garantía
o desea recibir servicio de garantía, llame al 1 800 458 8407 y podrá obtener la
dirección del centro de servicio que le resulte más conveniente.
En los Estados Unidos, esta garantía es ofrecida por Sunbeam Products, Inc.
ubicada en Boca Raton, Florida 33431.
POR FAVOR NO DEVUELVA ESTE PRODUCTO A NINGUNA
DE ESTAS DIRECCIONES NI AL LUGAR DE COMPRA.
®
For product questions:
Sunbeam Consumer Service
USA : 1-800-458-8407
www.sunbeam.com
© 2020 Sunbeam Products, Inc.
Product of: Sunbeam Products Inc.
2381 NW Executive Center Dr. Boca Raton, FL, 33431
Printed in China.
GCDS-SUN-SL
®
Para preguntas sobre los productos llame:
Sunbeam Consumer Service
États-Unis : 1-800-458-8407
www.sunbeam.com
© 2020 Sunbeam Products, Inc.
Producto de: Sunbeam Products Inc.
2381 NW Executive Center Dr. Boca Raton, FL, 33431
Impreso en China
GCDS-SUN-SL
Table of contents
Other Sunbeam Steam Cleaner manuals

Sunbeam
Sunbeam SB80 User manual

Sunbeam
Sunbeam SC4500 User manual

Sunbeam
Sunbeam SG3000 User manual

Sunbeam
Sunbeam SB20 User manual

Sunbeam
Sunbeam 4026-2 User manual

Sunbeam
Sunbeam GCSBHH01-033 User manual

Sunbeam
Sunbeam SC7500 User manual

Sunbeam
Sunbeam GCSBHS-100 User manual

Sunbeam
Sunbeam 26630 User manual

Sunbeam
Sunbeam Power Shot SGS0900 User manual


