Sunbeam SB20 User manual

SMT051110
Classic Garment Steamer
Operating Instructions
Model Nos. SB20 - SB22
Read all instructions carefully before using this item
IMPORTANT SAFETY INSTRUCTIONS:
Use the appliance only as recommended in this manual.1.
To avoid overload, do not operate another high wattage2.
appliance in the same outlet or extension. Do not use
extension cords to avoid overheating and risk of re.
Do not immerse the unit, plug or cord in water to protect3.
against risk of electrical shock.
No detergent can be added into the water tank or it will cause4.
damage. Distilled or de-mineralized water is recommended.
Do not leave the steamer unattended while it is in operation;5.
particular close supervision is necessary when used near
children.
Make sure to ll the water reservoir before operating the 6.
steamer. Always check the water level before and during
operation.
Do not lay the hose on the ground or wind it.7.
Refrain from touching the hot metal parts, hot water or steam8.
to avoid burns.
Allow the appliance to cool completely for at least 30 minutes9.
and drain the water tank and water reservoir before storage.
Move the appliance by grasping the telescopic pole. Do not10.
force the casters if they are stuck. Turn off the unit, and drain
the water tank and water reservoir before inspecting the
casters.
Always disconnect the appliance from the outlet before lling 11.
or draining water. Be careful to avoid excess water spilling
from the water reservoir.
Unplug the unit from the outlet when not in use, when moving12.
unit from one location to another, and before cleaning.

Do not place the unit or any parts near an open ame, 13.
cooking or other heating appliance.
Do not operate the unit with a damaged cord, plug, after a14.
malfunction, or if dropped or damaged.
To disconnect, grip the plug and pull it from the wall outlet.15.
Never drag the cord.
**Important**: To avoid danger of electric shock, unplug from
outlet when not in use and before cleaning. If the power cord
is damaged or your steamer does not work and must be
opened in order to repair, please call 1-877-678-6232 for help.
Caution!
Always hang the Steam Nozzle on the steam nozzle holder•
when not in use to prevent damage.
The telescopic pole must be fully extended during steam•
operation to ensure smooth lining of the hose and to provide a
free ow of steam.
Do not pull the hose with excessive force or damage may occur,•
causing steam leakage.
PRODUCT SPECIFICATIONS:
Model Nos. SB20 - SB22•
Unit Weight: 11.96 Lbs.•
Water Tank Capacity: 1.9L•
Ready to use: 45 seconds•
Input Voltage: 110-120V/60Hz•
Output Power: 1260-1500W•
IMPORTANT SAFETY INSTRUCTIONS CONT.

COMPONENTS IDENTIFICATION:
(A) Hanger for steam nozzle (B) Clothes Hanger Hook1.
Telescopic Pole2.
Steam Nozzle3.
Handle4.
Hose5.
Water Tank6.
Water Reservoir7.
Switch8.
Rolling Casters9.
Drain Plug10.
Hose Base11.
Pole Base12.
Indicating Lamps13.
Folding Clothes Rack14.
Fabric Brush15.

ASSEMBLY INSTRUCTIONS:
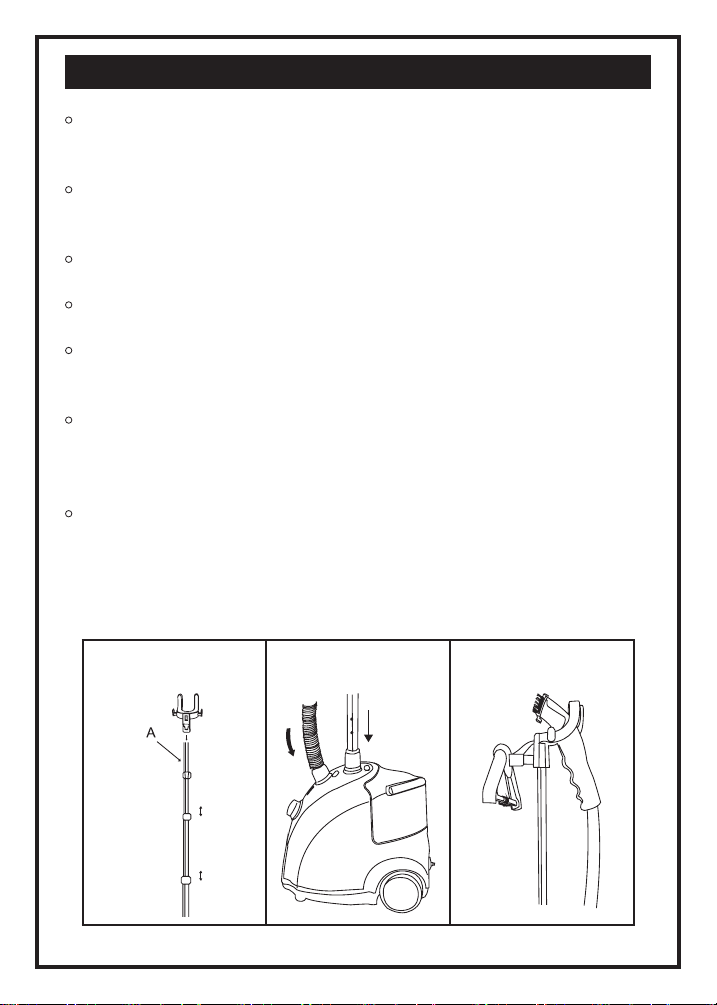
Place the clothes hanger hook onto the top telescopic pole (A)•
as shown in Figure 1.
Insert the bottom of the telescopic pole into the pole base as•
shown in Figure 2.
Turn the pole base lock clockwise until tightened.•
Loosen the clips on the telescopic pole.•
Pull the pole up to its full extension and tighten the clips as•
shown in Figure 1.
Place the hose onto its threaded hose base by turning the tting •
at the end of the hose clockwise (see Figure 2). Do not over-
tighten.
Hang the Steam Nozzle on the Steam Nozzle Holder as shown•
in Figure 3.
Fig. 1 Fig. 2 Fig. 3

PREPARING FOR USE:
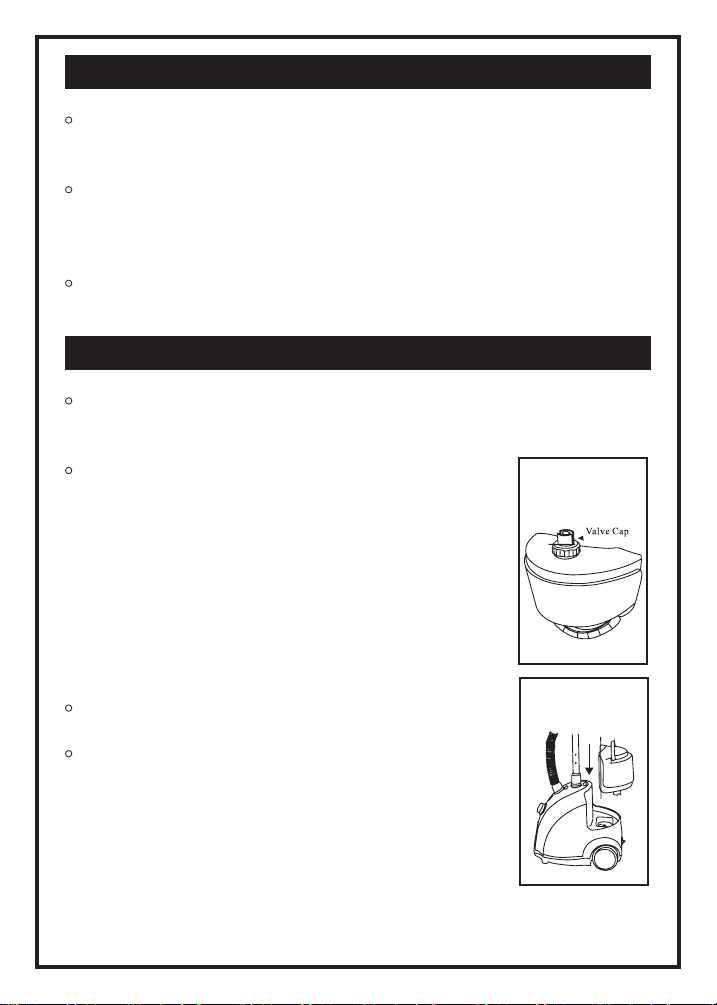
Make sure the steamer is unplugged. Turn the•
Switch to OFF.
Remove the Water Tank, turn it upside down,•
and unscrew the Valve Cap (see Figure
4). Fill the Water Tank with cool water, and
replace the Valve Cap. To prolong the life of
your steamer, we recommend using distilled
or de-mineralized water. Place the water tank
securely onto the unit’s cavity (see Figure 5).
Warning: Operating with a dry water tank may
cause damage to the unit.
Plug the cord into a working outlet.•
Turn the Switch to ON. The light on the switch•
should be illuminated, and the nozzle should
start discharging steam in approximately 45
seconds.
Important: When not steaming, always set the switch to OFF•
and unplug the cord from the outlet.
ACCESSORY ASSEMBLY:
The garment steamer comes with 2 accessories,
a Fabric Brush and Folding Clothes Rack. These
accessories can aid during steaming process.
Fabric Brush sweeps away unwanted threads,•
lint and more.
Folding Rack secures the clothes to avoid•
shimmy during steaming.
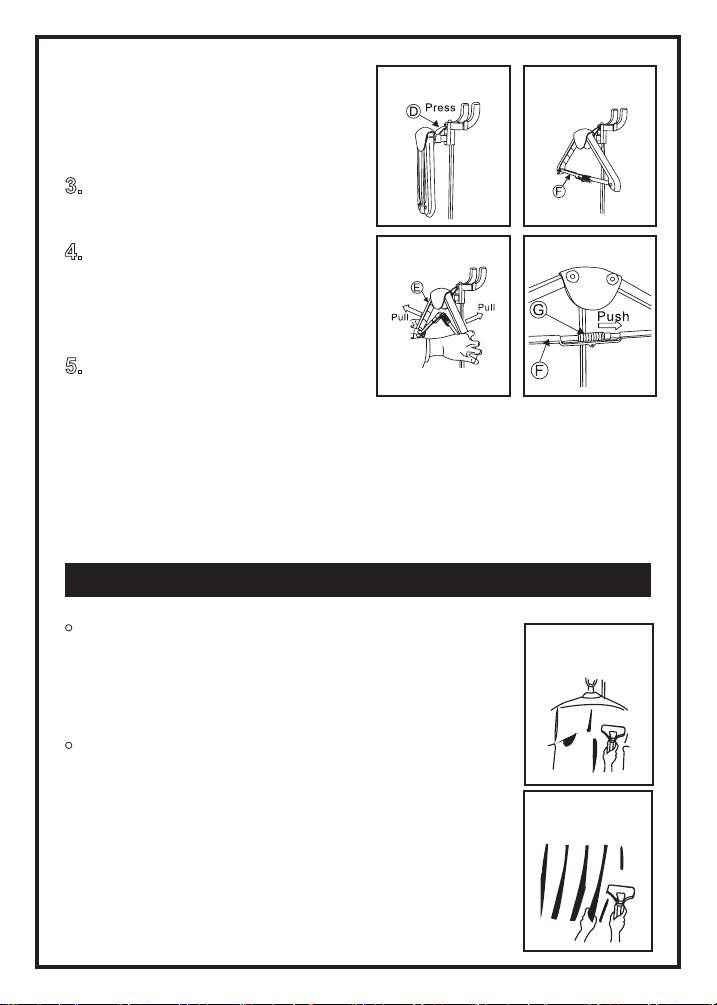
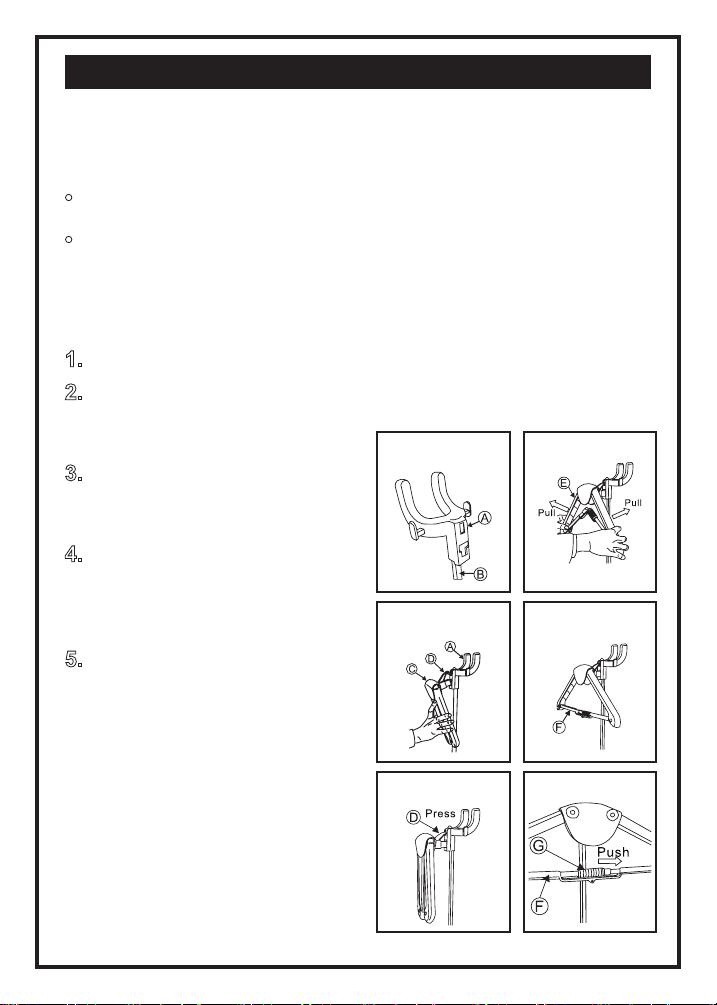
FOLDING CLOTHES RACK ASSEMBLY
Insert the Clothes Rack (A) on the Telescopic1.
Pole (B). (Figure 6)
Slant the hook (D) of Folding Rack (C)2.
Fig. 6
Fig. 7
Fig. 4
Fig. 5
around the angle of 40
degrees, and then insert it
into the hole of Clothes Rack
(A). (Figure 7)
Press the hook (D) vertically3.
and tighten it. (Figure 8)
Pull the arm of the Folding4.
Rack (E) out until two poles
(F) are in alignment. (Figure
9-10)
Push the xed pipe (G) onto 5.
the pole (F) by aligning the
salient dots on the hole of xed pipe (G) and the pole (F).
(Figure 11)
CAUTION:
Do not install the accessories while steam emitting from the
Steam Nozzle to avoid burns.
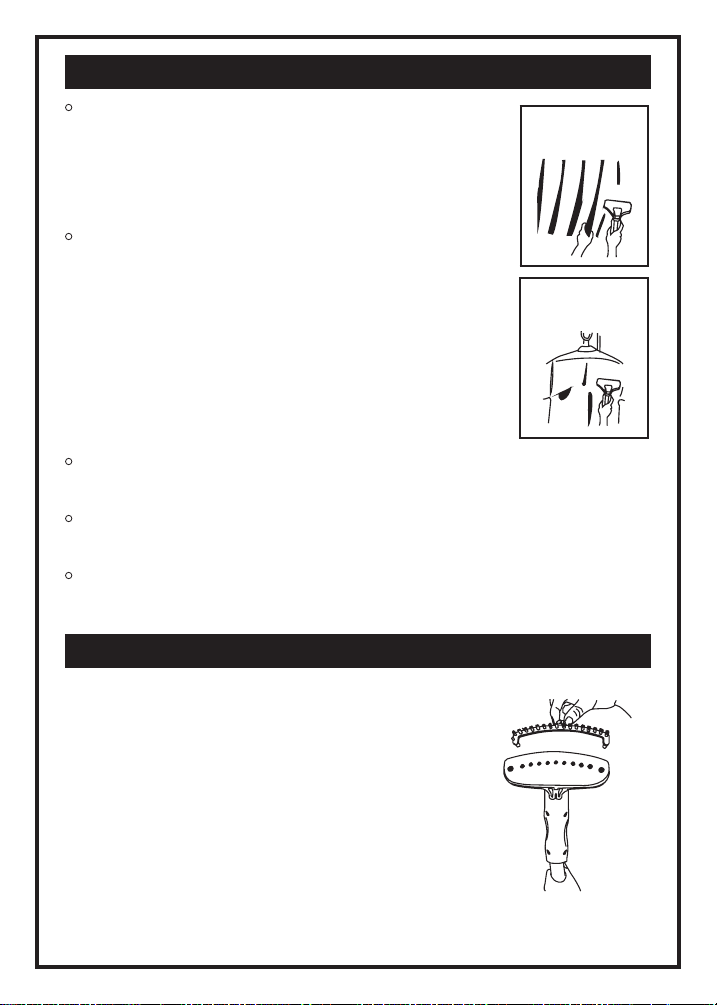
PRESSING WITH STEAM:
To steam a garment, either place it on a clean,•
rust-free clothes hanger and clip onto the
Clothes Hanger Hook, or hang the garment
directly on supplied Hanger.
Hold the handle in a vertical position with the•
Steam Nozzle at the bottom of the garment.
Steam will rise along the inside and outside
of the fabric, removing wrinkles. Slowly slide
the nozzle upward and downward along the
garment (Figure 12). Do not allow kinks to form
in the hose at any time. Repeat as necessary
until garment is wrinkle-free.
Fig. 8
Fig. 9
Fig. 10
Fig. 11
Fig. 12
Fig. 13

Curtains and draperies can be steamed while still hanging•
(Figure 13).
Heavier fabrics may require repeated steaming. To remove•
stubborn wrinkles, the Fabric Brush may be used.
Important: Pulling on the garment with too much force may
cause the unit to tip. Handle gently.
USING THE STEAMER’S FABRIC BRUSH:
The garment steamer comes with a Fabric
Brush, which sweeps away lint, unwanted
threads, etc.
To use the Fabric Brush, turn off steamer and
wait until the steam nozzle emits no steam.
Press the brush rmly into the two pegs at
corners of the steam nozzle.
MAINTAINING YOUR STEAMER:
Unplug steamer. Allow the steamer to cool for at least 301.
minutes.
Remove the Hose and shorten the Telescopic Pole.2.
Remove and drain the Water Tank. Rinse the water tank with3.
fresh water, and drain completely. Place the tank back onto
the Water Reservoir.
Drain the steamer by removing the Drain Plug and allowing4.
the water to empty.
Flush the unit by lling the Water Reservoir and the hose 5.
connector with fresh water and draining completely. Replace
the Drain Plug.
Wrap the Hose around the Telescopic Pole one time. Place6.
the Steam Nozzle on the steam nozzle holder. Store in a cool,
dry place.
Important: It is recommended that you do this at least once a
week if steamer is used regularly.
REMOVING MINERAL BUILD UP:
Mineral build-up in the internal pipes and heater—caused by
high levels of minerals in many municipal water supplies—may
cause intermittent steaming, or, in some cases, no steaming at
all. It is advisable to eliminate the build-up after 7-15 days of use,
depending on the particular water quality of your region. Use of
de-mineralized or distilled water may prevent this problem.
Turn off the steamer and unplug the power cord.•
Remove the hose and pole.•
Drain the Water Reservoir, and empty the water from•
the Water Tank.
Mix a solution of 50% vinegar and 50% water. In most cases, 2•
cups of this solution will be sufcient.
Slowly pour the water-vinegar solution into the Hose Connector.•
The solution will become visible in the Water Reservoir’s inlet
hole. Continue to pour solution into the Hose Connector until the
Water Reservoir is about half-full, near the top of hose.
Allow it to stand for 40 minutes.•
Drain the Water Reservoir by removing the drain plug and•
allowing the liquid to drain into a sink or tub.
Drain the Hose Connector by tilting the unit over a sink or tub•
and pouring the water out of the Hose Connector.
Pour clean water into the Hose Connector and Water Reservoir•
inlet, and drain. Repeat this step until the vinegar odor
dissipates.
Reassemble the unit and operate normally.•
If this procedure does not return the steamer to normal operation,
the unit may need servicing.
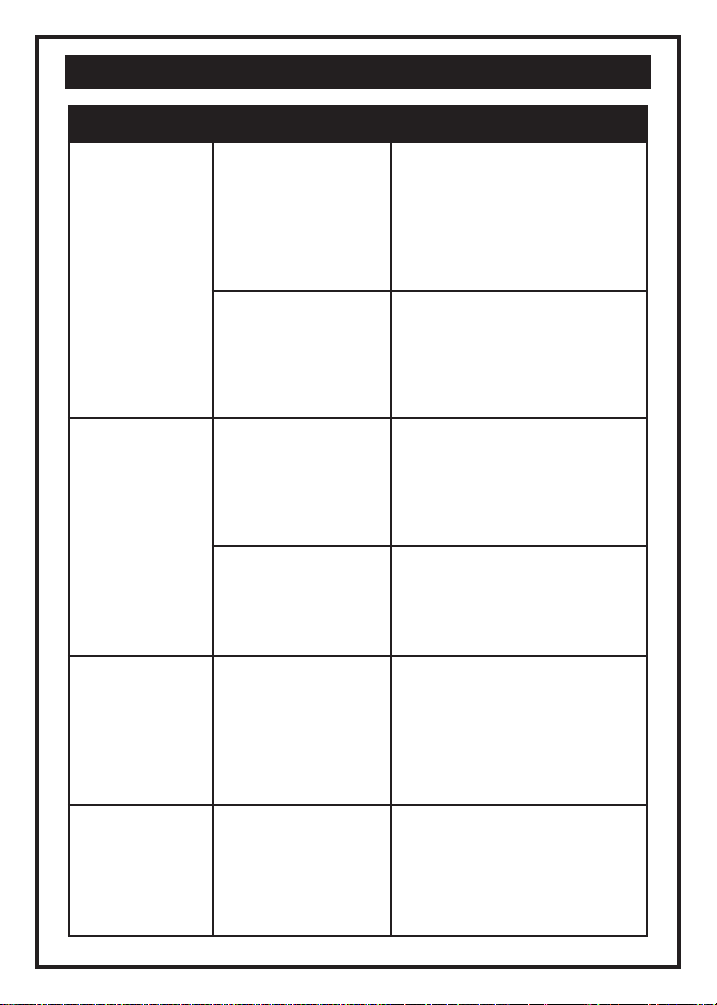
PROBLEMS AND SOLUTIONS:
PROBLEM REASON SOLUTION
The unit fails to
steam.
The Indicating
Lamps do not
turn on.
Steamer is not
plugged in.
Plug into electrical outlet.
Household Circuit
Breaker / Ground
Fault Interrupter is
tripped or Fuse is
blown.
Check the power outlet. If you
need assistance, contact a
qualied electrician.
The unit fails to
steam.
The Indicating
Lamps are lit.
Mineral build-up in
the unit.
Follow the Removing Mineral
Build-up instructions.
The Water Tank is
empty.
Rell the Water Tank.
Excessive
gurgling of
Hose and
Steam Nozzle.
Condensation in
hose.
Some gurgling is a natural
effect of the steam process.
For excessive gurgling,
extend the hose vertically to
allow water to drain back into
the Water Reservoir.
Steam is
intermittent.
Mineral build-up in
the unit.
It is normal for the unit to
periodically stop steaming for
a few seconds. If the steam
stays off for longer periods,
follow Removing Mineral
Build-up procedure.

1 YEAR LIMITED WARRANTY
The SB20 and SB22 Garment Steamers are warranted for 1 year
from provable date of purchase against defects in material and
workmanship.
During this period such defects will be repaired, or the product will
be replaced without charge.
This warranty does not cover damage caused by misuse,
negligence or improper installation. Warranty is also invalid
in any case that the product is taken apart or serviced by an
unauthorized service station.
Send your package postage prepaid with a copy of your proof of
purchase. You will also need to enclose a letter explaining the
nature of your difculty in detail. Please allow 2-4 weeks for return
shipping.
Smartek USA Inc.
49 Bartlett Street Brooklyn, NY 11206
1-877-678-6232
Sunbeam®logo is a registered trademark of Sunbeam Products, Inc. used under license.


SMT051110
Clásico vaporizador
Manual de instrucciones
Modelo Nos. SB20 - SB22
Lea atentamente las instrucciones antes de usar este tema

Lea por favor todas instrucciones con cuidado
antes de utilizar este producto.
Utilice el aparato sólo como recomendado en este manual.1.
Para evitar sobrecarga, no opere otro aparato alto de vataje2.
en la misma salida ni la extensión. No utilice alargadores para
evitar recalentar y riesgo del fuego.
No sumerja la unidad, el tapón ni la cuerda en el agua para3.
proteger contra riesgo de golpe eléctrico.
Ningún detergente puede ser agregado en la cisterna4.
ni causará daño. Destilado o agua de de-mineralizó es
recomendada.
No salga el barco de vapor desatendido mientras está en5.
la operación; supervisión cercana particular es necesaria
cuando se usa cerca de niños.
Aségurese para llenar el depósito de agua antes de operar el6.
barco de vapor. Siempre verique el nivel del agua antes de y
durante operación.
No coloque la manga en el suelo ni enróllelo.7.
Absténgase de tocar las partes metálicas calientes, agua o8.
vapor calientes evitar quemaduras.
Permita el aparato para refrescar completamente para por lo9.
menos 30 minutos y desaguar el depósito de cisterna y agua
antes de almacenamiento.
Mueva el aparato agarrando la asta telescópico. No fuerce las10.
rueditas si ellos son atascados. Apague la unidad, y desagüe
el depósito de cisterna y agua antes de inspeccionar las
rueditas.

Siempre desconecte el aparato de la salida antes de agua de11.
llenar o desaguar. Tenga cuidado de evitar rociar de agua de
exceso del depósito de agua.
Desenchufe la unidad de la salida cuando no en uso, al12.
mover la unidad de una ubicación a otro, y antes de limpiar.
No coloque la unidad ni ninguna parte cerca de una llama13.
abierta, cocinando ni otro aparato de la calefacción.
No opere la unidad con una cuerda dañada, el tapón,14.
después de una falla de funcionamiento, ni si dejado caer ni
dañó en ninguna manera.
Para desconectar, agarrar el tapón y jalarlo de la salida de15.
pared. Nunca arrastre la cuerda.
Importante: Para evitar peligro de descarga eléctrica,
desenchufa de la salida cuando no en uso y antes de limpiar.
Si el cable de alimentación es dañado o su barco de vapor no
trabaja y debe ser abierto para reparar, llamar por favor a un
agente del servicio para la ayuda.
DESCRIPCION DEL PRODUCTO:
número de modelo SB20 - SB22•
El Peso de la unidad: 11.96 Lbs.•
Riegue la Capacidad de Tanque: 1.9L•
Humee Salida Tiempo: 45 segundos•
El Voltaje de entrada: 110-120V/60Hz•
El Poder de salida: 1260-1500W•

COMPONENTES:
(A) Gancho para la boca de vapor (B) de Gancho de Gancho 1.
de Ropa.
telescópico de Asta. Humee Boca2.
Tubo de vapor3.
Manejar4.
Manguera5.
Riegue Tanque6.
Riegue Depósito7.
Interruptor8.
Las Rueditas rodantes9.
Desagüe Tapón10.
Riegue con una manga Base11.
La Base de la asta12.
Indicando Lámparas13.
El Gancho que dobla14.
El Cepillo15.
INSTRUCCIONES de ASAMBLEA
Coloque el gancho de gancho de ropa en la asta telescópico•
primera (A) como mostrado en la Figura 1.
Inserte el fondo de la asta telescópico en la base de asta como•
mostrado en la Figura 2.
Gire la cerradura de base de asta a la derecha hasta apretado. •
Aoje los clips en la asta telescópico. •
Jale la asta hasta su extensión llena y apriete los clips como•
mostrado en la Figura 1.
Coloque la manga en su base enhebrada de manga girando el•
accesorio a nes de la manga a la derecha (ve Figura 2). Haga
no sobre-aprieta.
Cuelgue la Boca de Vapor en el Poseedor de Boca de Vapor•
como mostrado en la Figura 4.
Figura 1 Figura 2 Figura 3
Cuidado:
Siempre cuelga la Boca de Vapor en el poseedor de boca de•
vapor cuando no en uso para prevenir daño.
La asta telescópico debe ser extendida completamente durante•
operación de vapor para asegurar foro que liso de la manga y
para proporcionar un ujo libre de vapor.
no jala la manga con una fuerza excesiva ni el daño puede•
ocurrir, causando merma de vapor.
PREPARANDO PARA el USO:
Aségurese el barco de vapor es desenchufado. Gire el •
Interruptor a LEJOS.
Quite la cisterna, lo gira al revés, y destornilla•
la Tapa de Válvula (ve Figura 4). Llene la
cisterna con agua fresca, y reemplace la Tapa
de Válvula. Para prolongar la vida de su barco
de vapor, nosotros recomendamos utilizar
destilada o agua de de-mineralizó. Coloque la
cisterna rmemente en la cavidad de la unidad
(ve Figura 5). La advertencia: Operar con una
cisterna seca puede causar daño a la unidad.
Tape la cuerda en una salida de trabajo.•
Gire el Interruptor a EN. La luz en el interruptor •
debe ser iluminada, y la boca debe comenzar
descargando vapor en aproximadamente
45 segundos. Importante: Cuándo no vapor,
siempre puso el interruptor a LEJOS y
desenchufa la cuerda de la salida.
Figura 4
Figura 5
ASAMBLEA DE ACCESORIOS:
El vapor de prendas de vestir viene con 2 accesorios, incluyendo
cepillo de tela, plegable Rack. estos accesorios pueden ser sus
ayudantes práctica durante el vapor.
Tejido Cepillo barre temas no deseados, pelusa yλ más.•
plegable ja Rack las ropas para evitar laλ vibración excesiva •
durante vapor.
PLEGABLE RACK ASAMBLEA
Inserte la percha (A) de la barra telescópica (B). (Figura 6)1.
Slant el gancho (D) de Folding Rack (C) en todo el ángulo de2.
40 grados, y luego insertarlo en el agujero de la percha (A).
(Figura 7)
Pulse el gancho (D)3.
verticalmente y apretar.
(Figura 8)
Tire el brazo de la cremallera4.
de plegado (E) de plano
hasta dos polos (F) en la
misma línea. (Figura 9-10)
Empuje el tubo jo (G) sobre 5.
el polo F () mediante la
armonización de los puntos
más destacados en el
agujero de la tubería jo (G)
y el polo (F). (Figura 11)A
PRECAUCIÓN:
No instale los accesorios
mientras que el vapor que emiten
desde el tubo de vapor para
evitar quemaduras.
Figura 6
Figura 7
Figura 8
Figura 9
Figura 10
Figura 11
APRETAR CON VAPOR:
Para humear una prenda de vestir, o lugar en•
un gancho de ropa y clip limpio y oxidación-
libre en el Gancho de Gancho de Ropa, o
colgar la prenda de vestir directamente en
gancho suministrado.
Tenga el asidero en una posición vertical con•
la Boca de Vapor en el fondo de la prenda
de vestir. El vapor subirá por el interior y
fuera del tejido, quitando arrugas. Deslice
lentamente la boca hacia arriba y hacia abajo
por la prenda de vestir (ve Figura 15). No
permita retorceduras para formar en la manga
en tiempo. Repita como sea necesario hasta
prenda de vestir es arruga-libre.
Las cortinas y las colgaduras pueden ser humeadas al todavía•
colgar (ve Figura 16).
Los tejidos más pesados pueden requerir vapor repetido. Para•
quitar arrugas tercas, el Cepillo de Tejido puede ser utilizado.
Importante: Tirando de la prenda de vestir con demasiado•
fuerza puede causar que la unidad incline. Maneje suavemente.
USO DE SELVA SPECIEL FABRIC VAPORES DE:
El barco de vapor de la prenda de vestir viene
con un Cepillo de Tejido, que barre hilas, hilos
no deseados, etc.
Para utilizar el Cepillo de Tejido, la vuelta lejos
barco de vapor y espera hasta que la boca de
vapor no emita vapor.
Apriete el cepillo rmemente en las dos
perchas en rincones de la boca de vapor.
Fig. 12
Fig. 13
This manual suits for next models
1
Table of contents
Languages:
Other Sunbeam Steam Cleaner manuals

Sunbeam
Sunbeam Power Steam 32610046 User manual

Sunbeam
Sunbeam SC7500 User manual

Sunbeam
Sunbeam 4026-2 User manual

Sunbeam
Sunbeam GCSBES-100 User manual

Sunbeam
Sunbeam GCSBHS-100 User manual

Sunbeam
Sunbeam SC4500 User manual

Sunbeam
Sunbeam 26630 User manual

Sunbeam
Sunbeam GCSBHH01-033 User manual

Sunbeam
Sunbeam SB80 User manual

Sunbeam
Sunbeam SG3000 User manual


