Sunbeam Power Shot SGS0900 User manual

Power Shot Handheld Garment Steamer
User Guide
SGS0900

2
Sunbeam’s Safety Precautions 3
Before First Use 4
Sunbeam Power Shot Handheld Garment Steamer 4
About Your Features 5
Operating Instructions 5-7
Care And Cleaning 8
Troubleshooting 9
Warranty 10
Contents
Important Instructions - Retain For Future Use

3
Sunbeam’s Safety Precautions
When using electrical appliances, basic safety precautions should always be followed
including the following:
Read all instructions
1. Use appliance only for its intended use.
2. To reduce the risk of electric shock, do not immerse the appliance in water or other
liquids.
3. Always turn the appliance to “Off” before plugging or unplugging the appliance from the
electrical outlet. Never pull the cord to disconnect from outlet; instead, grasp plug and
pull to disconnect.
4. Do not allow cord to touch hot surfaces. Let appliance cool completely before putting away.
Loop cord loosely around appliance when storing.
5. Make sure unit is off, unplugged and allow it to cool completely before filling or cleaning.
6. Always disconnect appliance from electrical outlet when filling with water or emptying,
and when not in use.
7. Do not operate appliance with a damaged cord, or if the appliance has been dropped or
damaged. To reduce the risk of electric shock, do not disassemble or attempt to repair
the appliance, take it to a qualified service center for examination and repair. Incorrect
reassembly or repair could cause a risk of fire, electric shock, or injury to persons when
the appliance is used.
8. This appliance is not intended for use by persons (including children) with reduced
physical, sensory or mental capabilities, or lack of experience and knowledge, unless they
have been given supervision or instruction concerning use of the appliance by a person
responsible for their safety.
9. Burns could occur from touching hot metal parts, hot water, or steam. Use care when you
turn a steam appliance upside down – there may be hot water in the reservoir.
10. To reduce the risk of contact with hot water emitting from steam vents, check appliance
before each use by holding it away from body and operating steam button.
11. To reduce the likelihood of circuit overload, do not operate another high wattage appliance
on the same circuit.
12. If an extension cord is absolutely necessary, a cord with an ampere rating equal to or
greater than the maximum rating of the iron shall be used. A cord rated for less amperage
can result in a risk of fire or electric shock due to overheating. Care shall be taken to
arrange the cord so that it cannot be pulled or be tripped over.
13. When filling the water tank, watch for water that can drip onto the floor and cause you to
slip and fall.
14. Appliance may cause personal injury or be damaged if dropped.
15. The use of attachments not recommended or sold by the appliance manufacturer may
cause injuries or void your warranty.
16. To avoid personal injury and damage to the appliance, only add water to the water tank.
NEVER add cleaning solutions, perfumes, oils or any other chemical additives.
17. Care should be taken when using the appliance due to the emission of steam.
18. Children should be supervised to ensure that they do not play with the appliance.
SAVE THESE INSTRUCTIONS
HOUSEHOLD USE ONLY
Thank you for purchasing the Sunbeam Power Shot Handheld Garment Steamer. With
continuous steam technology and powerful shot of steam, this Steamer will bring out the best
in garments, linens, drapes and more-quickly and efficiently! .
4
Before First Use
• Unpack your Steamer; remove and peel off any labels adhered to the unit.
• Remove and save instruction manual.
• Wipe outside of the unit with a damp cloth or sponge to remove any dust. Dry thoroughly.
• Keep unit on a flat, leveled surface.
• When using your Steamer for the first time, you may notice a small amount of smoke and
a slight odor. This is normal when heating the appliance for the first time and there is no
reason for concern.
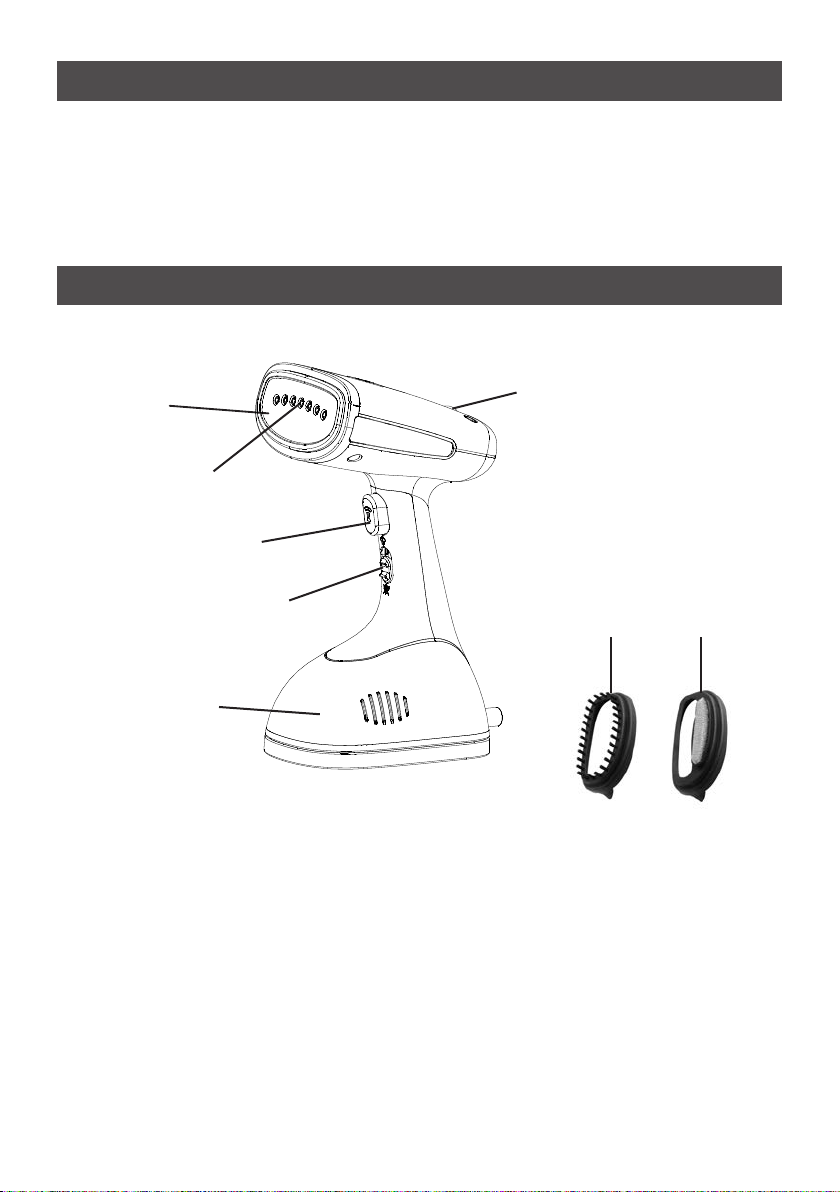
Sunbeam Power Shot Handheld Garment Steamer
1. Heated press bar
2. Steam exit
3. Shot of steam button
4. Continuous steam switch
5. Removable water tank with water inlet tube
6. Red ready indicator light
7. Fabric Brush
8. Lint Brush
3
2
6
7 8
1
4
5

5
About Your Features
Operating Instructions
Heated press bar – Works like an iron soleplate to press wrinkles out.
Wide steam exit – Provides wide coverage of steam for your garments and fabrics.
Continuous Steam switch – gives you the option to steam on demand for up to 14
minutes of continuous steam.
Removable water tank with water inlet tube – Easy to remove for quick refills. A water
inlet tube inside the water transmits the water from the tank to steamer head. A loud
vibrating noise indicates that the water is low in the water tank and time to refill.
Red power indicator light – Lights up when unit is plugged in to an electrical outlet.
Red ready indicator light – Turns off to indicate the unit is ready for use.
FILLING WATER TANK
Warning: To avoid personal injury and damage to the unit, only add water to the water tank.
NEVER add cleaning solutions, perfumes, oils or any other chemical additives.
Note: Your Steamer is designed to be used with tap water. However, if you have hard water,
we recommend using distilled water for better results.
1. Place Steamer on a flat surface.
2. Hold the water tank with one hand while pulling the tank away from the steamer body.
3. Take the water tank to a sink. Pull the rubberized water-fill cover to open and pour tap
water from the tap into the water-fill opening until it reaches the Max water level in
water tank (Figure 2). If water spills outside of the tank, or within the center water tank
cavity, wipe it dry with a paper towel or cloth.
Figure 1
Figure 2

6
Warning: When filling the water tank, watch for water that can drip onto the floor and
cause you to slip and fall.
Tip: It is not necessary to have a full tank of water for the Steamer to generate steam.
For best results, just make sure the water tank is at least half full.
4. Close the water-fill cover, push the water tank into the steamer body until a ‘click’ sound
is heard.
Note: If you need to add water while steaming, unplug the steamer, wait until it cools
and follow above steps. If a loud vibrating noise is heard, then the water level is low and
needs to be refilled.
USING YOUR STEAMER VERTICALLY
You can use your Steamer in the vertical position to press with steam hanging garments and
drapes.
Caution: Heated press bar gets hot. Do not touch!
1. Hang your garment to be steamed on a clean, rust-free hanger.
2. Plug unit into a standard electrical outlet.
Warning: Care should be taken to arrange the cord so that it cannot be pulled or tripped
over. Always make sure you can move freely without getting tangled with the cord.
3. The red ready indicator light turns off and will cycle on and off as the temperature is
maintained.
Caution: Burns could occur from touching hot metal parts, hot water, or steam. Use
care when you turn a steam appliance upside down – there may be hot water in the
reservoir.
4. You are now ready to start steaming!
5. Turn the continuous steam switch on
6. Hold your Steamer by the handle in vertical position with the head pointing toward the
fabric and away from you and your body.
Warning: Steam is hot. Always point steamer exit away from yourself, other persons,
pets, plants and walls. Never steam clothes while they are being worn.
7. With your free hand, pull the fabric tight.
8. Press the shot of steam button to generate bursts of steam.
Caution: do not press the shot of steam button before the ready indicator light turns off
or if the unit is off.
9. Touch the fabric lightly with the heated press bar, moving it in a downward motion,
beginning at the top of the garment and moving downward.
Caution: The heated press bar gets hot, do not touch.
10. Repeat this step until fabric is wrinkle free.
Tip: For more difficult wrinkles, try steaming from the underside of the fabric.
11. When finished, move trigger switch on the back of the steamer to the Off position.
12. Place Steamer on a flat surface and unplug from electrical outlet.
13. Wait until Steamer has cooled and empty water tank.
Note: Always unplug the Steamer when not in use.

7
STEAMING HORIZONTALLY
You can also use your Steamer as an iron to refresh sheets, pillows, mattress, sofas and
more.
1. Ensure water tank is filled.
2. Once the Steamer has reached set temperature, press turn the continuous steam switch
on and in a horizontal position, move the steamer continuously over the fabric being
steamed.
Caution: The heated press bar gets hot, do not touch.
3. Plug unit into a standard electrical outlet.
Warning: Care should be taken to arrange the cord so that it cannot be pulled or tripped
over. Always make sure you can move freely without getting tangled with the cord.
4. The red power indicator light illuminates and will cycle on and off as the temperature is
maintained.
Caution: Burns could occur from touching hot metal parts, hot water, or steam. Use
care when you turn a steam appliance upside down – there may be hot water in the
reservoir.
5. Once you finish, move trigger switch on the back of the steamer to the Off position. Wait
for unit to cool completely before emptying the water tank or removing accessory.
TIPS FOR APPLYING STEAM
• Improper use of the Steamer can cause property damage due to the steam. Always
read the instructions in this manual before using your Steamer.
• Do not operate the Steamer with an empty water tank. To add water during operation,
turn steamer off, wait for it to cool down then remove water tank and refill.
• Always read the fabric care labels to help determine fabric type to be steamed. If
unsure of fabric’s fiber, test a small hidden area, such as an inside seam or hem,
before steaming.
• For more difficult wrinkles, try steaming from the underside of the fabric.
• When steaming, touching fabric lightly with the steam nozzle can help in wrinkle
removal. It is important to make contact with the garment and/or fabric.
• Heavier fabrics require more steam.
• Only use water in the unit. Do not add cleaning solutions, scented perfumes, oils or
any other chemicals to the water that can cause damage to the appliance.
• Do not use steam against wall or doors.
• When hanging garment on a door while steaming, be careful not to damage the door
with steam.
• After use, empty water tank by turning it upside down to ensure all water empties out
and avoid leaks.
• When steaming, move the steamer continuously over the item being pressed. Do not
keep steamer over an area for any period of time to avoid damage to the fabric.

8
CLEANING
1. Make sure unit is off, unplugged and allow it to cool completely before cleaning.
2. If there is water in the water tank, remove the tank and turn it upside down to ensure all
the water empties out.
3. Wipe exterior surfaces with a soft, damp cloth. Dry thoroughly.
Warning: Never immerse steamer, cord or plug in water or any other liquid.
• Do not use abrasive cleaners or scouring pads that can scratch the surface.
• Do not place in the dishwasher.
CLEANING WITH VINEGAR AND WATER
It is recommended to clean your Steamer every two months to reduce mineral buildup that
can affect the performance of your unit.
1. Turn off the unit and let it cool completely.
2. Remove water tank and make sure it is empty.
3. Fill water tank with a solution of 50% white vinegar and 50% water up to the max level.
4. Plug unit into electrical outlet and press the continuos steam trigger to run a full
steaming cycle.
5. Once steaming is finished, fill with clean water and repeat process until the vinegar odor
is eliminated.
STORAGE
Fold the cord in loops and store the unit in upright position, in a clean dry place with a flat,
sturdy surface. Make sure the water tank is empty. If not, remove it and turn it upside down
to ensure all the water empties out and avoid leaks.
Care And Cleaning

9
Troubleshooting
Problem Possible Cause Solution
The steamer does not
produce any steam.
The steamer has
not heated up
sufficiently.
The water level in
the water tank is
too low.
The steamer is not
plugged in.
Electrical outlet is
not working.
The steamer is not
turned on.
Let the steamer heat up for about
45 seconds before using it.
Unplug the steamer, let it cool
completely and refill the water tank.
Make sure the steamer is plugged
into an electrical outlet.
Plug into another electrical outlet.
Make sure the power indicator light
is on.
The steamer makes
a rattling noise and
vibrates.
The water pump
inside the unit
detects the water
level is low.
Unplug the unit, let it cool
completely and refill water tank.
The steamer leaves
water drops on the
garment.
You may have
pressed the
shot of steam
button before the
steamer ready
indicator light
turned off.
Allow the ready indicator light to
turn off before pressing the shot of
steam button or sliding the switch
to the on position.
The steamer is
making a buzzing
noise while steaming.
The water pump is
running.
This noise is normal.
10
Warranty
3.8L
SLOW COOKER
User Guide
Need help with your appliance?
Contact our customer service team
or visit our website for information
and tips on getting the most from
your appliance.
Australia | visit www.sunbeam.com.au
phone 1300 881 861
mail Units 5 & 6, 13 Lord Street,
Botany NSW 2019 Australia.
New Zealand | visit www.sunbeam.co.nz
phone 0800 786 232
mail Level 6, Building 5,
Central Park,
660–670 Great South Road,
Greenlane, Auckland.
Sunbeam Corporation Limited | ABN 45 000 006 771
Sunbeam Corporation is a division of GUD Holdings Limited.
Sunbeam is a registered trademark.
Made in China to Sunbeam’s specification.
Due to minor changes in design or otherwise,
the product you buy may differ slightly from the one shown here.
Approved by the appropriate electrical regulatory authorities.
©Copyright Sunbeam 2015.
08/15
HP4000K
Australia
www.sunbeam.com.au
1300 881 861
Units 5 & 6,
13 Lord Street,
Botany NSW 2019
Australia
New Zealand
www.sunbeam.co.nz
0800 786 232
Level 6, Building 5,
Central Park,
660-670 Great South Road,
Greenlane, Auckland
New Zealand
Year
2 year
2 years

11

Sunbeam Corporation PTY LTD | ACN 000 006 771
Sunbeam is a division of Newell Brands
Due to continued product improvements,
product illustrations and photographs in this User Guide
may differ slightly from the actual product.
MADE IN CHINA TO
SUNBEAM’S
SPECIFICATION
AUTHORITIES
ELECTRICAL REGULATORY
APPROPRIATE
APPROVED BY
Need help with your appliance?
Contact our Customer Care Team or
visit our website for information and tips
on getting the most from your appliance.
AUSTRALIA
Visit:
Phone:
Mail:
NEW ZEALAND
Visit:
Phone:
Mail:
www.sunbeam.com.au
1300 881 861
Units 5 & 6, 13 Lord Street,
Botany NSW 2019
www.sunbeam.co.nz
0800 786 232
Level 6, Building 5, Central Park,
660–670 Great South Road,
Greenlane, Auckland
SGS0900_19EM1 (ANZ)
GCDS-SUN-SL
Table of contents
Other Sunbeam Steam Cleaner manuals

Sunbeam
Sunbeam GCSBHS-100 User manual

Sunbeam
Sunbeam Power Steam 32610046 User manual

Sunbeam
Sunbeam GCSBHH01-033 User manual

Sunbeam
Sunbeam 4026-2 User manual

Sunbeam
Sunbeam SB20 User manual

Sunbeam
Sunbeam SG3000 User manual

Sunbeam
Sunbeam SB80 User manual

Sunbeam
Sunbeam GCSBES-100 User manual

Sunbeam
Sunbeam SC7500 User manual

Sunbeam
Sunbeam SC4500 User manual


