Suncast Brilliant by Design Vista BMS7702 User manual


Register
your
product
for
Limited
Warranty!
Must
register
product
within
90
days
of
purchase
for
limited
warranty
Register
Scan
for
updated
Limited
Warranty
Warranty
www.suncast.com/warranty
or
call
US
1 (
800)
846-2345
Have
Questions?
We
are
here
to
help.
Check
out
our
resource
library
along
with
helpful
tips,
videos
and
FAQ's.
You
may
call
the
Contact
Center
directly
at:
1 (
800)
846-2345
or
write
Suncast
Corporation,
Contact
Center,
701
N.
Kirk
Road,
Batavia,
IL
60510 (
USA)
To
purchase
Suncast
replacement
parts
and
learn
about
other
Suncast
products
visit
us
online
or
call.
www.suncast.com
1-800-846-2345
or
1-630-381-6309
A
Before
You
Begin...
•
Consult
your
local
authorities
for
any
permits
required
to
construct
shed.
Prior
to
the
construction
of
your
shed,
check
with
the
local
building
code
official
to
review
any
required
permits
or
building
limitations.
• A
level
and
sturdy
foundation
is
required
before
shed
construction
can
begin.
Site
preparation
information
is
available
on
pages
11-12.
A
foundation
that
differs
from
the
suggestions
within
this
manual
could
prevent
proper
assembly
and
may
damage
parts.
•
Read
instructions
thoroughly
prior
to
assembly.
This
kit
contains
parts
that
can be
damaged
if
assembled
incorrectly
or
in
the
wrong
sequence.
•
Please
follow
instructions.
Suncast
is
not
responsible
for
replacing
parts
lost
or
damaged
due
to
incorrect
assembly.
•
Assistance
is
required
during
entire
assembly.
[
I]
IMPORTANT
OPEN
ALL
BOXES
FIRST
AND
NEATLY
LAYOUT
PARTS.
SMALL
PARTS
MAY
BE
CONTAINED
IN
EACH
BOX.
PLEASE
REFERENCE
PARTS
LIST
WITHIN
THIS
MANUAL
TO
VERIFY
ALL
PARTS
ARE
PRESENT.
COMPLETE
SITE
PREPARATION
AND
FOUNDATION
CONSTRUCTION
BEFORE
UNPACKING
ALL
PARTS.
A
CAUTION
•
Proper
site
preparation
required.
•
Shed
not
intended
for
use
in
extreme
weather
conditions.
•
Shed
not
intended
for
storage
of
flammable
or
caustic
chemicals.
•
Store
heavy
items
near
the
bottom
of
shed.
•
Shed
not
intended
for
use
by
children.
•
DO
NOT
stand,
sit,
or store
items
on
storage
shed
roof.
•
Treat
carefully
in
extreme
temperatures.
•
Repair
or
replace
broken
parts
immediately.
•
Suncast
is
not
responsible
for
damage
caused
by
weather
or
misuse.
•
At
regular
intervals,
inspect
your
shed
to
make
sure
that
assembly
integrity
has
been
maintained.
•
Periodically
check
that
the
location
you
have
chosen
to
set
your
shed
is
still
level.
•
This
kit
contains
parts
with
metal
edges.
Please
be
careful
when
handling.
3
A
Shed
Safety
and
Care
•
Hot
items,
such
as
recently
used
grills,
blowtorches,
etc.,
must
not
be
stored
in
the
shed.
•
Heavy
articles
should
not
be
leaned
against
the
walls,
as
this
may
cause
panel
distortion
and
permanent
damage.
•
Keep
roof
clean
of
snow
and
leaves.
•
The
shed
walls
and
roof
sections
have
a
textured
exterior,
much
like
vinyl
home
siding.
Over
time,
dust
may
accumulate
in
the
texture.
When
combined
with
moisture,
this
could
encourage
the
growth
of
moss
or
mold on
the
shed.
To
maintain
the
look
of
your
shed,
we
recommend
cleaning
it
each
year
with
mild
soap and
water.
DO
NOT
use
bleach,
ammonia,
or
other
caustic
cleaners,
and
DO
NOT
use
stiff
bristle
brushes.
Failure
to
perform
annual
cleaning
could
result
in
permanent
staining of
the
plastic.
This
is
not
a
manufacturing
defect
and
is
not
covered
under
warranty.
Assembly
Day
Tips
•
Complete
site
preparation
and
foundation
construction
before
unpacking
parts
and
beginning
assembly.
•
DO
NOT
attempt
to
assemble
on
a
day
with
strong
winds.
•
DO
NOT
attempt
to
assemble
on days
when
temperature
is
below
32 degrees
Fahrenheit.
•
Set
aside
appropriate
amount
of
time
to
completely
assemble
shed.
•
Make
sure
you
have
assistance
nearby
to
lift
and
secure
parts
in
place.
•
Wear
light
duty
work
gloves
while
assembling
shed.
•
Once
roof
is
assembled,
a
flashlight
may
be
of
use
when
assembling
smaller
components
inside
shed.
•
DO
NOT
use
a
torque
wrench
or
hand
drill
to
tighten
provided
Easy
bolts.
Use
010210410
Easy
Bolt
Easy
Driver
tool (
provided)
ONLY.
•
Suncast
provides
extra
hardware
for
small
fasteners
for
customer
convenience.
In
some
cases,
there
will
be
extra
small
fasteners
once
the
assembly
is
complete.
Note:
This
product
contains
parts
that
are
used
in
different
orientations
to
construct
the
shed.
Please
take
note
of
the
orientation
of
the
parts
shown
throughout
this
instruction
manual.
Failure
to
follow
instructions
could
result
in
damage
to parts.
Suncast
is
not
responsible
for
replacing
parts
lost
or
damaged
due
to
incorrect
assembly.
4
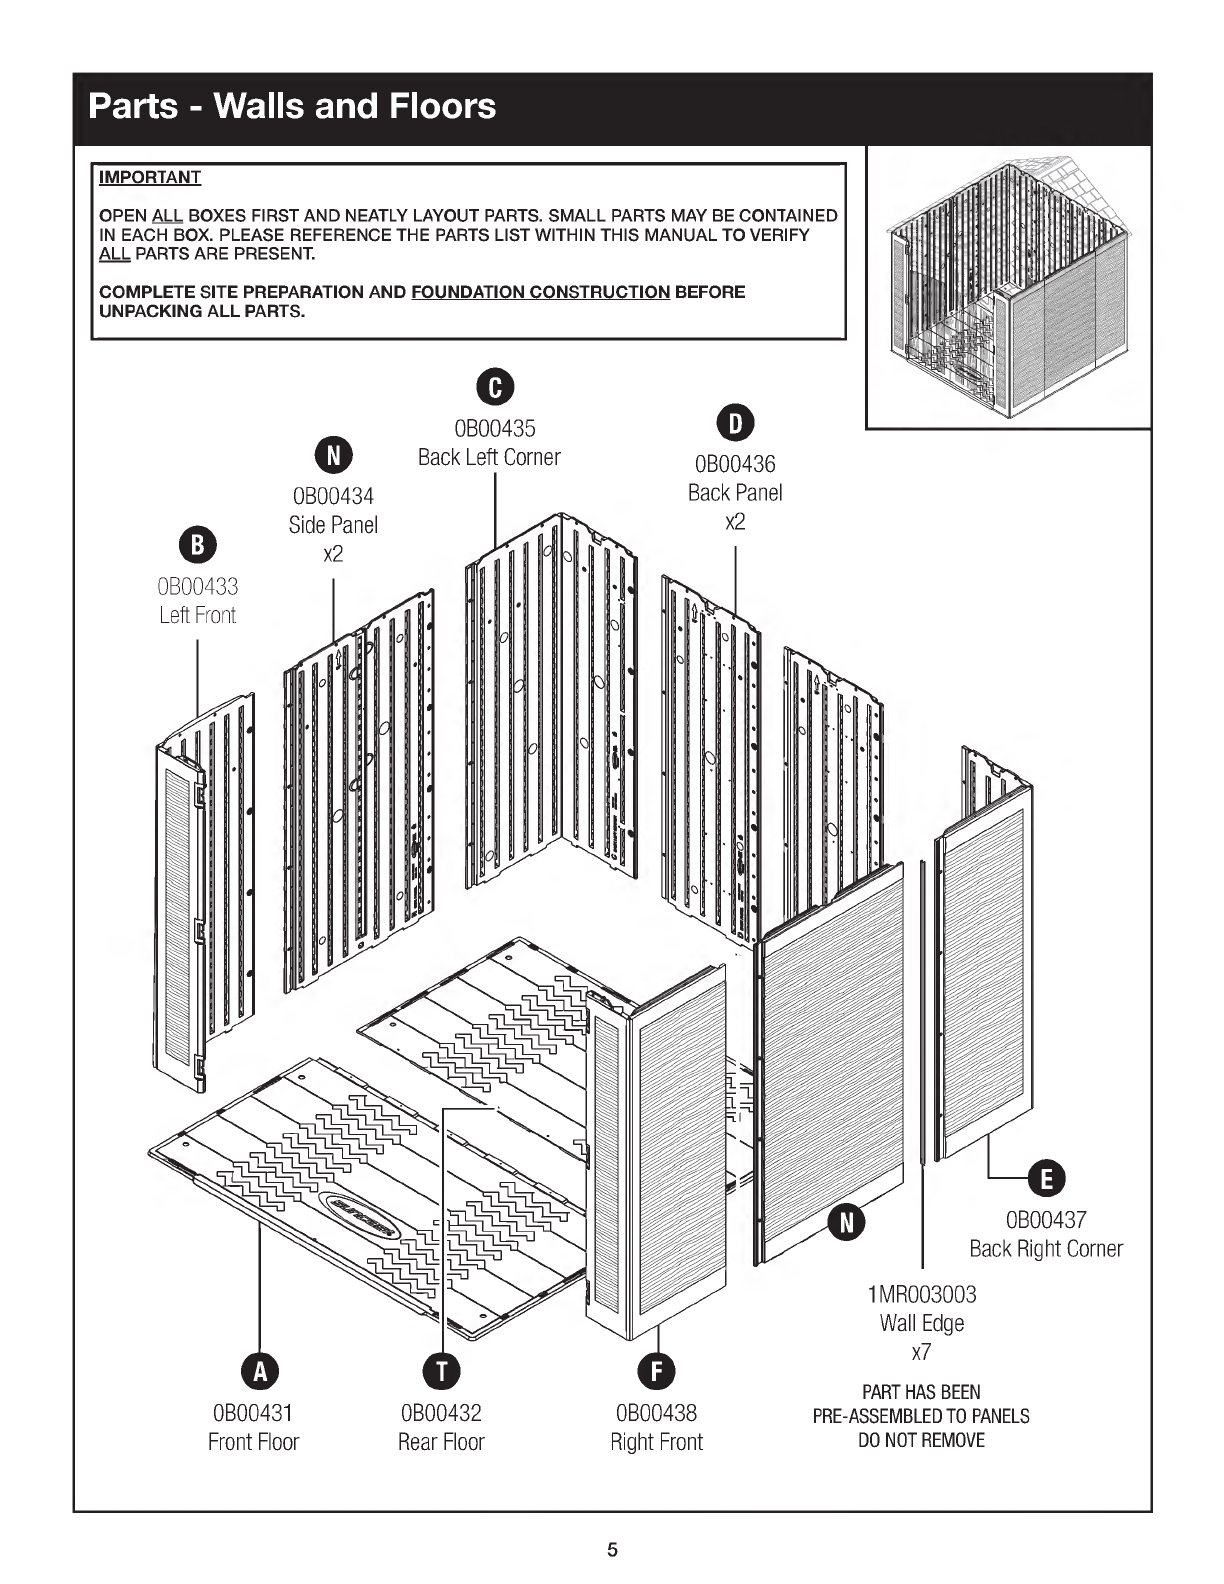
Parts -
Walls
and
Floors
-
IMPORTANT
OPEN
ALL
BOXES
FIRST
AND
NEATLY
LAYOUT
PARTS.
SMALL
PARTS
MAY
BE
CONTAINED
IN
EACH
BOX.
PLEASE
REFERENCE
THE
PARTS
LIST
WITHIN
THIS
MANUAL
TO
VERIFY
ALL
PARTS
ARE
PRESENT.
COMPLETE
SITE
PREPARATION
AND
FOUNDATION
CONSTRUCTION
BEFORE
UNPACKING
ALL
PARTS.
0
OB00433
Left
Front
o
OB00435
0
Back
Left
Corner
OB00434
Side
Panel
x2
OB00431
Front
Floor
OB00432
Rear
Floor
o
OB00436
Back
Panel
x2
OB00438
Right
Front
OB00437
Back
Right
Corner
1M
R003003
Wall
Edge
x7
PART
HAS
BEEN
PRE-
ASSEMBLED
TO
PANELS
DO
NOT
REMOVE
5
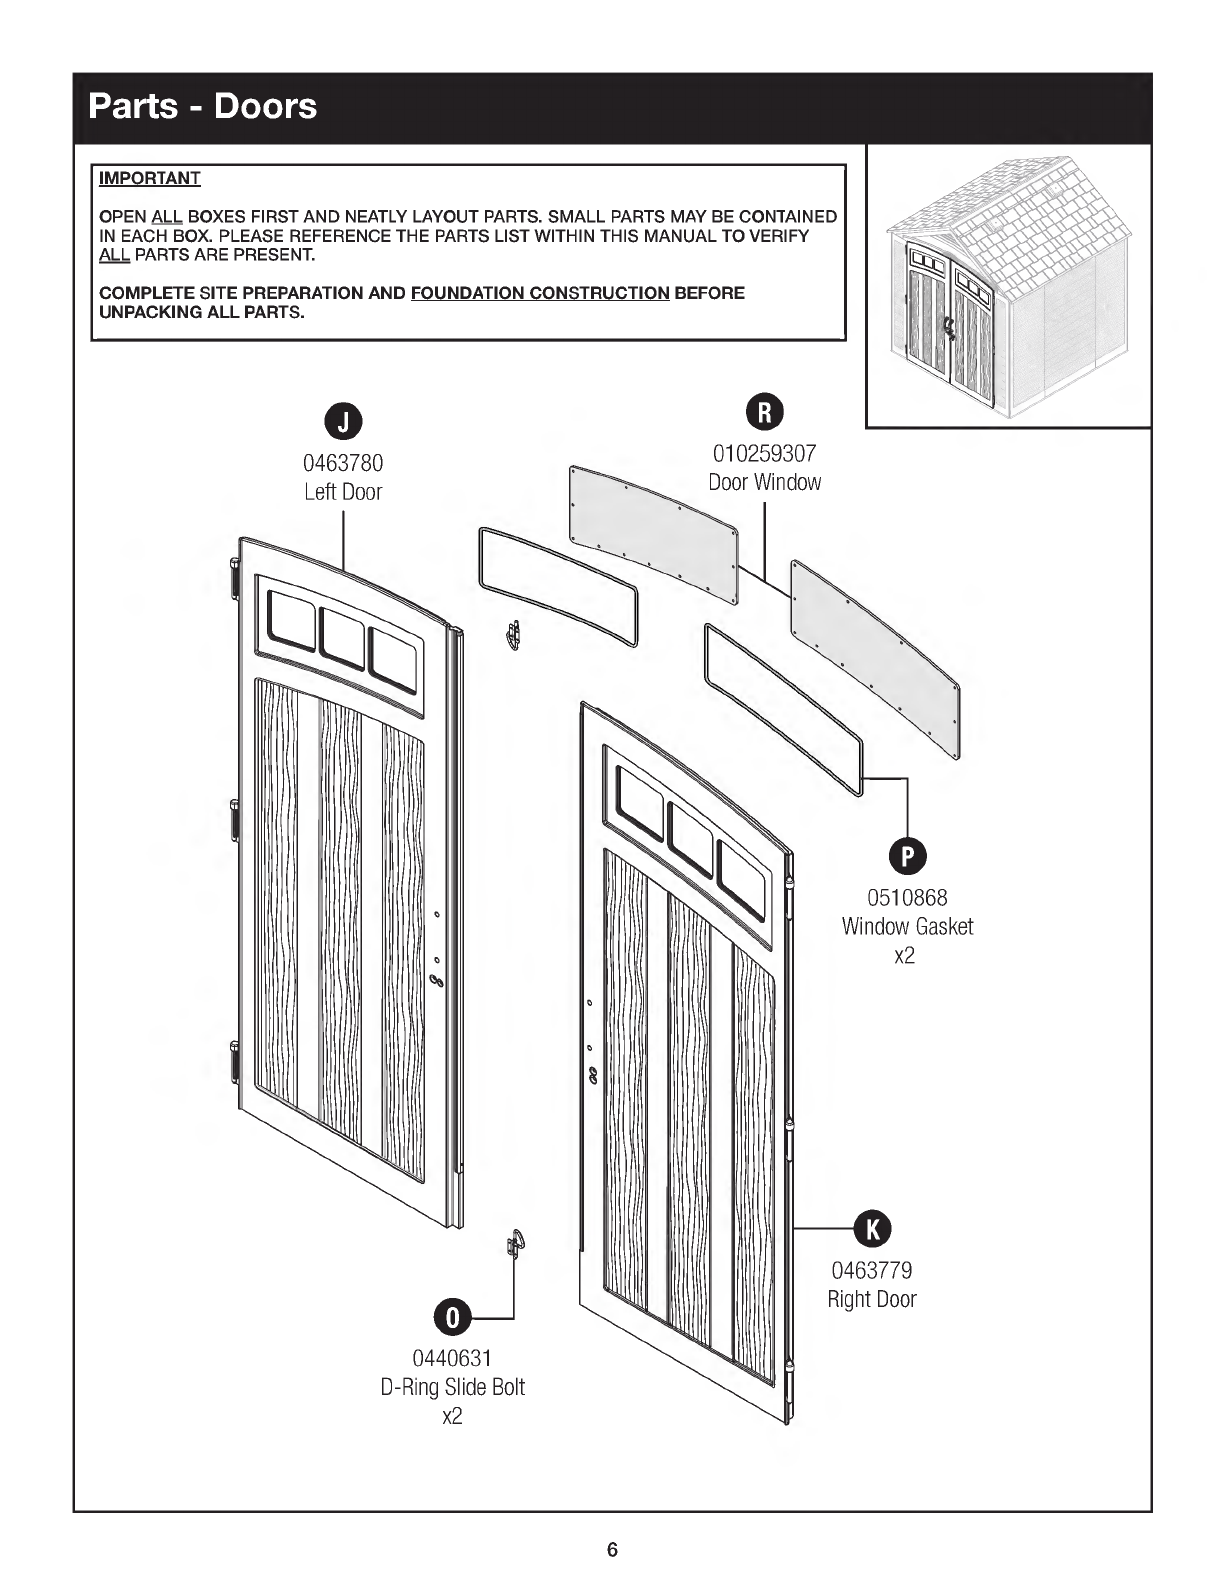
Parts -
Doors
IMPORTANT
OPEN
ALL
BOXES
FIRST
AND
NEATLY
LAYOUT
PARTS.
SMALL
PARTS
MAY
BE
CONTAINED
IN
EACH
BOX.
PLEASE
REFERENCE
THE
PARTS
LIST
WITHIN
THIS
MANUAL
TO
VERIFY
ALL
PARTS
ARE
PRESENT.
COMPLETE
SITE
PREPARATION
AND
FOUNDATION
CONSTRUCTION
BEFORE
UNPACKING
ALL
PARTS.
o
0463780
Left
Door
0440631
D-
Ring
Slide
Bolt
x2
o
010259307
Door
Window
0510868
Window
Gasket
x2
0463779
Right
Door
6
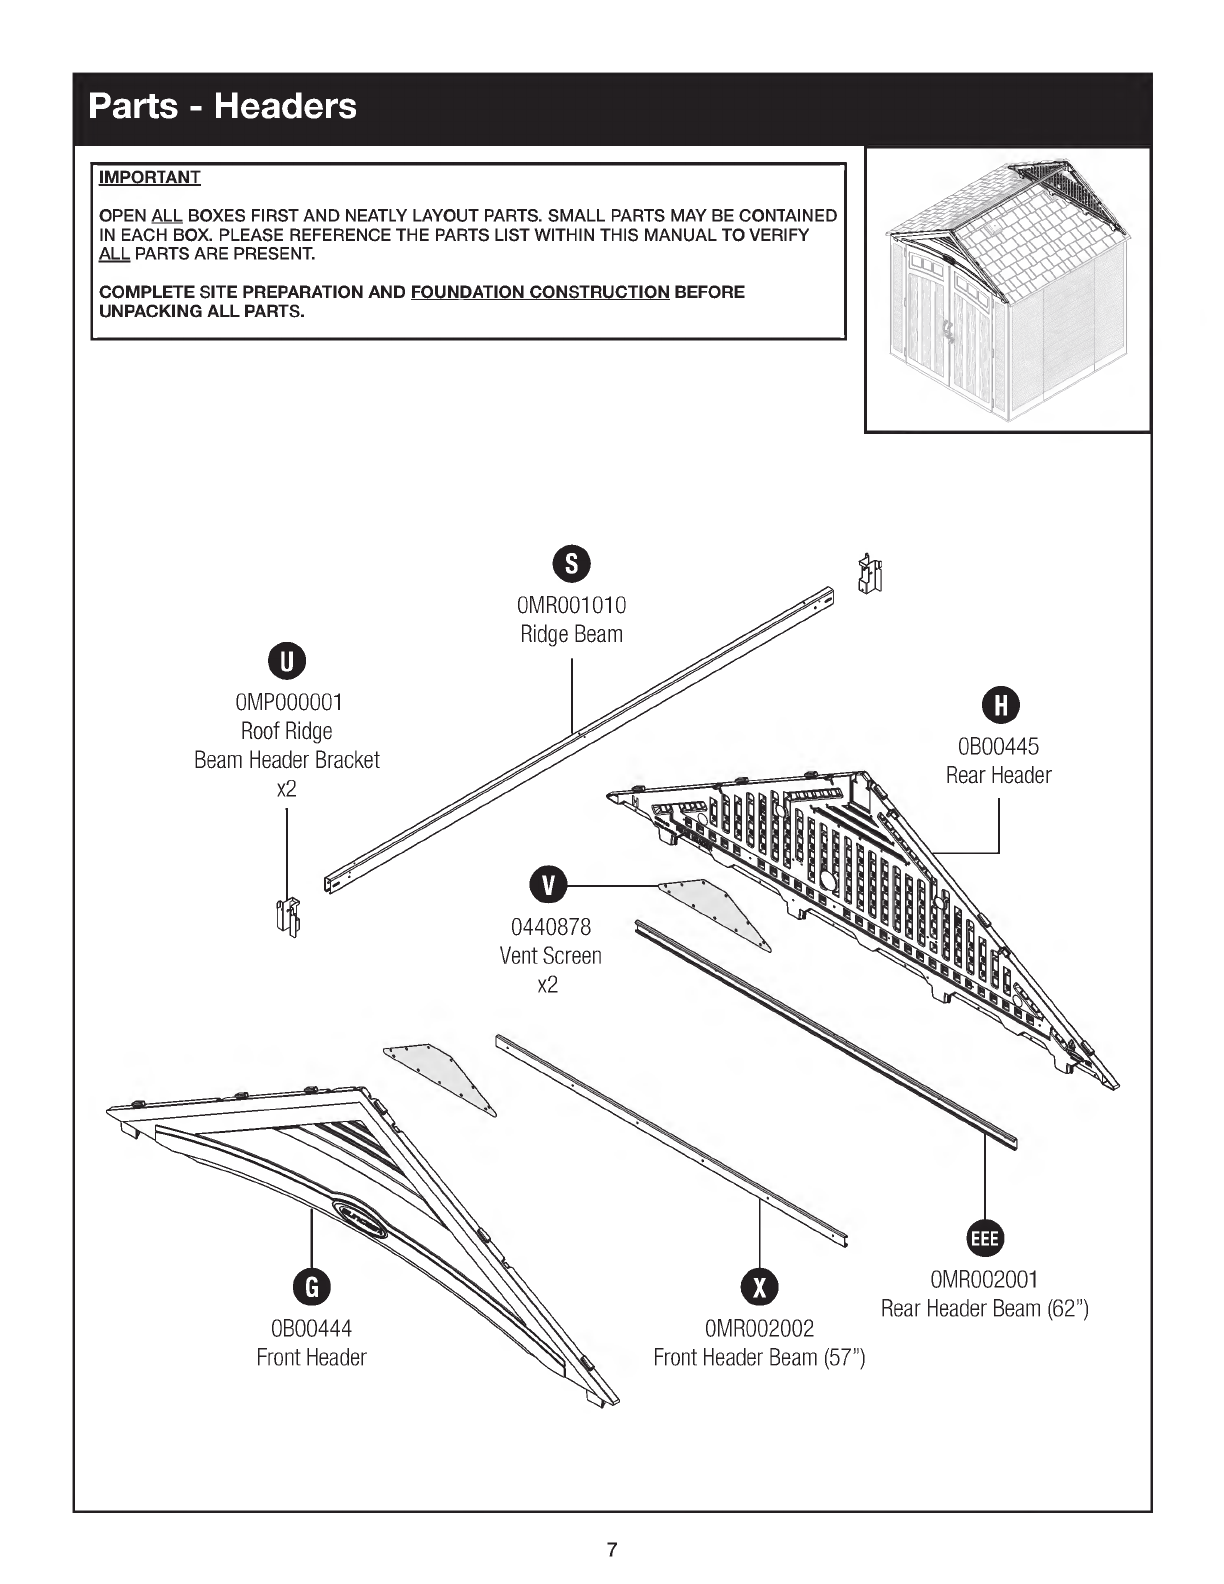
Parts -
Headers
-
IMPORTANT
OPEN
ALL
BOXES
FIRST
AND
NEATLY
LAYOUT
PARTS.
SMALL
PARTS
MAY
BE
CONTAINED
IN
EACH
BOX.
PLEASE
REFERENCE
THE
PARTS
LIST
WITHIN
THIS
MANUAL
TO
VERIFY
ALL
PARTS
ARE
PRESENT.
COMPLETE
SITE
PREPARATION
AND
FOUNDATION
CONSTRUCTION
BEFORE
UNPACKING
ALL
PARTS.
,
o
0M
P000001
Roof
Ridge
Beam
Header
Bracket
x2
OB00444
Front
Header
o
OMR001010
Ridge
Beam
0440878
Vent
Screen
x2
OMR002002
Front
Header
Beam (
57")
o
OB00445
Rear
Header
OMR002001
Rear
Header
Beam (
62")
7

Parts -
Roof
Truss
IMPORTANT
OPEN
ALL
BOXES
FIRST
AND
NEATLY
LAYOUT
PARTS.
SMALL
PARTS
MAY
BE
CONTAINED
IN
EACH
BOX.
PLEASE
REFERENCE
THE
PARTS
LIST
WITHIN
THIS
MANUAL
TO
VERIFY
ALL
PARTS
ARE
PRESENT.
COMPLETE
SITE
PREPARATION
AND
FOUNDATION
CONSTRUCTION
BEFORE
UNPACKING
ALL
PARTS.
41)
--
OMR005004
Truss
Leg
x2
OM
R004002
Side
Adapter
x2
0
OMP000003
Truss
Bracket
0
OMR009012
Roof
Support
Bar
x8
OMR006001
Truss
Cross
Beam
x2
0M
P000004
Truss
Strap
x2
s-
8

Parts -
Roof
IMPORTANT
OPEN
ALL
BOXES
FIRST
AND
NEATLY
LAYOUT
PARTS.
SMALL
PARTS
MAY
BE
CONTAINED
IN
EACH
BOX.
PLEASE
REFERENCE
THE
PARTS
LIST
WITHIN
THIS
MANUAL
TO
VERIFY
ALL
PARTS
ARE
PRESENT.
COMPLETE
SITE
PREPARATION
AND
FOUNDATION
CONSTRUCTION
BEFORE
UNPACKING
ALL
PARTS.
o
OB00442A
Left
Roof
x2
ED
0102231
Skylight
x2
OB00443A
Front
Roof
Peak
o
0464402
Skylight
Gasket
x4
010247607
lllumiventTM
Base
x2
o
OB00452A
Rear
Roof
Peak
44_
010247507
lllumiventTM
Cover
x2
OB00441A
Right
Roof
x2
9
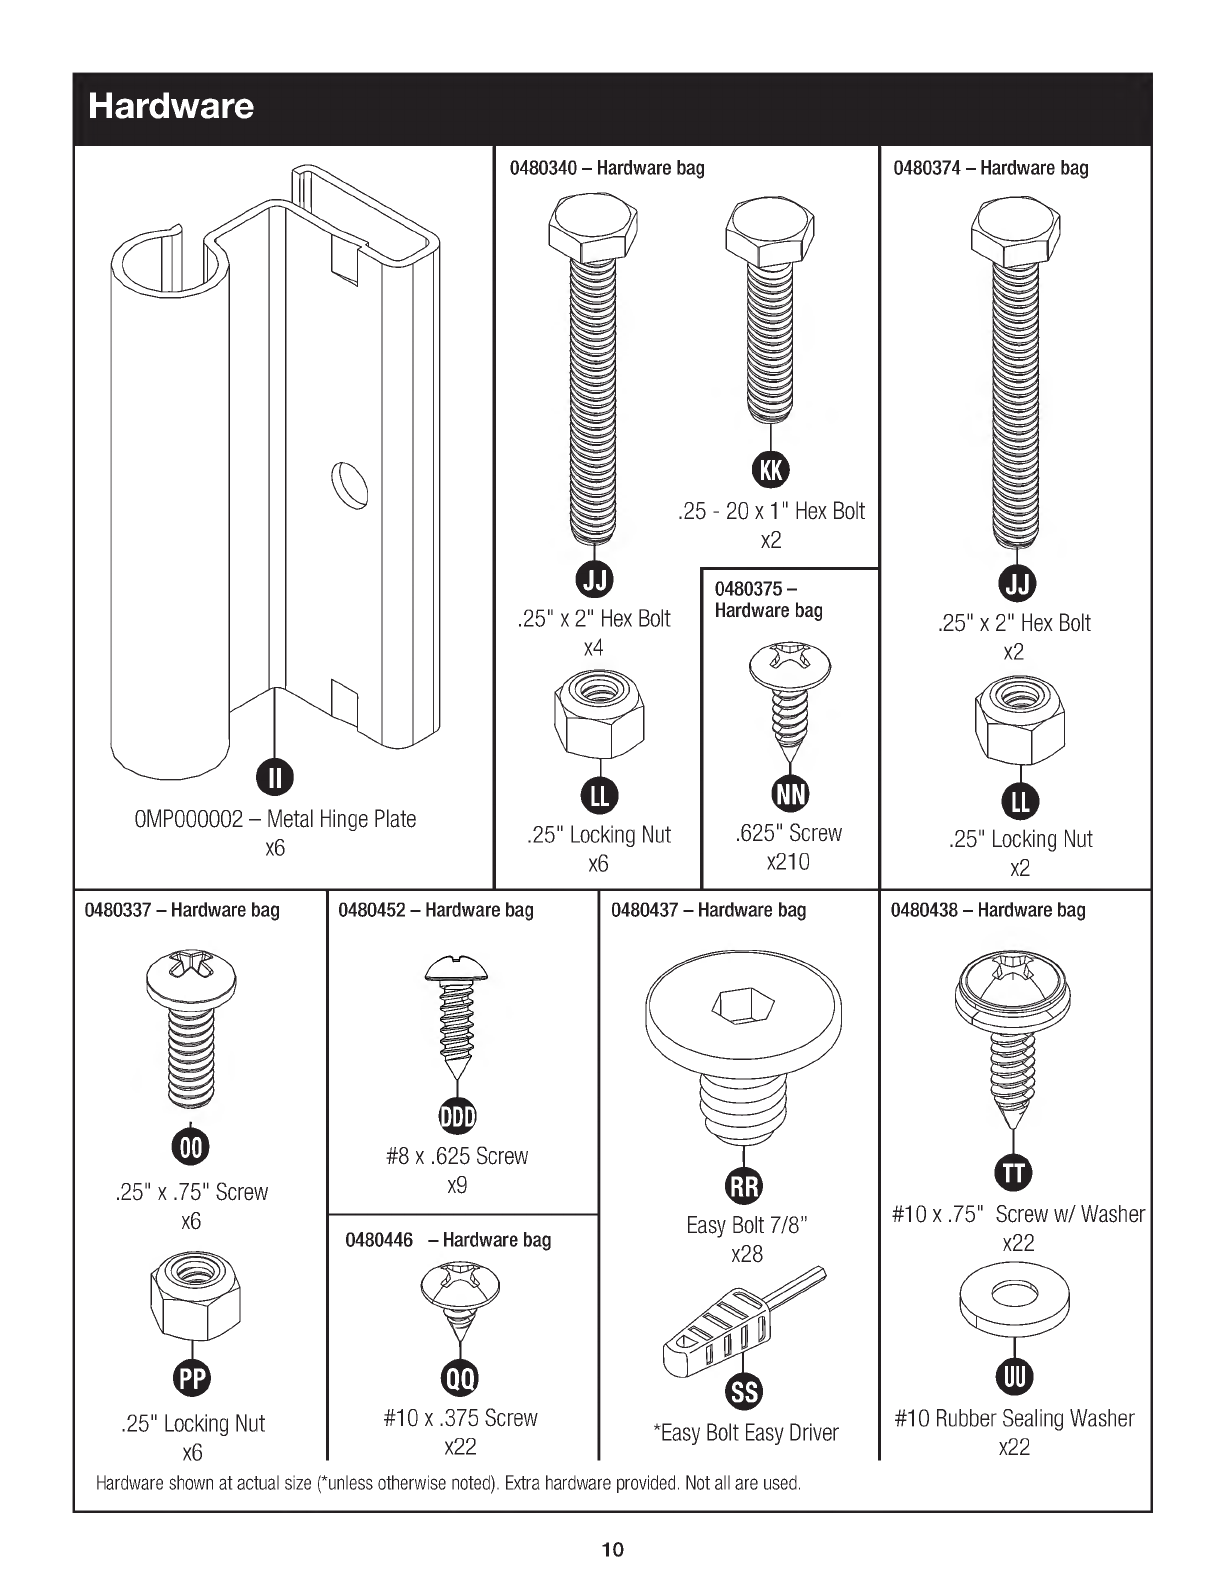
OMP000002 —
Metal
Hinge
Plate
x6
Hardware
0480340 —
Hardware
bag
.25"
x
2"
Hex
Bolt
x4
.25"
Locking
Nut
x6
.25 -
20
x
1"
Hex
Bolt
x2
0480375 —
Hardware
bag
.625"
Screw
x210
0480374
—
Hardware
bag
.25"
x
2"
Hex
Bolt
x2
.25"
Locking
Nut
x2
0480337 —
Hardware
bag
o
.25"
x .
75"
Screw
x6
("3
o
.25"
Locking
Nut
x6
Hardware
shown
at
actual
size (*
0480452 —
Hardware
bag
#8
x .
625
Screw
x9
0480446
—
Hardware
bag
#10
x .
375
Screw
x22
unless
otherwise
noted).
Extra
hardwa
0480437 —
Hardware
bag
Easy
Bolt
7/8"
x28
*Easy
Bolt
Easy
Driver
re
provided.
Not
all
are used.
0480438 —
Hardware
bag
#10
x .
75"
Screw
w/
Washer
x22
#10
Rubber
Sealing
Washer
x22
10


