SuperLightingLED DMX200 Installation instructions

DMX200 DMX-SPI Decoder
Product Specifications

DMX-SPI Decoder Product Specifications Page 1of 14
Contents
1.Summarization ......................................................................2
2.Technical Parameters.................................................................2
3.Controller External Dimension........................................................2
4.Interface Specification..............................................................3
5. Button Instruction ................................................................3-4
6.Screen display instruction ........................................................4-12
7.Typical Application..............................................................13-14
1.Summarization

DMX-SPI Decoder Product Specifications Page 2of 14
The DMX-SPI decoder adopts the advanced micro control unit, it receives standard
DMX-512/1024 digital control signal that is widely used in the international and transformes
it into SPI signal to drive LED, it supports 11 kinds of different model of lights, at the
same time the port of DMX signal has lightning protection measures; you could connect the
DMX decoder with DMX digital console to achieve dimming or various changes in procedures.
Not connected with DMX console, you can choose select the built-in 35 kinds of default patterns
through the modle button, the default points is 341(1024/3),Through the setting -ligth
configuration-light piexl,set up light piexl qty.
2.Technical Parameters
2.1 Working temperature:-20-60℃
2.2 Input voltage:DC 12V±2V
2.3 Working electricity:≤60mA
2.4 Output: SPI (DATA、CLK)
2.5 External dimension:L151*W78*H27(mm)
2.6 Packing size:L200*W175*H40(mm)
3.Controller External Dimension
4.Interface Specification
Interface of DMX signal adopts the 3PIN green terminal interface,wiring is as follows:

DMX-SPI Decoder Product Specifications Page 3of 14
4.1 USB Micro interface: Download update procedure
4.2 DMX IN:Input interface of DMX signal, connected with ground、D- connected with negative
of signal, Should be connected with positive of signal。
4.3 POWER: Input interface of power
4.4 SPI OUT: Output interface of SPI signal, GND connected with negative,DATA connected
with data interface of light, CLK connected with clock interface of light.
5. Button Instruction
5.1 "mode" button to select options, under the home page can be used to enter
the Settings menu
5.2 Back button to return to the higher level menu
5.3 "Up" button to select the project and adjust the Numbers.
Up
Back
Mode
Down

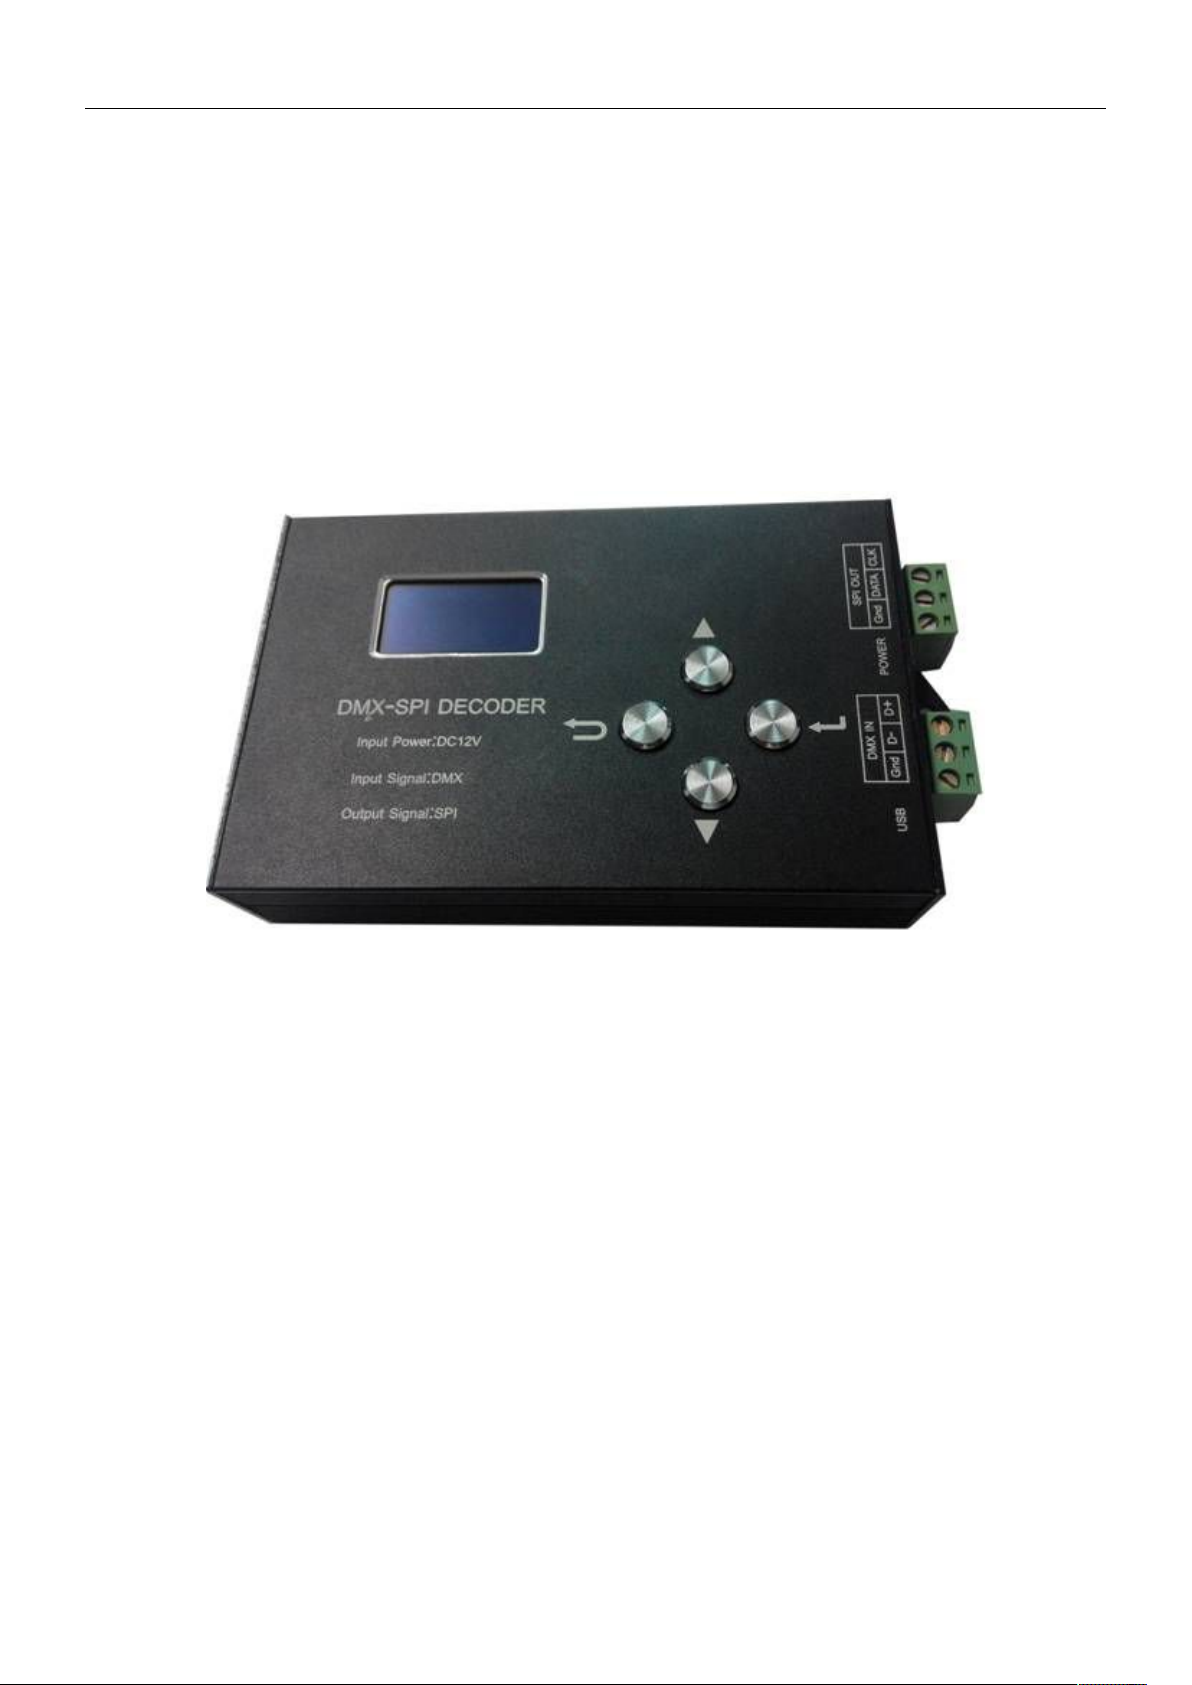
DMX-SPI Decoder Product Specifications Page 4of 14
5.4 "Down" button to select the project and adjust the Numbers
6.Screen display instruction
Main screen
picture 1
When open the default display the main screen, the first line shows the product name.The
second line shows the signal state, when there is no connected with DMX controller, showed
no signal, displays connected with the signal.The third line display mode, display the current
use of effects, there is no DMX controller, defaults to using the built-in effects.The fourth
line shows light chips, display the current configuration of drive IC chip, light chip can
be modified in the light configuration menu , this product can support 11 kinds of light
chip
Menu screen
picture 2
In the main screen press the mode button to enter the menu screen, the first line, can
be set play and speed.The second line Settings, set light chip, color sequence, light pixels,
set the DMX start address and number of channels, DMX Settings restore the default , language,
etc.The third line is about introduction of product information
6.1model effect instruction
when there is no connected with DMX controller,you can have built-in 35 kinds of default
patterns to select.To choose model 35 in the default state ,can be set to change, such
as "mode effect - static red"
6.1.1 In the main screen press "confirm button" into the menu screen Settings, press
up, down key to move the cursor to select "mode effect"
press "confirm button" to enter the menu Settings, as the following .To
select”mode effect” by upper and lower key button, such as "autoplay" click
"confirm" button to save, and enter the model speed setting (no model speed without
setting)
Menu screen
DMX-SPI
state of signal: no signal
mode: Automatically play 8~34
chip:WS2812B
model effect
set up
about

DMX-SPI Decoder Product Specifications Page 5of 14
mode effect all the mode effect
picture 3
6.1.2 After setted up mode effect,press confirm button ,then enter the model that choosed
speed setting screen,as the following
mode effect
set up
about
1 static red
2: static green
3 :
-----------------------
4:(8~34 ) Automatically
play
1:static red
19:Green trail forward direction
2:static green
20: Green trail backward direction
3:Static blue
21:Blue trail forward direction
4:Static yellow
22:Blue trail backward direction
5:Static purple
23:Seven-color running trail backward direction
6:Static cyan
24:Seven-color running trail forward direction
7:Static white
25:Change color purple-red-purple forward directi
on
8:Red horse race to right
26:Change color yellow-green-yellow forward
direction
9:Green horse race to right
27:Change color cyan-green-cyan forward direction
10:Bule horse race to right
28:Change color purple-blue-purple forward
direction
11:Three base color stroboflash
29:Change color cyan-blue-cyan forward direction
12:Seven-color stroboflash
30:Change color white-red-white forward direction
13:Three base color jumpy change
31:Change color yellow-red-yellow forward directi
on
14:Seven-color jumpy change
32:Change color red-yellow-red
15:Three mixing color three color wave by
wave running forward direction
33:Change color green-cyan-green
16:Seven-color wave forward direction
34:Change color blue-purple-blue
17:Red trail forward direction
35:Automatically play 8~34
18:Red trail backward direction

DMX-SPI Decoder Product Specifications Page 6of 14
picture 4
6.1.3 Press the up, down key
set mode speed, long hold up or down
keys to accelerate the
count, after speed set up ,you
press "confirm button" to save, to complete pattern effects Settings, press the
back key to exit and return the up higher level menu (picture 2).
Note: mode speed setting are independent&cyde for all patterns, ;Each mode can be
adjust the speed of need, if set selection mode no need setting speed can directly
press the back key to save the current mode and play.
6.2 Setting menu instruction
6.2.1 In the menu screen (picture 2), press up, down key to move the cursor to
select “setting”,then press“confirmbutton”enter this menu setting,as foll
owing
设置画面
picture 5
6.2.1.1 Press up, down key to move the cursor to select”ligth configuration”
then press“confirmbutton”enter this menu setting,as following
Use up,down key to select “chip select”,after ok you press "confirm button"
to save and press the back key to exit and return up higher level menu .
ligth configuration screen
设 置 速 度
setting speed
speed:xxx
ligth configuration
DMX configuration
backlighting time
language

DMX-SPI Decoder Product Specifications Page 7of 14
Select chip select all the mode
picture 6
6.2.1.2 In ligth configuration screen,press up, down key to move the cursor to
select”color order”,then press“confirmbutton”enter this menu setting,as
following.
Use up,down key to select “color order”,after ok you press "confirm button"
to save and press the back key to exit and return up higher level menu .
chip select
color order
light piexl
1:LPD6803
N:------------------------
---
N:------------------------
----
10:P9813
1:LPD6803
2:TM1803
3:TM1809
4:TM1812
5:UCS1903
6:WS2811
7:WS2801
8:TLS3001
9:TLS3008
10:P9813
11:WS2812B

DMX-SPI Decoder Product Specifications Page 8of 14
灯条配置页面
颜色顺序选择 颜色顺序全部选项
picture 7
6.2.1.3 In ligth configuration screen,press up, down key to move the cursor to
select “light piexl’’,then press“confirmbutton”enter this menu
setting,as following.
ligth configuration screen
Picture 8
6.2.1.4 Press the up, down key set adding or reduceing, long hold up or down keys to accelerate
the count, after setted up ,you press "confirm button" to save, press the back key
to exit and return the up higher level menu .
Note:The factory default pixel341(1024/3) pcs,Such as using the 100 RGB lamp bead
for light set 100, also can use the default of 341.If using the light is made up
of 341 RGB lamp bead, play only about 100 light bead, set up 100 pixels, 241 is at
the back of the lamp will not play, but it can light, only close power to restart
the SPI decoder, behind the 241 light bead is not on,in front of 100 lights play
as setting up .
6.2.2 DMX setting (Have a DMX signal to take effect)
6.2.2.1 In the setting menu screen (picture 5), press up, down key to move the
cursor to select “DMX configuration ”,then press“confirmbutton”enter this
menu setting,as following
芯片选择
颜色顺序
灯条像素
1.RGB
------------
---------------
BGR
1.RGB
2.RBG
3.GRB
4.GBR
5.BRG
6.BGR
light piexl
piel qty:XXX

DMX-SPI Decoder Product Specifications Page 9of 14
DMX configuration screen
Picture 9
6.2.2.2 In DMX configuration screen,press up,down keys to select “DMX starting
address”,then press “confirm button”to start address setting.
Picture 10
6.2.2.3 Press the up, down key set adding or reduceing address,long hold up or down
keys to accelerate the count, after setted up ,you press "confirm button" to
save, press the back key to exit and return the up higher level menu .
6.2.2.4 After Setted the start address, decoder will start from the address to send
data to the light, for example, DMX start address is 1, after receiving the
data the decoder from the first start sending to the light.
6.2.2.5 In DMX configuration screen,press up,down keys to select “DMX channels
qty”,then press “confirm button”to start channels qty setting.
Picture 11
6.2.2.6 Press the up, down key set adding or reduceing channels,long hold up or down
keys to accelerate the count, after setted up ,you press "confirm button" to
save, press the back key to exit and return the up higher level menu .
6.2.2.7 After setted Channel qty, decoder will start from the begining address to send
data to light with the channel qty .For example, DMX start address is 1, channel
600, after receiving the data decoder from the first start sending data and
end of the 600 .
Note: the factory default DMX channel qty 1024, after the start address
Settings without setting channel qty, channel qty as the default of 1024,
There are two kinds DMX communication protocol, 512 and 1024.The user can set
DMX starting address
DMX channels qty
DMX configuration to the
default
DMX start address set
ting
current address:XXXX
DMX channels qty
current channels qty
:XXXX

DMX-SPI Decoder Product Specifications Page 10 of 14
according to the configurations of DMX controller.If you want to use two
decoders in the same DMX channels, can install according to the requirements
set parameters.
For example: in the controller, DMX - 1024 with SPI decoder A and B, use a
DMX channels, SPI decoder A need 256 channels, B need 768 channels, A start
address is set to 1, channel qty set 256, B start address is set to 257, channel
number is set to 768, so it can use a DMX controller with 1024 the number of
channels drives the two decoders.General it no need to modify the parameters,
because a DMX - 1024 with a decoder.
6.2.2.8 When the user Settings DMX starting address or channel , it is wrong,can restore
DMX factory defaults.In the DMX configuration screen, press the up, down keys
to select "DMX factory defaults" .Press "confirm button", the screen will
display successful, the following
Picture 12
6.2.3 Backlighting time setting instruction
6.2.3.1 Product support backlight extinguishing time adjustment, the default is 3
minutes, can through this setting to change .
6.2.3.2 In the setting menu screen (picture 5), press up, down key to move the
cursor to select “Backlighting time”,then press“confirmbutton”enter this
menu setting,as following .
Press up ,down key to select right time ,then press “confirmbutton”to save
and exit.
Setting Screen
Successful

DMX-SPI Decoder Product Specifications Page 11 of 14
Select backlight time All the mode
Picture13
6.2.4 Language setting instruction
6.2.4.1 This product support simplified Chinese and English two languages, the default
is using simplified Chinese, can be used by language Settings to change the
language.
6.2.4.2 In the setting menu screen (picture 5), press up, down key to move the
cursor to select “language”,then press“confirmbutton”enter this menu
setting,as following
Through up,down key to select language , press "confirm button" to save, press
the back key to exit and return the up higher level menu .
Setting screen
Ligth configuration
DMX configuration
Backlighting time
Language
15S
30S
----------
For ever
15S
30S
1 Minute
3 Minute
5 Minute
10 Minute
For ever

DMX-SPI Decoder Product Specifications Page 12 of 14
language screen
Picture 14
6.3 About menu instruction
In the menu screen instruction,press up,down key to select “about”then
press”confirm button”,Enter the information about the product related
introduction.the following.
Picture 15
6.4 Upgrade instructions
DMX200 support USB cable for internal application update, using of mobile phone micro
USB cable.When upgrading, please ready cable and upgrade file, and then connect the cable
to the computer, press the DMX200 “confirm key”, connect the cable to DMX200, at that time
PC can display mobile disk, so can loosen the confirm key.Open the disk management (my
computer/computer), double-click to open the removable disk, the upgrade file is copied into,
after the completion, the pop-up USB devices, restart it
7.Typical Application: (voltage of strip is the same with external voltage )
7.1 With DMX communication, the light signal is single,only DATA light signal ,use wire
to connect.
DMX configuration
Ligth configuration
Backlighting time
Language
simplified Chinese
English
version:Beta 1.0

DMX-SPI Decoder Product Specifications Page 13 of 14
7.2 With DMX communication, the light signal is double,only DATA light signal and CLK
signal,use wire to connect.
7.3 Without DMX communication, the light signal is single,only DATA light signal ,use wire
to connect.

DMX-SPI Decoder Product Specifications Page 14 of 14
7.4 Without DMX communication, the light signal is double,only DATA light signal and CLK
signal,use wire to connect.
Table of contents
Other SuperLightingLED Media Converter manuals
Popular Media Converter manuals by other brands

Rockwell Automation
Rockwell Automation Allen-Bradley Guardmaster CIP user manual

Behringer
Behringer ULTRAGAIN PRO-8 DIGITAL ADA8000 Technical specifications

Carrier
Carrier UPC Open Installation and Integration Guide

Edision
Edision nano T265+ user guide

Bicker Elektronik
Bicker Elektronik DC1224 operating instructions

DTL Broadcast
DTL Broadcast MiniBlox 4261D 3G-HD-SD user guide