Sur la table SLT-1802 User manual

BEFORE USE, PLEASE READ AND FOLLOW ALL IMPORTANT
SAFEGUARDS, WARNINGS, CAUTIONS AND OPERATING INSTRUCTIONS.
OWNERS MANUAL
Scan here for bonus recipes and to watch how-to
videos that will help you make the most of your air fryer,
or go to www.monchateau.us/sltappliances
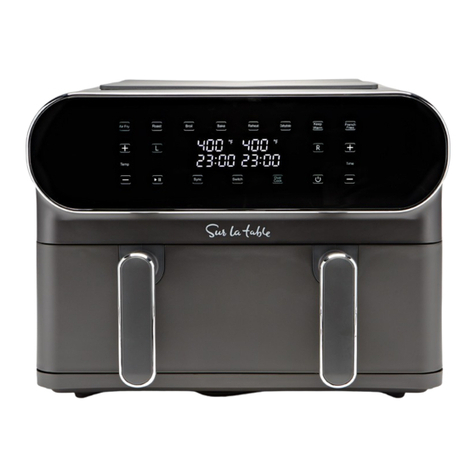
DUAL BASKET
AIR FRYER
8 QUART / 7.57 LITER

Congratulations!Congratulations! You now own an
incredibly versatile, convenient and
powerful countertop cooker.
Our air fryer with accessories gives
everyone a healthier, faster and
easier way to enjoy the foods they love.
To get the most out of your air fryer,
please read through this owner’s manual.
Enjoy!Enjoy!
2 3

AIR FRYER
ALL ACCESSORIES ARE DISHWASHER SAFE
7
1
in
DUAL BASKET
AIR FRYER
LEFT
BASKET
(2) NON-STICK
CRISPER
TRAYS
RIGHT
BASKET
B
C
D
A
WHAT’S IN THE BOX
DUAL HEATING
ZONES
54

WHEN USING ELECTRICAL APPLIANCES, BASIC SAFETY PRECAUTIONS SHOULD ALWAYS BE
FOLLOWED, INCLUDING THE FOLLOWING:
1. READ ALL INSTRUCTIONS.
2. Do not touch hot surfaces. Use handles or knobs. Use oven mitts or potholders.
3. To protect against electric shock do not immerse cord, plugs, or appliance in water or
other liquid.
4. This appliance may be used and cleaned by children age 8 and older or by persons with
reduced physical, sensory or mental capabilities, or lack of experience and knowledge,
ONLY IF they have been given supervision or instruction concerning use of the appliance
by a person responsible for their safety.
5. Children should be supervised to ensure that they do not play with the appliance.
6. Unplug from outlet when not in use and before cleaning. Allow to cool before putting on
or taking off parts, and before cleaning the appliance.
7. Do not operate any appliance with a damaged cord or plug, or after the appliance
malfunctions, or has been damaged in any manner. Bring it to a qualified technician for
examination, repair or electrical or mechanical adjustment.
NOTE: DO NOT ATTEMPT TO REPAIR THE UNIT YOURSELF. THIS WILL VOID THE
WARRANTY.
8. The use of accessory attachments not recommended by the appliance manufacturer
may cause injuries.
9. Do not use outdoors.
10. Do not let cord hang over edge of table or counter, or touch hot surfaces.
11. Do not place on or near a hot gas or electric burner, or in a heated oven.
12. Extreme caution must be used when moving an appliance containing hot oil or other
hot liquids.
13. To disconnect, press and pull any active fryer basket(s) out of the Air Fryer body. Remove
plug from wall outlet.
14. Do not use appliance for other than intended use.
15. When using the crisper tray(s), make sure they are properly inserted into each air fryer
basket before cooking. Make sure the crisper tray is in place before adding food to be air
fried.
16. Always make sure any active fryer basket is fully inserted and locked into the front of the
Air Fryer before operation.
WARNING: Air Fryer will not operate unless the active fryer baskets are fully closed
CAUTION: After hot air frying, roasting, broiling, baking, or reheating, the fryer baskets,
crisper trays (if used) and the cooked foods are hot. Extreme caution must be used when
handling the hot Air Fryer baskets and crisper trays.
IMPORTANT SAFEGUARDS
FOR HOUSEHOLD USE ONLY
SAVE THESE INSTRUCTIONS
76

ADDITIONAL IMPORTANT
SAFEGUARDS
CAUTION HOT SURFACES: This appliance generates heat and may release steam
during use. Proper precautions must be taken to prevent the risk of burns, fires, or
other injury to persons or damage to property.
CAUTION: This appliance is hot during operation and retains heat for some time
after turning OFF. Always use oven mitts when handling hot materials and allow
metal parts to cool before cleaning. Do not place anything on top of the appliance
while it is operating or while it is hot.
1. All users of this appliance must read and understand this instruction manual before
operating or cleaning this appliance.
2. The cord to this appliance should be plugged into a 120V AC electrical outlet only.
3. If this appliance begins to malfunction during use, press and pull any active fryer
basket(s) out of the body. Remove plug from wall outlet. Do not use or attempt to repair
the malfunctioning appliance. Contact Consumer Service.
4. Do not immerse power cord in any liquid. If the power cord to this appliance is
damaged, it must be replaced.
5. Keep the cord out of reach from children and infants to avoid the risk of electric shock
and choking.
6. Place the Dual Basket Air Fryer on a stable, heat-resistant work area.
7. Do not obstruct the air outlet or air inlets on the back and sides of the Air Fryer, with any
objects. Avoid escaping steam from the air outlet during air frying.
8. Keep appliance at least 4 inches away from walls or other objects during operation.
9. Always use each fryer basket handle to remove each fryer basket.
WARNING: Under- or over-filling the fryer basket may damage the Air Fryer and could
result in serious personal injury.
10. Never move a hot Air Fryer or an Air Fryer containing hot food.
11. Allow to cool before moving.
WARNING! This Air Fryer should not be used to boil water.
WARNING! This Air Fryer should never be used to deep fry foods.
Plug and Cord
This appliance has a polarized plug (one blade is wider than the other). To reduce the risk of
electric shock, this plug will fit in a polarized outlet only one way. If the plug does not fit fully
into the outlet, reverse the plug. If it still does not fit, contact a qualified electrician. Do not
modify the plug in any way.
Only the included cord should be used.
Plasticizer Warning
CAUTION: To prevent Plasticizers from migrating from the finish of the counter top or table
top or other furniture, place NON-PLASTIC coasters or place mats between the appliance
and the finish of the counter top or table top. Failure to do so may cause the finish to
darken; permanent blemishes may occur or stains can appear.
Electric Power
If the electrical circuit is overloaded with other appliances, your appliance may not operate
properly. It should be operated on a separate electrical circuit from other appliances.
98

GETTING TO KNOW YOUR
8-QT DUAL BASKET AIR FRYER
1 Dual Touchscreen Control
2Removable Air Fryer Baskets with Child Safety Buttons
2 (4.0 Qt. each) removable air fryer baskets with handles L (Left) and R (Right).
3Power Cord with Polarized Plug (not shown)
4Non-Skid Feet (not shown)
52 Non-Stick Crisper Trays with Handles
Product may vary slightly from illustration.
1
2
3
4
DUAL TOUCHSCREEN CONTROL
1 Dual Digital TIME/
TEMP Display
2Air Fry
3Roast
4Broil
5Bake
6Reheat
7Dehydrate
8Keep Warm
9French Fries
10 Temp
11 Time
12 Left/Right Basket
Control
13 Start/Pause
14 Sync Finish
15 Shake Food
16 Dual Cook
17 On/Off
10 Temp ( or ) / 11 Time ( or )
• Press or on the left side of the control panel to increase or reduce TEMP in 5
degree increments.
• Press or on the right side of the control panel to increase or decrease TIME in
1 minute increments.
NOTE: When using DEHYDRATE, TIME will increase or decrease in 1 hour increments.
NOTE: LEFT or RIGHT basket TIME and/or TEMP may be programmed independently,
at any time before or during operation. Press the LEFT or RIGHT button. When LEFT or
RIGHT begins to flash, programming can be adjusted.
12 Left/Right Basket Control ( or )
• When the pulsing is pressed, a tone will sound, you can select to use the left or
right basket independently, or dual cook to use both at the same time.
• Press the or button to program the Left or Right basket. While Left or Right
flashes, press any MENU button to continue.
NOTE: LEFT or RIGHT baskets may be programmed independently, at any time before or
during operation.
12 3 4 5 6 7 8 9
5
10 12 12 1113 14 15 16 17
1110

• The or button will illuminate steadily on the screen when active. To adjust
or add programming at any time, press the appropriate or basket control
button. When the button begins to flash, TEMP/TIME can be adjusted.
13 Start/Pause
• Once programming is complete, press to START the cooking process or to PAUSE
any operation.
14 Sync Finish
• Both LEFT and RIGHT baskets must first be programmed.
• Press to ensure both baskets will complete cooking together. Then press to
begin operation.
• Cooking time will appear on L and R sides and the countdown will begin on the side
with more time. When the remaining time on L and R sides is even, the countdown will
proceed on both sides.
NOTE: Once cooking has started, SYNC function will not be operable.
15 Shake Food
• For all menu selections except BROIL, REHEAT and DEHYDRATE, 5 tones will sound at 2/3
of the cook time to remind you to shake the basket.
• Press to turn this feature OFF. SHAKE will disappear from the screen.
NOTE: Shake will not work if cooking time is below 3 minutes.
16 Dual Cook
• Press to effortlessly duplicate settings for both LEFT and RIGHT Air Fryer baskets
or select Dual Cook to program LEFT and RIGHT basket at the same time. After pressing
, you can simply adjust the temperature and time for both baskets at the
same time.
17 On/Off
• When the Air Fryer is plugged in, a tone will sound, the control panel will illuminate, then
disappear. The button will light up, indicating that the unit is powered on.
• When is pressed again, a tone will sound and the and all the buttons will light up.
• When in operation, press to turn both LEFT and RIGHT basket controls OFF.
Remove all packing material and labels from
the inside and outside of the Air Fryer. Check
that there is no packaging underneath and
around each of the fryer baskets and crisper
trays.
1. Your Dual Basket Air Fryer is shipped with
the 2 crisper trays locked into each fryer
basket inside the Air Fryer body.
2. Firmly grasp each fryer basket handle, to
pull fryer baskets out of the main body.
3. Grasp each crisper tray handle and lift to
remove from each basket. (Figure 1)
4. Wash both fryer baskets and crisper trays in hot, soapy water.
5. DO NOT IMMERSE THE AIR FRYER BODY IN WATER. Wipe Air Fryer body with a damp cloth.
Dry all parts thoroughly.
6. Replace crisper trays into each fryer basket. With the handle facing up, insert each tray
so that the rubber corners fit and lock comfortably into each basket.
7. Due to base unit’s gracious front curve, the air fryer baskets must be inserted into the
proper sides. The tops of the drawers are labeled L (LEFT) and R (RIGHT). Slide the LEFT
air fryer basket/crisper tray into the left side of the Air Fryer body. Slide the RIGHT air fryer
basket/crisper tray into the right side of the body. Before use make sure each basket is
fully inserted and locked into place. (Figure 1)
Note: During first use, the Dual Air Fryer may emit a slight odor. This is normal and will
not affect flavor.
IMPORTANT! The maximum food capacity recommended for each Air Fryer basket is 4.0
quarts or 3.75 lbs. of food per basket. Using both baskets will enable you to feed up to 9
people.
WARNING! This Dual Basket Air Fryer should not be used to boil water.
WARNING! This Dual Basket Air Fryer should never be used to deep fry foods.
1. Place the Dual Basket Air Fryer on a flat, stable, heat-resistant work area, close to an
electrical outlet.
DUAL TOUCHSCREEN CONTROL
(CONTINUED)
BEFORE USING
FOR THE FIRST TIME
OPERATING INSTRUCTIONS
Figure 1
1312

OPERATING INSTRUCTIONS
(CONTINUED)
LET’S START COOKING
SINGLE BASKET MANUAL OPERATION
8 MENU SELECTIONS CHART
FOR PRE-PROGRAMMED COOKING
2. Insert crisper tray(s). See “Before Using for the First Time” for a detailed description.
3. Place food into either of both fryer baskets. Do not overfill. To ensure proper cooking
and air circulation, NEVER fill any fryer basket more than 2/3 full. When air frying fresh
vegetables, we do not recommend adding more than 2 to 3 cups of food to the
fryer basket.
Note: Up to 6 cups of ingredients may be dehydrated as food will shrink to a fraction
of its original volume. Place a single layer of ingredients into the empty air fryer basket.
Create a second layer by placing the crisper tray into the basket over the ingredients.
Add food on top of the crisper tray.
4. Insert the assembled fryer basket(s) into the front of the Dual Basket Air Fryer.
Always make sure fryer basket(s) are in their proper LEFT/RIGHT position and they
are fully closed.
MENU DEFAULT
TEMP DEFAULT
TIME
DUAL
COOK
TIME
TEMP
RANGE
(°F) TIME
RANGE SHAKE
FOOD
Air Fryer 400°F 20 mins 23 mins 170~400 1-60 mins 2/3 time/ 1x
Roast 400°F 35 mins 37 mins 350~400 1-60 mins 2/3 time/ 1x
Broil 400°F 10 mins 13 mins 400 1-30 mins Not recommended
Bake 350°F 16 mins 19 mins 170~400 1-60 mins 2/3 time/ 1x
Reheat 250°F 6 mins 9 mins 170~400 1-60 mins Not recommended
Keep Warm 170°F 60 mins 60 mins 150~200 1-60 mins Not recommended
French Fries 400°F 18 mins 21 mins 170~400 1-60 mins 2/3 time/ 1x
Dehydrate 130°F 8 hours 8 hours 90~170 1 hr-24 hrs Not recommended
1. Plug cord in the wall outlet. An audible tone will sound, the control panel will illuminate.
The button will light up white.
2. When the is pressed, a tone will sound and the control panel will illuminate (Figure
2).
3. Select , , or . Press the desired MENU button. A tone will sound. The LEFT
or RIGHT basket control and both the default TEMP (in large numerals) and default
TIME (smaller numerals) will flash on the display and alternate between time and
temperature. (Figures 3 A, 3 B, and 3 C)
1. For single basket cooking, press the
MENU button then press to START
the cooking process. (Figure 4)
2. For dual basket cooking, press the
other basket control. (Figure 5) MENU
selections will appear.
3. Press the desired MENU button for
RIGHT basket cooking.
Figure 2
Figure 3 B
Figure 3 A
Figure 3 C
Figure 4
Figure 5
1514

SINGLE BASKET MANUAL OPERATION
(CONTINUED)
4. Press to START the cooking process.
5. When the selected LEFT basket control begins to flash, press any MENU button + to
continue. (Figure 3)
6. When both the TEMP and TIME light up, press TEMP or to increase or reduce
TEMP in 5 degree increments.
Note: Press and hold the TEMP button to fast advance.
7. Press TIME or to increase or decrease TIME in 1 minute increments.
Note: Press and hold the TIME button to fast advance.
Note: In the dehydrate setting, time is adjusted in 1 hour increments.
8. When the desired TIME and TEMP appear on the digital display, press to turn the
Dual Basket Air Fryer ON. The target TIME will begin to count down. TEMP and remaining
TIME will appear on the digital display. (Figure 4)
Note: To pause air frying immediately, push the basket release button and pull the
active fryer basket out of the body at any time. When the basket is replaced, cooking
will resume.
Note: Press to PAUSE the cooking process at any time. When is pressed
again, cooking will resume.
9. When the remaining Time reaches 00:00, the display will show a countdown of 20
seconds and the machine will beep 5 times and turn off when it is safe to remove food.
Note: The quantity, density, weight of food will alter the total cooking time necessary.
Remember, frying smaller batches will result in shorter cooking times and higher food
quality.
IMPORTANT: Always check food halfway through cooking time to determine final cook
TIME and TEMP.
10. To adjust the air frying TEMP or TIME during operation, use the TEMP or TIME or
to increase or decrease TEMP or TIME as you cook.
1. Program the Air Fryer LEFT basket following Single Basket: Manual Operation Steps 5
through 10.
2. Press the RIGHT basket control (Figure 6). The menu will appear.
3. Press the desired MENU button for RIGHT basket cooking. Adjust TEMP or TIME as
needed.
4. Press to begin operation. (Figure 7)
Sync Finish
1. Program the Dual Air Fryer LEFT and RIGHT baskets following Dual Basket: Manual
Operation Steps 1 through 3.
IMPORTANT: Both LEFT and RIGHT baskets must first be programmed.
2. Press to ensure both baskets will complete cooking together. Then press to
begin operation.
3. Cooking time will appear on L and R sides and the countdown will begin on the side
with more time. When the remaining time on L and R sides is even, the countdown will
proceed on both sides.
NOTE: Once cooking has started, SYNC function will not be operable.
Dual Cook
1. Press . Settings for both Air Fryer baskets will be automatically duplicated.
(Figure 9)
2. Press to begin operation.
DUAL BASKET MANUAL OPERATION
Figure 7 Figure 8
Figure 9
Figure 6
1716

AIR FRY TECHNIQUE
AIR FRYING PRE-PACKAGED FROZEN FOODS
HINTS FOR ROAST
Please consult the Air Fry / Roast Cooking Chart and/or follow package directions
for suggested TIME and TEMP.
1. Always pat food dry before cooking to encourage browning and avoid excess smoke.
2. To assure even cooking/browning, ALWAYS open the active basket halfway through the
cook time and check, turn or shake foods in the fryer basket. Some recipes may call to
brush or spray oil halfway through cooking. Adjust TEMP or TIME if needed.
WARNING: Extreme caution must be used when handling any hot fryer basket or crisper
tray. Avoid escaping steam from the fryer basket and the food.
CAUTION: Always use oven mitts when handling the hot air fryer basket.
CAUTION: Hot oil can collect at the base of the basket. Use caution when removing
cooking foods.
3. To avoid excess smoke, when cooking naturally high fat foods, such as bacon, chicken
wings or sausages, it may be necessary to empty fat from the fryer basket between
batches.
4. To ensure crispiness, make sure the skin or exterior surface of your food is dry! Air fry
small batches of freshly breaded foods. Create more surface area by cutting food into
smaller pieces. Press breading onto food to help it adhere. Refrigerate breaded foods for
at least 30 minutes before frying.
5. To improve crispiness, dust poultry skin or exterior surface lightly with corn starch. Spray
with oil.
6. Arrange breaded food in fryer basket so that food is not touching to allow air flow on all
surfaces.
7. Spray oils work best. Oil is distributed evenly and less oil is needed. Canola, olive,
avocado, coconut, grapeseed, peanut, or vegetable oil work well.
8. Shake air fried foods out onto serving area. Promptly insert any fryer basket into Air Fryer
body and lock into place. Continue air frying subsequent batches, if any.
9. Press REHEAT to air fry food for 6 minutes at 250ºF. Simply pull out the active basket to
interrupt air frying at any time to check on food serving temperature. Repeat to extend
cook time until food is heated to your liking.
10. Unplug the Dual Basket Air Fryer when not in use.
• As a rule, depending on the food and amount to be cooked, suggested cook posted
cook TIMES may have to be reduced slightly. Always check food halfway through
cooking time to determine final cook TIME and TEMP.
• Always check cooking progress after TIME has expired.
IMPORTANT! Consult the USDA Cooking Guidelines section of this instruction
manual before cooking begins. Always test meat using an accurate cooking
thermometer.
• A meat thermometer inserted into the center of the meat should always be used to
ensure desired doneness.
• Cook meats to 5 to 10 degrees below desired doneness (internal temperature). Allow
meat to stand 15 to 20 minutes before serving. The temperature will continue to rise
while standing.
• ROAST large, tender cuts of meat and poultry. Seasoning prior to cooking adds to the
flavor and the aroma during cooking.
• A layer of fat on the top of the roast promotes better browning and provides natural
basting.
• To speed up browning, brush lean cuts of meat, chicken and fish with oil, margarine or
melted butter.
• Place meat (fat side up) and turn over half-way through ROAST time.
IMPORTANT: Turn and check food halfway through ROAST time.
• Press to turn this feature OFF. SHAKE will disappear from the screen.
HINTS FOR BROIL
• Use BROIL to melt cheese or to brown crumb toppings.
• Typically, BROIL is used for thinner, tender cuts of meats, or marinated meats, chops,
poultry or fish, fruits and vegetables
• Dry marinated meats and fish before broiling. ALWAYS pat meat dry to reduce smoke
and promote brownness during broiling.
• To speed up browning and add lusciousness, brush lean cuts of meat, chicken and fish
with oil or melted butter.
• Trim excess fat from meat and score edges to prevent curling.
• Thaw frozen meats and fish before broiling.
• BROIL TIME is determined by the desired doneness Always use a meat thermometer.
•
HINTS FOR BAKE
• When using BAKE, you may need to lower the bake recipe temperature by 50°F to a
minimum of 300°F.
• Check package directions to determine if the container is suitable for use in an Air Fryer.
• Press to turn this feature OFF. SHAKE will disappear from the screen.
1918
HINTS FOR DEHYDRATE
NOTE: When manually programming DEHYDRATE menu selection, TIME will increase or
decrease in 1 hour increments.
• Dehydrate fresh, ripe foods to preserve nutrients and enhance flavor.
• Your Dual Basket Air Fryer’s automated drying makes home dehydration both simple
and rewarding and ensures healthy, safe, preservative-free results.
• DEHYDRATE combines low, steady heat with steady convection fan power.
• Precise low temperatures dry out foods evenly without cooking or overheating.
NOTE: Turn food several times during DEHYDRATE .
FRUIT / VEGETABLES
• Wash all fruit skins well.
• Slice fruit into 1/4 inch thick slices and arrange with space between each slice to ensure
even drying.
• Rotate foods halfway through DEHYDRATE time for even drying.
USDA COOKING GUIDELINES
• The USDA recommends that meats such as beef and lamb, etc. should be cooked to an
internal temperature of 145ºF/63ºC. Pork should be cooked to an internal temperature of
160ºF/71ºC and poultry products should be cooked to an internal temperature of 165ºF/74ºC
to be sure any harmful bacteria has been killed. When reheating meat/poultry products, they
should also be cooked to an internal temperature of 165ºF/74ºC.
USER MAINTENANCE INSTRUCTIONS
• This appliance requires little maintenance. It contains no user-serviceable parts.
Any servicing requiring disassembly other than cleaning must be performed by a
qualied appliance repair technician.
CARE & CLEANING INSTRUCTIONS
WARNING! Allow the Dual Basket Air Fryer to cool fully before cleaning.
1. Unplug the Dual Basket Air Fryer. Remove fryer baskets from the Air Fryer body. Make
sure both fryer baskets and crisper trays have cooled completely before cleaning.
2. Wash both fryer baskets and crisper trays in hot soapy water. Do not use metal kitchen
utensils or abrasive cleansers or cleaning products as this may damage the
non-stick coating.
3. Both fryer baskets and crisper trays are dishwasher-safe. For best results, place in the
top rack
4. Wipe the Dual Basket Air Fryer body with a soft, non-abrasive damp cloth to clean.
STORING INSTRUCTIONS
1. Make sure the Dual Basket Air Fryer is unplugged and all parts are clean and dry
before storing.
2. Never store the Dual Basket Air Fryer while it is hot or wet.
3. Insert each clean crisper tray into each fryer basket and store inside the Dual Basket
Air Fryer body.
4. Store Dual Basket Air Fryer in its box or in a clean, dry place.
2120

Customer Service:
(877) 246-0990
MODEL: SLT-1802
DUAL BASKET
AIR FRYER
8 QUART / 7.57 LITER
Servicio al consumidor:
(877)246-0990
MODELO: SLT-1802
FREIDORA DE AIRE CON
CANASTILLA DOBLE
8 CUARTOS / 7.57 LITROS

CONSEJOS PARA DESHIDRATAR
NOTA: Cuando programe manualmente la opción “DEHYDRATE” (deshidratar) del menú, el TIEMPO
aumentará o disminuirá en incrementos de una hora.
• Deshidrate alimentos maduros y frescos para preservar los nutrientes y resaltar el sabor.
• La función de secado automático de la freidora de aire con canastilla doble hace que proceso de
deshidratación en casa sea simple y beneficioso, y le garantiza alimentos saludables, seguros y libres de
conservantes.
• La función “DEHYDRATE”(deshidratar) combina calor bajo y permanente con el poder de convección
constante del ventilador.
• El uso de temperaturas bajas precisas, secan los alimentos de manera homogénea sin cocinarlos
ni sobrecalentarlos.
NOTA: Gire los alimentos varias veces durante el proceso de deshidratación.
FRUTAS/VERDURAS
• Lave bien la cáscara de las frutas
• Rebane la fruta en rodajas gruesas de 1/4”(0.60cm) y colóquelas separadas entre sí para asegurar
un secado uniforme.
• Gire los alimentos a mitad del tiempo de deshidratado para lograr un secado uniforme.
INSTRUCCIONES DE MANTENIMIENTO PARA EL USUARIO
• Este aparato requiere de bajo mantenimiento. No contiene piezas que el usuario pueda reparar.
Cualquier reparación que requiera desarmar el aparato más allá de la limpieza debe realizarla un técnico
especializado en reparación de electrodomésticos.
INSTRUCCIONES DE CUIDADO Y LIMPIEZA
¡ADVERTENCIA! Deje que la freidora de aire con canastilla doble se enfríe por completo antes de limpiarla.
1. Desenchufe la freidora de aire. Retire las canastillas de la estructura principal de la freidora. Asegúrese de que
las canastillas y las bandejas se hayan enfriado por completo antes de limpiarlas.
2. Lave las canastillas y las bandejas con agua caliente y agua jabonosa. No use utensilios de metal o
detergentes y productos de limpieza abrasivos que puedan dañar la capa antiadherente.
3. Las canastillas y las bandejas son aptas para el lavaplatos. Para mejores resultados, colóquelas en la rejilla
superior del lavaplatos.
4. Limpie la estructura principal de la freidora con un paño húmedo, suave y no abrasivo.
INSTRUCCIONES DE ALMACENAMIENTO
1. Asegúrese de que la freidora de aire esté desenchufada y que todas las piezas estén limpias y secas antes
de guardarlas.
2. Nunca guarde la freidora de aire si está caliente o húmeda.
3. Introduzca cada bandeja freidora dentro de cada canastilla y colóquelas en la estructura principal
de la freidora de aire.
4. Guarde la freidora de aire en su caja original o en un lugar limpio y seco.
GUÍA DE COCCIÓN DEL DEPARTAMENTO DE
AGRICULTURA DE ESTADOS UNIDOS (USDA)
• El USDA recomienda que las carnes como la vacuna y el cordero, entre otras, debe cocinarse a una
temperatura interna de 145ºF/63ºC. El puerco debe cocinarse a una temperatura interna de 160ºF/71ºC
y las carnes de aves, a 165ºF/74ºC de temperatura interna para asegurar que se haya matado cualquier
bacteria peligrosa. Cuando recaliente carne vacuna o pollo, también debe hacerlo a una temperatura
interna de 165ºF/74ºC.
2120

MÉTODO DE LA FREIDORA DE AIRE
FREÍR CON AIRE ALIMENTOS CONGELADOS
Y PREENVASADOS
CONSEJOS PARA ROSTIZAR
Consulte la tabla de cocción FREÍR CON AIRE/ROSTIZAR y siga las instrucciones en el paquete
sobre las recomendaciones de TIEMPO y TEMPERATURA.
1. Siempre seque los alimentos por fuera para conseguir que se doren y evitar el exceso de humo.
2. Para asegurar que los alimentos se cocinen/ doren de forma pareja, abra SIEMPRE la canastilla en
uso a mitad del tiempo de cocción y controle, gire o sacuda los alimentos. Para algunas recetas es
necesario aplicar aceite con un cepillo o rociador a mitad del tiempo de cocción. Ajuste TEMPERATURA
o TIEMPO en caso de ser necesario.
ADVERTENCIA: Se debe tener mucho cuidado al manipular las canastillas y las bandejas calientes de
la freidora. Evite el vapor que sale de la canastilla freidora y de los alimentos.
PRECAUCIÓN: Use SIEMPRE guantes cuando manipule las canastillas calientes de la freidora.
PRECAUCIÓN: Se puede acumular aceite caliente en la base de la canastilla. Tenga mucho cuidado
cuando retire los alimentos.
3. Para evitar el exceso de humo, cuando cocine alimentos altos en grasas, como el tocino, las alas de
pollo o las salchichas, puede que sea necesario sacar la grasa de la bandeja entre tandas de cocción.
4. Para obtener comidas crocantes, asegúrese de que la piel o la parte externa de los alimentos esté seca.
Los alimentos recientemente empanizados se deben freír en pequeñas tandas. Aproveche la superficie
de cocción cortando los alimentos en pequeños trozos. Presione el pan rallado en los alimentos para
ayudar a que se adhiera. Refrigere los alimentos empanizados por al menos 30minutos antes de freír.
5. Para obtener comidas más crocantes, espolvoree la piel del pollo o la parte exterior de los alimentos
con un poco de almidón de maíz. Rocíe con aceite.
6. Coloque los alimentos empanizados en la canastilla de la freidora de modo que no se toquen entre sí
para permitir que el aire circule en todas las superficies.
7. Se recomienda usar aceites en spray. El aceite se distribuye de forma pareja y se necesita menos
cantidad. Se puede usar aceite de canola, de oliva, de palta, de coco, de semillas de uva, de maní
ovegetal.
8. Sacuda los alimentos después de freírlos y antes de servirlos. De inmediato, introduzca cualquier
canastilla freidora en la estructura principal de la freidora de aire y asegúrela en su lugar. Continúe
friendo con aire otras tandas de alimentos si así lo desea.
9. Presione “REHEAT”(recalentar) para freír los alimentos durante 6minutos a 250ºF (121ºC). Solo tire
de la canastilla en uso para interrumpir el proceso de cocción en cualquier momento y constatar
la temperatura para servir los alimentos. Repita para extender el tiempo de cocción hasta que los
alimentos se encuentren en la temperatura deseada.
10. Desenchufe la freidora de aire con canastilla doble cuando no esté en uso.
• Como regla general, dependiendo de los alimentos y la cantidad, se recomienda reducir un poco
los tiempos de cocción sugeridos. Revise siempre los alimentos a mitad del tiempo de cocción para
determinar el tiempo y la temperatura finales de cocción.
• Revise siempre el proceso de cocción luego de que haya terminado el tiempo.
¡IMPORTANTE! Consulte la sección Guía de cocción del Departamento de Agricultura de Estados
Unidos (USDA, por su sigla en inglés) incluida en este manual antes de comenzar a cocinar.
Controle siempre la carne usando un termómetro de cocina preciso.
• Para asegurar la cocción de su elección, introduzca un termómetro para carnes en el centro del trozo.
• Cocine las carnes entre 5 y 10grados por debajo de la cocción final deseada (temperatura interna).
Deje reposar las carnes entre 15 y 20minutos antes de servir. La temperatura continuará aumentando
en reposo.
• ROSTICE cortes grandes y tiernos de carne vacuna y pollo. Sazonar antes de la cocción le agregará
sabores y aromas durante la cocción.
• Una capa de grasa sobre los alimentos a rostizar ayuda a obtener resultados más crocantes y provee
una cobertura untuosa natural.
• Para que los alimentos se doren más rápido, aplique aceite, margarina o manteca derretida con
uncepillo sobre los cortes más magros de carne vacuna, pollo y pescado.
• Coloque la carne con la grasa hacia arriba y gírela a mitad del tiempo de cocción.
IMPORTANTE: Gire y revise los alimentos a mitad del tiempo de cocción.
• Presione para que esta función quede en “OFF”(apagado). La palabra “SHAKE”(sacudir)
desaparecerá de la pantalla.
CONSEJOS PARA ASAR
• Use la función “BROIL”(asar) para fundir quesos y obtener cortezas doradas.
• Generalmente, la función “BROIL”(asar) se usa para verduras y frutas, cortes de carne finos y tiernos,
ocarnes, pollo, costillas o pescados marinados.
• Seque las carnes y el pescado marinado antes de asar. SIEMPRE seque la carne para reducir el humo
yayudar a que se dore mientras se asa.
• Para que los alimentos se doren más rápido y se vean más atractivos, aplique aceite o manteca
derretida con un cepillo sobre los cortes más magros de carne vacuna, pollo y pescado.
• Retire el exceso de grasa de la carne y empareje los bordes para evitar que se curven.
• Descongele las carnes y el pescado congelados antes de asar.
• El tiempo de cocción depende de su elección. Use siempre un termómetro para carnes.
CONSEJOS PARA HORNEAR
• Cuando use la función “BAKE”(hornear), puede que necesite disminuir la temperatura de la receta
original en unos 50ºF hasta un mínimo de 300ºF.
• Revise las instrucciones del envase para determinar si el contenedor es apropiado para usar
en la freidora de aire.
• Presione para que esta función quede en “OFF”(apagado). La palabra “SHAKE”(sacudir)
desaparecerá de la pantalla.
1918

CANASTILLA SIMPLE FUNCIONAMIENTO MANUAL
(CONTINUACIÓN)
4. Presione para INICIAR el proceso de cocción.
5. Cuando el control seleccionado de la canastilla “LEFT”(izq.) destelle, presione cualquier botón del
MENÚ + para continuar. (Figura3)
6. Cuando “TEMP”(temperatura) y “TIME”(tiempo) se enciendan, presione TEMP o para
aumentar o reducir la temperatura en incrementos de 5grados.
Nota: Deje presionado el botón “TEMP”(temperatura) para avanzar rápidamente.
7. Presione el botón “TIME”(tiempo) o para aumentar o disminuir el TIEMPO en incrementos
de un minuto.
Nota: Deje presionado el botón “TIME”(tiempo) para avanzar rápidamente.
Nota: En la configuración “DEHYDRATE”(deshidratar), el tiempo se ajusta en incrementos de una hora.
8. Cuando el TIEMPO y la TEMPERATURA de su elección se muestren en la pantalla, presione para
ENCENDER la freidora de aire con canastilla doble. El tiempo deseado comenzará una cuenta
regresiva. La temperatura y el tiempo restante se mostrarán en la pantalla digital. (Figura4)
Nota: Para pausar la cocción de la freidora con aire de inmediato, presione el botón para soltar la
canastilla y tire de ella hacia afuera de la estructura principal en cualquier momento. Cuando se
coloque la canastilla nuevamente, se reanudará la cocción.
Nota: Presione para PAUSAR el proceso de cocción en cualquier momento. Cuando
se presiona otra vez, se reanudará la cocción.
9. Cuando el tiempo restante alcance 00:00, en la pantalla se mostrará una cuenta regresiva de
20segundos y el aparato sonará 5veces y se apagará cuando sea seguro sacudir los alimentos.
Nota: El tiempo de cocción total necesario variará según la cantidad, la densidad y el peso de los
alimentos. Recuerde que al freír cantidades más pequeñas obtendrá alimentos de mejor calidad en
un menor tiempo de cocción.
IMPORTANTE: Revise siempre los alimentos a mitad del tiempo de cocción para determinar el tiempo
y la temperatura finales de cocción.
10. Para ajustar la temperatura o tiempo mientras la cocción esté en proceso, use los botones
“TEMP”(temperatura) y “TIME”(tiempo) o .
1. Programe la canastilla “LEFT”(izquierda) de la freidora de aire siguiendo la sección Canastilla simple:
funcionamiento manual, pasos 5al10.
2. Presione el control de canastilla “RIGHT”(derecha) (Figura6). Se mostrará el menú.
3. Presione el botón del MENÚ de su elección para realizar el proceso de cocción en la canastilla
“RIGHT”(derecha). Ajuste TEMPERATURA o TIEMPO según se requiera.
4. Presione para iniciar el funcionamiento. (Figura7)
Apagado sincronizado
1. Programe las canastillas izquierda y derecha de la freidora de aire doble siguiendo la sección
Canastilla doble: funcionamiento manual, pasos 1al3.
IMPORTANTE: Primero programe ambas canastillas, “LEFT”(izq.) y “RIGHT”(der.).
2. Presione para asegurarse de que en ambas canastillas se completará la cocción a la vez. Luego
presione para iniciar el funcionamiento.
3. El tiempo de cocción aparecerá en los lados izquierdo y derecho y se iniciará una cuenta regresiva del
lado con más tiempo. Cuando el tiempo restante es igual en el lado izquierdo y el derecho, la cuenta
regresiva se mostrará en ambos lados.
NOTA: Una vez iniciada la cocción, la función “SYNC”(sincronizar) quedará inhabilitada.
Cocción dual
1. Presione . La configuración se duplicará automáticamente para ambas canastillas de la freidora
de aire. (Figura9)
2. Presione para iniciar el funcionamiento.
CANASTILLA DOBLE FUNCIONAMIENTO MANUAL
Figura 7 Figura 8
Figura 9
Figura 6
1716

INSTRUCCIONES DE USO
(CONTINUACIÓN)
EMPECEMOS A COCINAR
CANASTILLA SIMPLE FUNCIONAMIENTO MANUAL
TABLA CON 8OPCIONES DE MENÚ
PARA COCCIÓN PREPROGRAMADA
1. Introduzca la(s) bandeja(s) freidora(s). Lea la sección “Antes de usar por primera vez” para una
descripción detallada.
2. Coloque los alimentos dentro de ambas bandejas freidoras. No las llene de más. Para garantizar una
buena cocción y circulación de aire, NUNCA llene las canastillas con más de 2/3 de su capacidad total.
Para freír verduras frescas, se recomienda no agregar más de 2a3tazas de alimentos en la canastilla.
Nota: Se pueden deshidratar hasta 6tazas de ingredientes debido a que los alimentos se encogerán y
quedarán reducidos a una fracción de su volumen original. Coloque una sola capa de ingredientes en
la canastilla vacía de la freidora de aire. Cree una segunda capa colocando la bandeja freidora sobre
los ingredientes de la canastilla. Agregue alimentos sobre la bandeja freidora.
3. Una vez armadas, coloque la(s) canastillas(s) freidora(s) en la parte frontal de la freidora de aire.
Asegúrese siempre de que la(s) canastilla(s) freidora(s) esté(n) ubicada(s) correctamente en las
posiciones “LEFT” (izq.)/ “RIGHT” (der.) y que esté(n) cerrada(s) por completo.
MENÚ
TEMP.
POR
DEFECTO
TIEMPO
POR
DEFECTO
TIEMPO
COCCIÓN
DUAL
RANGO DE
TEMPERATURA
(ºF)
RANGO
DE
TIEMPO
SACUDIR
ALIMENTOS
Freír con
aire
400°F 20min 23 min 170~400 1-60min 2/3tiempo/x1
Rostizar 400°F 35min 37 min 350~400 1-60min 2/3tiempo/x1
Asar 400°F 10min 13 min 400 1-30min No se
recomienda
Hornear 350°F 16min 19 min 170~400 1-60min 2/3tiempo/x1
Recalentar 250°F 6min 9 min 170~400 1-60min No se
recomienda
Mantener
caliente
170°F 60min 60 min 150~200 1-60min No se
recomienda
Papas fritas 400°F 18min 21 min 170~400 1-60min 2/3tiempo/x1
Deshidratar 130°F 8h 8 h 90~170 1h-24h No se
recomienda
1. Enchufe el cordón al tomacorriente de la pared. Se escuchará un pitido y el panel de control se
iluminará. El botón se iluminará de color blanco.
2. Cuando presione , se escuchará un pitido y el panel de control iluminará (Figura2).
3. Seleccione , , o . Presione el botón del MENÚ de su elección. Se escuchará un pitido.
El control de canastillas “LEFT”(izq.) o “RIGHT”(der.), la TEMPERATURA por defecto (en números
grandes) y el TIEMPO por defecto (en números más pequeños) destellarán en la pantalla y alternarán
entre tiempo y temperatura. (Figuras3 A, 3 B y 3 C)
1. Para cocinar con una sola canastilla,
presione MENU seguido de para INICIAR
el proceso de cocción. (Figura4)
2. Para cocinar con dos canastillas, presione
el control de la otra canastilla. (Figura5)
Aparecerán las opciones de MENÚ.
3. Presione el botón del MENÚ de
su elección para realizar el proceso de cocción
en la canastilla “RIGHT”(derecha).
Figura4
Figura 2 Figura 3 A
Figura 3 B Figura 3 C
1514
Figura 5

• Presione el botón o para programar la canastilla izquierda o la derecha. Mientras
“LEFT”(izq.) o “RIGHT”(der.) destella, presione cualquier botón del MENÚ para continuar.
NOTA: Las canastilla “LEFT”(izq.) o “RIGHT”(der.) pueden programarse de forma independiente en
cualquier momento antes o durante el funcionamiento.
• La luz del botón o quedará fija en la pantalla mientras la función esté activa. Para ajustar
o programar en cualquier momento, presione el botón de control de canastillas que corresponda:
o . Cuando el botón comience a destellar, puede ajustar TEMP/TIEMPO.
13 Inicio/Pausa
• Una vez que se completó la programación, presione para INICIAR el proceso de cocción o para
PAUSAR cualquier función.
14 Apagado sincronizado
• Primero programe ambas canastillas, “LEFT”(izq.) y “RIGHT”(der.).
• Presione para asegurarse de que en ambas canastillas se completará la cocción a la vez. Luego
presione para iniciar la función.
• El tiempo de cocción aparecerá en los lados izquierdo y derecho y se iniciará una cuenta regresiva del
lado con más tiempo. Cuando el tiempo restante es igual en el lado izquierdo y el derecho, la cuenta
regresiva se mostrará en ambos lados.
NOTA: Una vez iniciada la cocción, la función “SYNC”(sincronizar) quedará inhabilitada.
15 Sacudir alimentos
• Para todas las opciones de menú, excepto “BROIL”(asar), “REHEAT”(recalentar) y
“DEHYDRATE”(deshidratar), se escucharán 5pitidos cuando se hayan completado 2/3 de la cocción
para recordarle que debe sacudir la canastilla.
• Presione para que esta función quede en “OFF”(apagado). La palabra “SHAKE”(sacudir)
desaparecerá de la pantalla.
NOTA: La función sacudir no funcionará si el tiempo de cocción es menor a 3minutos.
16 Cocción dual
• Presione para duplicar con facilidad una misma configuración para ambas canastillas freidoras
o seleccione “DUALCOOK”(cocción dual) para programar las canastillas izquierda y derecha a la vez.
Luego de presionar , puede ajustar la temperatura y el tiempo de forma sencilla para ambas
canastillas a la vez.
17 Encendido/Apagado
• Cuando se enchufe la freidora de aire, se escuchará un pitido, el panel de control se iluminará, y luego,
desaparecerá. El botón se iluminará, indicando que la unidad está encendida.
• Al presionar nuevamente, se escuchará un pitido y se iluminarán todos los botones.
• Mientras esté en funcionamiento, presione para APAGAR los controles de las canastillas
izquierda y derecha.
Retire todo el material de embalaje y las etiquetas del
interior y exterior de la freidora de aire. Verifique que no
quede material de embalaje debajo de las canastillas
y las bandejas freidoras ni alrededor de ellas.
1. La freidora de aire con canastilla doble se
entrega de fábrica con las 2bandejas freidoras
aseguradas en cada canastilla dentro de la
estructura principal de la freidora de aire.
2. Tome con firmeza el mango de cada canastilla
freidora y tire las canastillas hacia afuera de la
estructura principal.
3. Tome cada asa de las bandejas freidoras y
levántelas para retirarlas de cada canastilla. (Figura 1)
4. Lave las canastillas y bandejas con agua caliente y agua jabonosa.
5. NO SUMERJA LA ESTRUCTURA PRINCIPAL DE LA FREIDORA DE AIRE EN EL AGUA. Limpie la estructura
principal de la freidora con un paño húmedo. Seque bien todas las piezas.
6. Coloque nuevamente las bandejas freidoras en cada canastilla. Con el mango hacia arriba,
inserte cada bandeja de modo que las gomas de las esquinas encajen y traben con facilidad
en cada canastilla.
7. Debido al diseño frontal curvo de la freidora, las canastillas deben insertarse del lado correspondiente.
Las superficies de los compartimentos están rotulados “L”(izquierdo) y “R”(derecho). Deslice la
canastilla/bandeja freidora “LEFT”(izquierda) en el lado izquierdo de la estructura principal de la
freidora de aire. Deslice la canastilla/bandeja freidora “RIGHT”(derecha) en el lado derecho de la
estructura principal de la freidora de aire. Antes de usar, asegúrese de que cada canastilla esté
encastrada por completo en su lugar. (Figura1)
Nota: Durante el primer uso, la freidora de aire doble puede emanar un leve olor. Esto es normal
y no afectará los sabores.
¡IMPORTANTE! La capacidad máxima de alimentos recomendada para cada canastilla de la freidora
de aire es de 4.0cuartos o 3.75lb(1.70kg). Si usa las dos canastillas, puede preparar comida para hasta
9personas.
¡ADVERTENCIA! Esta freidora de aire con canastilla doble no debe usarse para hervir agua.
¡ADVERTENCIA! Esta freidora de aire con canastilla doble no debe usarse nunca para freír
alimentos por inmersión.
1. Coloque la freidora de aire con canastilla doble sobre una superficie plana, estable y resistente al calor,
cercana a un tomacorrientes.
CONTROL CON PANTALLA TÁCTIL
DOBLE (CONTINUACIÓN)
ANTES DE USAR
POR PRIMERA VEZ
INSTRUCCIONES DE USO
Figura1
1312

CONOCIENDO SU
FREIDORA DE AIRE CON CANASTILLA DOBLE
DE 8CUARTOS
1 Control de pantalla táctil doble
2Canastillas freidoras extraíbles con botones de seguridad para niños
2 canastillas freidoras extraíbles (4.0cuartos cada una) con mango “L” (izquierdo) y “R” (derecho).
3Cordón de alimentación con enchufe polarizado (no se muestra)
4Patas antideslizantes (no se muestra)
52 Bandejas antiadherentes con asas
El producto puede variar ligeramente de esta ilustración.
1
2
3
4
CONTROL DE PANTALLA TÁCTIL
DOBLE
1 Pantalla digital
doble para TIEMPO/
TEMPERATURA
2Freír con aire
3Rostizar
4Asar
5Hornear
6Recalentar
7Deshidratar
8Mantener caliente
9Papas fritas
10 Temperatura
11 Tiempo
12 Control de canastilla L/R
(izq./der.)
13 Inicio/Pausa
14 Apagado sincronizado
15 Sacudir alimentos
16 Cocción dual
17 Encendido/Apagado
10 Temp ( o ) / 11 Tiempo ( o )
• Presione o del lado izquierdo del panel de control para aumentar o disminuir la
TEMPERATURA en incrementos de 5grados.
• Presione o del lado derecho del panel de control para aumentar o disminuir el TIEMPO en
incrementos de un minuto.
NOTA: Cuando use la función “DEHYDRATE” (deshidratar), el TIEMPO aumentará o disminuirá en
incrementos de una hora.
NOTA: El TIEMPO y/o la TEMPERATURA de la canastilla “LEFT”(izq.) o “RIGHT”(der.) pueden
programarse de forma independiente en cualquier momento antes o durante el funcionamiento.
Presione el botón “LEFT”(izq.) o “RIGHT”(der.). Cuando el botón “LEFT”(izq.) o “RIGHT”(der.) comience
a destellar, puede ajustarlo.
12 Control de canastilla L/R (izq./der.) ( o )
• Cuando presione mientras destella, se escuchará un pitido. Puede seleccionar usar la canastilla
izquierda o la derecha de forma independiente, o “DUALCOOK”(cocción dual) para usar ambas al
mismo tiempo.
5
12 3 4 5 6 7 8 9
10 12 12 1113 14 15 16 17
1110

MEDIDAS DE SEGURIDAD
IMPORTANTES ADICIONALES
PRECAUCIÓN: SUPERFICIES CALIENTES. Este aparato genera calor y puede emanar vapor durante
el uso. Deben tomarse las precauciones necesarias para prevenir el riesgo de quemaduras,
incendios u otras lesiones a personas o daños a la propiedad.
PRECAUCIÓN: Este aparato se calienta durante su funcionamiento y retiene el calor durante
algún tiempo después de apagarlo. Use siempre guantes cuando manipule materiales calientes
o deje que las piezas metálicas se enfríen antes de limpiarlas. No coloque nada sobre el aparato
mientras esté en funcionamiento o esté caliente.
1. Todos los usuarios deben leer y entender este manual antes de usar o limpiar el aparato.
2. El cordón de este aparato debe enchufarse únicamente a un tomacorriente de 120VAC.
3. Si el aparato comienza a funcionar mal durante el uso, presione y tire de la(s) canastilla(s) freidora(s)
en uso hacia afuera de la estructura principal de la freidora de aire. Retire el enchufe del tomacorriente
de la pared. No use el aparato si falla durante el uso ni intente repararlo usted mismo. Contáctese con
el servicio al consumidor.
4. No sumerja el cordón en ningún líquido. Si el cordón se daña, debe reemplazarse.
5. Mantenga el cordón fuera del alcance de niños y bebés para evitar el riesgo de descarga eléctrica
yasfixia.
6. Coloque la freidora de aire con canastilla doble sobre una superficie estable y resistente al calor.
7. No obstruya la salida ni entrada de aire en la parte trasera y en los costados de la freidora de aire
con ningún objeto. Evite el vapor que sale por la salida de aire durante la fritura.
8. Mantenga el aparato al menos 4” (10cm) de distancia de las paredes u otros objetos durante el
funcionamiento.
9. Use siempre el mango de la canastilla freidora para retirarla.
ADVERTENCIA: Si coloca en la canastilla freidora menor o mayor cantidad de alimentos de
loindicado, puede dañar la freidora de aire y causar lesiones físicas graves.
10. Nunca mueva la freidora de aire cuando esté caliente o contenga alimentos calientes.
11. Antes de moverla, deje que se enfríe.
¡ADVERTENCIA! Esta freidora de aire no debe usarse para hervir agua.
¡ADVERTENCIA! Esta freidora de aire no debe usarse nunca para freír alimentos por inmersión.
Enchufe y cordón
Este aparato tiene un enchufe polarizado (una clavija es más ancha que la otra). Para reducir el riesgo
de descarga eléctrica, este enchufe está diseñado para encajar en un tomacorriente polarizado de una
sola manera. Si el enchufe no encaja completamente en el tomacorriente, invierta el enchufe. Si aún así no
encaja, comuníquese con un electricista calificado. No modifique el enchufe de ninguna forma.
Debe usar solamente el cordón que se incluye.
Advertencia sobre el plastificante
PRECAUCIÓN: Para evitar que los plastificantes migren al acabado de la encimera, la mesa u otro mueble,
coloque posavasos o manteles individuales NO PLÁSTICOS entre el aparato y el acabado de la encimera
o de la mesa. En caso de no hacerlo, el acabado puede oscurecerse, y pueden aparecer imperfecciones
permanentes o manchas.
Energía eléctrica
Si se sobrecarga el circuito eléctrico con otros aparatos, es posible que la freidora no funcione
correctamente. Debe funcionar en un circuito eléctrico separado de otros aparatos.
98

CUANDO USE APARATOS ELÉCTRICOS, SIEMPRE SE DEBEN SEGUIR LAS PRECAUCIONES BÁSICAS DE
SEGURIDAD, INCLUIDAS LAS SIGUIENTES:
1. LEA TODAS LAS INSTRUCCIONES.
2. No toque superficies calientes. Use asas o manijas. Use guantes o agarradores.
3. Para protegerse de las descargas eléctricas, no sumerja el cordón, los enchufes ni el aparato en agua
u otro líquido.
4. Los niños mayores de 8años y las personas con capacidades físicas, sensoriales o mentales reducidas,
o con falta de experiencia y conocimientos pueden usar este aparato SOLO si reciben instrucciones
adecuadas sobre su uso y bajo la supervisión de una persona responsable de su seguridad.
5. Se debe supervisar a los niños para asegurarse de que no jueguen con el aparato.
6. Desenchufe el aparato del tomacorriente cuando no esté en uso y antes de limpiarlo. Deje que el
aparato se enfríe antes de poner o quitar piezas, y antes de limpiarlo.
7. No opere ningún aparato con un cordón o enchufe dañado o después de que el aparato haya fallado
o haya sufrido algún daño. Lleve el aparato a un técnico calificado para que lo examine, repare
orealice un ajuste eléctrico o mecánico.
NOTA: NO INTENTE REPARAR EL APARATO USTED MISMO. ESTO INVALIDA LA GARANTÍA.
8. El uso de accesorios no recomendados por el fabricante puede causar lesiones.
9. No lo utilice al aire libre.
10. No deje que el cordón cuelgue del borde de la mesa o encimera, ni que toque superficies calientes.
11. No lo coloque cerca o sobre una hornilla caliente a gas o eléctrica, o dentro de un horno caliente.
12. Se debe tener mucho cuidado al mover un aparato que contenga aceite u otros líquidos calientes.
13. Para desconectarlo, presione y tire de la(s) canastilla(s) freidora(s) en uso hacia afuera de la estructura
principal de la freidora de aire. Retire el enchufe del tomacorriente de la pared.
14. No utilice el aparato para otro uso que no sea el previsto.
15. Cuando use la(s) bandeja(s) freidora(s), asegúrese antes de cocinar de que estén colocadas
correctamente en cada canastilla de la freidora de aire. Asegúrese de que la bandeja esté bien
colocada antes de agregar la comida que va a freír.
16. Siempre asegúrese de que toda canastilla en uso esté completamente inserta y trabada en la freidora
de aire antes de hacerla funcionar.
ADVERTENCIA: La freidora de aire no funcionará a menos que las canastillas estén completamente
cerradas.
PRECAUCIÓN: Luego de freír, rostizar, asar, hornear, o recalentar con aire caliente, las canastillas
de la freidora, las bandejas (si se usaron) y los alimentos cocinados estarán calientes. Se debe tener
mucho cuidado al manipular las canastillas y las bandejas de la freidora.
MEDIDAS DE SEGURIDAD
IMPORTANTES
SOLO PARA USO DOMÉSTICO.
GUARDE ESTAS INSTRUCCIONES.
76
Other manuals for SLT-1802
2
Table of contents
Other Sur la table Fryer manuals

Sur la table
Sur la table SLT-1805 User manual

Sur la table
Sur la table SLT-1805 User manual

Sur la table
Sur la table SLT-1807 User manual

Sur la table
Sur la table SLT-1805 User manual

Sur la table
Sur la table SLT-1802 User manual

Sur la table
Sur la table SLT-1802 User manual

Sur la table
Sur la table SLT-1806 User manual
Popular Fryer manuals by other brands

Brentwood Appliances
Brentwood Appliances AF-100W Operating and safety instructions

Carnival King
Carnival King 382DFC18001 user manual

DIHL
DIHL KA-AFD02 Series user guide

SEVERIN
SEVERIN FR 2419 - FRITEUSE ELECTRIQUE Instructions for use

Jata
Jata FR335 Instructions of use

Henny Penny
Henny Penny OFE-341 Troubleshooting