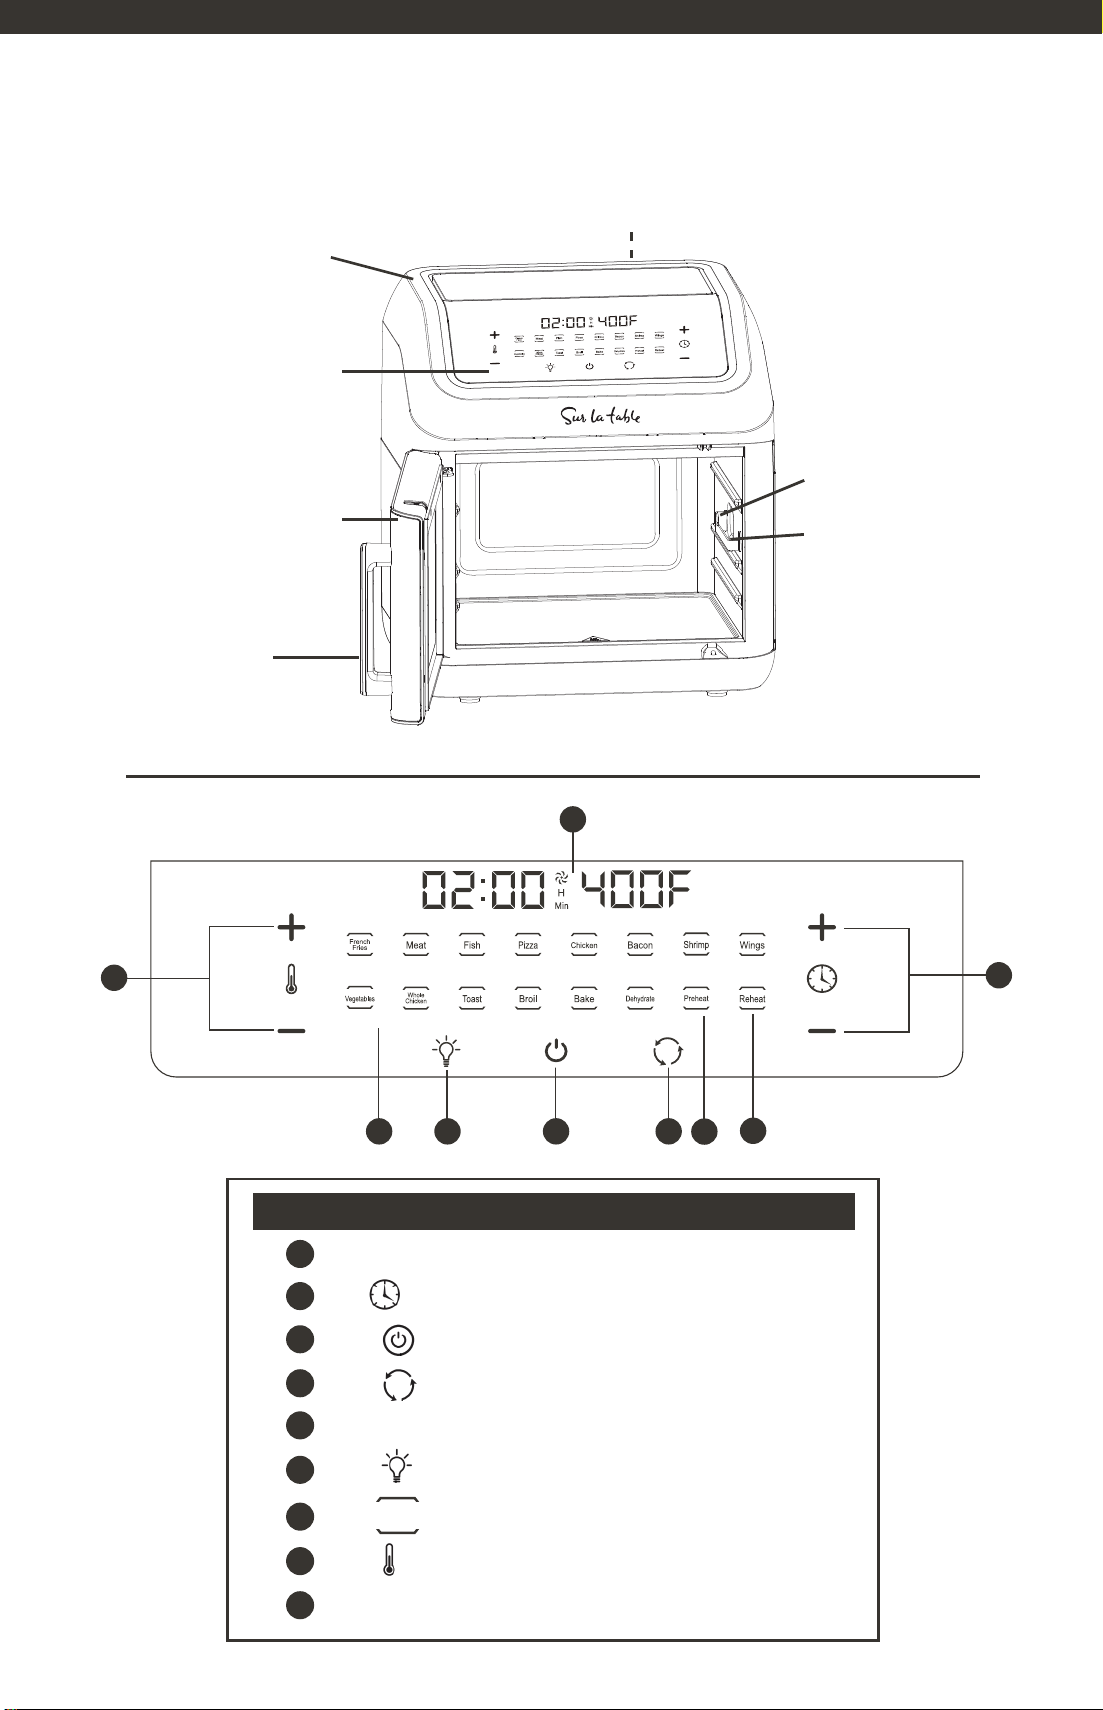
GETTING TO KNOW YOUR
13 QT AIR FRYER APPLIANCE
TOUCHSCREEN CONTROL
Figure 3
Display Displays time/temperature
Increase/decrease cooking time
Switch on/off
Rotation function (for accessories F/G/H)
Reheat (pre-set)
Light on/off
Pre-set programs
Increase/decrease temperature
Preheat
+/-
+/-
Reheat
Preheat
1
2
3
4
5
6
7
8
9
NAME DETAIL FUNCTION
1
2
3 4 5
69
7
8
POWER ( ) button. Press the POWER button to begin. The POWER ( ) button will also initiate
cooking once the TIME and TEMPERATURE are set or adjusted. Pressing the POWER button again will
turn the appliance off.
DIGITAL DISPLAY. While in operation, the Air Fryer’s set TEMPERATURE and remaining TIME are
displayed on the digital display at the same time. When the time counts down to 00:00, “OFF” will
appear and 3 beeps sound as the Air Fryer Appliance turns OFF automatically.
16 PRESET MENU ICONS. To use any of the 16 preset menu options, simply press the desired preset
icon.
(French Fries, Meat, Fish, Pizza, Chicken, Bacon, Shrimp, Wings, Vegetables, Whole Chicken, Toast,
Broil, Bake, Dehydrate, Preheat, Reheat)
LIGHT ( ) button. Press to turn the LIGHT on or off. While ON, the button will flash. Press the
flashing LIGHT ( ) button to turn the light OFF. NOTE: Any time the appliance’s door is opened, the
light will illuminate. When the appliance’s door is properly closed, the light will turn OFF.
The appliance’s light can be turned on and off during the cooking process. Light turns off once the
cooking time has ended and air fryer has turned off automatically.
FAN ( ) Icon. The white convection fan ( ) will flash when the Air Fryer is ON, as “OFF” appears on
the digital display, until 5 beeps sound and the Air Fryer Appliance turns OFF.
TIME ( ) button. Press to change the TIME on the digital display. The (+) and (-) symbols enable
you to add or decrease cook TIME 1 minute at a time. Long press the (+) or (-) symbol to increase or
decrease time at 5 minute increments.
NOTE: Cooking time can be added or reduced while cooking is in progress.
TEMPERATURE ( ) button. Press to change the TEMPERATURE on the digital display. The (+)
and (-) symbols enable you to add or decrease cooking TEMPERATURE 5°F at a time. NOTE:
Cooking temperature can be increased or reduced while cooking is in progress. To switch between
Fahrenheit and Celsius, press the up and down temperature arrows for 3 seconds.
ROTISSERIE ( ) button. When the food is securely fastened to the rotisserie assembly and the
rotisserie bar is securely in place, press to turn the Rotisserie ON. The rotisserie bar will begin to
rotate, and the ROTISSERIE icon will flash. Press the flashing ROTISSERIE ( ) button again to turn
rotation OFF.
PREHEAT Button. Once you have selected your desired cooking preset, time, and temperature, you
can press preheat to preheat the air fryer. When the air fry is preheated, it will beep and ADD FOOD
will appear on the digital display. Add food, close the door, and cooking will begin after 5 seconds of
inactivity.
Pre-sets
Bacon
Shrimp
Wings
Reheat
Meat
Toast
Broil
Fish
Pizza
Bake
Chicken
Dehydrate
Vegetables
Preheat
French
Fries
Whole
Chicken
Touchscreen
Conrol
Door
with Extra
Large Viewing
Window
Metal Notch
Rotisserie Bar
Notch
Door
Handle
Air Inlet Air Outlet
Product may vary slightly from illustration.
98