Swagelok MS-TBE-1 series User manual

Electric Tube Bender
User’s Manual
www.swagelok.com

– 2 –
Table of Contents
SAVE THESE INSTRUCTIONS!
Operator’s Safety Summary........................................................................3
Grounding and Extension Cord Information ......................................................3
Statements................................................................................3
Symbols ..................................................................................3
Safety Features ............................................................................4
Tube Bender Technical Data .......................................................................5
Tubing Information ...............................................................................5
Tube Bender Components .........................................................................6
Digital Display Pendant ...........................................................................6
Error Message ..................................................................................6
Assembling Components..........................................................................7
Tubing Layout
Single 90° Bend ............................................................................8
Multiple 90° Bends (Measure-Bend Method) .....................................................8
Multiple 90° Bends (Premeasure Method) ........................................................9
Making Offset Bends .......................................................................10
Springback ....................................................................................11
Bending ......................................................................................11
Bending Using Auto Bend . . . . . . . . . . . . . . . . . . . . . . . . . . . . . . . . . . . . . . . . . . . . . . . . . . . . . . . . . . . . . . . . . . . . . . . .12
Troubleshooting ................................................................................12
Roller Adjustment Screws ........................................................................13
Roller Alignment ................................................................................13
Maintenance...................................................................................14
Warranty Information ............................................................................16

Operator’s Safety Summary
READ AND UNDERSTAND THIS MANUAL BEFORE USING BENDER. This device is electrically powered and must
be operated in a safe environment to avoid risk of fire, explosion, or electric shock.
Grounding and Extension Cord Information
• BenderMUST be grounded to guard against electrical shock. It is equipped with a three-wire conductor and
three-prong plug to fit a grounded receptacle.
NEVER CONNECT THE GREEN OR GREEN/YELLOW WIRE TO A LIVE TERMINAL!
• Useonlythree-wireextensioncordsthathavethree-pronggrounding-typeplugsandthree-polereceptacles.
• Theextensioncordwiresizemustmeetthefollowingspecifications:
– For 0 to 50 ft (0 to 15 m), the recommended minimum wire gauge is #12 AWG (2.5 mm).
– For 50 to 100 ft (15 to 30 m), the recommended minimum wire gauge is #10 AWG (4.0 mm).
Statements
CAUTION! Statements that identify conditions or practices that could result in damage to the equipment or
other property
WARNING! Statements that identify conditions or practices that could result in personal injuries or loss of life
CAUTION!
Indicates cautionary information.
WARNING!
Indicates that voltage greater than 30V (ac) is present.
WARNING!
PINCH POINTS. Keep hands, loose clothing, and long hair away from moving parts. Serious injury can
occur.
WARNING!
KEEP DRY. Do not expose the equipment to water or wet locations.
WARNING!
FIRE OR EXPLOSION. Do not use equipment in a combustible or explosive atmosphere. Flammable
liquids or gases could ignite.
WARNING!
EYE PROTECTION. Eye protection must be worn while operating or working near the equipment.
– 3 –
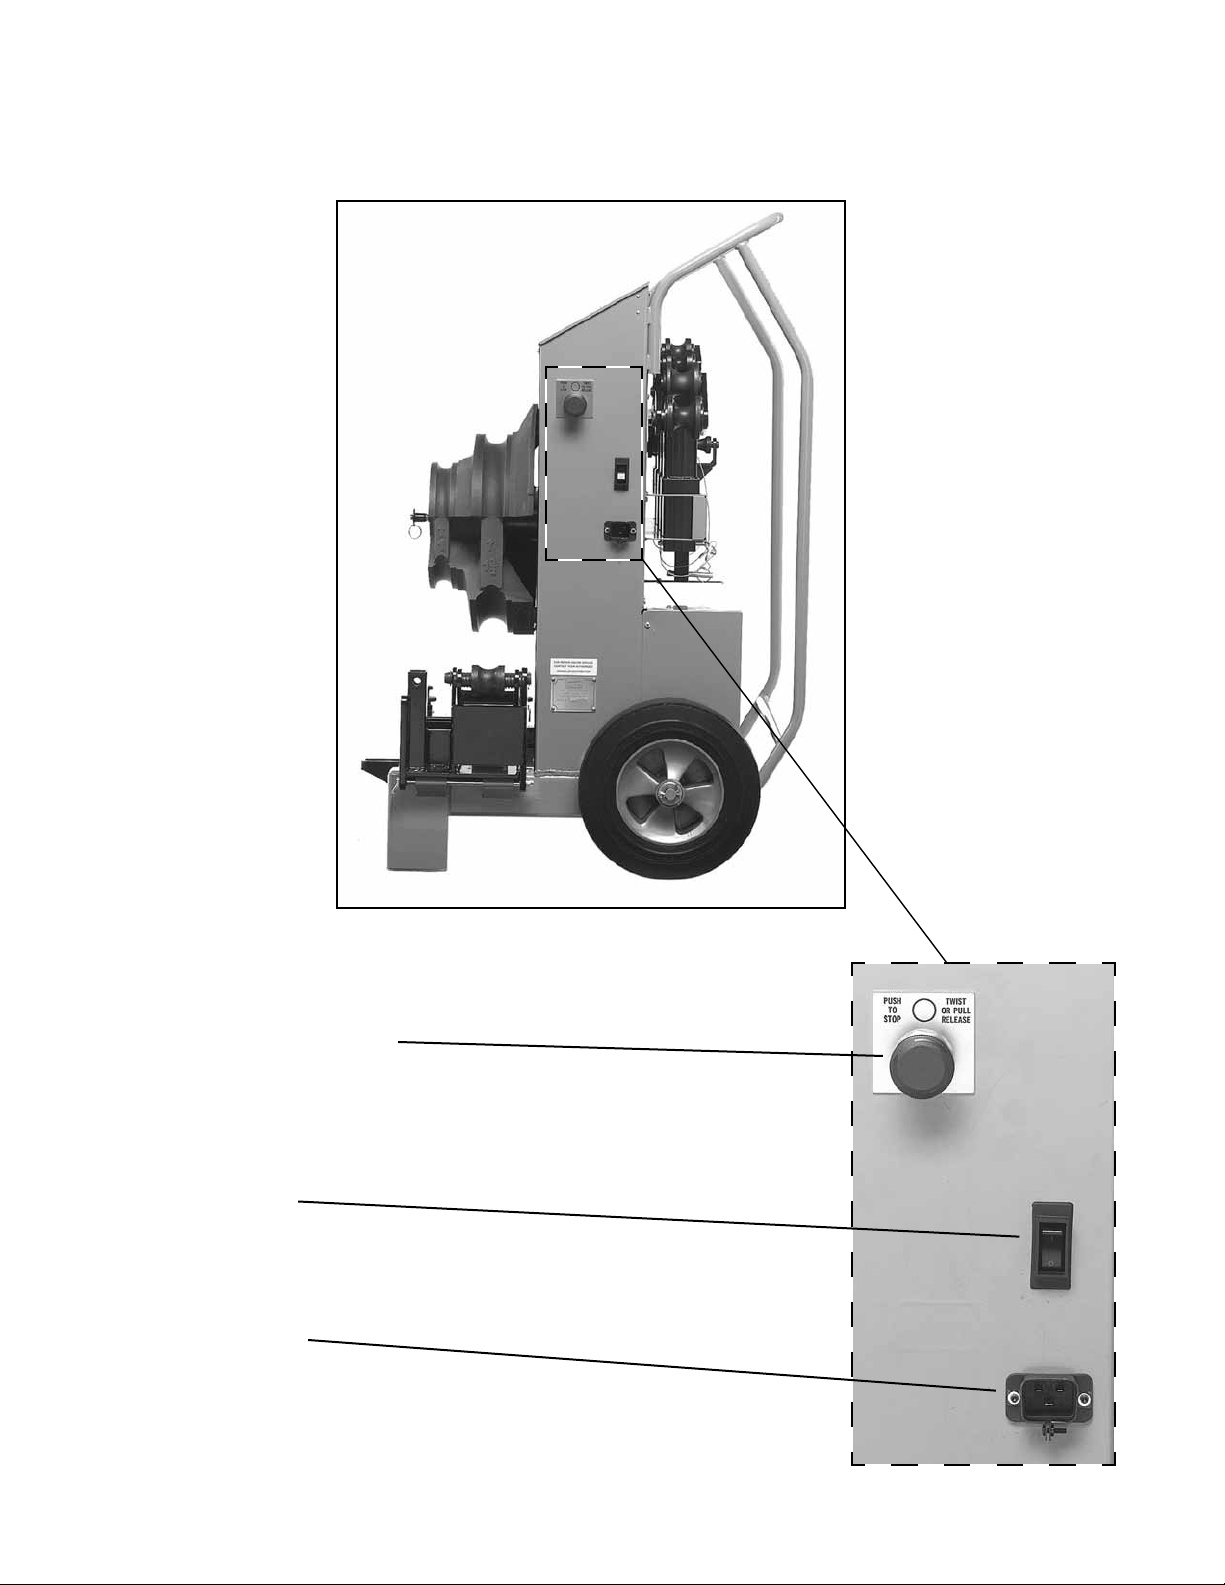
Symbols

Emergency Stop Button
Stops rotation of bend shoe andclears all
settings. Auto bend function will require
reprogramming.
Circuit Breaker
Disconnects power from outside source.
Clears all settings.
Receptacle with
Cord/Socket Lock
Plug in power cord. Tighten screw on cord/
socket lock to secure power cord.
Safety Features
– 4 –

– 5 –
Tube Bender Technical Data
BENDING RANGE: 1° to 110°, in 1° increments. Bending in excess of 110° may damage bender.
DIMENSIONS: VerticalPosition:44in.(112cm)high,29in.(74cm)wide,30in.(76cm)deep
WEIGHT: 420 lb (191 kg)
POWER REqUIREMENTS: MS-TBE-1 MS-TBE-2
115V(ac)50/60Hz 230V(ac)50/60Hz
Maximumcurrent:13A Maximumcurrent:7A
Tubing Information
• Alltubingshouldbefreeofscratchesandsuitableforbending.
• Bends1,11/4,11/2,and2in.;25,32,38,and50mmODtubinginavarietyofwallthicknesses.
• Carbonsteeltubingshouldbesoft(annealed),seamless(ASTMA179),orweldedanddrawn,DIN2391-1and
DIN-2391-2orequivalent,withahardnessof72HRB,HV(VPN)130orless.
• Stainlesssteeltubingshouldbefullyannealed,seamless,orweldedanddrawn,meetingASTMA269,ASTMA213,
EN-ISO-1127,orequivalentspecification,withahardnessof80HRB,HV(VPN)180orless.
• ThefollowinginformationforbendingannealedtubingislistedbelowinTable1:bendradius,wallthicknesslimits,
and minimum straight length required to make a 90° bend using the tail roller.
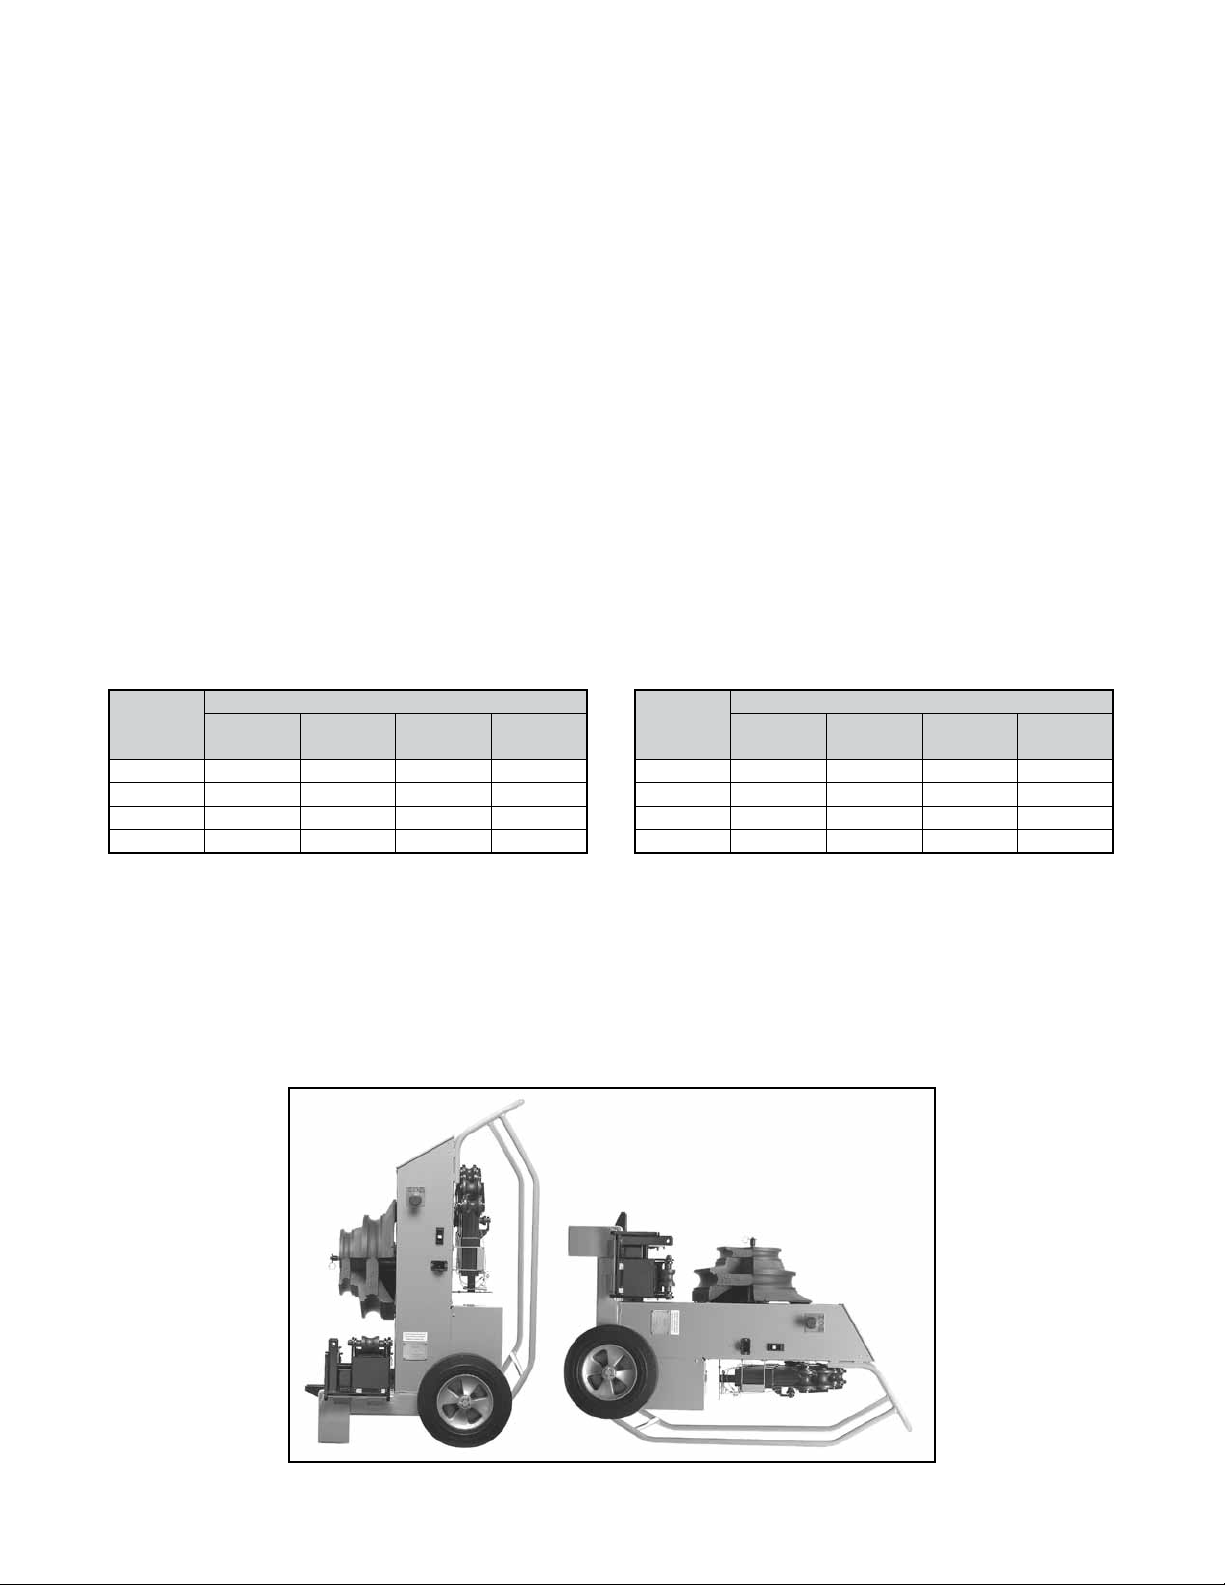
This bender can be used in the
verticalorhorizontalposition.
Before using bender make sure rollers and shoe grooves are in line.
See Roller Alignment (page 13).
READ AND BECOME FAMILIAR WITH OPERATING INSTRUCTIONS
BEFORE BENDING TUBING!
Table 1 – Min/Max Wall Thickness➀
➀See the Swagelok Tubing Data catalog for suggested tubing wall thickness for use with Swagelok tube fittings.
Tube
OD
in.
Dimensions, in.
Min
Length
Bend
Radius
Carbon
Steel
Stainless
Steel
120 1/2 4 0.049/0.120 0.065/0.120
1 1/4 22 3/4 5 0.065/0.180 0.083/0.156
1 1/2 25 1/2 6 0.083/0.220 0.095/0.188
2 32 8 0.095/0.220 0.109/0.188
Tube
OD
mm
Dimensions, mm
Min
Length
Bend
Radius
Carbon
Steel
Stainless
Steel
25 520 103 1.2/3.0 1.8/3.0
32 582 126 2.0/4.0 2.0/4.0
38 648 152 2.2/4.5 2.2/4.5
50 810 203 — 3.0/5.0

– 6 –
CAUTION!
Pressing color key pad
functions on the pendant
causes bend shoe to rotate.
Error Message
An “E1” in pendant display indicates
that the motor has stopped. Remove
any obstruction in bend shoe, and retry
theBENDorUNLOADfunction.
Digital Display Pendant
LED DISPLAY – Displays degrees of rotation.
BEND – Rotates bend shoe clockwise.
JOG – Rotates bend shoe clockwise in
1° increments.
UNLOAD – Rotates bend shoe counterclockwise.
ZERO SET – Resets pendant display to “0.”
BEND SET – Stores a bend in memory. Indicator
light on display (center decimal point) will flash to
confirm bend is stored.
AUTO BEND – Rotates bend shoe to the angle
stored in memory. Auto bend indicator light (right
decimal point) remains on when bending with
memory.
OVERRIDE – Overrides the AUTOBEND mode
without erasing memory.
Tube Clamps
Removable Tail Roller
Fixed Tail Roller
Roller Towers
Bend Shoe
Bridge Opening
Handle Lock
Roller
Adjustment
Screws
Bend Shoe
Retaining Pin
Bridge
Roller
Tower
Tube Bender Components

– 7 –
Assembling Components
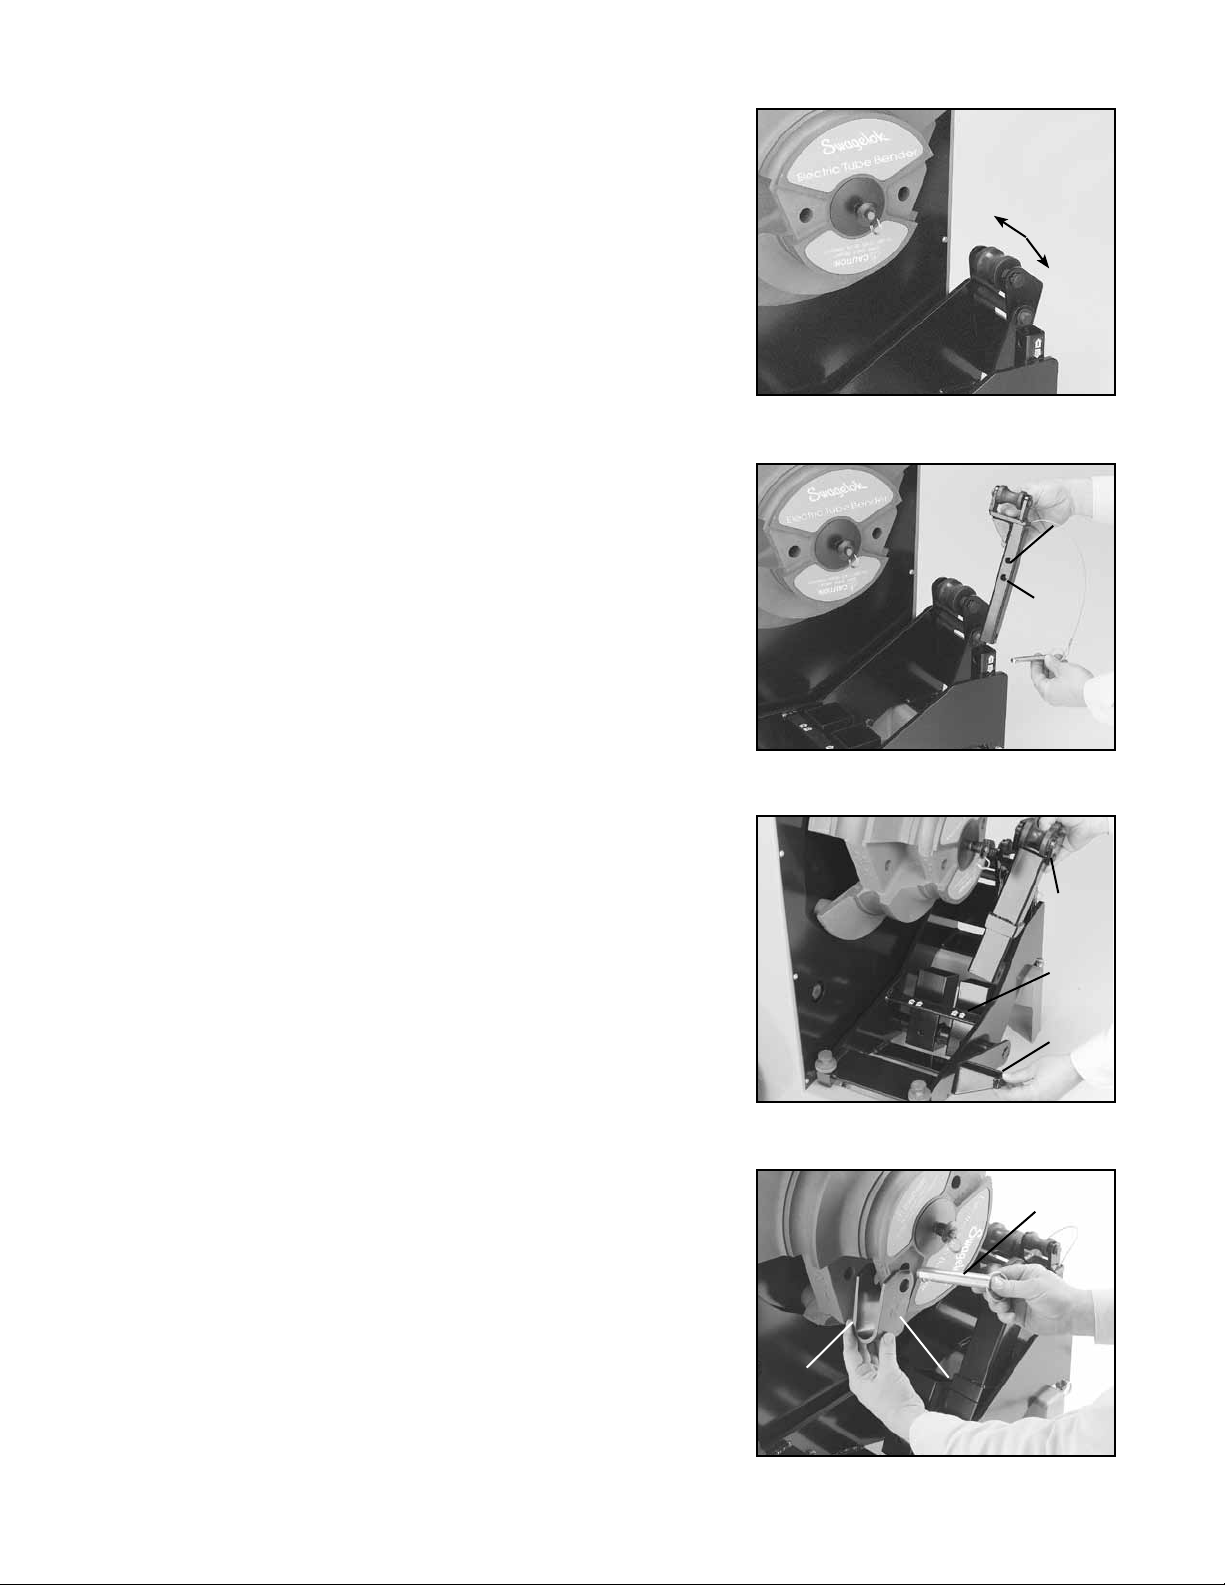
1. Select and install proper tail rollers. To bend 1 1/2 in. (38 mm) OD
tubing, use the fixed tail roller in the up position. For 2 in. (50 mm) OD
tubing, use the fixed tail roller in the down position. (See Figure 1.)
To bend 1 in. (25 mm) OD tubing, use the 1 in. (25 mm) removable tail
roller, securing pin in lower pin hole (up position). For 1 1/4 in. (32
mm) OD tubing, use the 1 1/4 in. (32 mm) removable tail roller, securing
pin in upper pin hole. Align roller with the inside of the unit. (See Figure
2.)
2.Selectproperrollertower;thesizeisindicatedonrollertower.Toinstall,
lift and hold the handle lock. Insert the roller tower into proper bridge
openingsothatthesizeindicatorfacesyou.Allowrollertowertolean
against tail roller. (See Figure 3.)
3.Selectpropertubeclamp;thesizeisindicatedonclampface.Locate
thetubesizeonthebendshoe,andattachthetubeclampwithpin,
makingsurethesizeidentificationfacesout.(SeeFigure4.)
4. MakesurethecircuitbreakerisswitchedtotheONpositionandthe
EMERGENCYSTOPbuttonisnotengaged.
5. Plug the unit into an appropriate power source. The display on the
pendant will illuminate.
Figure 4
Pin
Tube
Clamp
Size
Indicator
Figure 2
Upper
Pin Hole
1 1/4 in.
(32 mm)
Lower
Pin Hole
1 in.
(25 mm)
Figure 3
Roller
Tower
Size
Indicator
Roller
Tower
Label
Location
Handle
Lock
Figure 1
Up Position
1 1/2 in.
(38 mm)
Down
Position
2 in.
(50 mm)

First 90 Bend.eps
Center
Line
Tubing Layout
With this bender, you can form single, offset, and other bends. This section contains information for measuring and
marking the tubing prior to bending. NOTE: Make all marks 360° around the tubing.
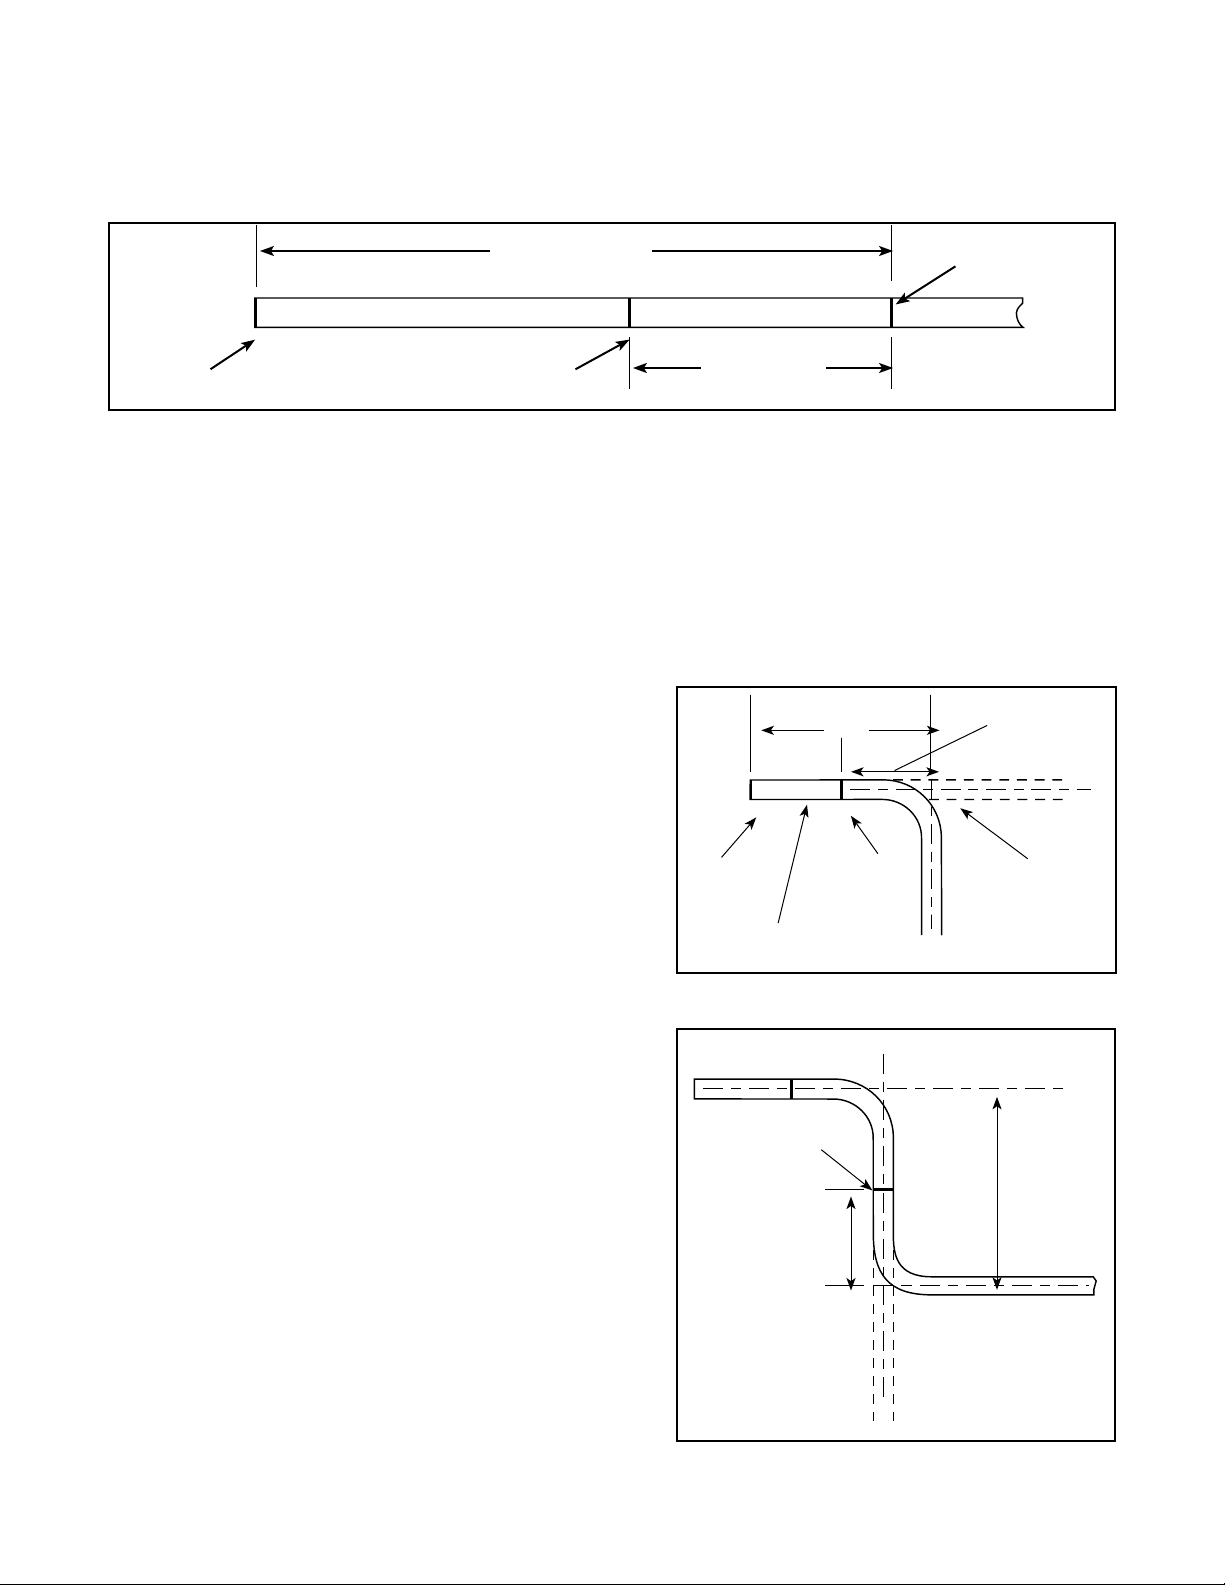
Single 90° Bend
1. Place a reference mark at the end of the tubing from which your measurement begins.
2. From the reference mark at the end of the tubing, measure the desired length for the bend. Make a measurement
mark on the tubing.
3. Subtract the bend deduction distance (see Table 2 on page 9) from the measurement mark and make a bend
mark. (The bend deduction distance is a length that compensates for the bender and tube clamp design.)
4. To bend tubing, see Bending on page 11.
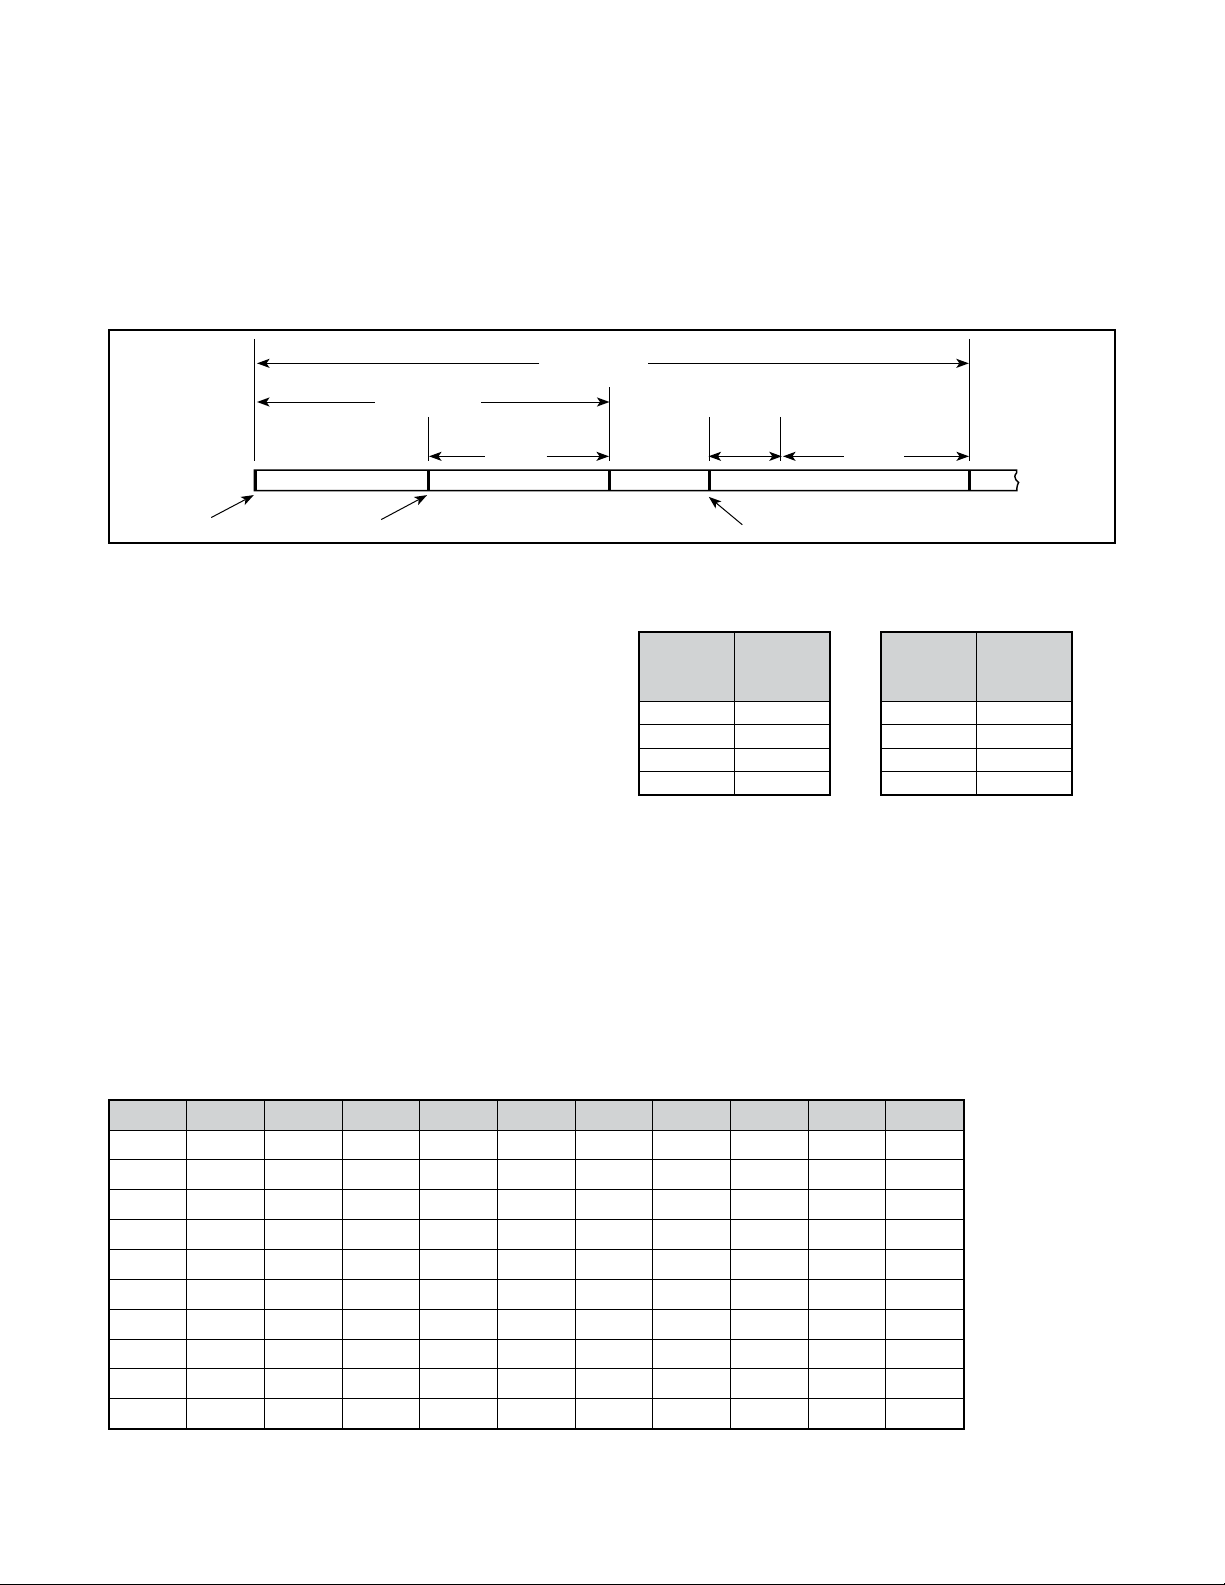
First Measurement Mark
18 in. Bend Deduction
Distance
9 7/8 in.
Reference
Mark
Bend
Mark
1 1/2 in. OD Tubing
Multiple 90° Bends
The Measure-Bend Method
1. Follow Steps 1 to 4 above for a Single 90° Bend.
2. Using the center line of the previous 90° bend as your
second reference mark, repeat Steps 2 to 4 for the second
90° bend.
EXAMPLE: Using 1 1/2 in. OD tubing, make two 90° bends
with measured length distances of 18 in. between bend marks.
(See Illustrations 2 and 3.)
1. From the reference mark at the end of the tubing, measure
18 in. and make a measurement mark.
2. The bend deduction distance for 1 1/2 in. OD tubing in
Table 2 is 9 7/8 in.
3. 18 in. – 9-7/8 in. = 8-1/8 in. Make the first bend mark at
8-1/8 in.
4. Bend tubing.
5. From the center line of the first 90° bend, measure 18 in.
and make a measurement mark.
6. The bend deduction distance for 1 1/2 in. OD tubing in
Table 2 is 9-7/8 in.
7. 18 in. – 9-7/8 in. = 8-1/8 in. Make the second bend mark
at 8-1/8 in. from the center line of the first 90° bend.
8. Bend tubing.
Note: Follow the above steps when using metric
measurements.
Illustration 2 – First 90° Bend
Second 90 Bend.eps
Second
Measurement
Mark
18 in.
Bend Deduction
Distance
9-7/8 in.
Bend
Mark
Illustration 3 – Second 90° Bend
Single Bend 90.eps
Reference
Mark
Illustration 1 – Single Bend 90°
Measurement Length Measurement
Mark
Bend Deduction
Distance
Bend
Mark
– 8 –

Multiple 90° Bends
The Premeasure Method
1. Follow Steps 1 to 3 for a Single 90° Bend. (See page 8.)
2. From the reference mark at the end of the tubing, measure the desired length for the second bend and make a
measurement mark.
3. Subtract the bend deduction distance (see Table 2) and the adjustment factor (see Table 3) from the second
measurement mark, and make the second bend mark.
– 9 –
First Measurement
Length 18 in.
Bend Deduction Distance
9-7/8 in.
Gain
Adjustment
Factor
2 9/16 in.
Reference
Mark
Bend
Mark
Bend
Mark
Second Measurement
Length 36 in.
Bend Deduction
Distance
9-7/8 in.
Illustration 4 – Multiple 90° Bends
EXAMPLE: Using 1 1/2 in. OD tubing, make two 90° bends
with a measured length distance of 18-in. between bend
marks. (See Illustration 4.)
1. From the reference mark at the end of the tubing,
measure 18 in. and make a measurement mark.
2. The bend deduction distance for 1 1/2 in. OD tubing in
Table 2 is 9-7/8 in.
3. 18 in. – 9-7/8 in. = 8-1/8 in. Make the first bend mark
at 8-1/8 in.
4. Add the first and second measurement lengths. 18 in. +
18 in. = 36 in.
5. From the reference mark at the end of the tubing,
measure 36 in. and make a second measurement mark.
6. The bend deduction distance for 1 1/2 in. OD tubing is
9-7/8 in., and the adjustment factor for a 90° bend in
Table 3 is 2-9/16 in.
Table 2 – Bend Deduction Distance
Table 3 – Gain Factors for 0 to 90° Bends
Example:Thegainfactorfora90°bendis0.4292.
To calculate the gain for 90° bend multiply the gain factor times the bend radius.
Example:0.429236in.=2.58,orabout2-9/16in.gain
7. 36 in. – 9-7/8 in. – 2-9/16 in. = 23-9/16 in.
8. From the reference mark at the end of the tubing,
measure 23-9/16 in. and make a second bend mark.
9. Bend tubing.
Note: Follow the above steps when using metric
measurements.
Tube
OD
in.
Bend
Deduction
in.
1 6-1/2
1 1/4 8-3/16
1 1/2 9-7/8
2 12-5/8
Tube
OD
mm
Bend
Deduction
mm
25 177
32 213
38 247
50 318
0° 1° 2° 3° 4° 5° 6° 7° 8° 9°
0° 0.0000 0.0000 0.0000 0.0000 0.0000 0.0000 0.0001 0.0001 0.0003 0.0003
10° 0005 0006 0.0008 0.0010 0.0013 0.0015 0.0018 0.0022 0.0026 0.0031
20° 0.0036 0.0042 0.0048 0.0055 0.0062 0.0071 0.0079 0.0090 0.0100 0.0111
30° 0.0126 0.0136 0.0150 0.0165 0.0181 0.0197 0.0215 0.0234 0.0254 0.0276
40° 0.0298 0.0322 0.0347 0.0373 0.0400 0.0430 0.0461 0.0493 0.0527 0.0562
50° 0.0600 0.0637 0.0679 0.0721 0.0766 0.0812 0.0860 0.0911 0.0963 0.1018
60° 0.1075 0.1134 0.1196 0.1260 0.1327 0.1397 0.1469 0.1544 0.1622 0.1703
70° 0.1787 0.1874 0.1964 0.2058 0.2156 0.2257 0.2361 0.2470 0.2582 0.2699
80° 0.2819 0.2944 0.3074 0.3208 0.3347 0.3491 0.3640 0.3795 0.3955 0.4121
90° 0.4292—————————
– 10 –
Making Offset Bends
NOTE: Make all marks 360° around the tubing.
1. Make a reference mark at the end of the tubing from which
your measurement begins.
2. From the reference mark at the end of the tubing, measure
the desired length for the bend. Make a measurement
mark on the tubing.
3. Subtract the clamp distance (see Table 4) from the first
measurement mark and make a bend mark.
4. Determine the length of tubing (L) consumed in the offset.
See Table 5 or use one of the offset bend allowances
referred to in Table 6. (See Illustration 5.)
5. From the first bend mark, measure the distance required
for the offset bend allowance and make a second bend
mark.
6. Check for proper bend direction and tube orientation. To
bend tubing, see Bending on page 11.
L
OE
First Measurement Length
14 in.
Clamp Distance 3 1/2 in.
First Measurement
Mark Second Bend Mark
Distance to CenterFirst
Bend Mark
Reference
Mark
(Clamp distance only applies to offset bends.)
Illustration 5 – Tubing Length Offset
Illustration 6 – Offset Bends
EXAMPLE: Using 1 1/2 in. OD tubing, make an offset bend
beginning 14 in. from the end of the tube with a 20-in. offset
dimension (O) and a 30° offset angle (E). (See Illustration 6.)
1. From the reference mark at the end of the tubing, measure
14 in. and make a measurement mark.
2. The clamp distance for 1 1/2 in. OD tubing in Table 4 is
3-1/2 in.
3. 14 in. – 3-1/2 in. = 10-1/2 in. Make the first bend mark at
10-1/2 in.
4. The 20 in. offset bend is not in Table 5. Calculate the center-
to-center distance by multiplying 20 in. by the factor in Table
6 for a 30° offset, 2.000. 20 in. 3 2.000 = 40 in.
5. From the first bend mark, measure 40 in. and make the
second bend mark.
6. Bend tubing.
Note: Follow the above steps when using metric
measurements.
Table 4 – Clamp Distance
Table 5 – Offset Bend Calculations
Table 6 – Offset Bend Allowance
Tube
OD
in.
Clamp
Distance
in.
12 1/4
1 1/4 2 3/4
1 1/2 3 1/2
2 4
Tube
OD
mm
Clamp
Distance
mm
25 57
32 70
38 89
50 102
O
Offset
Dimension
in.
E
30° Offset
E
45° Offset
E
60° Offset
Max
Tube
OD
in.
L
Center
to Center
in.
Max
Tube
OD
in.
L
Center
to Center
in.
Max
Tube
OD
in.
L
Center
to Center
in.
6
2
12 1 1/2 8 3/8 1 7
8 16
2
11-1/4 1 1/2 9-1/4
10 20 14
2
11-1/2
12 24 16-3/4 13-3/4
14 28 19-5/8 16-1/8
16 32 22-3/8 18-3/8
18 36 25-1/4 20-3/4
O
Offset
Dimension
mm
E
30° Offset
E
45° Offset
E
60° Offset
Max
Tube
OD
mm
L
Center
to Center
mm
Max
Tube
OD
mm
L
Center
to Center
mm
Max
Tube
OD
mm
L
Center
to Center
mm
150
50
300 38 212 25 173
200 400
50
283 38 231
250 500 353
50
288
300 600 424 346
350 700 495 404
400 800 566 462
450 900 636 519
E
Angle.
L
Length
30° 2.000 X O (offset)
45° 1.414 X O (offset)
60° 1.154 X O (offset)

– 11 –
Springback
Bending the tubing approximately 3° beyond the desired angle is
necessary to compensate for tubing springback.
NOTE:Thisisanapproximatevalue.Tubingspringbackcharacteristics
differduetosize,wallthickness,andmaterial.
Bending
1. PresstheBENDorUNLOADfunctionkey.Rotatethebendshoe
until the proper reference notch on the bend shoe is aligned with the
pointeronthefaceplate.(SeeFigures5and6.)Notethedifference
in appearance of the bend shoe in each figure. The tube clamp
should hang vertically from the bend shoe.
NOTE: If the bend shoe stops at 110° or –99°, reset the pendant
display by pressing the ZERO SET function key. Then, press the
BEND or UNLOAD function key to rotate bend shoe.
2. Insert tubing through tube clamp with reference mark toward the left
(see Tubing Layout, page 8), making sure tubing is positioned over
tower and tail rollers. Press the JOG function key until tubing rests
on tail roller and fits tightly. Press the ZERO SET function key. This
process ensures the bender is set correctly for bending.
3. PresstheUNLOADfunctionkeyuntilthetubingcanbemovedby
hand. (Display will read approximately –2.)
4. Slide tubing to align the bend mark with the left edge of the tube
clamp. (See Figure 7.)
5. Lock the roller tower by pushing the handle lock down until the roller
tower stops firmly against bridge. (See Figure 8.)
6. Tobend,pressandholdtheBENDorJOGfunctionkeyuntil
the desired angle is displayed. The JOG function key will bend
in 1° increments. Release the key to stop the bend shoe. Add
approximately 3° to allow for springback.
CAUTION! Bending in excess of 110° may damage tubing and bender.
7. To remove tubing, stand clear of the handle lock, and press and
holdtheUNLOADfunctionkey(approximately5°)untilrollertower
unlocks by lifting slightly. Lift the handle lock and allow roller tower
to lean against tail roller. Remove tube clamp and tubing. Inspect the
tubingbend;ifwrinkling,ovality,orsidemarkinghasoccurred,see
Troubleshooting on page 12.
Figure 5
1 1/4 and 2 in. (32 and 50 mm)
ReferenceNotch
Figure 6
1 and 1 1/2 in. (25 and 38 mm)
ReferenceNotch
Bend Mark Aligned with
Left Edge of Clamp
Figure 7
Roller Tower Stops
Against Bridge
Figure 8
WARNING!
MOVING PARTS.

– 12 –
Bending Using Auto Bend
Use the auto bend feature to program a bend angle into the bender’s
memory for applications where a single bend angle must be repeated.
NOTE: A bend setting will be stored in memory until power is
disconnected or a new bend is set.
1. Follow steps 1–3 under Bending (see page 11), then slide tubing
completely away from tube clamp and bend shoe.
2. PresstheBENDorJOGfunctionkeyuntilthedesiredangleis
displayed. Add approximately 3° to allow for springback. Press the
BENDSETfunctionkeytostorethebendangle.TheBENDSETlight
(center decimal point) on the display pendant will flash momentarily.
PresstheUNLOADfunctionkeyuntilthedisplayreadsapproximately
–2.
3. Slide tubing through tube clamp and align the bend mark with the left
edge of the tube clamp. (See Figure 9.)
4. Lock the roller tower by pushing the handle lock down until the roller
towerstopsfirmlyagainstbridge.PresstheAUTOBENDfunctionkey.
TheAUTOBENDindicatorlight(rightdecimalpoint)willilluminate.
5. PressandholdtheBENDfunctionkey.Thebendshoewillrotateuntil
the set angle is reached.
6. Follow step 7 under Bending.
NOTE:Theautobendfunctionmaybetemporarilydisabledtoallowfor
bending of different angles, while maintaining the pre-set bend angle in
memory.Todisengagetheautobendfunction,either:
1.PresstheAUTOBENDfunctionkey.TheAUTOBENDindicatorlightwill
turn off, and the auto bend is disengaged. To reactivate the auto bend
function,presstheAUTOBENDfunctionkey.Theindicatorlightwill
illuminate.
2.PresstheOVERRIDEAUTOBENDfunctionkeytotemporarilyoverride
autobendfunction.TheAUTOBENDindicatorlightwillflashandthe
auto bend function is temporarily disengaged. To reactivate the auto
bendfunction,presstheOVERRIDEAUTOBENDfunctionkey.The
indicator light will stop flashing.
Figure 9
Troubleshooting
Bender adjustments can be made if any of the following conditions are encountered. See page 13 for specific
instructions.
Sidemarking
Ovality
Wrinkling
Rollers not aligned with
bend shoe
Oversizetubing
Excess roller pressure
Undersizetubing
Insufficient roller
pressure
Undersizetubing
Insufficient roller
pressure
Align rollers by turning roller alignment screws.
Turn roller adjustment screws counterclockwise in
quarter-turn increments until condition clears.
Turn roller adjustment screws clockwise in
quarter-turn increments until condition clears.
Turn roller adjustment screws clockwise in
quarter-turn increments until condition clears.
Condition Potential Cause Solution

Roller Alignment
The two roller alignment screws, located on the rear side plate of the bridge assembly (see Figure 11), allow adjustment
of the bridge assembly to keep the roller towers and bend shoe aligned. Misalignment can lead to sidemarking.
To Check Alignment:
• Viewingthebenderfromtheside,lookbetweentherollertowersandthe
bend shoe. If the roller tower appears to be misaligned with the bend
shoe, loosen the lock nuts on the roller alignment screws with a 9/16 in.
wrench.
• Usinga3/16in.hexkey,turntherolleralignmentscrewsuntiltheroller
tower aligns with the bend shoe. Tighten the lock nuts.
• Alwayssettherolleralignmentscrewsevenlytokeepthebridge
assembly parallel with the bend shoe.
– 13 –
Roller Adjustment Screws
The two roller adjustment screws on the left side of the bender
(see Figure 10) change the pressure applied to the tubing. The
factory setting (as viewed from the front) for these screws is the
gap measured between the top of the bender frame leg and the
bottom of the screw blocks.
Notes:
• Whentherolleradjustmentischangedtocompensateforunderoroversizedtubing,returntherollerscrewstotheir
original factory setting before bending a new length or lot of tubing.
• ZEROSETmayneedtobere-established.(SeeBending,page11,step2.)
• Settherolleradjustmentscrewsevenlytokeepthebridgeassemblylevel.
Figure 10
Roller
Adjustment
Screws
Original
Factory Setting
Figure 11
Roller
Alignment
Screws

Maintenance
If this bender is subjected to flooding, severe impact, fire, or other
extreme conditions, it should be inspected thoroughly by a trained
technician before use.
Front Chain
The front chain requires no routine adjustment. However, it will stretch
slightlyaftermakingthefirst10to20bendsof11/2or2in.;or38or
50 mmODheavywalltubing.Ifthereisanyslackinthechain:
1. Disconnect the bender from the power source and remove the roller
tower.
2. Remove the bend shoe retaining pin. (See Figure 12.)
3. Rock the bend shoe gently and pull forward until it clears drive lugs.
Remove the bend shoe.
CAUTION!
Bend shoe weight is 33 lb (15 kg)
4. Remove the long pin on the right side of the bridge assembly. (See
Figure 13.)
5. Unhook both springs from the left side of the bridge assembly, and
remove the bridge assembly. (See Figure 14.)
6. Remove the front cover, exposing the front chain. (See Figure 15.)
7. Loosen the adjusting bolt, and rotate cam clockwise until the chain is
free of slack. Retighten the adjusting bolt. (See Figure 16.)
8. Reassemble the cover, bridge assembly, and bend shoe.
Lubrication
• Chainsdonotrequirelubricationundernormalworkconditions.For
corrosive environmental conditions, a 90 weight oil may be used.
• Lubricate rollers and pivot points with a light machine oil as
necessary.
– 14 –
Figure 12
Figure 13
Figure 14
Figure 15
Figure 16
Adjusting
Bolt

– 15 –

Swagelok—TM Swagelok Company
©1999, 2002, 2004 Swagelok Company
Printed in U.S.A.
December 2004, R5
MS-13-138
Warranty Information
Swagelok products are backed by The Swagelok Limited
Lifetime Warranty. For a copy, visit swagelok.com or contact
yourauthorizedSwagelokrepresentative.
This manual suits for next models
1
Table of contents
Other Swagelok Construction Equipment manuals