Swisscom Aton C30 User manual

Aton C30
Manual
Bedienungsanleitung
Mode d’emploi
Istruzioni per l’uso

1
2
3
4
5
6
7
8
21
20
19
18
17
16
10
13
14
15
9
11
12
1. Telephone line socket
2. Handset hook
3. Keypad
4. Handset cord socket
5. Handset volume
6. Recall
7. Volume boost
8. Call memory / OK
9. Delete
10. Mains adapter socket
11. Ring tone
12. Ring melody
13. Ring volume
14. Speed dial keys
15. Phone book
16. Handset tone
17. Speaker volume
18. Speakerphone
19. UP/DOWN
20. New call indicator
21. Ringer indicator
English

1. Prise de ligne téléphonique
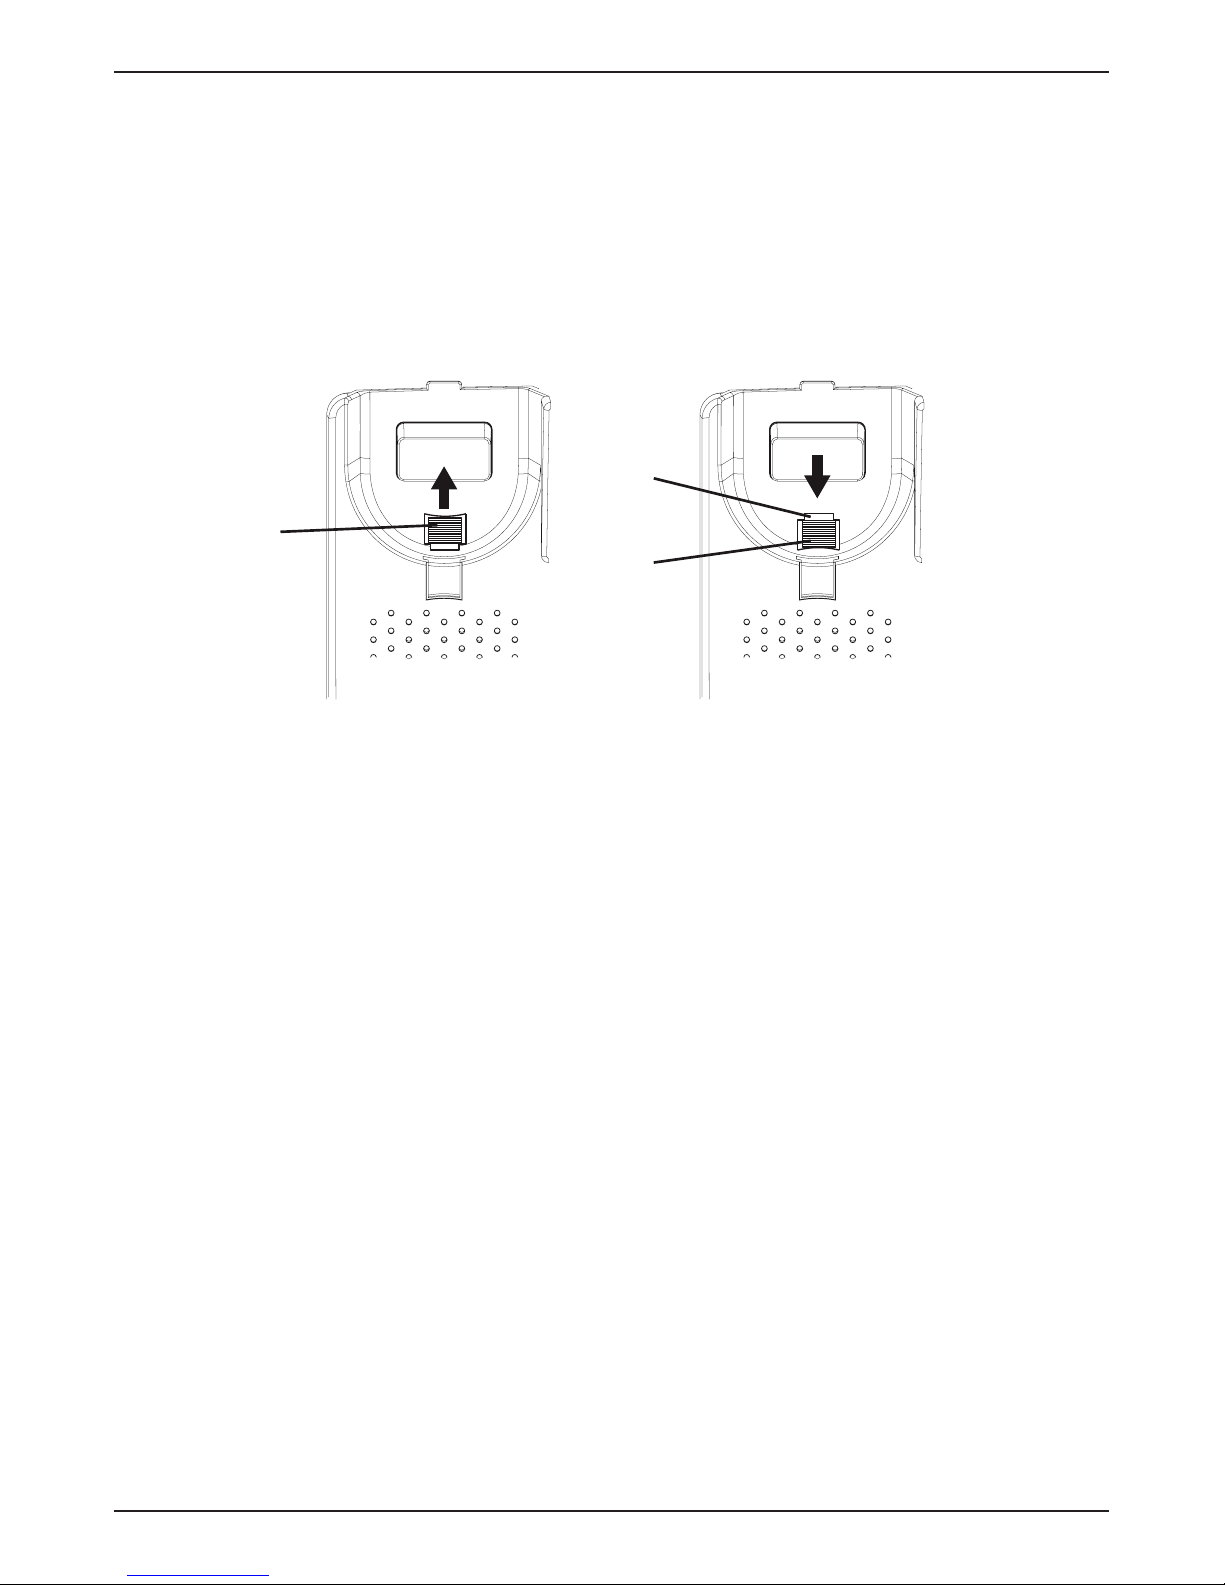
2. Languette de support du
combiné
3. Clavier
4. Prise du cordon du combiné
5. Volume du combiné
6. Touche R
7. Amplication du volume
8. Journal des appels / OK
9. Effacer
10. Prise du bloc d'alimentation
11. Tonalité d'appel
12. Mélodie
13. Volume de la sonnerie
14. Touches mémoires directes
15. Répertoire
16. Tonalité du combiné
17. Volume du haut-parleur
18. Mode mains libres
19. HAUT/BAS
20. Témoin d’appel en absence
21. Témoin de la sonnerie
Français
1. Presa linea telefonica
2. Gancio cornetta
3. Tastiera
4. Presa cavo cornetta
5. Volume cornetta
6. Recall (funzione richiamata)
7. Volume amplicato
8. Ultime chiamate / OK
9. Elimina
10. Presa adattatore di rete
11. Suoneria
12. Melodia suoneria
13. Volume suoneria
14. Tasti composizione rapida
15. Rubrica telefonica
16. Tono cornetta
17. Volume microfono
18. Vivavoce
19. FRECCIA SU/FRECCIA GIÙ
20. Indicatore nuova chiamata
21. Indicatore suoneria
Italiano
1. Buchse für das Telefonkabel
2. Hörerhaken für Wandmontage
3. Zahlenfeld
4. Buchse für Hörerspiralkabel
5. Hörerlautstärke
6. R-Taste
7. Lautstärkeanhebung
8. Anruiste / OK
9. Löschen
10. Buchse für Netzteil
11. Klingeltöne (an der Unterseite)
12. Klingelmelodie (an der
Unterseite)
13. Klingellautstärke
14. Direktwahltasten
15. Telefonbuch
16. Hörerklang
17. Lautsprecherlautstärke
18. Lautsprecher
19. NACH OBEN/NACH UNTEN
20. Anzeige neue Anrufe
21. Optische Anrufsignalisierung
Deutsch

1
English
Description
Aton C30
This product can be used as a desktop or wall-mounted
telephone. Handset tone control, volume boost, enhanced ring
volume and visual call indication make the telephone well
suited for people with hearing difficulties.
The extra-large keypad and easy to read display with large
characters make the telephone easy to use even with impaired
eyesight.
The built-in phonebook can store up to 30 names and
numbers. Three one touch memory keys can be programmed
for frequently used numbers or emergency numbers. A call
memory logs the 15 most recently incoming and outgoing
calls.
A speakerphone function allows you to talk hands-free with
the simple press of a button.

2
English
Installation
Connection
1. Connect the curly cord to the handset and to the socket
marked yon the telephone.
2. Connect the telephone line cord to a network wall socket
and to the Ksocket on the back of the telephone.
3. Connect the mains adapter*to the mains power wall
socket and to the DC 9V socket on the telephone.
4. Lift the handset and listen for the dial tone.
Batteries
Four AA alkaline batteries are needed for the call memory and
speakerphone in the event of a power cut. When
BATT. LOW
is displayed, replace all 4 batteries. Use only AA alkaline
batteries of good quality (not included).
Note!
Before installing or changing the batteries, make sure
that the telephone is not connected to the telephone
network.
1. Remove the battery cover and insert the batteries ensuring
correct battery polarity is observed.
2. Replace the battery cover and reconnect the telephone
line cord.
* Note: Only use the enclosed mains adapter.

3
English
Basic setup
Before using the telephone the first time, the following basic
settings should be made. After confirming a setting, the next
setting is automatically displayed. To skip to the next setting,
press .
The phone will return to standby mode after 30 seconds of
inactivity or when pressing .
On first setup the display clock will show
00:00
.
1. Press and hold *for about 5 seconds until the hour
flashes.
2. Use v / Vto change the value and confirm with .
3. Repeat steps 1–2 to set the minutes, day and month.
ENGLISH
is displayed.
Use v / Vto select the desired language, then confirm with
.

4
English
-2- CONTRAST
Use v / Vto set the display contrast setting
(1–4), and confirm with .
KEYT. ON
Use v / Vto set key tone ON/OFF, and confirm with .
-100- FLASH
Use v / Vto set the flash key time (100/300/600 ms) and
confirm with .
The standard setting is 100 for Switzerland.
LED OFF
Use v / Vto enable/disable the LED indicator for new
calls, and confirm with .
TONE
Use v / Vto select either tone or pulse dialling mode, and
confirm with .
Note!
If unsure of which mode to use, select TONE as this
works in most locations.

5
English
Wall mounting
The telephone can be wall mounted by using the included
wall mount bracket and two screws (not included).
Warning!
Make sure that no cables, water pipes or gas pipes are
located inside the wall before drilling into it.
1. Drill two holes in the wall, vertically 83 mm apart.
2. Insert the screws, allowing them to project
~5 mm out from the wall.
3. Unplug and remove the handset.
4. Fit the guide tabs (A) on the bracket into the slots (B) on
the back of the telephone, then slide the bracket upwards
until it snaps into place.
B
A

6
English
5. Position the telephone so that the screws on the wall fit
into the slots in the bracket, then slide the telephone
downwards until it is hanging on the screws.
6. Remove the handset hook (C) by pushing it upwards, and
insert it in the reversed position so that the small tab (D)
protrudes. The hook will now keep the handset in the
cradle when the phone is wall mounted.
C
D
C
7. Reconnect the handset and place it in the cradle.
Note!
If the phone is to be used as a desktop phone again,
remember to reverse the position of the handset hook.

7
English
Operation
Making a call
Normal dialling
1. Lift the handset.
2. Dial the number. Hang up the handset to terminate the
call.
Speakerphone
Note!
The speakerphone only works when batteries are installed
or mains adapter is connected.
1. Press sto activate the speakerphone. The LED next to
the key will light up.
2. Dial the number. Press sagain to terminate the call.
Lift the handset to switch from speaker to handset during a
call.
Pre-dialling
1. Enter the number. Press to delete the last entered
digit.
2. Lift the handset or press sto dial.
Quick redial
1. Lift the handset or press s.
2. Press to redial the last dialled number.

8
English
Dialling numbers in the call memory
1. Press to display the most recent call.
2. Use v / Vto scroll through the last 15 incoming and
outgoing calls.
= Incoming call
= Outgoing call
3. Lift the handset or press s to dial the displayed
number.
Speed dial (one-touch dialling)
1. Press one of the speed dialling keys A/B/C. The stored
telephone number is displayed.
2. Lift the handset or press sto dial.
Dialling numbers in the phone book
1. Press b to open the phone book.
2. Use v / Vto browse through the phone book, or enter
the first character in the name to quickly find an entry
(see Keypad characters).
3. Lift the handset or press sto dial.
Answering
Lift the handset to answer an incoming call, or press sto
answer using the speakerphone.
Ring signal
The ring melody and tone can be adjusted using the sliders on
the bottom of the telephone.
Ring melody
Ring tone
The ring volume is adjusted with the switch on the right side
of the telephone.

9
English
Volume control
The speaker volume is adjusted with a slider on the right side
of the telephone.
The handset volume control is located under the handset.
Keypad characters

10
English
Additional functions
Phone book
The phone book can store up to 30 entries. When the memory
is full,
----100%
is displayed.
Storing numbers in the phone book
1. Press and hold buntil a blinking cursor is shown.
2. Enter a telephone number (up to 22 digits). Use v/V
to move the cursor and to erase if needed.Use #to
insert a pause in the number.
3. Press to confirm. A blinking cursor will be shown on
the second line on the display.
4. Enter a name (up to 9 characters) for the number to be
stored (see Keypad characters).
5. Press to confirm.
OK
is now displayed.
6. Repeat steps 1–5 to store another number, or press and
hold to exit.
Deleting numbers from the phone book
1. Press b to open the phone book.
2. Use v/Vto browse through the phone book, or enter the
first character to quickly find an entry.
3. Press and hold to delete the entry.

11
English
Editing numbers in the phone book
1. Press b to open the phone book.
2. Use v/Vto browse through the phone book, or enter the
first character to quickly find an entry.
3. Press and hold buntil the blinking cursor appears.
4. Use v/Vto move the cursor, and use and the
keypad to erase and enter new data.
5. Press to confirm. The cursor will move to the second
line.
6. Repeat step 4 to edit the name/description.
7. Press to confirm.
OK
is displayed.
Storing speed dial numbers
1. Press and hold one of the speed dialling keys
A/B/C until a blinking cursor is shown on the first line on
the display.
2. Enter a telephone number (up to 22 digits) using the
keypad. Use v/Vto move the cursor and to erase
if needed.
Use #to insert a pause in the number.
3. Press to confirm. A blinking cursor will be shown on
the second line on the display.
4. Enter a name (up to 9 characters) for the number to be
stored (see Keypad characters).
5. Press to confirm. OK is displayed.
6. Repeat steps 1–5 to store numbers for the other speed
dialling keys.
Deleting speed dial numbers
Speed dial numbers can not be deleted, they can only be
replaced by storing a new number.

12
English
Caller ID and call memory
Caller ID allows you to see who is calling before you answer
and to see who has called in your absence.
Note! The Caller ID function must be subscribed. Please
contact your network operator for more information.
The call memory will store the last 15 incoming and 15 outgoing
calls. On the display, incoming (answered and unanswered) calls
are indicated with and outgoing calls with .
If the Call Indicator function is active, a blinking light
indicates that an unanswered call has been received since the
call memory was last checked.
Browsing the call memory
1. Press then v / Vto scroll through the call
memory. The number and time of each call will be
displayed. For calls older than 24 hours, the date of the
call is displayed instead of the time.
2. Press to exit the call memory.
Deleting numbers from the call memory
1. Press then v / Vto scroll through the call memory.
2. Press and hold to delete the selected entry.
Copying call memory entries to the phone book
1. Press then v / Vto scroll through the call memory.
2. Press and hold *until
OK
is displayed. The selected
number has now been saved to the phone book.
Call timer
The display shows the current time when in standby mode.
During a call the display will show a call timer instead,
indicating the duration of the call. The call duration is
displayed for 5 seconds after the call is terminated.

13
English
Hearing aid
This telephone is hearing aid compatible. Select the Tmode
on your hearing aid to enable this feature.
Recall key (R)
ABC
2
1
DEF
3
JKL
5
GHI
4
MNO
6
TUV
8
PQRS
7
WXYZ
9
0#
ABC
C
543
R
HearPlus
R
Press the Rkey followed by the extension number to transfer
a call when connected to a PBX system.
Additional network services may be accessible by using the
R, *and #keys. Please contact your network operator for
more information about the available network services.
Volume Boost
The handset volume can be raised another 10 dB by pressing
the Volume Boost key while talking. The LED indicator on the
key will light up. Press the key again or terminate the call to
turn off Volume Boost.
Warning!
The handset volume can be very loud with this setting.
Volume boost should only be used by persons with impaired
hearing.
Handset tone
The speech tone (bass/treble) can be adjusted for better
clarity using the handset tone control on the right side of the
phone. PLEASE NOTE! Only works when Boost is active.

14
English
Care and maintenance
Your unit is a technically advanced product and should be treated with the
greatest care. Negligence may void the warranty.
• Protect the unit from moisture. Rain/snowfall, moisture and all types of
liquid can contain substances that corrode the electronic circuits. If the
unit gets wet, you should remove the battery and allow the unit to dry
completely before you replace it.
• Do not use or keep the unit in dusty, dirty environments. The unit’s moving
parts and electronic components can be damaged.
• Do not keep the unit in warm places. High temperatures can reduce the
lifespan for electronic equipment, damage batteries and distort or melt
certain plastics.
• Do not keep the unit in cold places. When the unit warms up to normal
temperature, condensation can form on the inside which can damage the
electronic circuits.
• Do not try to open the unit in any other way than that which is indicated
here.
• Do not drop the unit. Do not knock or shake it either. If it is treated roughly
the circuits and precision mechanics can be broken.
• Do not use strong chemicals to clean the unit.
• The mains adapter is the disconnect device between the product and
mains power. The mains socket outlet must be close to the equipment and
easily accessible.
The advice above applies to the unit, battery, mains adapter and other
accessories.
Faults and self-help with troubleshooting:
Not every problem signies a fault in your telephone. In some cases,
problems can be resolved by briey interrupting the power supply to the base
station (unplug the power supply unit and then plug it in again) or just plug
in the telephone line cord off and on again.
Important: Some problems or faults can only be resolved if you take
the complete device (base station, handset and connection cable)
to the place of purchase.

15
English
Warranty/Maintenance/Repair/ Approval
Warranty
The warranty period is 2 years as of the date of purchase. For warranty repair, the
warranty card, lled out and stamped by the place of purchase must accompany
the faulty device. Excluded from the warranty are damages due to improper use,
wear and tear or tampering by others. The warranty does not include consumable
materials and faults that have only an insignicant affect on the value or usability
of the product. In case of errors, please contact your place of purchase.
Repair/Maintenance
Rental devices
If your phone does not operate properly, notify Technical Assistance
(phone number 0800 800 800).
The repair*and the fault action are free of charge.
Purchased devices
Repair services are performed free of charge within the warranty period
in accordance with the regulation of the warranty certicate. If a repair is
necessary, the device must be returned to the place of purchase.
If Technical Assistance is made available (also during the warranty period*),
the fault action is charged (route lump sum price as well as expenses for
time). The repair costs are additional outside the warranty period.
Help
If you have any general questions about products, services etc., please
contact your Swisscom Information Centre (toll-free number 0800 800 800).
* An exception is damage to wearing parts (cable, labels, batteries etc.) and
due to improper handling (damage from dropping, inltrated uids etc.).

16
English
Specications
Size: 175 mm x 175 mm x 60 mm
Weight: 750 g (including batteries)
Battery: 4 x 1.5 V AA Alkaline batteries
Conformity
This device is intended to be operated on the analogue Swiss network.
Country-specic conditions have to be taken into account. If you have any
questions about the differences between the public phone networks, please
contact your specialist dealer or network provider.
Swisscom hereby declares that this device meets the essential requirements
and other relevant regulations laid down in Directive 1999/5/EC.
The Declaration of Conformity can be found the following web site:
www.swisscom.ch
under the rubric “Online Shop”, Phone, Declaration of Conformity.
WEEE
Disposal of Waste Equipment by Users in Private Households in the
European Union. This symbol on the product or on its packaging
indicates that this product must not be disposed of with your other
household waste. Instead, it is your responsibility to dispose of your
waste equipment by handing it over to a designated collection point for
the recycling of waste electrical and electronic equipment. The separate
collection and recycling of your waste equipment at the time of disposal will
help to conserve natural resources and ensure that it is recycled in a manner
that protects human health and the environment. For more information about
where you can drop off your waste equipment for recycling, please contact
your local city ofce, your household waste disposal service or the shop where
you purchased the product.
Where batteries or accumulators are collected together with waste electrical
and electronic equipment on the basis of Directive 2002/96/EC, batteries
or accumulators shall be removed from the collected waste electrical and
electronic equipment.

1
Deutsch
Beschreibung
Aton C30
Das Aton C30 kann als Tischtelefon verwendet oder an die
Wand montiert werden. Durch eine verbesserte Regelung
des Hörerklanges, die Lautstärkeanhebung, die verbesserte
Klingellautstärke und die optische Anrufsignalisierung eignet
sich diese Telefon optimal für Menschen mit Hörproblemen.
Durch das extra große Tastenfeld und das leicht lesbare
Display mit großen Zeichen kann das Telefon auch von
Menschen mit eingeschränkter Sehfähigkeit verwendet
werden.
Im integrierten Telefonbuch können bis zu 30 Namen mit
Rufnummern gespeichert werden. Für häufig verwendete
Nummern oder Notrufnummern können drei Direktwahltasten
programmiert werden. Die 15 letzten ein- und ausgehenden
Anrufe werden in einer Anrufliste gespeichert.
Mit der Freisprechfunktion haben Sie mit einem Tastendruck
die Hände beim Telefonieren frei.
Table of contents
Languages:
Other Swisscom IP Phone manuals