SWIT MUF100C User manual
USER MANUAL
SWIT Electronics Co.,Ltd.
MUF100C
Out shooting portable tripod
Ver: A
Tel:+86-25-85805753
Fax:+86-25-85805296
http://www.swit.cc
E-mail: [email protected]
Thank you for choosing SWIT products, please read this user manual before using and keep it properly for future reference.
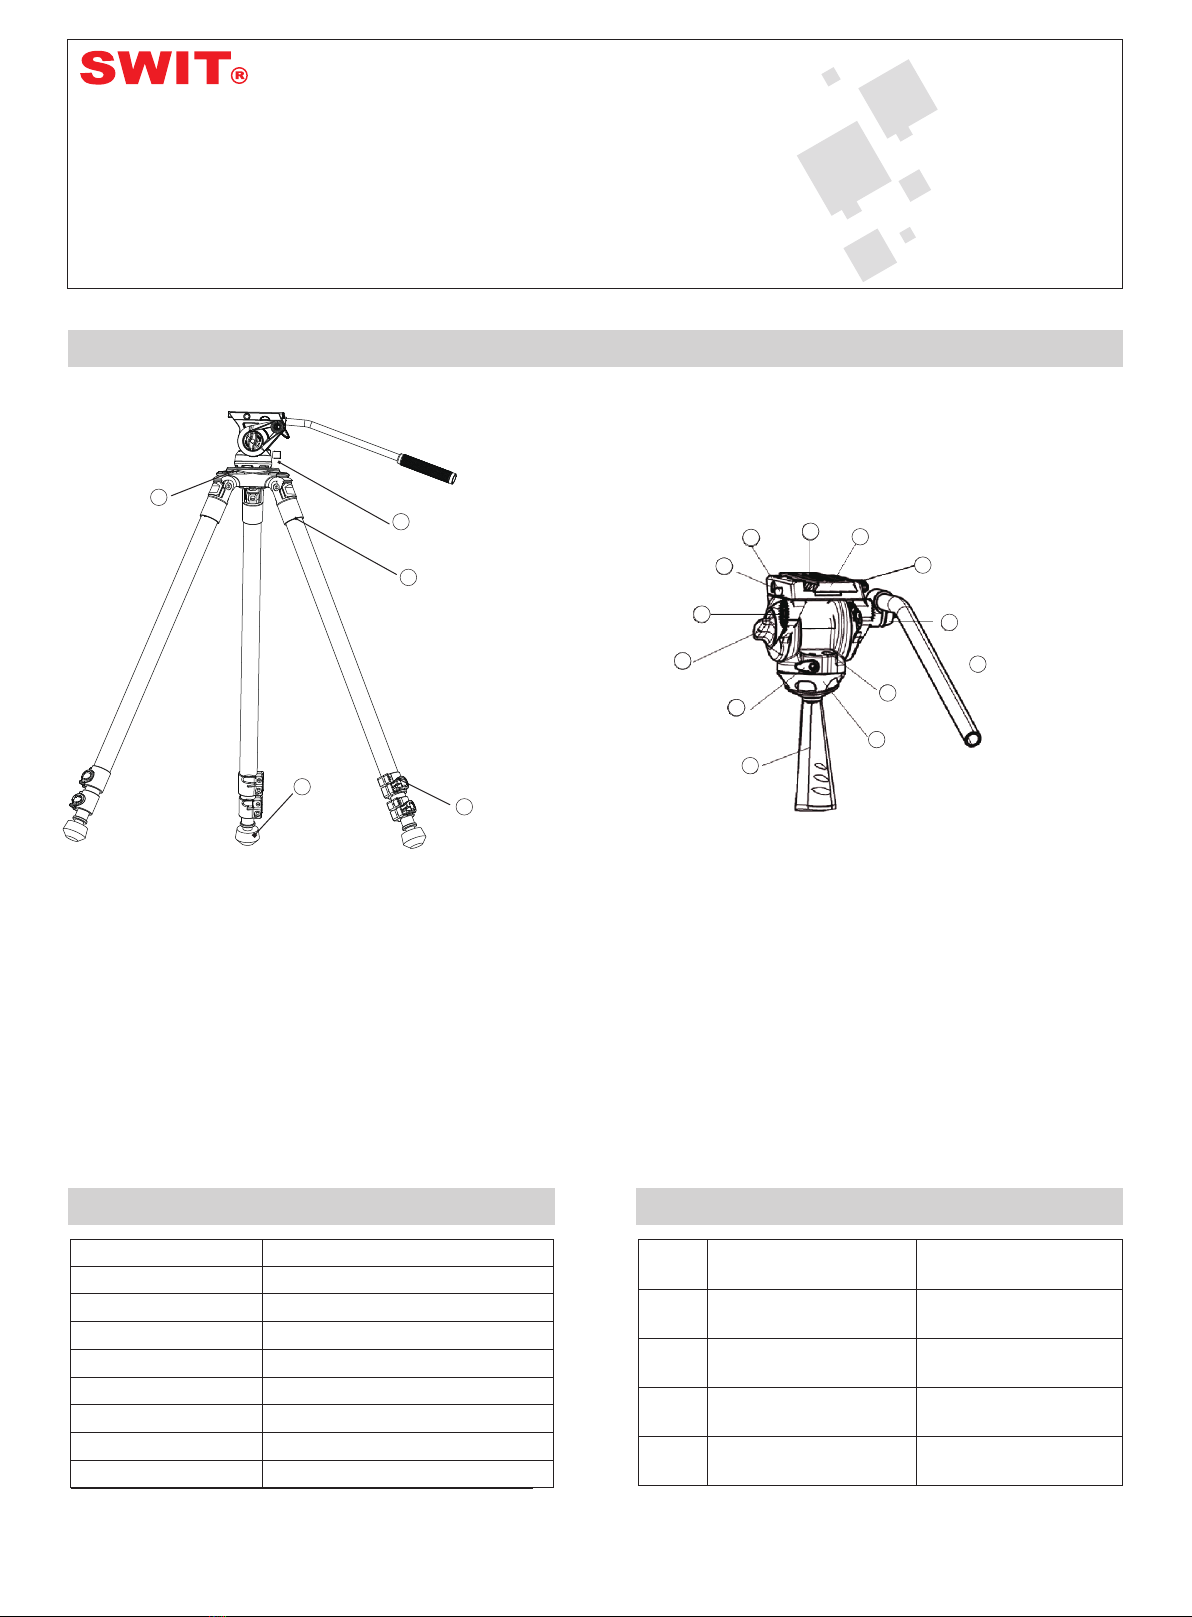
Appearance
MUF100C
1.Main frame
2.Connecting plate
3.Angle adjustment button
4.Changeable feet nail
5.Buckle
6.Standard bolt
7.Quick release plate safety switch
8.Accessories installation bolt
9.Handle installation port
10. Pitch damping knob
11.Horizontal damping lock knob
12.Hand knob
13.Ball arm
14.Bubble level
15.Handle
16.Handle lock knob
17.Quick release lock bolt.
18.Quick release plate
TH100 Fluid head
Model & Specification Packing list
No.
1
2
3
4
Description
Tripod kit
Quick release plate
Accessories tool
Fluid head
Quantity
1
1
1
1
Model
Material
Tube Diameter(mm)
Self-weight(kg)
Load(kg)
Fluid head
Number of feet socket
Fold height(cm)
Height(cm)
MUF100C
Aluminum
29.4-39
4.83
10
TH100
3
82.5
40-170
Tips: Manual measurement has an error of 1-2cm, please refer to
the actual object, thank you for understanding.

the PTZ will automatically return to the
horizontal state after being used.
(2) By adjusting the horizontal damping locking
button, the horizontal Angle of the cradle
head can be adjusted to achieve a 360-degree
horizontal Angle and a 360-degree panoramic
shooting.
5. The use of the bubble level
The tripod will be perpendicular to the ground
when Bubble inside the level is in the most
middle position.
6. Unfold and fold the tripod
(1)Pull open the buckle and the foot frame will
slide automatically. According to the required
height, buckle the buckle again to fix the
height of the foot frame.
(2)Open the pins of the tripod to an appropriate
Angle.For the foot of fixed middle tube, only
fixed Angle can be selected.The Angle can be
adjusted for a moving tube or a leg that
extends to the ground.
7. Nail conversion
On loose ground, can use foot nail to increase
tripod stability.Rotate the rubber part of the
convertible foot pin to switch between the
foot nail and the rubber foot.When switching,
make sure to rotate to a position that cannot
be rotated,but do not use brute force to avoid
damage to the tripod.
1. Do not use at temperatures below minus 40℃ and above 70℃.
2. When in damp, sand and dust environment, please wipe dry with
dry cloth after use When in a rain environment, after use, please pull
the pin to full elongation Until the inside of the pin is dry and then
closed; Not recommended for use in seawater.
3. Do not carry camera or photography equipment on the tripod.
4. The product does not need to be equipped with lubricating oil, do
not add improper lubricating products without authorization, if
necessary, use standard lubricants and oils Or please call our
customer service hotline +49(0)2131 6632331 for consultation.
5. Please do not disassemble the product under the guidance of
non-professionals. If you have any questions, please call SWIT
customer service hotline +49(0)2131 6632331.
6. In order to ensure personal safety, do not use this product with
live products, high voltage equipment and strong chemical
exposure.
7. When adjusting the device, do not exert too much force to avoid
component damage.
8. Do not exceed the maximum load (see parameter description).
9. Do not expose the product to the sun or high temperature for a
long time in the car or under the glass.
10. When working, do not let the product be seen in a dangerous
public place out of the reach of children.
If you have any comments and suggestions about this product, you can contact us through the following ways to give us feedback.
Your comments are valuable resources for our growth.Thank you very much!
Customer service hotline: +49(0)2131 6632331
E-mail: info@swit-europe.com (European office) /Cont[email protected]c (China headquarters)
Quick release plate
safety switch
Take out the quick
release plate
Lock knob
Install quick
release plate
Adjust handle usage
Directions
Notice
Common problems and solutions
Contact
Left handle
Installation Port
Right handle
Installation Port
Height adjustment
Adjust the buckle
with wrench
Angle
adjustment
Foot nail & Rubber
feet conversion
Faults
The head shaking
The foot tube slides loose
Quick release plate can not be removed
Open the buckle foot tube and cannot fall
by itself
After installing the equipment,
The head tilt forward or backward
Quick release plate can not be inserted, or
the safety bolt loses its protective effect.
Reason
The head is not connect to the tripod
The buckle is not fastened well
Lock knob not loosened/
Failure to press safety bolt
Foreign matter between the wall of the
foot tube,or flip lock is too tight
Quick release plate is not in the right place
Insertion direction of quick release plate
is wrong
Treatment
Connect the head with the tripod
Fasten the clasp or lock the clasp with a medium wrench
Loose the lock knob,and press the safety bolt,
simultaneously pull out the quick release plate
Check if it has foreign matter or loose the flip clock
appropriately.
Adjust the front and back position of the quick release
plate until the platform is in a horizontal state.
Keep the arrows at the bottom of the quick release plate
in the same direction as the head.
1.Camera installation
SLR camera or camcorder can be installed.
①Rotate the lock knob for release quick
release plate counterclockwise.
②Press the safety switch and take out the
quick release plate.
③Chosse 1/4 or 3/8 bolt to lock the device
according to your requirement.
③Press the quick release plate diagonally into
the platform from the direction of the safety
bolt,Turn the knob to lock.
2.Accessories & other device installation
The external nut can be connected with the
rocker arm, display LED lights and other
equipment.Choose 1/4 or 3/8 screw according
to the equipment you have,you can locking
with the coin in the tool kit.
3. Handle installation
① Rotate the handle lock button counter
clockwise And remove the handle.
② Re install the handle on the left or right
handle Install the handle according to
your use habit.
4. Adjust the Angle of the cradle head
(1) The pitch Angle of the holder can be
adjusted between +90 degrees and -70
degrees by adjusting the pitch damping
knob.Under the condition of low damping,
Other SWIT Camera Accessories manuals


Popular Camera Accessories manuals by other brands

Viltrox
Viltrox EF-NEX Mount instructions

Calumet
Calumet 7100 Series CK7114 operating instructions

Ropox
Ropox 4Single Series User manual and installation instructions

Cambo
Cambo Wide DS Digital Series Main operating instructions

Samsung
Samsung SHG-120 Specification sheet

Ryobi
Ryobi BPL-1820 Owner's operating manual


