FRA NÇ A IS
ITALIANO
ESPAÑOL
NEDERLANDS
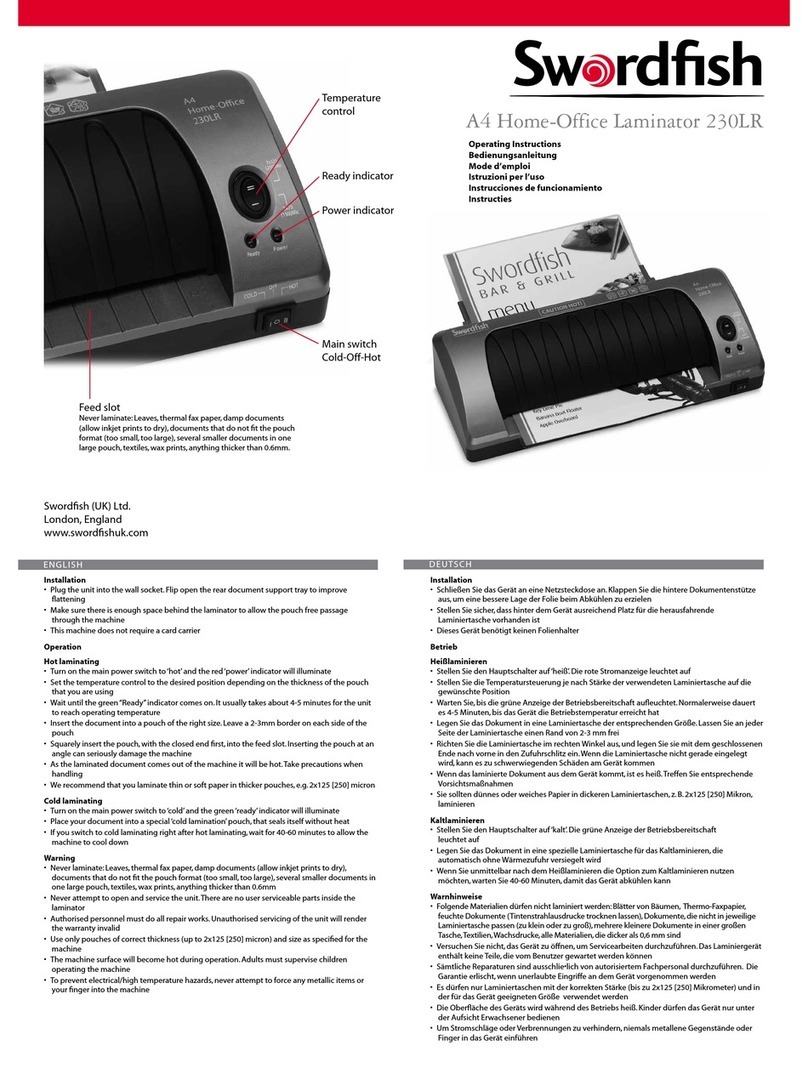
Installation
• Brancher l’unité sur le secteur
• Veiller à laisser susamment d’espace derrière la pelliculeuse pour permettre au document de
traverser la machine sans problèmes
• Cette machine ne nécessite pas de support de carte
Fonctionnement
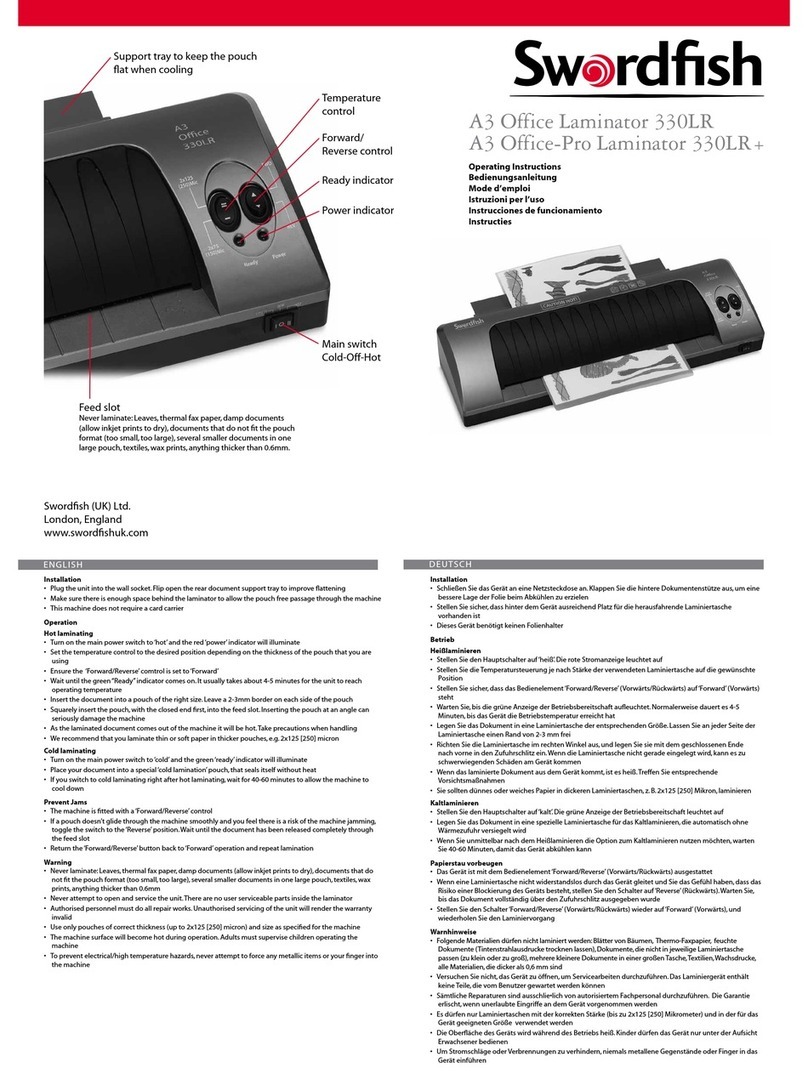
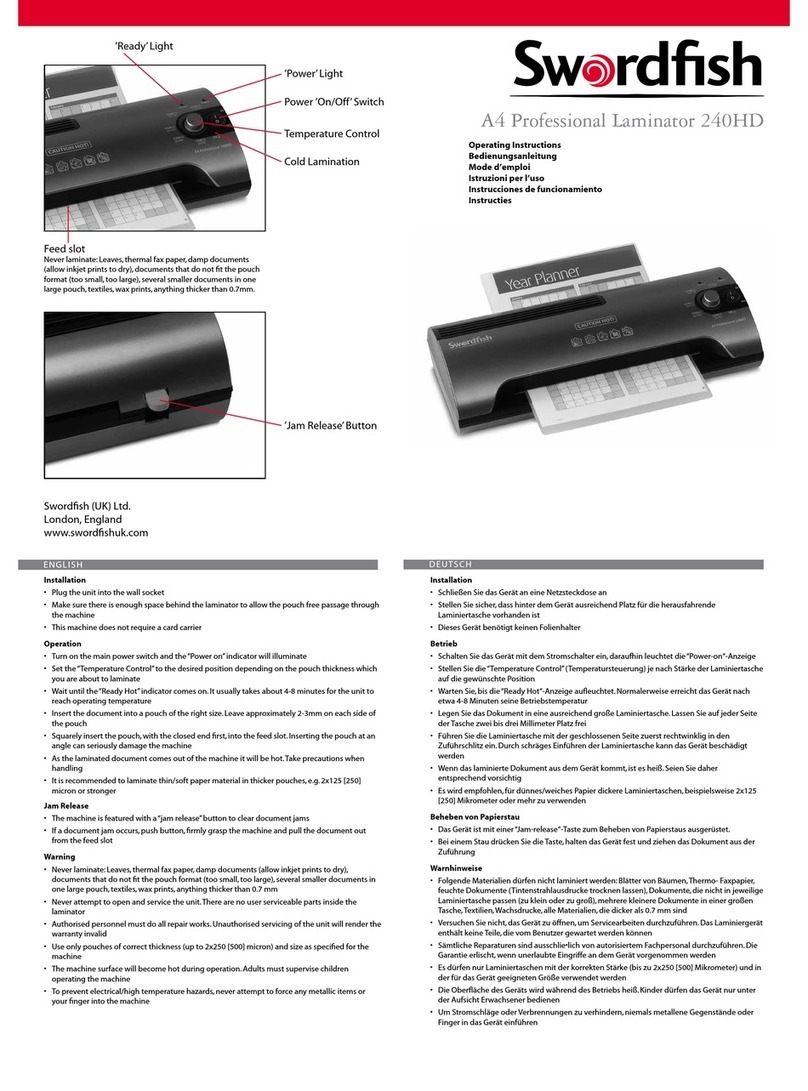
• Actionner l’interrupteur principal ; le témoin rouge “Power” s’allume
• Attendre que le témoin “Ready” s’allume. L’unité atteint généralement sa température de
service en quelque 2-3 minutes
• Introduire le document dans une chemise de taille appropriée. Laisser environ 2-3 mm sur
chaque bord
• Introduire l’extrémité fermée de la chemise dans la fente d’alimentation. Pour éviter
d’endommager gravement la machine, ne pas introduire la chemise de biais
• À sa sortie de machine, le document pelliculé est chaud. Le manipuler prudemment
• Il est conseillé de pelliculer les papiers minces/souples dans des chemises plus épaisses, par ex.
2x125 [250] micromètres
Déblocage des bourrages
• La machine est équipée d’un bouton « jam release » pour débloquer les bourrages
• Lorsqu’un bourrage se produit, appuyer sur le bouton, tenir fermement la machine et dégager
le document
Mise en garde
• Ne jamais pelliculer les feuilles d’arbre, le papier fax thermique, les documents humides
(attendre que l’encre soit sèche), les documents ne correspondant pas au format de la chemise
(trop petits ou trop grands), plusieurs petits documents dans une chemise de grande taille, les
textiles et autres éléments de plus de 0.5 mm d’épaisseur
• Ne pas tenter d’ouvrir ou d’entretenir l’unité. La pelliculeuse ne comporte aucun élément
susceptible d’être réparé par l’utilisateur
• Coner les réparations exclusivement à du personnel agréé. Tout entretien non autorisé de
l’unité a pour eet d’annuler la garantie
• Utiliser uniquement des chemises d’épaisseur adéquate (jusqu’à 2x125 [250] micromètres) et
dont les dimensions correspondent à la machine
• La surface de la machine chaue pendant le fonctionnement. Ne pas laisser les enfants utiliser
la machine sans la surveillance d’un adulte
• Pour éviter les risques d’électrocution ou de brûlures, ne pas introduire d’éléments métalliques
ou les doigts dans la machine
Instalación
• Enchufe la unidad a la red eléctrica
• Asegúrese de que hay suciente espacio detrás de la laminadora para que la bolsa salga sin
problemas de la máquina
• Esta máquina no necesita transportador
Funcionamiento
• Accione el interruptor de encendido; el piloto “Power” se iluminará
• Espere a que se ilumine el piloto “Ready”. La máquina tarda alrededor de 2-3 minutos en
alcanzar la temperatura de funcionamiento adecuada
• Introduzca el documento en una bolsa de tamaño adecuado, dejando unos 2 ó 3 mm a cada
lado de la bolsa
• Inserte la bolsa bien recta en la ranura de entrada, con el extremo cerrado primero. Si
introduce la bolsa en ángulo, la máquina puede estropearse
• El documento sale de la máquina caliente; extreme las precauciones
• En el caso de las hojas de papel nas, es recomendable utilizar bolsas más gruesas, por
ejemplo, de 2 x 125 [250] micras
Eliminación de atascos
• La máquina incorpora un botón de eliminación de atascos para extraer los documentos
atascados
• Si se atasca un documento, pulse el botón, sujete la máquina con rmeza y saque el
documento por la ranura de entrada
Advertencia
• No lamine hojas de plantas, papel térmico para fax, documentos húmedos (deje secar la tinta
de los documentos que acaban de salir de la impresora), varios documentos pequeños juntos
en una bolsa grande, tejidos, papel paranado y documentos de un grosor superior a 0.5 mm
• No abra la máquina para repararla. La laminadora no lleva ninguna pieza que pueda reparar el
usuario
• Todas las operaciones de reparación deben ser realizadas por personal autorizado. De no
respetarse esta norma, la garantía de la máquina perderá su validez
• Utilice solamente bolsas del grosor adecuado (hasta 2x125 [250] micras) y del tamaño
indicado para la máquina
• Durante el funcionamiento, la supercie de la laminadora se calienta. Si va a utilizar la máquina
un niño, deberá hacerlo bajo la supervisión de un adulto
• Tenga cuidado de no introducir los dedos o cualquier objeto metálico en la máquina para
evitar accidentes eléctricos y quemaduras
Installazione
• Collegare la spina elettrica dell’apparecchio alla presa a muro
• Vericare che ci sia spazio a sucienza dietro la plasticatrice in modo che la pouch possa
liberamente inserirsi nella macchina
• La macchina non necessita dell’uso di un portaschede /portacarte
Funzionamento
• Accendere l’interruttore principale: la spia “Power” si illumina
• Attendere no all’accensione della spia “Ready”. Solitamente occorrono 2-3 minuti prima che
la macchina raggiunga la temperatura di funzionamento
• Inserire il documento in una pouch della dimensione appropriata. Lasciare un margine di circa
2-3mm per ogni lato della pouch
• Inserire la pouch nella fessura di alimentazione allineandola perfettamente con quest’ultima,
inserendo per primo il lato chiuso. L’inserimento della pouch in modo non appropriato, ad es.
di sbieco o trasversalmente, potrebbe danneggiare seriamente la macchina
• Quando il documento plasticato esce dalla macchina è molto caldo, per cui è necessario fare
molta attenzione nel maneggiarlo
• È consigliabile plasticare materiale cartaceo sottile/leggero in pouch più spesse, ad es. da
2x125 [250] micron
Funzione antinceppamento
• La macchina è dotata di pulsante ”antinceppamento” per rimuovere i documenti inceppati
• Se un documento dovesse incepparsi, premere il pulsante, aerrare energicamente la
plasticatrice e tirare il documento fuori dalla fessura di alimentazione
Avvertenze
• Mai plasticare: foglie, carta termica per fax, documenti umidi (attendere che l’inchiostro si
asciughi), documenti non adeguati al formato della pouch (troppo piccoli o troppo grandi),
più documenti di piccole dimensioni in un’unica grande pouch, tessuti, stampe in cera e
qualsiasi cosa con uno spessore maggiore di 0.5 mm
• Non aprire mai la plasticatrice per eettuare interventi di manutenzione. La plasticatrice
non dispone di parti che possano essere riparate o sostituite dall’utente
• Gli interventi di riparazione devono essere eettuati esclusivamente da personale autorizzato.
Eventuali interventi di riparazione non autorizzati annulleranno la garanzia
• Utilizzare esclusivamente pouch di spessore (no a 2x125 [250] micron) e dimensioni
adeguate, come indicato nelle istruzioni della plasticatrice
• Durante il funzionamento, la supercie della plasticatrice si scalda. I bambini possono
utilizzare la plasticatrice solo sotto la supervisione di un adulto
• Non inserire alcun oggetto metallico o le dita all’interno della plasticatrice: rischio di
folgorazione/ustioni
Installatie
• Sluit het apparaat aan op het stopcontact
• Zorg ervoor dat er achter de laminator voldoende ruimte is om de hoes vrij door het apparaat
te laten bewegen
• Voor deze machine is geen kaartdrager nodig
Bediening
• Zet de voedingsschakelaar om. Het lampje ’Power’ (Voeding aan) gaat branden
• Wacht tot het lampje ’Ready’ (Gereed) brandt. Het duurt normaliter ongeveer 2-3 minuten
voordat het apparaat de bedrijfstemperatuur bereikt
• Plaats het document in een hoes met de juiste afmeting. Laat aan de randen van de hoes
ongeveer 2-3 mm vrij
• Plaats de hoes vlak en met het gesloten uiteinde naar voren in de papierinvoer. Als de hoes
onder een hoek in het apparaat wordt geplaatst, kan dit ernstige schade aan het apparaat tot
gevolg hebben
• Als het gelamineerde document uit het apparaat komt, is het heet. Denk daaraan voordat u
het vastpakt
• Het wordt aanbevolen dun of zacht papier in dikkere hoezen te lamineren, bijvoorbeeld van
2x125 [250] micron
Papierstoring oplossen
• Het apparaat heeft een ontgrendelingsknop om vastgelopen papier te verwijderen
• Druk als er een papierstoring optreedt op de knop, pak het apparaat stevig vast en trek het
document uit de papierinvoer
Waarschuwing
• Lamineer nooit: bladeren, thermisch faxpapier, vochtige documenten (laat inkjetafdrukken
eerst drogen), documenten die niet in de hoes passen (te klein, te groot), een aantal kleine
documenten in één grote hoes, textiel, wasafdrukken, documenten die dikker zijn dan 0.5 mm
• Probeer nooit het apparaat te openen en er onderhoud aan te plegen. Er bevinden zich geen
door de gebruiker te vervangen onderdelen in de laminator
• Alle reparatiewerkzaamheden moeten door bevoegd personeel worden uitgevoerd. Als er
onbevoegd onderhoud aan het apparaat is gepleegd, vervalt de garantie
• Gebruik uitsluitend hoezen met de juiste dikte (tot 2x125 [250] micron) en de aangegeven
afmeting
• Het oppervlak van het apparaat wordt heet als deze in bedrijf is. Er moet altijd een volwassene
toezicht houden als het apparaat door een kind wordt bediend
• Steek nooit metalen objecten of vingers in het apparaat, dit kan leiden tot elektrische
schokken of brandgevaar
