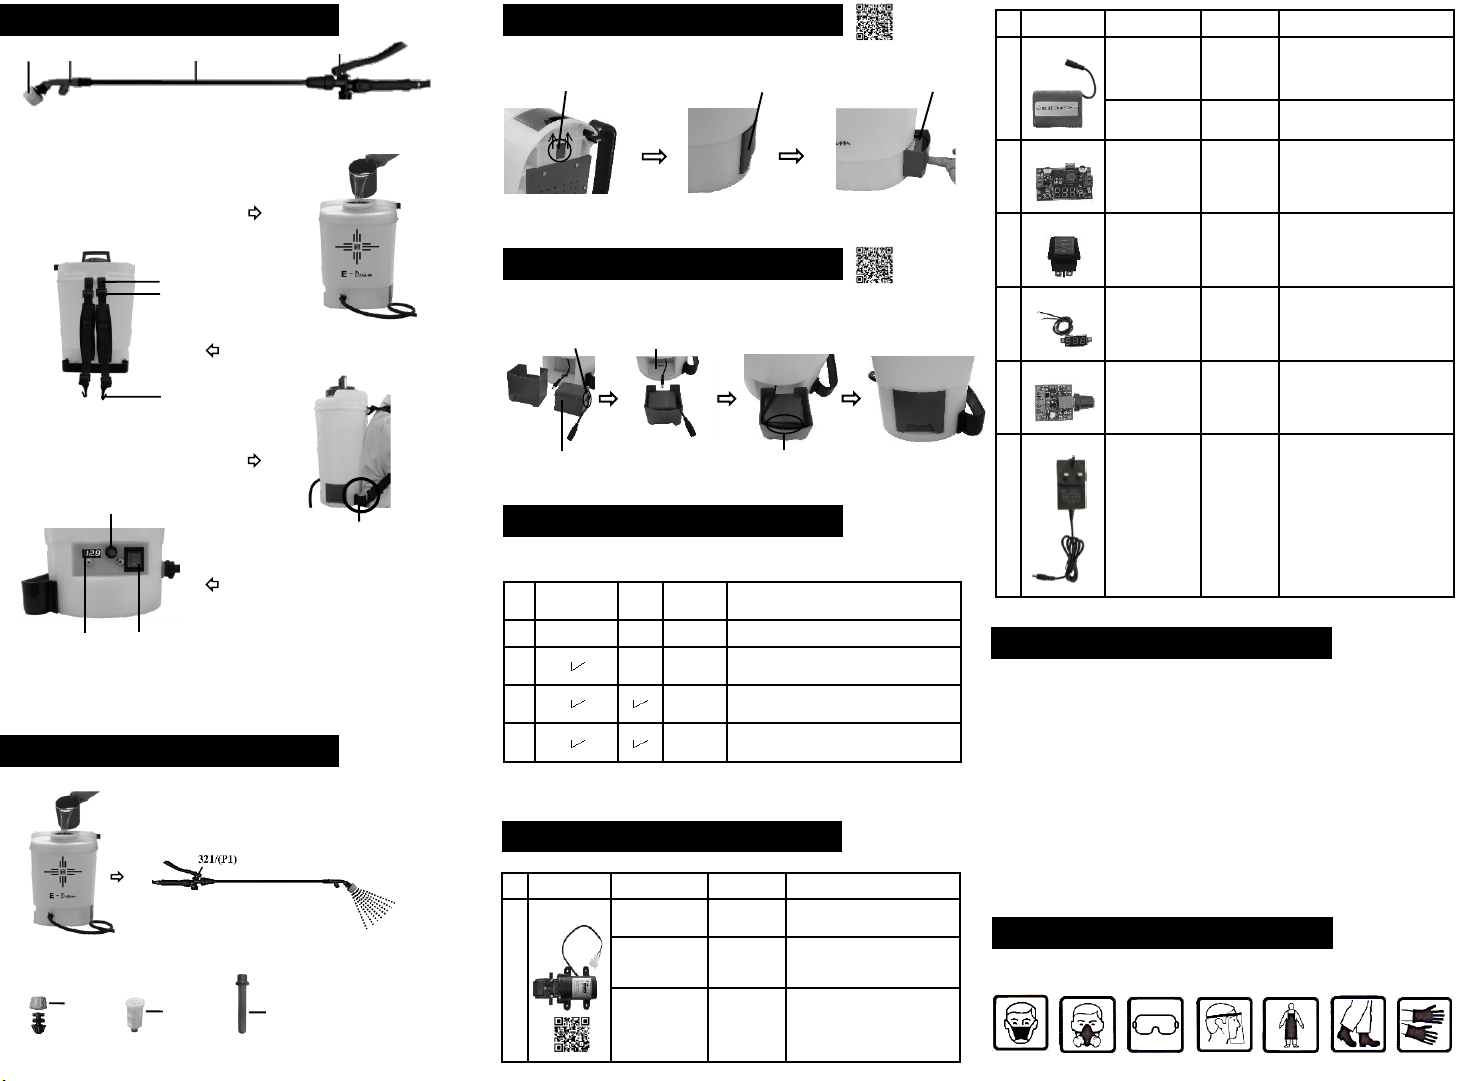
1) The lance [331(F)] with twin elbow [TE/2A(P1)]
and SCA/4 nozzle are screwed onto the automatic
release completed [321(P1)] with hose [346/(P2)] and
connected to sprayer. Fix the Filter IEM-DC(9) onto
the tank base.
2) Check all the joints are tightened properly
with washer to prevent leaking.
3) Fill the chemical mixture into the sprayer tank
through the strainer (303) in order to filtrate the dirt
and sediments. To avoid overflow.
4)Shoulder straps (337) are fully adjustable to
ensure operator’s comfort in fieldwork.
7) The Volmeter (EPB-EC05) show the voltage
reading. The spraying power will stop upon the reading
of Volmeter (EPB-EC05) shown below 10.0V.
1) To clean the sprayer After spraying job, fill sprayer tank with clean water at least 2 liters, then on the
power and squeezing the Automatic Release [321(P1)], to allow the clean water
to flow into Water Pump (EPB-WP2.6L), Spraying Lance [331(F)] and Nozzle
until blow out air only. Please to repeat the step at least 2 times, lastly keep
littleclean water in the tank to moisturize the Water Pump before storage.
Maintenance Guides
Problems and Remedies
337
338
339P
304
EPB-EC02
EPB-EC03
EPB-EC05
6)Rocket Switch (EPB-EC02),
i) Press down (=), power on, then adjust the
Governor Switch (EPB-EC03) to control the
flow as you needed.
ii) Press up (-), power on, the power is fixed
and the flow is dependent on type of nozzle
use [Recommended SCA/4(R) nozzle or any
nozzle which provided a flow rate below 0.8
L/Min at pressure 3 Bar].
iii) To off the power, press back to (0).
Attention: To save battery power, please to
disconnect or take out the battery when
storage. The Volmeter is off to confirm the
battery disconnected.
331(F)
TE/2A(P1)
SCA/4 321(P1)
5) To carry the sprayer, the shoulder strap hook
(339P) hooked on the stand guard (304).
Battery Casing Lock
Draw Battery Casing Instruction
Pic. 1 Pic. 2 Pic. 3
Battery Casing (EPB-TK07) Battery (EPB-BT-6.6AH)
Press the battery casing lock upward and push the casing out as pic.1 & 2 shown. Then, use your finger to pull
battery casing out fully as pic. 3 shown, now you can take out the battery easily. Please scan the QR code for
details.
Installation of Battery Instruction
Pic. 1
Replace battery into the battery casing and make sure the position of the battery cable outlet at your right hand
side at arrow upward position as pic.1 & pic.2 shown. Place the cable and the connector as pic. 3 shown before
push in the battery casing fully into the battery housing as pic.4 shown. Please scan the QRcode for details.
Battery Cable Outlet Battery Housing
Battery Cable Connector
Charging Battery Instruction
Remember to charge the Battery (EPB-BT-6.6AH) each time after use. The following are the charging instruction
details:-
2) To wash the nozzle
(SCA/4) and filter
[322(P1)]
Remove the nozzle cap (SCA/4/1), suction filter (IEM-DC9) inside the tank and
the filter [322(P1)] from cleaning chamber for cleaning purpose. Then, replace
them back after cleaning.
3) Disconnect or take
out the battery
(EPB-BT- 6.6AH)
Remember to disconnect or take out the battery after spraying job to prevent
wastage of the power. Charge the battery if necessary.
SCA/4/1
Caution
4.) Only use the original Battery Charger (EPB-CG-UK) to charge the battery and unplug the Battery Charger
after 3 to 4 hours charging to prolong the life span of Battery Charger and the Battery (EPB-BT-6.6AH).
7.) Always dry the sprayer body and electrical control area before storage. Please store the sprayer under roof
and cool dry place.
1.) Not recommend to use powder form agrochemical in this sprayer due to the Water Pump design. If
unavoidable condition, please dissolve the powder form chemical in water perfectly then fill into the sprayer tank
through Strainer (303). Please clean the sprayer according to Maintenance Guide immediate after spraying job to
prevent the stuck of Water Pump.
2.) Thinner,Solvents and Petrochemical Solvents are prohibited to used.
Operating Instruction
Battery (EPB-BT-6.6AH)
Pic. 2 Pic. 3 Pic. 4
3.) To avoid chemical solution overflow from tank when filling. This is to protect electrical components from
wet.
Practical Guide of Protective Clothing
To wear the appropriate personal protective clothing as pictograms below to prevent
direct contact or splashing of agrochemical during doing spraying job
Respirator Face Shield Hand GloveBoots
Apron
Goggle
No.