6
CHANGING THE DEFAULT SOUND SETUP
The elementsTM obturation unit offers three different sound mode settings. Active sounds
associated with various events for each of these modes are displayed in the chart below. To cycle
through volume indicator , audio mode indicator and Setup Mode Indicator options
press the button repeatedly until the desired option starts flashing.
1. Activate the unit by pushing the button.
2. Press the button, the will flash on the screen. Press one of the (+) or (-)
buttons until desired volume level is reached.
Press the button to enter Sound Mode Setup, , or will flash. Press one of the
(+) or (-) buttons until desired sound mode is reached. The sound mode chart outlines which
sounds are active in each mode. If no sound is desired, adjust the volume accordingly.
NOTE: Press and hold button for 2 seconds and the desired volume level or sound mode
will be saved. Unit will also leave the sound set up mode and return to functional mode after 5
seconds of inactivity.
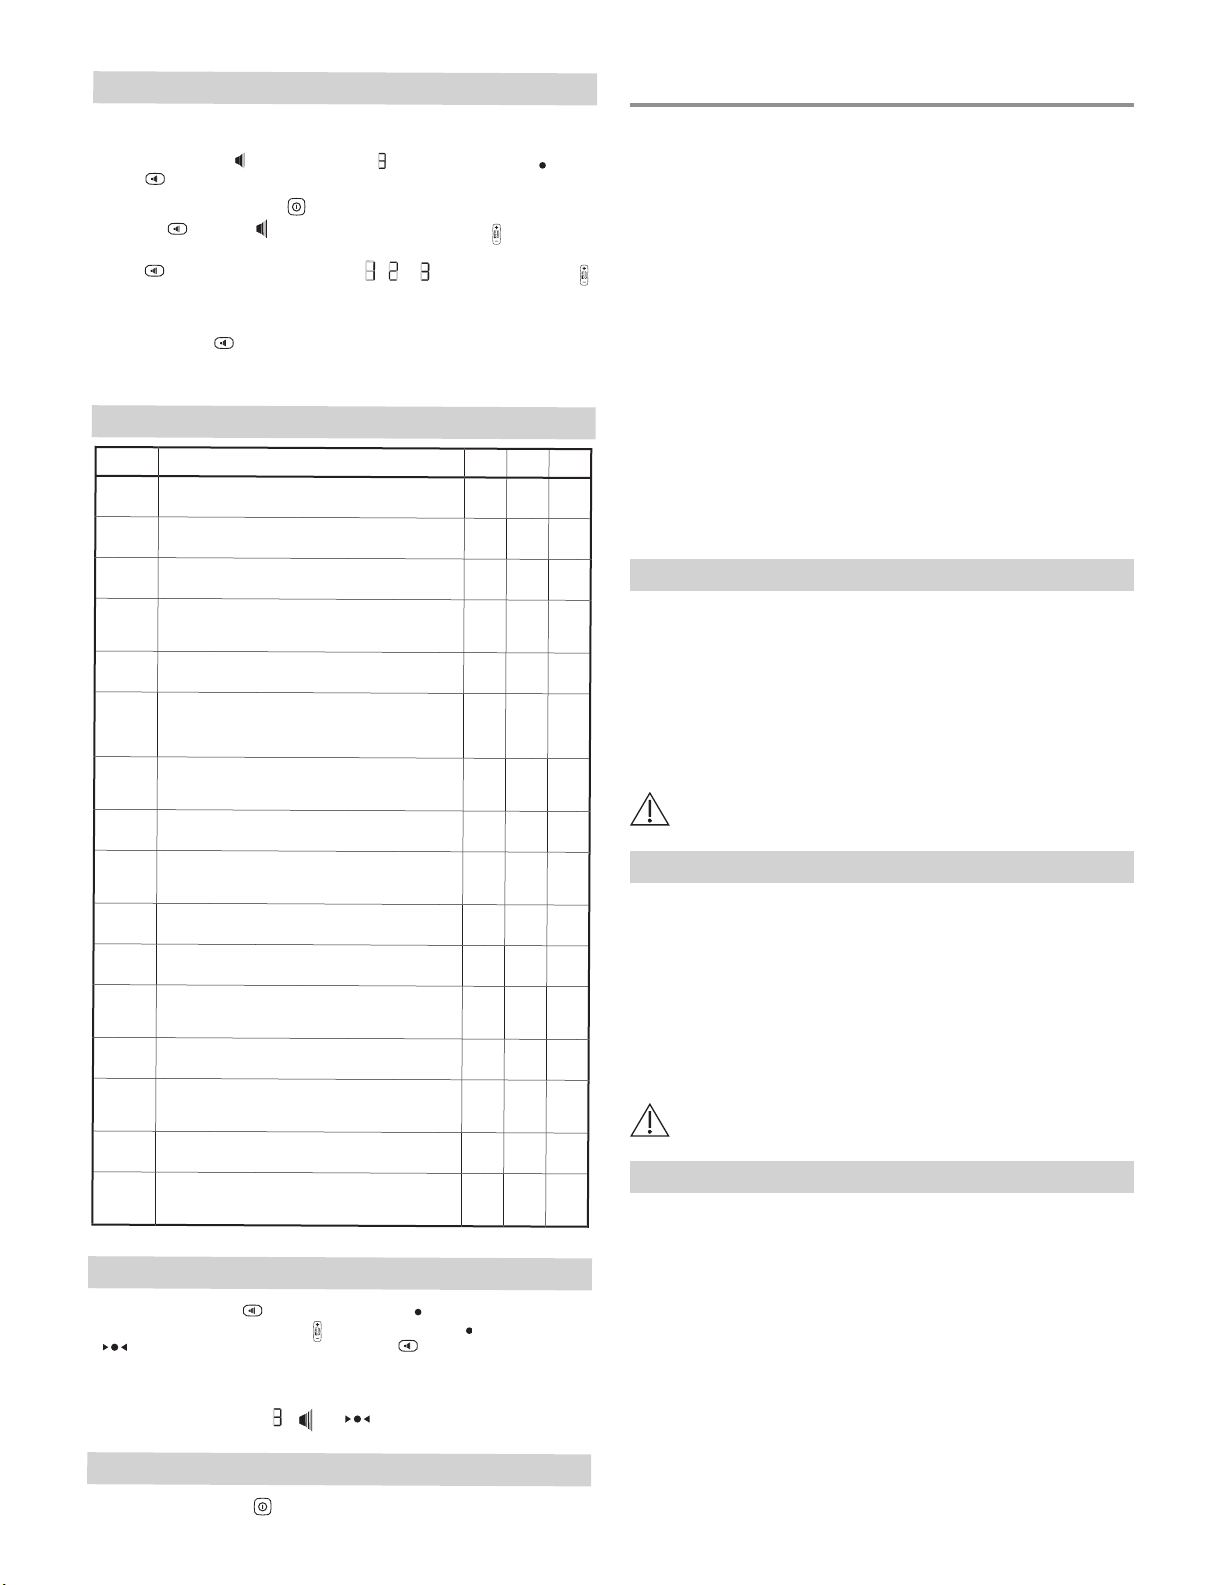
SOUND MODE CHART
EVENT SOUND NAME ACTIVE IN MODES: 1 2 3
1 Any Keystroke
Audio feedback for any user interaction with the console and handpiece.
2 Extruder Set to No Heat
A chime when no heat button on the button pad membrane is pressed.
3 Initiate Extruder Preheat
A chime when the preheat button on the button pad membrane is pressed.
4 Extruder Preheat Timeout
A chime to alert user when the extuder keep warm timer has expired. (Standard
Gutta Percha mode 15 minute timeout)
5 Invalid Keystroke
Audio prompt for invalid buttons are presses in setup mode.
6 System B Downpack 5- and 10-second Timers
In Downpack mode after the auto shutoff or release of the handpiece button, the
system has two timers. The system beeps once at 5 seconds and beeps twice at 10
seconds upon heater shutoff (by releasing button or auto shutoff).
7 Extruder Reaches Temperature
A «zing» sound at the end of preheating cycle notifying the users that the exturder
has reached the target tempearture.
8 Extruder Mode Active
A humming sound when the extruder motor is active.
9 Empty Extruder Cartridge
A «ding» sound when the extruder motor is at the most forward postion notifying
the user that the cartridge is empty now.
10 Unit Power On
Sound when the «On» button is pushed.
11 Reset Defaults
Restore factory setting ackowledgement sound.
12 Incorrect Heat Plugger
System B alert for defective tips in Downpack, Backfill and Cautery mode, or Hot
Pulp Test Tip missing.
13 New Temperature Saved
When the System B side default temperature is changed and saved.
14 Extruder Is Under Temperature
A high pitch chime when the user tries to activate the extruder handpiece before
the tip reaches the minimum required temperature.
15 Active System B Handpiece
A humming sound when the System B heater is active.
16 System B Handpiece Timeout
A «Clink» sound coinciding with either the release of the Handpiece Activation
button or the end of a System B mode duration.
RESETTING TO DEFAULTS
To reset to defaults, press the button repeatedly until the indicator flashes at the bottom
right of the screen. Immediately press the + on the button once. The indicator will change
to indicator and flash. Immediately press and hold the button for 2 seconds and the unit
will reset to defaults, including sound mode, volume and preset temperatures.
Unit will leave setup mode and return to functional mode after five seconds of inactivity.
When the unit leaves setup mode, , , and will all disappear.
POWER UNIT OFF
To power the unit off, press the button.
CLEANING AND STERILIZATION
Clean the elementsTM obturation system, Buchanan Heat Pluggers, Hot Pulp Test Tip, Cartridge
Needle Bender and Extruder and System B Shields immediately after each patient use following
the cleaning steps to prevent drying of soil and contaminants.
The components mentioned above should be inspected prior to cleaning for the appearance of
defects such as cracks, deformations, corrosion, which are indications that the instruments are not
in conditions to be re-used with the required level of confidence.
The use of automated cleaning devices is not recommended for the cleaning of the above
components.
• Remove the used gutta percha cartridge and the Heat Plugger from the respective handpieces.
• Carefully discard examination gloves, rinse and disinfect hands using an appropriate hand
disinfectant solution and use a new pair Lof examination gloves.
• Follow standard precautions for personal protection using cleaning agents/disinfectant
solution as recommended by the manufacturer.
NOTE: FDA-cleared sterilization pouches are to be used following the recommended sterilization
parameters.
Health Care facilities are responsible for making sure that the sterilization equipment is calibrated
according to the manufacturers manuals and specifications. In addition, health care facilities are
responsible for training their staff on infection control and proper sterilization procedures.
elementsTM obturation CONSOLE
The elementsTM obturation Console has sensitive electronic circuitry and should not be autoclaved
as it will damage the device.
CLEANING:
• The Base Unit should be wiped down with a cloth moistened with any of the common
nonabrasive, mild, cleaning liquids containing alcohol. SybronEndo recommends Cavicide.
• Repeat with additional wipes until no soil is visible on the cloth.
• Visually inspect the Base Unit to ensure cleanliness and for any damage or contamination. If
any contamination is visible, repeat the cleaning steps.
Do not submerge the device or let liquids enter the Base Unit.
EXTRUDER AND SYSTEM B HANDPIECES
The Extruder and System B Handpieces have sensitive electronic circuitry and should not be
autoclaved as it will damage the device.
CLEANING:
• The handpiece shields must be removed from the handpieces prior to cleaning.
• Clean handpieces and cords with a cloth moistened with any of the common nonabrasive, mild,
cleaning liquids containing alcohol. SybroEndo recommends CaviCide.
• Repeat with additional wipes until no visible soil is detected on the cloth.
• Visually inspect the Extruder and System B handpieces to ensure cleanliness and for any
damage or contamination. If any contamination is visible, repeat the cleaning steps.
Do not submerge the device or let liquids enter the enclosure.
BUCHANAN HEAT PLUGGERS AND HOT PULP TEST TIP
Heat Pluggers and Hot Pulp Test Tips must be cleaned and sterilized after each use. For the reuse of
the Heat Pluggers, please refer to the Instructions For Use enclosed in the individual Heat Pluggers.
CLEANING:
• Remove the Heat Plugger/Hot Pulp Test Tip from the System B Handpiece.
• Clean with water and mild, nonabrasive detergent such as dishwashing liquid using a soft
bristled brush until all visible soil is removed.
• Rinse with clean running water for a minimum of 30 seconds.
• Visually inspect for cleanliness and for any damage or contamination.
• If any contamination is visible, repeat the cleaning steps until there is no visible contamination.
• Dry with a clean, lint free cloth until there is no visible moisture.