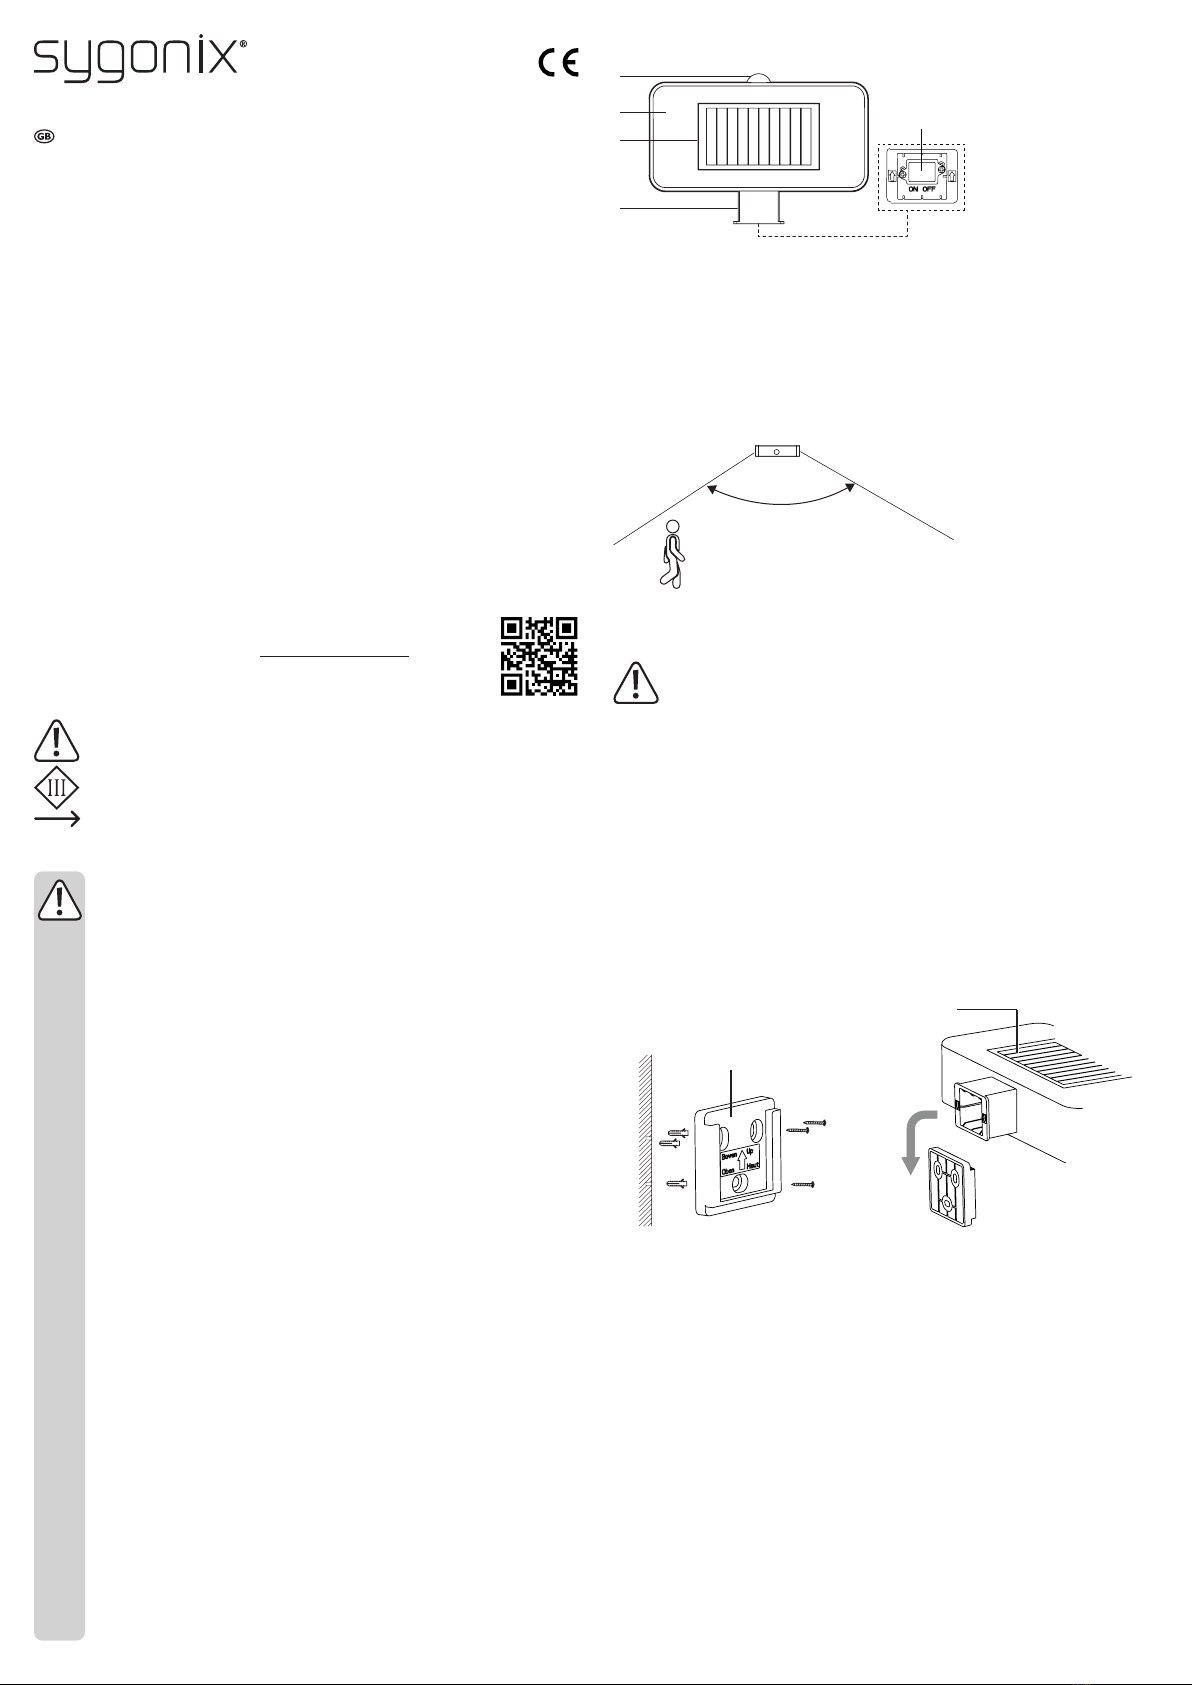
manuals.online logo
Brands
  1. Home
  2. •
  3. Brands
  4. •
  5. Sygonix
  6. •
  7. Outdoor Light
  8. •
  9. Sygonix 2338749 User manual

Sygonix 2338749 User manual

Operating elements
1
2
3
4
5
Location
• To optimize charging, place the solar panel (3) in a location exposed to maximum sunlight. Do not set up
the solar panel in the shade or under any cover.
• Do not install the product in the direct proximity of other light sources such as yard or street lights, other-
wise the product will not switch on automatically at nightfall.
• The product is suitable for use in unprotected outdoor areas. Do not submerge!
Installation
a) Motion detection sensor
5 m
100°
b) Mounting
This product comes with a wall mount kit and is designed to be mounted on wall.
When drilling or tightening screws, make sure there are no cables, wires, or pipes located un-
derneath the surface. Inadvertently drilling through electric cables can cause life-threatening
electric shock!
Check if the supplied screws are suitable for the mounting surface material. If in doubt consult a
professional.
1. Select a wall surface 2.5 - 3 m above ground level. According to three screw holes on the supplied wall
bracket, mark three spots on the wall.
2. Using a drill, bore three holes on the marked spots.
3. Correctly orientate the bracket: the side with up arrow indication faces outward and the bracket edge
indicated by up arrow direction faces up.
Then secure three supplied dowels into the three drilled holes, and secure three supplied screws into
the three dowels separately.
4. Attach the lamp case (2) onto the wall bracket.
Align the lamp case horizontally on the top of the bracket while ensuring the solar panel (3) faces up.
Then slide the lamp base (4) all the way into the grooves of the bracket.
To remove the lamp case from the bracket, simply slide the lamp case up out of the grooves of the
bracket.
Side with up arrow indication
Solar panel facing up
Solar charging
When using for the rst time or after prolonged periods of low sunlight, you should fully recharge the battery.
• The product must be switched on for the battery to charge.
• Switch the product off before it gets dark to prevent the light from switching on and draining the battery.
• Switch the product back on after sunrise the next day to resume charging.
Operation
• When light level is ≤10 lux (e.g.at nightfall), the LED light turns on automatically (1x LED on).
• When the built-in motion sensor is triggered, the LED light gets brighter (5x LEDs on).
• When the ambient light reaches a certain brightness level, the LED light will turn off.
a) Motion sensor
• The motion detection will be activated when the light level is ≤10 lux.
• When motion detection is activated, 5x LED will stay on for a short period after the motion stops. After
that, 1x LED stays on during darkness.
1 PIR sensor cover
2 Lamp case
3 Solar panel
4 Lamp base
5 ON/OFF switch
Motion detection:
• Works best when the subject
walks across the sensor.
• Does not work well behind
glass.
Operating Instructions
Solar Wall Light with PIR Sensor
Item No. 2338749
Intended use
The product is intended for use as decoration and is not suitable for domestic lighting. This product is wall
mounted and has an built-in PIR sensor. 5 LEDs serve as the illuminant. The light turns on automatically at
nightfall. All LEDs will stay on for a short period when the PIR sensor is triggered. The product is powered by
one battery that recharges via the integrated solar panel during the daylight hours.
The product has an IP44 ingress protection rating. It is splash proof and suitable for outdoor use. Do not
submerge!
For safety and approval purposes, you must not rebuild and/or modify this product. If you use the product
for purposes other than those described above, the product may be damaged. In addition, improper use can
result in short circuits, res or other hazards. Read the instructions carefully and store them in a safe place.
Make this product available to third parties only together with its operating instructions.
This product complies with the statutory national and European requirements. All company names and prod-
uct names are trademarks of their respective owners. All rights reserved.
Delivery content
• Solar wall light with PIR sensor (1x rechargeable battery inserted)
• 1x wall bracket
• 3x screws
• 3x dowels
• Operating instructions
Up-to-date operating instructions
Download the latest operating instructions at www.conrad.com/downloads or scan the QR
code shown. Follow the instructions on the website.
Explanation of symbols
The symbol with the exclamation mark in the triangle is used to indicate important information in
these operating instructions. Always read this information carefully.
This product is constructed according to protection class III.
The arrow symbol indicates special information and advice on operation.
Safety instructions
Read the operating instructions carefully and especially observe the safety information.
If you do not follow the safety instructions and information on proper handling in this
manual, we assume no liability for any resulting personal injury or damage to property.
Such cases will invalidate the warranty/guarantee.
a) General information
• The device is not a toy. Keep it out of the reach of children and pets.
• Do not leave packaging material lying around carelessly. This may become dangerous playing
material for children.
• Protect the product from extreme temperatures, strong jolts, ammable gases, steam and
solvents.
• Do not place the product under any mechanical stress.
• If it is no longer possible to operate the product safely, take it out of operation and protect it
from any accidental use. Safe operation can no longer be guaranteed if the product:
- is visibly damaged,
- is no longer working properly,
- has been stored for extended periods in poor ambient conditions or
- has been subjected to any serious transport-related stresses.
• Please handle the product carefully. Jolts, impacts or a fall even from a low height can dam-
age the product.
• Do not short circuit the battery terminals
• Consult an expert when in doubt about the operation, safety or connection of the product.
• Maintenance, modications and repairs must only be completed by a technician or an au-
thorised repair centre.
• If you have questions which remain unanswered by these operating instructions, contact our
technical support service or other technical personnel.
b) LED light
• Attention, LED light:
- Do not look directly into the LED light!
- Do not look into the beam directly or with optical instruments!
c) Rechargeable batteries
• Correct polarity must be observed while inserting the rechargeable battery.
• The rechargeable battery should be removed from the device if it is not used for a long period
of time to avoid damage through leaking. Leaking or damaged rechargeable batteries might
cause acid burns when in contact with skin, therefore use suitable protective gloves to handle
corrupted (rechargeable) batteries.
• Rechargeable batteries must be kept out of reach of children. Do not leave rechargeable bat-
teries lying around, as there is risk, that children or pets swallow them.
• Rechargeable batteries must not be dismantled, short-circuited or thrown into re. Never re-
charge nonrechargeable batteries. There is a risk of explosion!
b) Notes on battery use and charging
• The battery can be fully charged for eight hours in sunny weather, which can light the product for ap-
proximately eight hours.
• Keep the solar panel clean. Dust and dirt covering the solar panel reduces charging efciency.
• During extended periods without sufcient sunlight for solar charging, it is possible that the recharge-
able battery will completely discharge. Rechargeable batteries can get damaged if left with no charge
for some time. It is recommended to switch the power off so the battery does not completely discharge.
• Cold temperatures adversely affect the battery life. To ensure long, error-free operation, we recommend
switching the power off and storing the product in a dry, warm location when not in use. Switch the
product off for this purpose.
• You can remove the rechargeable battery before storing the product and charge them with a suitable
charger. Observe all relevant information provided in these operating instructions regarding removing or
replacing the rechargeable battery.
c) Remove/Insert rechargeable battery
Replace the rechargeable battery if the illumination time reduces signicantly despite the battery
being sufciently charged.
When replacing the rechargeable battery, make sure no moisture enters the battery compart-
ment.
1. Remove the lamp case (2) from the wall bracket (see section “Installation - b) Mounting”).
2. Switch the product OFF (5).
3. Loosen the four screws on the bottom cover of the lamp case using a suitable screwdriver. Then remove
the bottom cover.
4. Replace the battery matching the polarity shown inside the compartment.
Only use rechargeable battery of the same type and specication as indicated in the section
“Technical data”.
Make sure the cable connection is not damaged when replacing the battery and the bottom
cover.
5. Replace and tighten the bottom cover with the four screws. Then put the lamp case back onto the bracket
(see section “Installation - b) Mounting”).
Troubleshooting
Problem Solution
The light does not turn
on automatically.
• There is a nearby light source which causes interference with
the product. Make sure the product is placed in darkness to
activate the light.
• The ON/OFF switch is in the OFF position. Adjust the switch to
the ON position.
The light stays on for
short periods.
• Long periods of low sunlight (e.g. cloudy weather or in winter)
will cause the battery to recharge less during the day. We rec-
ommend using a commercially available charger to charge the
battery.
• The battery is old and cannot store sufcient charge. Replace
with new one.
• See sections “Solar charging” and “Operation - b) Notes on bat-
tery use and charging”.
The light gets brighter. • Motion detection is activated and this turns all ve LEDs on. A
short period later after the motion stops, only one LED stays on.
Care and cleaning
• Do not use any aggressive cleaning agents, rubbing alcohol or other chemical solutions as they can
cause damage to the housing and malfunctioning.
• Never point a water jet, e.g. of a high-pressure cleaning device, at the product.
• Besides occasional cleaning, the product is maintenance-free.
• Let the product cool down sufciently before cleaning.
• Use a clean, soft and dry cloth to clean the housing. For more stubborn dirt, slightly moisten the cloth
with lukewarm water.
• If necessary, remove any dust from the solar panel, as the charging current could otherwise decrease.
Disposal
a) Product
Electronic devices are recyclable waste and must not be disposed of in the household waste.
At the end of its service life, dispose of the product in accordance with applicable regulatory
guidelines.
Remove the rechargeable battery and dispose of it separately from the product.
b) Rechargeable battery
You as the end user are required by law (Battery Ordinance) to return all used rechargeable
batteries. Disposing of them in the household waste is prohibited.
Contaminated rechargeable batteries are labeled with this symbol to indicate that disposal in
the domestic waste is forbidden. The designations for the heavy metals involved are: Cd =
Cadmium, Hg = Mercury, Pb = Lead (name on rechargeable batteries, e.g. below the trash icon
on the left).
Used rechargeable batteries can be returned to collection points in your municipality, our stores or wherever
rechargeable batteries are sold.
You thus fulll your statutory obligations and contribute to the protection of the environment.
Technical data
Power supply........................................ 3.7 V, 1300 mAh Li-ion, 18650 rechargeable battery
Power consumption.............................. 5 x 0.5 W
Solar panel ........................................... 5 V, 150 mA, monocrystal
Illuminant type ...................................... LED
LED quantity......................................... 5 pcs
LED service life..................................... 25000 hours
Charging time ....................................... 8 hours (in optimum conditions)
Illumination time.................................... max. 8 hours with fully charged battery
Light output........................................... max. 70 lm
Light activation threshold...................... ≤10 lux
Motion detection threshold ................... ≤10 lux
PIR sensor............................................ Detection angle: 100º, Detection range: max. 5 m
Colour temperature............................... 5000 K
Ingress protection................................. IP44
Protection class .................................... III
ON/OFF switch..................................... Yes
Material................................................. ABS + PC
Operating/Storage conditions............... -20 to +40 ºC, ≤100 % RH (non-condensing)
Dimensions (W x H x D) ....................... 200 x 145 x 50 mm
Weight .................................................. 450 g
This is a publication by Conrad Electronic SE, Klaus-Conrad-Str. 1, D-92240 Hirschau (www.conrad.com). All rights in-
cluding translation reserved. Reproduction by any method, e.g. photocopy, microlming, or the capture in electronic data
processing systems require the prior written approval by the editor. Reprinting, also in part, is prohibited. This publication
represent the technical status at the time of printing.
Copyright 2021 by Conrad Electronic SE. *2338751_V1_0121_02_mxs_m_en

Other Sygonix Outdoor Light manuals

Sygonix 2338748 User manual

Sygonix

Sygonix 2338748 User manual

Sygonix Trento User manual

Sygonix

Sygonix Trento User manual

Sygonix 2595505 User manual

Sygonix

Sygonix 2595505 User manual

Sygonix 2752213 User manual

Sygonix

Sygonix 2752213 User manual

Sygonix 2338746 User manual

Sygonix

Sygonix 2338746 User manual

Sygonix Macra User manual

Sygonix

Sygonix Macra User manual

Sygonix SY-4737238 User manual

Sygonix

Sygonix SY-4737238 User manual

Sygonix 2574833 User manual

Sygonix

Sygonix 2574833 User manual

Sygonix Latina User manual

Sygonix

Sygonix Latina User manual

Sygonix Catania User manual

Sygonix

Sygonix Catania User manual

Sygonix SY-4715528 User manual

Sygonix

Sygonix SY-4715528 User manual

Sygonix 2338745 User manual

Sygonix

Sygonix 2338745 User manual

Sygonix 2749678 User manual

Sygonix

Sygonix 2749678 User manual

Sygonix 2525888 User manual

Sygonix

Sygonix 2525888 User manual

Sygonix 2338749 User manual

Sygonix

Sygonix 2338749 User manual

Sygonix 2336768 User manual

Sygonix

Sygonix 2336768 User manual

Sygonix Badino User manual

Sygonix

Sygonix Badino User manual

Sygonix 2585412 User manual

Sygonix

Sygonix 2585412 User manual

Popular Outdoor Light manuals by other brands

Roger Pradier Hogar 100 manual

Roger Pradier

Roger Pradier Hogar 100 manual

NEBO NEB-LSP-0020 Use and care guide

NEBO

NEBO NEB-LSP-0020 Use and care guide

Principal LED Street Wrap Gen 2 installation guide

Principal LED

Principal LED Street Wrap Gen 2 installation guide

Dayva SL064LED user manual

Dayva

Dayva SL064LED user manual

LIGMAN SE-90002-LC instruction manual

LIGMAN

LIGMAN SE-90002-LC instruction manual

nordlux AGNES Mounting instruction

nordlux

nordlux AGNES Mounting instruction

LIGMAN RA-10772 installation manual

LIGMAN

LIGMAN RA-10772 installation manual

HEPER LF8017.693-US Installation & maintenance instructions

HEPER

HEPER LF8017.693-US Installation & maintenance instructions

marset Jaima P307.54 Assembly instructions

marset

marset Jaima P307.54 Assembly instructions

Adesso Corinne Assembly instruction

Adesso

Adesso Corinne Assembly instruction

Inspire Lakko Assembly, Use, Maintenance Manual

Inspire

Inspire Lakko Assembly, Use, Maintenance Manual

LIGMAN FORREY 27 installation manual

LIGMAN

LIGMAN FORREY 27 installation manual

LIGMAN NAT-20002 installation manual

LIGMAN

LIGMAN NAT-20002 installation manual

Beta 1838SLIM Instructions for use

Beta

Beta 1838SLIM Instructions for use

LUTEC SECURY'LIGHT VESTA ST1906-CAM manual

LUTEC

LUTEC SECURY'LIGHT VESTA ST1906-CAM manual

LIVARNO LUX 104775 Operation and safety notes

LIVARNO LUX

LIVARNO LUX 104775 Operation and safety notes

LIGMAN DUOMO 12 installation manual

LIGMAN

LIGMAN DUOMO 12 installation manual

Claypaky C52321 operating instructions

Claypaky

Claypaky C52321 operating instructions

manuals.online logo
manuals.online logoBrands
  • About & Mission
  • Contact us
  • Privacy Policy
  • Terms and Conditions

Copyright 2025 Manuals.Online. All Rights Reserved.