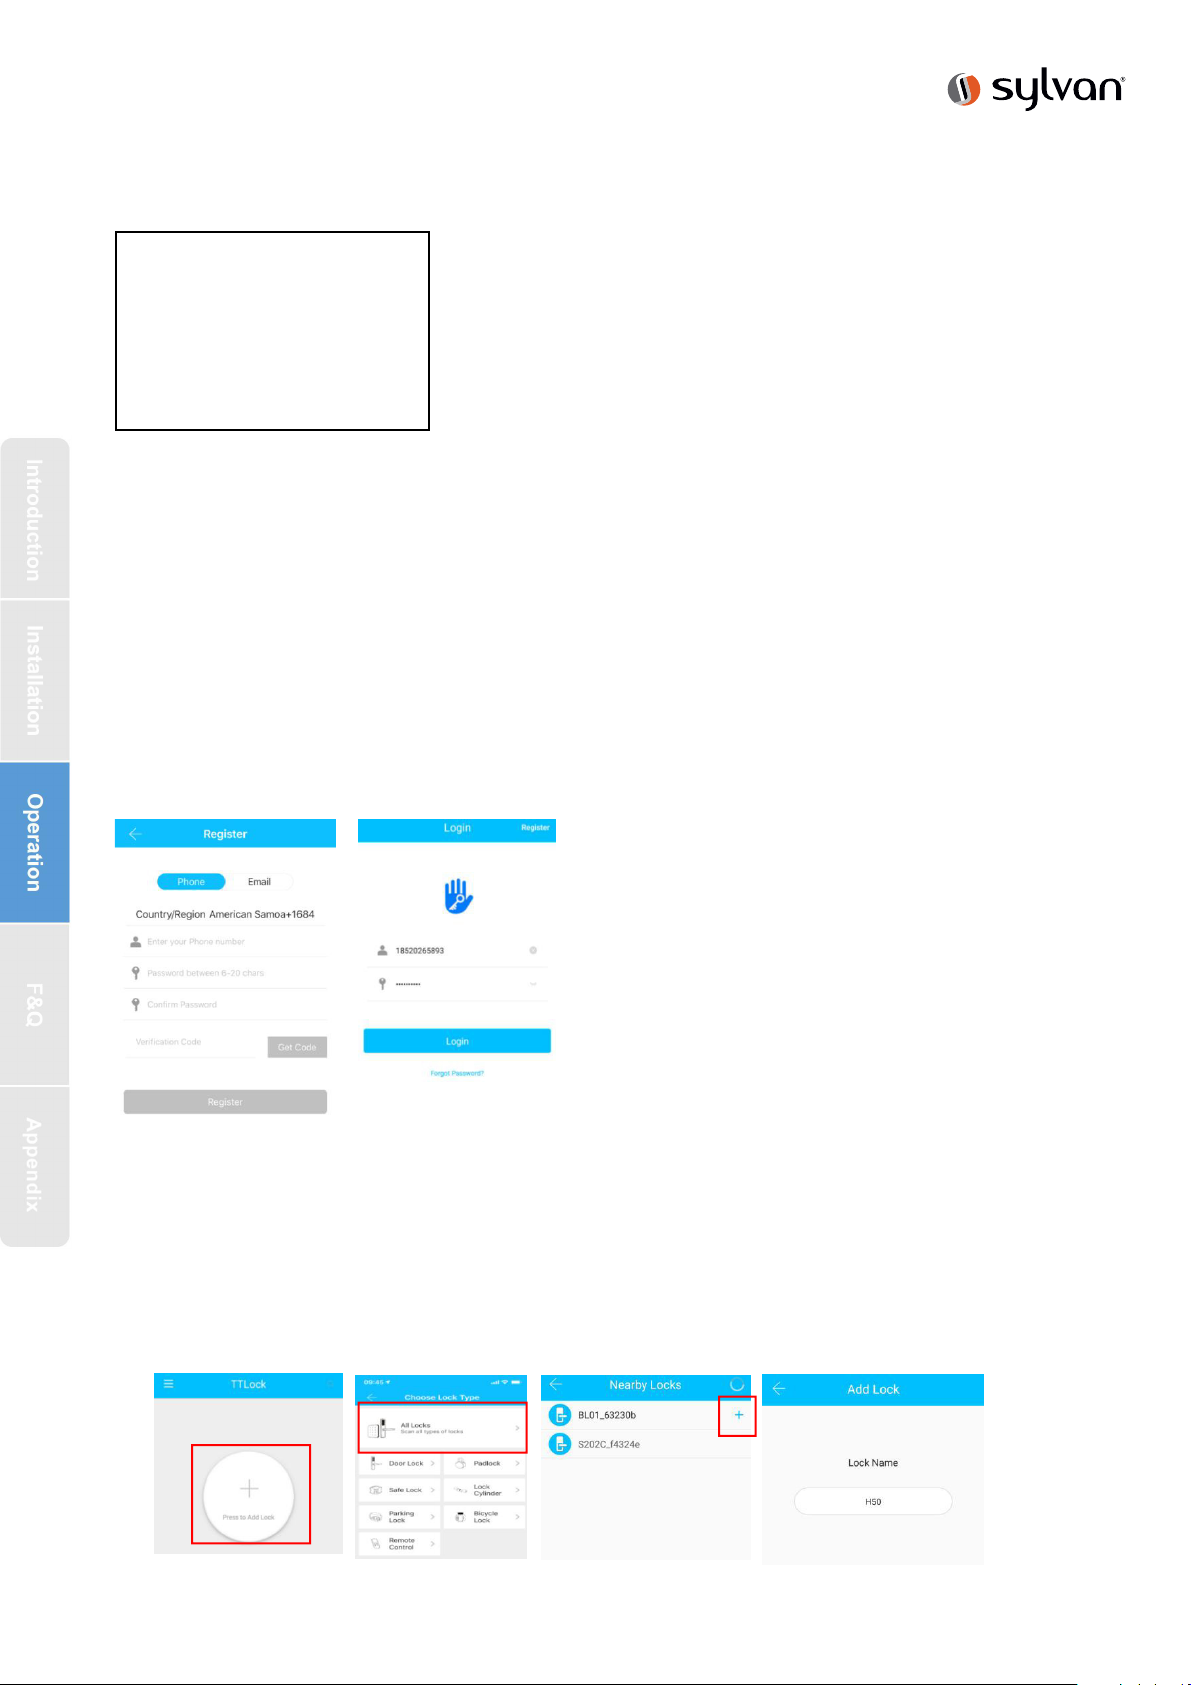
Sylvan SL39E User manual

Smart Lock
SL39E
User Manual
www.sylvan.co.nzV.002
Special Attention:
1.Mechanical keys please keep outdoor, just in case keys are required to unlock door in low power conditions.
2.Please replace for the battery when low wattage alarm. (check app status)
3
4. Alkaline (4 x AA) batteries MUST be used, do not use lithium batteries.
.Reading this manual carefully before installation, and keep it for future reference.

Thank you for choosing our Sylvan Smart Lock, as with all Smart Locks there are a few
key tips that will ensure your Smart Lock meets your expectations.
• Good quality Alkaline batteries should always be used
• The supplied rubber boot must be installed, however smart locks are not suitable
for use on a tongue and groove door, water can penetrate the lock via a grove.
• The lock must be mounted onto a flat surface and must have protection from the rain
• This lock is not suitable for the use on a gate
www.sylvan.co.nz

1. Introduction
1.1.Lock structure
1.2.Packing List
Check the following drawing to check whether the package contains all the parts
NO Name Qty NO Name Qty
1Front Panel 1 9 Screw Stubs:M4*30mm 3
2Back Panel 110 Screw Stubs:M4*40mm 3
3Mortise 1 11 Mortise Screws:M4*25mm
(For Wooden Door)
4
4Card 3 12 Mortise Screws:M5*10mm
(For Aluminum Door)
4
5Mechanical Key 2 13 M4*10mm Screws
For Fixing Back Panel
4
6Waterproof Rubber
Plate
2 14 M4*30mm Screw 3
7User Manual 1 15 M4*50mm Screw 3
8Strike&Strike Box 1+1 16
www.sylvan.co.nz
USB Emergency Power

1.3.Specifications
1.4.Initialization
IP Rating
SL37E
IP 55
www.sylvan.co.nz
Long press the reset button located on the battery compartment
side of the lock for approx 5 seconds, input 000#, the initialization is
successful when the buzzer beeps twice.
Underside of the inner part
of the lock.

2.Installation
2.1Confirm opening direction ! IMPORTANT !
1
2
3
4
5
S
This may need to be cut to
suit the door thickness.
pindle always
keep horizontal
Deadbolt always
k
during
installation
eep pull in
Change to
"L"or“R” position
in the PCB of
back panel
Deadbolt knob
Attention If the above is not followed correctly, the lock will not operate correctly
L R
www.sylvan.co.nz
Left hand
opening option
Right hand
opening option
Outside
Inside
Outside
Inside
What is left
open?
This we called
"left open"(show
as image)

2.2. Installation Diagram
Step1 Install Mortise Step2 Install Screws Casing and Water Rubber
Plate
vStep3 Install Front Panel Step4 Fixed Front Panel and Water Rubber
Plate
Step5 Connecting Front and Back Panels Step6 Fixed Back Panel
Step7 Install Batteries
Step8 Cover the battery box
USING THE CORRECT
DRILLING TEMPLATE
Note: Spindle may need
to be cut down for narrow
doors. This should be
done using a hacksaw
ensuring enough length
to engage correctly into
deadbolt hub.
www.sylvan.co.nz
IMPORTANT
IMPORTANT
SPINDLE MUST
BE INSTALLED
HORIZONTAL
IMPORTANT
DEADBOLT MUST
BE RETRACTED
DURING INSTALL

3.Operation
3.1.Registration
3.2. Connect lock to the phone
1) Please scan the QR code to download the app
2) You can also search for TTLock in the APP store(Google Play)to download
4) Register a new account (phone number or email) or login with an existing
account.
5) Touch the lock screen to light, click "+ Add Lock”
6) The lock nearby will appear on the phone screen, Click "+"
7) Re-name the lock
8) The lock added successfully
3.3.Add locks
TTLock supports multiple types of lock devices. The lock needs to be added by
the app after entering the add mode. Generally, a lock that has not been added, as
long as the lock keyboard is touched, it will enter the add mode. The default
password is 123456 if not added by the phone
The software (iOS version) can be
downloaded from the app store, and the Android
version can be downloaded from the application
store of Google play, Yingyongbao, Baidu, Ali,
360, Huawei, and Xiaomi.
TTlock users can register the account by
mobile phone and Email which currently
support 200 countries and regions on the
world. The verification code will be sent
to user’s mobile phone or email, and the
registration will be successful after the
verification.
www.sylvan.co.nz
SEARCH:
“TTLock” in your
smartphone app store
to download software

3.4.User Management
3.4.1. Bluetooth management
Make sure there is no problem with Bluetooth communication. After connecting the
phone to the door lock as above, Click " "to unlock.(the phone is within
5meters from the door lock)
3.4.2. Setting Passcode
Passcodes are also a way to unlock. After entering the passcode on the locked keyboard,
press the unlock button in the lower right corner to unlock. Passcodes are divided into
permanent, time-limited, single, clear, cycle, and custom.(You can share the Passcode to
other user via WeChat SMS Email Messenger WhatsApp)
3.4.3. Send e-Key
Click on the " " as shown in figure, you can send the eKey to other users of
TTlock to authorize the unlock(the receiver must be download the APP and set up
an account) Select e-key format (Timed, permanent, One-time, Recurring)
Enter recipient's account of TTlock,set the name and effective time of the eKey, Can
choose to allow remote unlocking or disallowing, authorized administrator or not
authorized, as shown in figure Send The recipient's account has Bluetooth
unlock permission
www.sylvan.co.nz

3.4.4.Add card
Supports opening doors through various IC cards. Before an IC card is used to
open the door, it needs to be added first. The adding process needs to be perform
ed by the app beside the lock.The validity period of the IC can be set, it can be per
manent, or it can be limited in time.
3.4.6. e-Key management
Click “ “ The manager can delete ekey, reset ekey, send and adjust the
ekey, meanwhile he can search the lock record.
3.4.7. Passcode management
Click " " .All generated passwords can be viewed and managed in the
password management module. This includes a password change, password
deletion, password reset, and password unlock record.
3.4.8.Unlock records
Click " "you can query your unlock record as shown in figure
www.sylvan.co.nz

3.5. Gateway management(Optional)
The TT lock is directly connected via Bluetooth, that is why it is not attacked by
the network. The gateway is a bridge between smart locks and home WIFI
networks. Through the gateway, the user can remotely view and calibrate the lock
clock, read the unlock record. Meanwhile, it can remotely delete and modify the
password.
3.5.1. Add Gateway
3.6.Electronic Locking Button
1.
function, first turn on "privacy lock" on the app
2.When the button is depressed, it is in the
locked state and can only be unlocked through
the administrator app or mechanical key.
www.sylvan.co.nz
If you want to have the Secure Electronic Locking

4.FAQ
1) How to read operation records? In the Records of the main interface. .
2) Why can’t I unlock it after open the
passage mode
You need to perform an unlock verification in
any method, than the passage mode will take
effect.
3) What is the purpose of Auto Lock You can set how long to lock after unlocking
4After installation, touch sensing
keyboard, screen no respond
a) In this case, first check that the positive
and negative terminals of the battery
have been installed upside down, whether
the battery has enough power
b) Remove the back panel and see if it's
connected.
c) To eliminate the above situation, you need
to remove the lock ,check whether the
wires of the lock body are squeezed, and
the re-wire.
6What is the reason why the smart lock
consumes fast power?
a) Large standby power consumption
b) Short circuit
7There is no response to pressing the
code on outside the door, and there is
unlock normally on inside the door, but
the verification is normal, and the motor
is normal.
It may be the handing direction on the clutch
w
(see installation page)
as error, please check correction.
8How many times will the password be
locked? How long is it locked?
Enter the wrong password more than 5 times
Other ways to can open the door
www.sylvan.co.nz
in a row, the keyboard is locked for 5 minutes
Alkaline batteries must be used.
Do not use Lithium Batteries.

PRODUCT WARRANTY
Customer Name:
Customer Phone:
Purchase Date:
Store Name:
Reciept #:
Product Name:
Product Model:
Note:
1. Please keep this card so that you can use it when you need warranty service.
2. We provide you with a two-year warranty from the date of purchase.
127 Diana Drive
Glenfield
Auckland 0627
Ph: +64 9 444 5359
Email: sales@gdrutter.co.nz
Web: www.sylvan.co.nz
www.sylvan.co.nz
Other manuals for SL39E
1
Table of contents
Other Sylvan Lock manuals
Popular Lock manuals by other brands

Schlage
Schlage FE595 installation instructions

SECO-LARM
SECO-LARM SLI E-942FC-1K3SQ manual

SAFE-O-TRONIC
SAFE-O-TRONIC LS 200 user manual

Powerfix Profi
Powerfix Profi 300389 instructions

Assa Abloy
Assa Abloy Corbin Russwin BLSS ML2000 Series installation instructions

hager
hager 3800 Series installation instructions