manuals.online logo
Brands
  1. Home
  2. •
  3. Brands
  4. •
  5. Sync Ergonomics
  6. •
  7. Bicycle Accessories
  8. •
  9. Sync Ergonomics PROJECT 0.2 User manual

Sync Ergonomics PROJECT 0.2 User manual

We’re pleased to welcome you to a global family of athletes embracing more comfortable, more effective time trailing positions. Sync
Ergonomics strongly recommends the installation of your Sync components to be undertaken by a qualified bicycle mechanic,
experienced with time trial and triathlon bicycles. Irrespective of your level of mechanical experience, please read the following guide
as it contains information vital for correct setup and use.
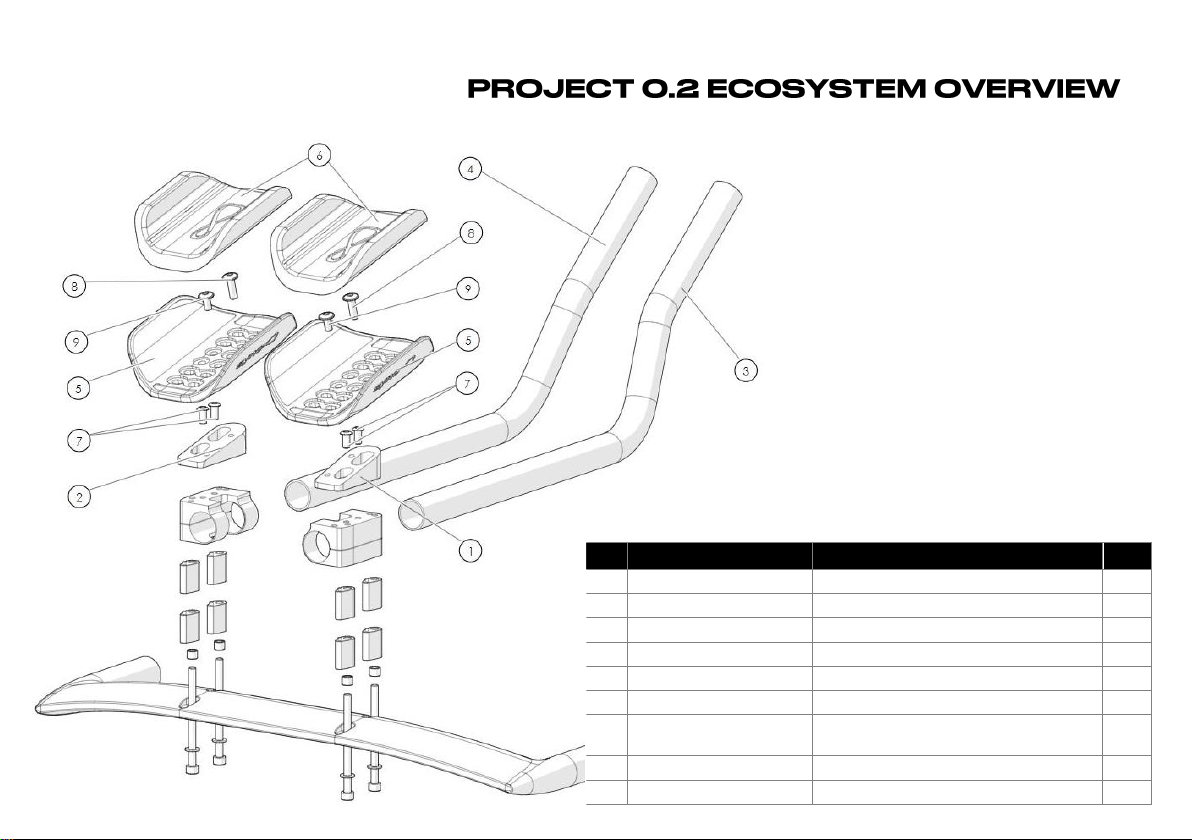
This document has been prepared to guide you through the assembly of your Project 0.2 ecosystem. Care must be taken during the
installation process to ensure proper function and ongoing maintenance must be performed to ensure longevity of your Sync Ergonomics
components.
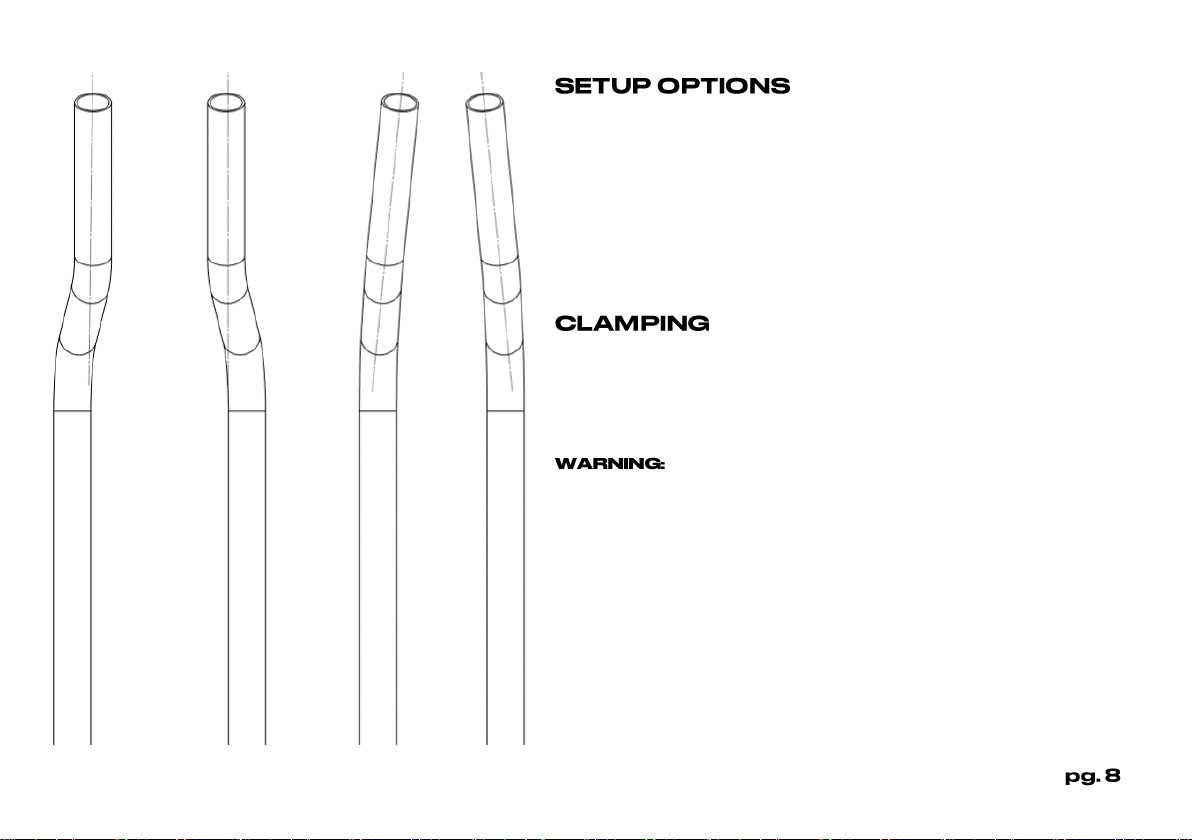
WARNING: In order to be installed correctly the components of Project 0.2 require specialised knowledge of a time trial bicycle. It is recommended that
installation should be performed by a qualified bicycle mechanic. Improper assembly of any of the components of Project 0.2 could cause damage to the
product(s) and/or bicycle, may lead to loss of control of the bicycle, and may lead to personal injury, or in severe cases even death. Sync Ergonomics
assumes no responsibility for improper assembly and installation of the product(s).
WARNING: Please have your bicycle and Sync Ergonomics products regularly inspected for possible damage from use, especially from instances such as
accidents, crashes, and/or impact that occurs with travel. In the event of an accident, crash and/or impact in travel, it is strongly recommended you stop
using your bicycle immediately and take your bicycle to a professional bicycle mechanic for inspection to ensure proper function and safety. In the case
of damage, replace affected parts immediately. Even when no damage is visible, there may be internal damage to the integrity of a component. Failure
to replace damaged parts could result in loss of control, and may lead to personal injury, or in severe cases even death. Sync Ergonomics assumes no
responsibility for improper maintenance and inspection of the product(s).
Sync Ergonomics components are free from materials and manufacturing defects for a period of 12 months starting from the original
purchase date, unless otherwise stated in our warranty policy, detailed on our website at www.syncergonomics.com. This warranty is
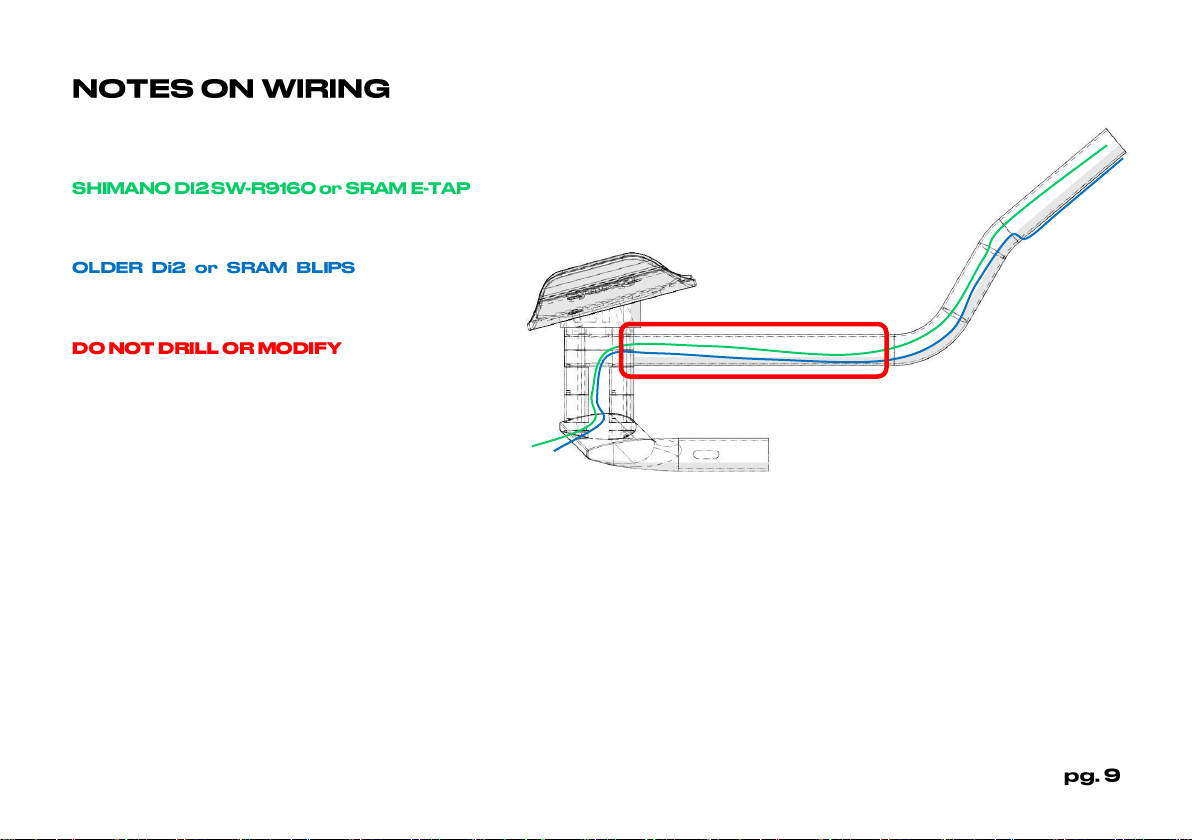
non-transferable and only applicable to the original customer who purchased this product and this product only. Any modifications to
the product, other than for its original intended use, such as drilling, will effectively and immediately void the warranty.
For more information on our warranty policy and instructions for completing a warranty claim, please visit our website for full details at
www.syncergonomics.com.
Torque wrench
Torx head driver set (T25 and T30)
Socket head driver set (as per bike requirements)
Isopropyl alcohol
Medium-strength retaining compound (LOCTITE 243)
MOTOREX Bike Grease
Torque wrench
Cutting guide (Park Tool SG-6)
32 TPI hack saw blade
Fine metal file or deburring tool
WARNING: Your bike may require additional tools to what is mentioned above and we cannot guarantee that these recommendations will cover the
requirements of all bikes. If in doubt, ensure assembly is handled by a qualified bicycle mechanic, experienced with the assembly and setup of a time trial
bicycle.
The Project 0.2 Ecosystem is designed to function using the original base bar and extension clamp assemblies relevant to your time trial
bike. Please ensure that your bicycle is suitable for the Project 0.2 Ecosystem prior to installation. For details on compatibility please visit
www.syncergonomics.com.
WARNING: Do not attempt to modify your Sync components, outside of what is described within this setup guide as appropriate for assembly. Modification
may impact the structural integrity of a components and could result in component failure, or failure of the complete system. Sync Ergonomics is not liable
for product damage and/or personal injury resulting from improper assembly.
Part No.
Part Name
Qty
1
SYN-OPT-WG-M5/M6-LX
Left 15 Degree Wedge M5/M6
1
2
SYN-OPT-WG-M5/M6-RX
Right 15 Degree Wedge M5/M6
1
3
SYN-OPT-EX-395-40-RX
High Rise Extension (R)
1
4
SYN-OPT-EX-395-40-LX
High Rise Extension (L)
1
5
SYN-EVO-CP-15-14-CB
V2 Deep Groove Arm Cup
2
6
SYN-OPT-PD
EVA Foam Pad
2
7
-
M5 x 10mm or M6 x 8mm Torx Button
Head Screws (M5 vs M6 Wedges)
4
8
-
M5 x 10mm Torx Flanged Button Screw
2
9
-
M5 x 10mm Torx Flanged Button Screw
2
Arm Cup Wedges mount to the original arm cup mounting
points, using the supplied M5 (T25) or M6 (T30) button head Torx
screws. We recommend the use of MOTOREX Bike Grease for
hardware (screws) used with our Arm Cup Wedges.
For Model Year (MY) 2018 (and prior)
Speedmax CF SLX, use M6 wedges and the original arm cup
mounting screws (shoulder screws). For MY 2019 (and newer)
Speedmax CF SLX, use M5 wedges and the supplied M5 button
head screws.
: Certain bikes will favor certain wedge orientations. For the narrowest arm cup spacing,
set the Arm Cup Wedges to the narrow fitment option. For the widest arm cup spacing, use the wide fitment option as indicated below.
Deep Groove arm cups and pads are directional. Cups should be mounted with the rounded edge of the arm cup and the scooped
front of the arm cup pad facing forward. When removing and installing arm cup pads, working from the sides makes it easier to centralise
the pad and ensures the pad remains crease free. Replacement arm cup pads are available from the Sync Ergonomics online store.
For each arm cup, use the supplied Torx flanged button head screws for connection to the Arm Cup Wedges. We recommend the
application of a medium-strength retaining compound (LOCTITE 243) for the screws used with Deep Groove arm cups.
Over torqueing the cup connection screws will lead to permanent damage of the arm cup base plate. Sync Ergonomics
is not liable for product damage and/or personal injury resulting from inappropriate product setup.
V2 High Rise 3D extensions are designed to work with Shimano Di2
electronic shifters and SRAM eTap CLICS. As such, High Rise 3D extensions
are free of mechanical cable entry ports.
DO NOT DRILL OR MODIFY extensions in the region
immediately in front of the extension clamp (high-stress area). Any such
modification immediately voids the product warranty. Sync Ergonomics
is not liable for product damage and/or personal injury resulting from
product modification.
The length/height of the extension (with shifters installed)
must not exceed the original length/height of the supplied extension.
Sync Ergonomics is not liable for product damage and/or personal injury
resulting from untrimmed extensions.
The correct length and height needs to be set for the athlete in question.
For riders seeking a UCI-compliant position, 100 mm is the maximum
allowable height. High Rise 3D extensions must be trimmed to achieve
this measurement, measured as the vertical distance from the centre of
the arm cup pad, to the top edge of the shifter body.
Please ensure you use a properly designed
tube cutting guide (e.g. Park Tools SG-6) and saw (e.g. 32 TPI hack saw
blade). Post cutting, a fine metal file or deburring tool will be required to
finish the tube ends.
Thanks to the unique 3D bend profile, High Rise 3D extensions can be
configured with the grip end angled in, or aligned straight.
A bike with a narrow extension tube spacing will favor the “angled in”
orientation. A bike with a wide extension tube spacing will favor the
“aligned straight” orientation. During setup, perform a dummy fit of the
extensions to find your preferred extension orientation.
Ensure that the extension clamps are clean and free of grease or other
lubricants by using isopropyl alcohol to prepare the clamping surfaces.
Tighten the extension clamps to the torque specified in the
frame/handlebar manufactures specifications.
Ensure that the extensions clamps are free of sharp edges
that may cause tube damage to the extensions when clamped, and/or
when in use. Sync Ergonomics is not liable for product damage and/or
personal injury resulting from inappropriately prepared clamping area.
Ensure that you complete proper setup of your
Project 0.2 Ecosystem prior to installing shift wiring.
You can run the wires through the extension directly
into the shifter.
When shifters
require an external wire, use the pre-drilled hole in
the grip end of the extension.
extensions in the
region immediately in front of the extension clamp
(high-stress area).
WARNING: When using SRAM, the length of the wires limits
placement of the Blip Box. Plan for this prior to assembly.
Saddle offset 0-50 mm behind the bottom bracket
Saddle offset 50 mm (or more) behind the bottom bracket
Athlete height of 190 cm or taller, with a saddle offset of 50 mm
(or more) behind the bottom bracket
The clamp end of the extension must be trimmed in order to
achieve UCI compliance for length.
For all individuals, height gain is measured from the centre of the
arm cup pad, to the top edge of the shifter body/extension tube
The grip end of the extension must be trimmed in order to achieve
UCI compliance for height gain.

Other Sync Ergonomics Bicycle Accessories manuals

Sync Ergonomics Project 0.2 Evo User manual

Sync Ergonomics

Sync Ergonomics Project 0.2 Evo User manual

Sync Ergonomics Project 0.2 Evo User manual

Sync Ergonomics

Sync Ergonomics Project 0.2 Evo User manual

Popular Bicycle Accessories manuals by other brands

Lightyourbike HALO quick start guide

Lightyourbike

Lightyourbike HALO quick start guide

Kettler SM3305-68 Training and operating instructions

Kettler

Kettler SM3305-68 Training and operating instructions

CAMPAGNOLO SHAMAL CARBON user manual

CAMPAGNOLO

CAMPAGNOLO SHAMAL CARBON user manual

GEONAUTE KEYMAZE 500 HIKE manual

GEONAUTE

GEONAUTE KEYMAZE 500 HIKE manual

Garmin Edge 1000 Quick start manual

Garmin

Garmin Edge 1000 Quick start manual

Sigma 500 manual

Sigma

Sigma 500 manual

Hyena E-Road Series user manual

Hyena

Hyena E-Road Series user manual

Bikers Dream Mini-foot-pump instruction manual

Bikers Dream

Bikers Dream Mini-foot-pump instruction manual

Lupine SL MINI MAX instructions

Lupine

Lupine SL MINI MAX instructions

Merida Procraft Lenker Installation and operating instructions

Merida

Merida Procraft Lenker Installation and operating instructions

ROSE Bikes XTREME PRO F-197 owner's manual

ROSE Bikes

ROSE Bikes XTREME PRO F-197 owner's manual

Tune TURNSTANGE manual

Tune

Tune TURNSTANGE manual

Bosch eShift Original instructions

Bosch

Bosch eShift Original instructions

Marzocchi 320 LCR CARBON manual

Marzocchi

Marzocchi 320 LCR CARBON manual

Sigma BC1200 manual

Sigma

Sigma BC1200 manual

Halfords Essentials 684146 quick start guide

Halfords Essentials

Halfords Essentials 684146 quick start guide

Crivit Pro CBGT 4 A1 operating instructions

Crivit Pro

Crivit Pro CBGT 4 A1 operating instructions

Shimano SC-EN600 user manual

Shimano

Shimano SC-EN600 user manual

manuals.online logo
manuals.online logoBrands
  • About & Mission
  • Contact us
  • Privacy Policy
  • Terms and Conditions

Copyright 2025 Manuals.Online. All Rights Reserved.