SynOptics SYNBIOSIS aCOLyte3 User manual

aCOLyte3
User Manual
All possible care has been taken in the preparation of this publication, but Synoptics Limited accepts no liability for any
inaccuracies that may be found.
Synoptics Limited reserves the right to make changes without notice both to this publication and to the product that it
describes.
No part of this publication may be reproduced, stored in a retrieval system or transmitted in any form or by any means
electronic, mechanical, photocopying, recording or otherwise without the prior permission of the copyright owner.
Version 13.p.1
Published by Synoptics Limited
© Synoptics Limited 2013


Contents
Getting started 1
Introduction 1
Structure of the Manual 1
Using aCOLyte3 – overview 2
Creating a batch 3
Accepting a batch 3
Taking measurements 3
Starting aCOLyte3 3
Logging out and closing aCOLyte3 5
Capturing images 7
The Image tab 7
Loading plates into the instrument 8
Capturing an image 9
Setting the exposure 9
Zooming the image 10
Exporting the image to a file 11
Importing an image from a file 11
Calibrating the image 12
Viewing batch images 14
Creating a new batch 17
Creating the batch 17
Creating a completely new batch 18
Creating a new batch based on an existing batch or an exported batch file 21
Setting up batches 24
Giving the batch a name 25
The Classification tab 25
Frame 26
Choosing the type of frame to use 26
Adjusting the position and size of frames 28
Total Plate Count 30
The Classification panel 33
The Configuration tab 35
Manually entered plate identifiers 37
Selecting auto-incrementing plate identifiers 39
Using a barcode reader for plate identifiers 41
Using an external source for plate identifiers 42
Using a CSV list of identifiers 43
Creating a plate list 45
The Measure tab 47
Plate ID 48
aCOLyte3 User Manual Contents–i

Contents
Dilution 48
Pour Plate batches 49
Spiral Plate batches 50
Setting count restrictions 52
Test Measure Plate 53
The Results tab 54
Accepting the batch design 56
Managing batches 57
Exporting batch details 57
Deleting batches 57
Using Measurement Mode to count colonies 61
Opening and selecting batches 61
Adjusting frame settings in Measurement mode 63
Entering plate identifiers and dilutions 63
Auto-incrementing plate identifiers 64
Manually entered plate identifiers 64
Changing the dilution set for a plate 65
External source – CSV file or Custom plate list 66
Using a barcode reader for identifiers and dilutions 68
Counting colonies 68
Counting the colonies on a plate automatically 69
Exclude regions 69
Test measurement and adjusting settings 72
Manual colony counting 74
Entering a zero count 75
Closing batches 75
Working with results 77
The Results table 77
Editing plate measurements 78
Editing the plate identifier, comments and dilution 81
Saving changes to results 82
Undoing and resetting changes 82
Deleting results 82
Viewing the audit history of changes 83
Manually adding and removing colonies 83
Adjusting the frame for a result 84
Rejecting small particles in a result 84
Changing the Sensitivity setting for a result 85
Splitting colonies in a result 85
Adding exclude regions to a result 86
Zeroing the count 87
Compiling reports 88
Configuring aCOLyte3 91
About aCOLyte3 91
Contents–ii aCOLyte3 User Manual


Getting started
Introduction
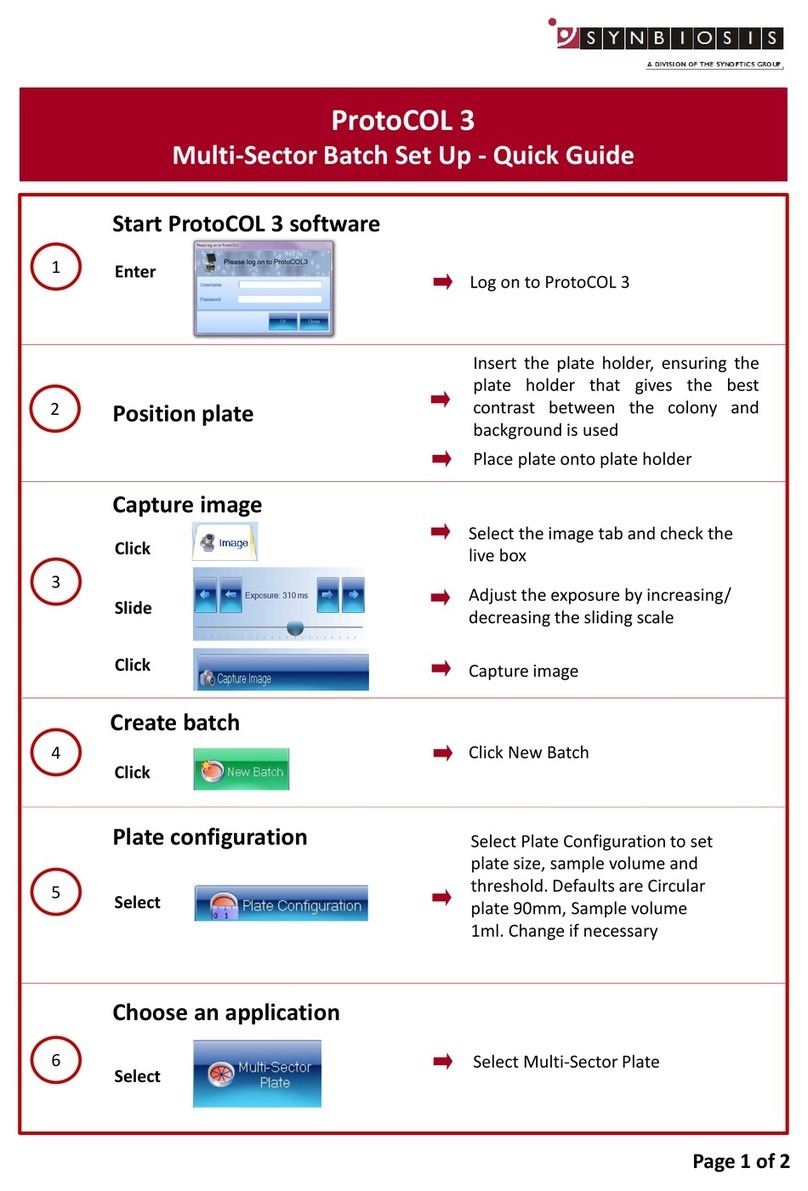
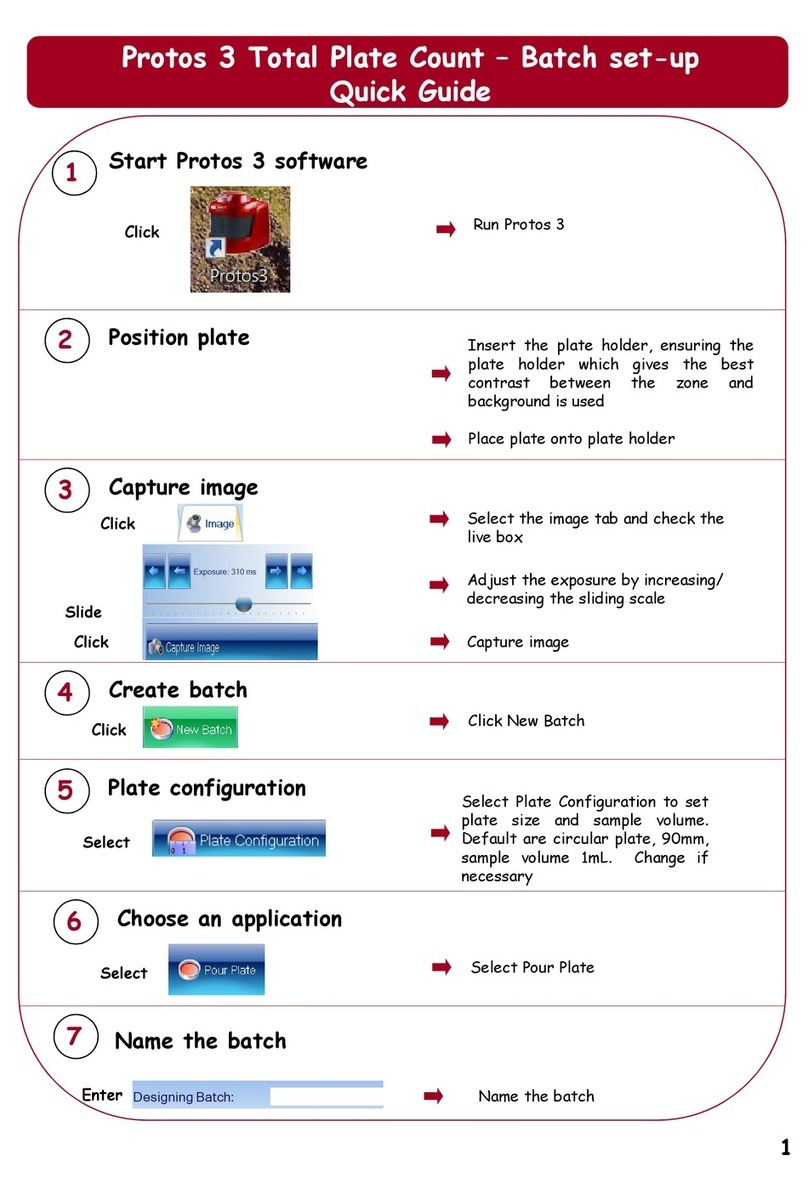
aCOLyte3 is a combined hardware and software system for automatically counting colonies on
plates.
Once the system has been set up, all you have to do to count the colonies is to put each plate
on the plate holder and press a button. The counting of each plate takes no more than a few
seconds and the results are shown instantly in a table.
aCOLyte3 allows you to enter plate identifiers and dilutions manually, to use auto-
incrementing plate identifiers or to enter lists of plate identifiers and dilutions within
aCOLyte3 or to import them from a CSV file. If you use auto-incrementing plate identifiers or
a plate list, aCOLyte3 will prompt you for which plate to insert next. The plate identifiers and
dilutions are then automatically assigned to the results and recorded. You can also read plate
identifiers and dilutions using a barcode reader.
When you are counting colonies, you can use aCOLyte3:
lto apply sophisticated algorithms to distinguish touching colonies;
lto add or remove colonies manually after an automatic count – you can also perform a
completely manual count if required;
lto define ‘exclude regions’ on the plate if there are any problem areas on an individual
plate where colonies cannot be distinguished for some reason – the missing area is then
automatically allowed for in calculating the total count for the plate.
All counting results are displayed and saved automatically, and any manual changes you
make to a result are marked against the individual result with comments and coded flags. By
default, an image of the plate is automatically saved with each result, and can be reloaded at
a later time for auditing. You can also view a full audit history for any changes you have made
to a result.
Once you have completed the counts/measurements, you can compile a report showing the
results.
This introduction has only mentioned a few of the features that make aCOLyte3 such a
powerful but easy tool to use. The rest of the Manual gives full instructions for using all of its
many functions.
Structure of the Manual
Note The cross-references in this manual assume that it is printed or viewed with odd numbered
pages on the right-hand side. If you are using Adobe Acrobat to read this manual on-screen,
you can display two pages side-by-side by choosing Two Page View from the View®Page
Display submenu, and you can then choose Show Cover Page in Two Page View from the
same submenu to display the odd numbered pages on the right-hand side.
aCOLyte3 User Manual 1

Getting started
The rest of this Manual is structured as follows:
lThe next section,
Using aCOLyte3 – overview
in this
Getting Started
chapter provides a
brief overview of the way you use aCOLyte3 to count colonies. This involves two main
phases:
lusing
the Batch Designer
to set up the system for detecting and counting colonies on
a series of plates;
lusing
Measurement mode
to actually count the colonies on the plates and record the
results.
The next section also introduces you to the idea of a ‘batch’, which is used to hold the
settings made in
the Batch Designer
and then to store the results produced in
Measurement mode.
The final two sections of this
Getting Started
chapter give instructions for starting
aCOLyte3 (see
Starting aCOLyte3
, on the facing page) and then for logging out and
closing aCOLyte3 (see
Logging out and closing aCOLyte3
, page 5).
The remaining chapters are:
l
Capturing images
, page 7, which shows you how to load plates into aCOLyte3 and
capture an image of the plate.
These procedures are used in the Batch Designer and Measurement mode.
l
Creating a new batch
, page 17, which shows you how to use the Batch Designer to
create a new batch and specify how colonies should be counted.
Some of these procedures can also be applied in Measurement mode.
l
Using Measurement Mode to count colonies
, page 61, which shows you how to count
the colonies on a series of plates.
l
Working with results
, page 77, which shows you how to view and edit the results of your
measurements and how to create reports using the results.
l
Configuring aCOLyte3
, page 91, which shows you how to configure aCOLyte3 in a
variety of ways, including how to set up and manage user accounts to protect access to
the program.
Using aCOLyte3 – overview
aCOLyte3 uses ‘batches’ to define the settings used to detect colonies on plates and to store
the results of the measurements you make using those settings. This means that before you can
use aCOLyte3 to take any measurements, you must have an open batch. You can do this by
opening an existing batch or by creating a new batch. You can create a completely new batch
or base a new batch on an existing one, either to use the same settings, or as a starting point
for defining new settings. aCOLyte3 automatically saves your results in the current batch, so
once you have created and accepted a batch design, you do not need to take any action to
save it again.
Each batch contains the settings and results for detecting and counting the colonies on a series
of plates that have the same types of colony, use the same medium and are of the same type
(Pour Plate or Spiral Plate).
2aCOLyte3 User Manual

Starting aCOLyte3
Creating a batch
In many cases, all you need to do to set up the colony detection procedure for a batch is
specify whether the colonies are lighter or darker than the background, but if required, you can
also fine tune the colony detection by adjusting the sensitivity, setting a minimum size for
colonies and choosing whether to use the colony splitting algorithm.
When you create the batch, you also need to choose how plate identifiers and dilutions are
entered for each plate as you measure it. If required, you can also enter count restrictions so
that warnings are given if the count on a plate is higher or lower than specified maximum
and/or minimum bounds.
Accepting a batch
While you are working in the Batch Designer, you can perform test measurements and
experiment with and change the settings used to detect the colonies. Once you are satisfied
with the design, the next step is to ‘accept’ the batch and switch aCOLyte3 to Measurement
mode, which you then use to count the colonies on each plate, and record the results.
Once you have accepted the batch, some of the batch settings, such as whether you are
detecting light or dark colonies, are fixed and cannot be changed. However, other settings,
such as the sensitivity, small particle filter and colony splitter, can be changed in
Measurement mode before you perform a count.
Taking measurements
Once the batch has been accepted for Measurement mode, the process of counting the
colonies is very straightforward: put a plate in the plate holder, press a button and move on to
the next plate.
In most cases this is all you will need to do, but if there are any problems with difficult plates,
you can make manual adjustments before carrying out the measurement. For example, for
Pour Plate batches, you can add exclude regions, carry out a test measurement and optimize
the colony detection settings, or perform a manual colony count.
After you have carried out a measurement, the results are recorded in a results table. You can
edit the individual results in a number of ways. For example, you can add exclude regions and
adjust the colony detection settings before carrying out an automatic colony recount, or you
can add and remove colonies manually.
Any changes you make to a result are recorded in an audit history for that result.
Finally, once you have taken all the measurements, all you need to do to compile a report on
the results is press a few buttons.
Starting aCOLyte3
Note You can control aCOLyte3 using the touch-sensitive screen, a mouse or keyboard shortcuts.
See the aCOLyte3
Quick Guide
for how to set up the hardware ready for use.
To turn on the aCOLyte3 system:
1. Plug the flying lead from the power supply into the jack socket on the back of the
aCOLyte3 system box.
2. Plug the power supply into a mains socket.
3. Plug in the USB lead.
aCOLyte3 User Manual 3

Getting started
4. Plug in the software dongle.
5. Press the black button on the front of the instrument to switch the light on – the lighting
can be cycled between using the lower lights, the upper light or both the upper and
lower lights by repeatedly pressing this button.
To start the aCOLyte3 colony counting program:
1. Double-click on the aCOLyte3 icon on the Windows Desktop:
If user authentication is disabled (see
Managing aCOLyte3 users
, page 95), the program
will open immediately and you will not need to follow the remaining steps in this
procedure.
Otherwise, the Please log on to aCOLyte3 dialog box will be displayed:
Note If user authentication is enabled, this dialog box is also displayed when you log out from
aCOLyte3 or if you are logged out automatically by aCOLyte3 because you have not used it
for a set period of time (5 minutes by default) – see
Logging out and closing aCOLyte3
, on the
facing page, for more details.
2. Enter your Windows Username – the name you use to log on to Windows on this PC.
3. Enter your Windows Password – the password you use to log on to Windows on this PC.
Notes aCOLyte3 checks that the user name/password is a valid combination to log on to Windows on
this PC, but does not check that it is the currently logged on user. This means that you can log
on to aCOLyte3 while someone else is logged on to Windows on this PC.
4. Press OK.
The aCOLyte3 Application window will open. You can now either create a new ‘batch’ (see
Creating a completely new batch
, page 18) or open an existing batch if there is one (see
Opening and selecting batches
, page 61) and start counting colonies immediately.
4aCOLyte3 User Manual

Logging out and closing aCOLyte3
To log out from aCOLyte3 (this only applies if user authentication is enabled – see
Managing
aCOLyte3 users
, page 95):
Press the Log out button near the top right-hand corner of the aCOLyte3 application
window:
The Please log on to aCOLyte3 dialog box will be displayed.
Note You may also be logged out automatically and this dialog box displayed if you do not use
aCOLyte3 for more than a set period of time (5 minutes by default) – see
System settings
, page
92, for how to set the timeout period.
You (or someone else) can then:
lLog on again – see
Starting aCOLyte3
, page 3.
lPress Close to exit aCOLyte3.
Alternatively, to exit aCOLyte3:
1. Press the aCOLyte3 button at the top left-hand corner of the window to display the
aCOLyte3 menu:
2. Press
aCOLyte3 User Manual 5

Getting started
6aCOLyte3 User Manual

Capturing images
This chapter shows you how to capture and work with images. You will find out about:
l
The Image tab
, below
l
Loading plates into the instrument
, on the next page
l
Capturing an image
, page 9
l
Setting the exposure
, page 9
l
Zooming the image
, page 10
l
Exporting the image to a file
, page 11
l
Importing an image from a file
, page 11
l
Calibrating the image
, page 12
l
Viewing batch images
, page 14.
The ‘view batch images’ procedure is used to view images captured during the measurement
process, so is only available in Measurement mode. All of the other procedures described in
this chapter are used in both the Batch Designer and Measurement mode.
The Image tab
To display the image controls:
Press the Image tab:
aCOLyte3 User Manual 7

Capturing images
You use the controls on the Image tab to capture and work with images:
The View Batch Images button is enabled when you are working in Measurement mode (see
Using aCOLyte3 – overview
, page 2, for more information about the Batch Designer and
Measurement mode).
For instructions on how to use the image controls, see the following sections:
l
Capturing an image
, on the facing page
l
Setting the exposure
, on the facing page
l
Exporting the image to a file
, page 11
l
Importing an image from a file
, page 11
l
Viewing batch images
, page 14.
See also:
l
Zooming the image
, page 10
Loading plates into the instrument
To load a sample plate into the instrument:
1. Remove the curtain from around the sample stage – it is held in place by magnetic tape
along its top edge.
2. If required, fit the small plate adapter in the plate recess.
3. Place the sample plate in the plate recess.
Note aCOLyte3 automatically displays a live image when you insert a new plate. However, if
required, you can choose to display a live image manually by checking the Live Image box on
the
The Image tab
, on the previous page.
8aCOLyte3 User Manual

Capturing an image
4. Re-attach the curtain around the sample stage.
Capturing an image
To capture an image in aCOLyte3:
1. Press the Image tab
to display the image controls.
2. Press
The image will be captured and displayed in the aCOLyte3 window.
Note In fact, three images will be captured, with red, green and blue illumination respectively, and
the results combined to form a color image – this procedure produces more accurate results
than can be obtained using a color camera.
If the image is too light or too dark, you can adjust the exposure (see the next section,
Setting
the exposure
) and capture the image again.
Setting the exposure
Note You can adjust the exposure in both the Batch Designer and Measurement Mode.
To set the exposure for capturing an image:
1. Press the Image tab
to display the image controls, including the exposure controls:
aCOLyte3 User Manual 9

Capturing images
2. The current exposure time is shown between the arrow buttons. To change the exposure
time, press:
to decrease the exposure by a large step
to decrease the exposure by a small step
to increase the exposure by small step
to increase the exposure by a large step.
Or:
Drag the handle in the exposure slider bar:
Zooming the image
By default, the image is scaled to fit the image pane in the aCOLyte3 window.
To zoom the image:
Press
When it is zoomed, the button shows the scaling factor:
To zoom out:
Press
To return to fitting the image to the image pane:
Press
10 aCOLyte3 User Manual

Exporting the image to a file
To export the current captured image in the aCOLyte3 window to a file:
1. Press the Image tab
to display the image controls.
2. Press
to display the Export Image dialog box – this is a standard Windows ‘Save As’ dialog
box.
3. Use the Export Image dialog box to:
lselect an image format from the Save as type drop-down list
lselect a folder to hold the image
lenter a file name for the image.
4. Press Save to save the file.
See also
Viewing batch images
, page 14, for how to export previous images from a batch.
Importing an image from a file
To import an image from a file into the aCOLyte3 window:
1. Press the Image tab
to display the image controls.
2. Press
to display the Import Image dialog box – this is a standard Windows ‘Open’ dialog box.
3. Use the Import Image dialog box to locate the folder holding the required image and
select the image.
4. Press Open to open the file and load it into the aCOLyte3 window.
aCOLyte3 User Manual 11

Capturing images
A warning dialog box will be displayed asking you to calibrate the image – see the next
section,
Calibrating the image
, for details.
Calibrating the image
When you import an image from a file (see
Importing an image from a file
, on the previous
page) or try to perform a measurement from an uncalibrated imported image, a warning dialog
box will be displayed asking if you want to calibrate the image, for example:
Note In order to create an accurate calibration you need to know the actual size of some feature in
the image.
To calibrate the image:
1. Press Yes in the warning dialog box to display the Calibrate Camera for Measurements
dialog box.
2. Choose some horizontal or vertical feature of known length in the image, such as the
plate itself, and click on one end of it, for example:
12 aCOLyte3 User Manual

Importing an image from a file
3. Move the pointer to the other end of the feature – as you do this, a line will be drawn
back to the starting point, for example:
4. Click to mark the other end of the feature.
The calibration edit box and units button will be displayed:
5. To change the units:
a. Press the units button to display the units menu:
b. Select the required units from the menu.
aCOLyte3 User Manual 13

Capturing images
6. Type the length of the known feature into the calibration edit box:
7. Press
to set the calibration and return to the main aCOLyte3 window.
Viewing batch images
By default (see
System settings
, page 92), when you create a new batch, the image used to set
it up (see
Setting up batches
, page 24) is saved with the batch, and then, after you have
accepted the batch design, each time you take a measurement in Measurement mode, the
captured image is also saved with the result in the batch.
To view the batch setup image and images used for measurements:
1. Press
to display a dialog box:
The box on the left-hand side lists the batch images, beginning with the batch setup
image followed by the measurement images listed in order of their plate identifiers –
expanding the measurement image items (as in the picture) shows the dilutions.
2. To view a measurement image, click on the plate identifier.
To view the batch setup image, click on the batch identifier (the top line).
14 aCOLyte3 User Manual
Table of contents
Other SynOptics Laboratory Equipment manuals