Sysgration HQXAKM-7500 User manual

User’s Guide
Wireless RF Keyboard & Mouse
HQXAKM-7500
HQXAGM-9600


Note: the manufacturer is not responsible for any radio or tvinterference caused by
unauthorized modifications to this equipment. such modifications could void the user's
authority to operate the equipment.

T
Ta
ab
bl
le
e
o
of
f
C
Co
on
nt
te
en
nt
ts
s
INTRODUCTION............................................................................................................... 1
PACKAGE CONTENTS.......................................................................................................... 2
SYSTEM REQUIREMENTS..................................................................................................... 2
FEATURES .......................................................................................................................... 2
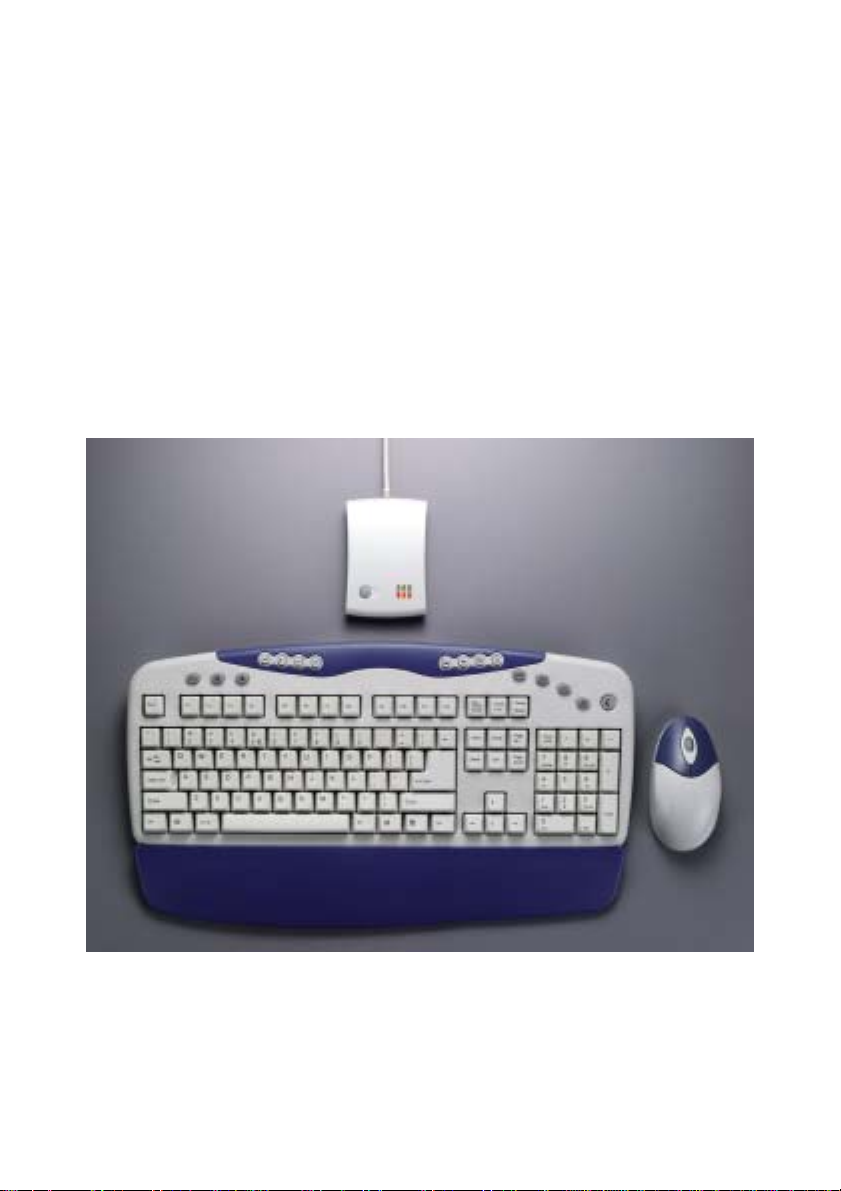
MAINBOARD AND MOUSE COMPONENTS............................................................... 3
WIRELESS RF KEYBOARD .................................................................................................. 3
WIRELESS RF MOUSE ........................................................................................................ 4
RF RECEIVER..................................................................................................................... 4
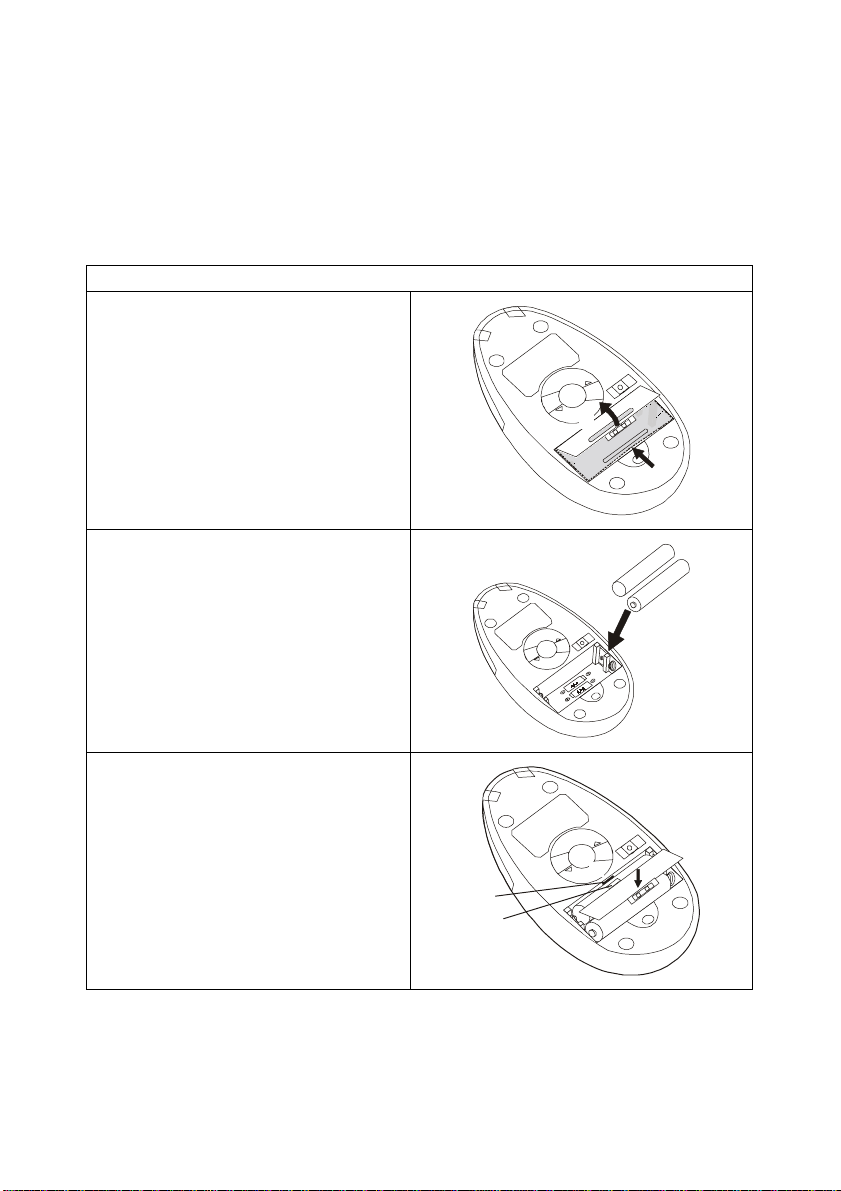
INSERTING BATTERIES................................................................................................. 5
MOUSE............................................................................................................................... 5
KEYBOARD......................................................................................................................... 6
SETTING UP YOUR KEYBOARD AND MOUSE ......................................................... 7
INSTALLING THE SOFTWARE..................................................................................... 9
MOUSE............................................................................................................................... 9
KEYBOARD........................................................................................................................11
USING THE SOFTWARE................................................................................................15
IWARE MOUSE..................................................................................................................15
MULTIMEDIA KEYBOARD ..................................................................................................17
TROUBLESHOOTING.....................................................................................................20
A WORD ABOUT ERGONOMICS.................................................................................22

1
I
In
nt
tr
ro
od
du
uc
ct
ti
io
on
n
Congratulations on your purchase of the Wireless RF Keyboard & Mouse, which
combines an innovative ergonomic design with all the features and convenience of
wireless technology:
Wireless RF Keyboard
Wireless RF Mouse
RF Receiver
The Wireless RF Keyboard has advanced multimedia features that enable you to
play audio CDs, VCDs, DVDs, and MPEG files. You can use the keyboard hot keys
to raise, lower and mute audio.
Other hot keys let you open your default Web browser and refresh Web pages,
browse forward and backwards, open a search page, and send e-mail. There are
also hot keys for launching the Windows calculator and entering power savings
mode.
The bundled software further enhances your keyboard by supplying an onscreen
display (OSD) and onscreen menus to control audio and Web functions.
The Wireless RF Mouse has a scroll wheel/middle button that can be assigned
various functions such as Web page or word processing software scrolling, or
launching applications such as Windows Explorer.

2
P
Pa
ac
ck
ka
ag
ge
e
C
Co
on
nt
te
en
nt
ts
s
After you have unpacked the Wireless RF Keyboard & Mouse, check the contents
to make sure the following items are included.
•One Wireless RF Mouse
•One Wireless RF Keyboard
•One RF receiver
•Two AAA alkaline batteries (for the mouse)
•Two AA alkaline batteries (for the keyboard)
•This quick guide
If any of the above items are missing or appear damaged, contact your dealer im-
mediately. Do not throw the shipping carton away in case you need to ship your
Wireless RF Keyboard & Mouse.
S
Sy
ys
st
te
em
m
R
Re
eq
qu
ui
ir
re
em
me
en
nt
ts
s
To use the mouse software and the hot keys on your multimedia keyboard, you
need the following:
•Windows ME/2000/98/95/NT 4.0 or later
•PS/2 mouse and keyboard ports
•Sound Blaster compatible sound card (for CD/VCD/DVD, and MPEG operation)
•CD-ROM drive (for software installation and CD/VCD operation)
•DVD-ROM drive (for DVD operation)
F
Fe
ea
at
tu
ur
re
es
s
•Wireless radio frequency (RF) technology
•Scroll wheel mouse enables scrolling in Web pages and text editors
•Onscreen display (OSD) provides status information
•Keyboard multimedia and Web hot keys provide convenient access to often
used commands
•Plug and Play compliant
•Compatible with Windows ME/2000/98/95/NT4.0

3
M
Ma
ai
in
nb
bo
oa
ar
rd
d
a
an
nd
d
M
Mo
ou
us
se
e
C
Co
om
mp
po
on
ne
en
nt
ts
s
W
Wi
ir
re
el
le
es
ss
s
R
RF
F
K
Ke
ey
yb
bo
oa
ar
rd
d
The following illustration shows the Wireless RF Keyboard and hot keys:
WWW
Button Function Button Function
Play/Pause: plays or
pauses a CD/DVD/VCD Forward: goes to the next
page in your Web browser
Mute: turns off the audio
output Stop: stops loading a Web
page
Stop: stops playing a
CD/DVD/VCD Refresh: reloads the Web
page
Next Track: searches back-
ward through tracks on a
CD/DVD/VCD
WWW
World Wide Web: opens
your default Web browser
Volume Down: decreases
audio volume E-mail: launches the default
e-mail application
Volume Up: increases audio
volume Search: opens a search
window in Netscape or
Windows IE
Previous Track: searches
forwards through tracks on a
CD/DVD/VCD
My Favorite: opens the IE
favorites folder, or the Net-
scape bookmarks folder
Back: goes to the previous
page in your Web browser Suspend: enters the com-
puter into power saving
mode

4
W
Wi
ir
re
el
le
es
ss
s
R
RF
F
M
Mo
ou
us
se
e
The following illustration shows the RF mouse components:
Le
f
t button
Scroll wheel/middle butto
n
Right button
R
RF
F
R
Re
ec
ce
ei
iv
ve
er
r
The following illustration shows the RF receiver components:
Num Lock indicator
Caps Lock indicator
Scroll Lock indicator
Mouse/keyboard
connect button
P
S/
2 keyboard
connector (purple)
PS/2 mouse
connector (green
)

5
I
In
ns
se
er
rt
ti
in
ng
g
B
Ba
at
tt
te
er
ri
ie
es
s
The keyboard and mouse both require batteries to operate. The mouse uses two
AAA batteries and the keyboard uses two AA batteries. Refer to the following in-
structions and illustrations for inserting the batteries:
M
Mo
ou
us
se
e
1. Turn the mouse over.
2. Open the battery compartment.
Press the edge (A) with your
thumb and pull up (B).
A
B
3. Insert two AAA batteries into the
compartment. Ensure that you
orient the batteries according to
the polarity markings inside the
battery compartment.
4. Replace the battery compartment
cover. Insert the tab into the slot
(A) and flip the cover into place
(B).
B
A
Slot
Tab

6
K
Ke
ey
yb
bo
oa
ar
rd
d
1. Turn the keyboard over.
2. Open the battery compartment.
Slide the cover in the direction of
the arrows.
3. Insert two AA batteries into the
compartment. Ensure that you
orient the batteries according to
the polarity markings inside the
battery compartment.
4. Replace the battery compartment
cover.

7
S
Se
et
tt
ti
in
ng
g
u
up
p
Y
Yo
ou
ur
r
K
Ke
ey
yb
bo
oa
ar
rd
d
a
an
nd
d
M
Mo
ou
us
se
e
Your RF keyboard and mouse connect to the PS/2 keyboard and mouse ports on
your computer.
Note! Insert the keyboard and mouse batteries before setting up the keyboard and
mouse. Refer to the previous section.
Refer to the following instructions and illustrations to connect the keyboard and
mouse to your PC:
1. Turn off your computer.
2. Plug the purple PS/2 connector on
the RF receiver cable into the
PS/2 keyboard port on your com-
puter.
3. Plug the green PS/2 connector on
the RF receiver cable into the
PS/2 mouse port on your com-
puter.
4. Place the RF receiver in a good
location.
Place the receiver at least
8 inches (20 cm) from electrical
devices such as the computer
or monitor.
5. Place the keyboard and the
mouse in the proper location for
your computer.
Note! Refer to the section on er-
gonomics later in the quick guide
for more information on setting
up your workstation.

8
6. Turn on the computer.
7. Press the RF receiver connect
button (A), and then use a pen tip
or bent paper clip to press the
keyboard connect switch (B) and
the mouse connect switch (C).
Note! Repeat Step 7 when con-
necting the Wireless RF
Keyboard & Mouse for the first
time and after replacing the bat-
teries.
A
B
C
Receiver
connect button
Connect switches
Ensure that the mouse and keyboard are working. If they do not respond to mouse
movement or keystrokes, repeat Step 7 to ensure that a connection has been made.
If they still are not working, refer to the Troubleshooting section at the end of this
guide.

9
I
In
ns
st
ta
al
ll
li
in
ng
g
t
th
he
e
S
So
of
ft
tw
wa
ar
re
e
The RF mouse and multimedia keyboard come with software to enhance their func-
tion. The software is located on the bundled CD.
Note! Connect your Wireless RF Keyboard & Mouse before installing the soft-
ware. Refer to the previous section.
Insert the software CD into the CD-ROM drive. The autoinstallation screen appears.
A menu provides you with the option of installing the mouse and keyboard.
Follow these instructions to install the keyboard and mouse software:
M
Mo
ou
us
se
e
1. From the software CD install
menu, click Install Mouse. The
iWare mouse installation program
starts. Click Next.
2. Select “3 Button Wheel Mouse,”
and click Next.

10
3. Select “PS2 Port” and click Next.
4. Click Next to accept the default
directory or browse to the desired
directory.
5. Click Next to accept the default
folder or type a new folder name.
6. Click Next to start copying files to
your computer.

11
7. Click Finish to complete the in-
stallation.
When the computer has restarted, an
iWare mouse icon appears in the task-
bar.
K
Ke
ey
yb
bo
oa
ar
rd
d
1. From the software CD install
menu, click Install Keyboard. The
keyboard installation program
starts and you are prompted to
choose a setup language. Choose
your language and click Next.
The MediaKey Setup Wizard be-
gins.
iWare mouse
icon

12
2. Click Next to continue the setup
program.
3. Read the Software License
Agreement and click Yes.
4. Enter your name, company name
if desired, and your serial number.
The serial number is located on
the software CD case. Click Next.

13
5. Click Next to accept the default
location or browse to a new loca-
tion.
6. Click Next to accept the default
folder or type a new folder name.
The setup program copies files to
the computer.

14
7. Click Finish to complete the in-
stallation.
When the setup program has finished
installing the multimedia software, a
MediaKey icon appears in the taskbar. MediaKey
icon

15
U
Us
si
in
ng
g
t
th
he
e
S
So
of
ft
tw
wa
ar
re
e
After your computer restarts, the iWare Mouse icon and the Multimedia Key-
board icon appear at the lower right side of your screen in the taskbar:
The following sections briefly describe the iWare Mouse and Multimedia Keyboard
software. For detailed information on the Multimedia Keyboard software, refer to the
Multimedia Keyboard online help.
i
iW
Wa
ar
re
e
M
Mo
ou
us
se
e
Double-click the iWare Mouse icon in the taskbar to open the iWare Mouse Setting
screen. The following table describes the iWare Settings:
Wheel Tab
Wheel Mode
These two items define the operation
of the scroll wheel:
•System default (Intelli-Mouse)
mode: this option sets the wheel
scrolling function as Microsoft’s
Intelli-Mouse standard.
•Enhance scroll mode: enables
enhanced scroll mode.
Note! Experiment with these two
modes; after some practice,
choose the mode to best suit your
work habits.
iWare
Mouse Multimedia
Keyboard

16
Wheel Speed
These items enable you to set how
fast the page scrolls on the screen:
•Scroll # lines per scroll unit:
sets the number of text lines that
the page will scroll.
•Scroll one page per scroll unit:
sets the screen to scroll one com-
plete page at a time.
Button Tab
Enables you to set the middle button
function. Choose the function from the
drop-down list.
About Tab
Provides the iWare software version.
Refer to this screen when updating the
software to ensure that you have the
most recent version.
This manual suits for next models
1
Table of contents
Popular Computer Accessories manuals by other brands

APLIC
APLIC 302101/20201130SZ055 user manual

Black Box
Black Box ServTray KVT415A-R2 manual

Silvercrest
Silvercrest MTS 2218 User manual and service information

Black Box
Black Box 26681 Specification sheet

Corsair
Corsair 230T installation guide

Silvercrest
Silvercrest MTS2219-SLN User manual and service information