TAG Heuer Chronoprinter 540 User manual

TAG Heuer Timing Page 1 / 44
CHRONOPRINTER 540
User Manual
Version 11/2013

TAG Heuer Timing Page 2 / 44
Table of contents
1. The Keyboard 3
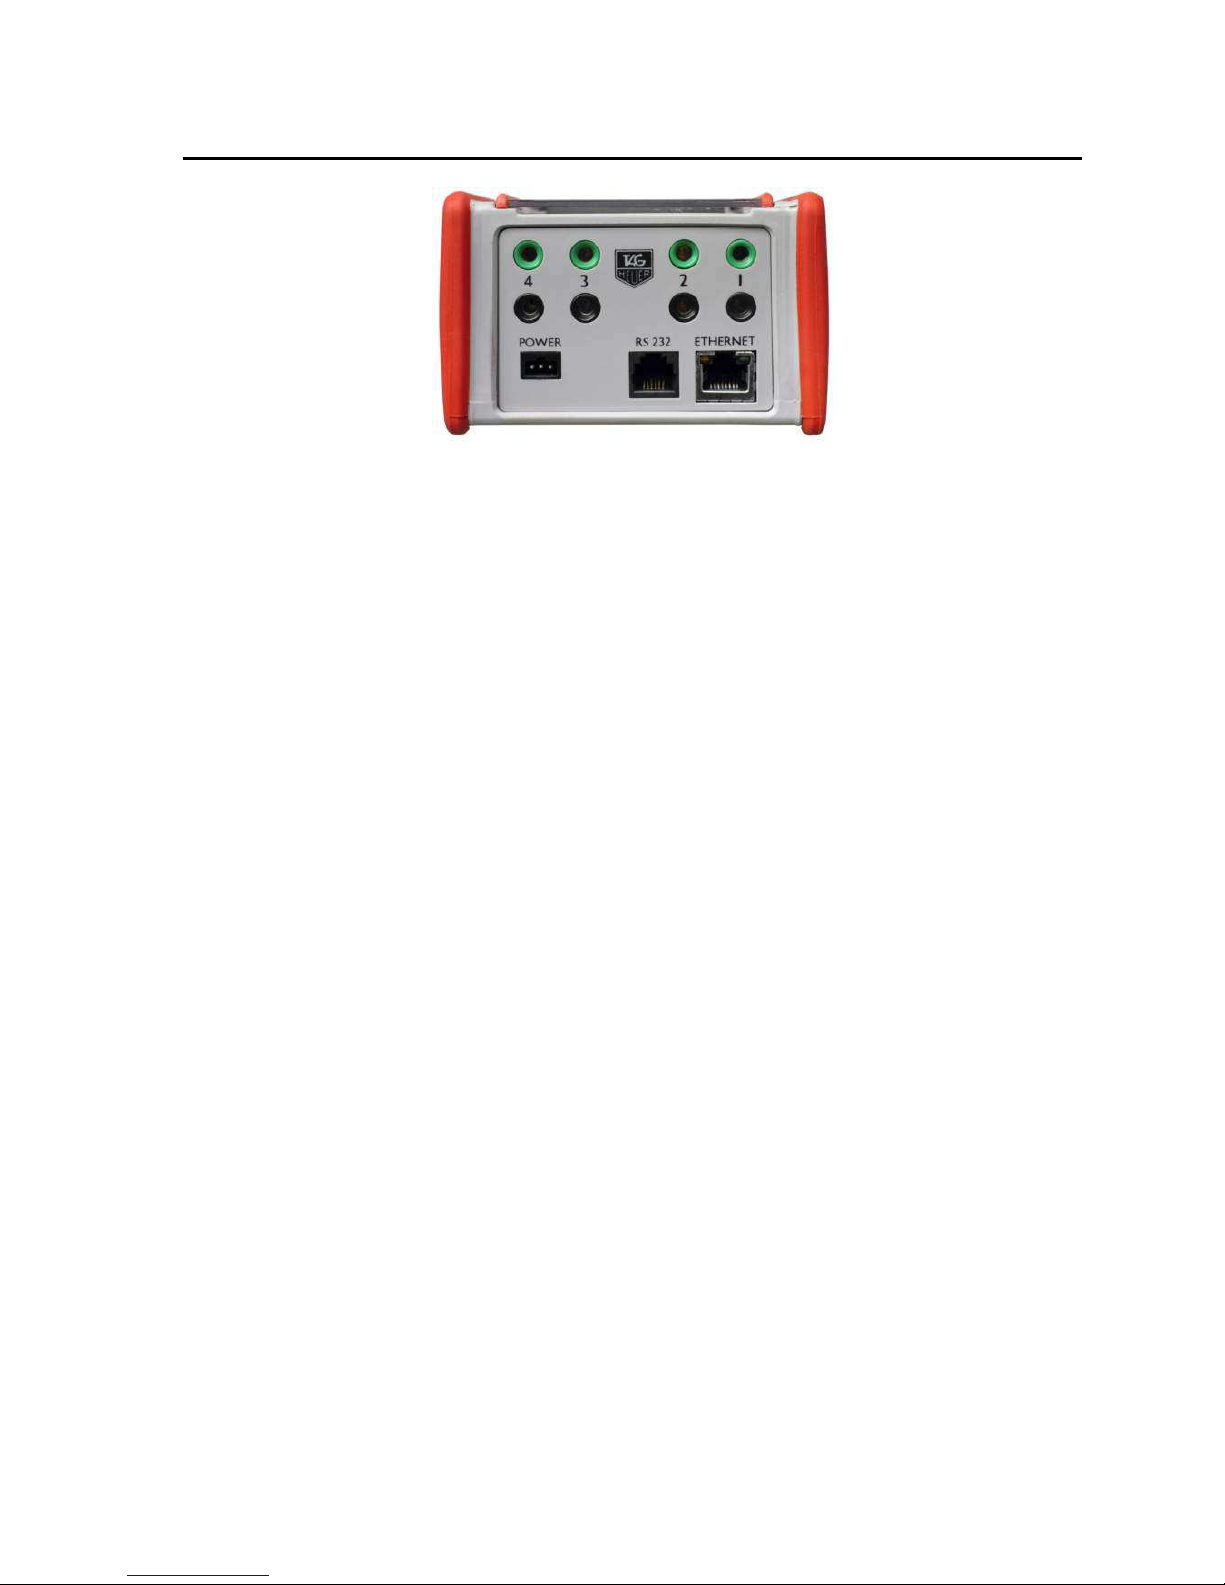
2. Rear Connectors 4
3. Quick operation guide 5
3.1.
Battery installation & replacement 5
3.2.
Switch the CP540 ON and Synchro 5
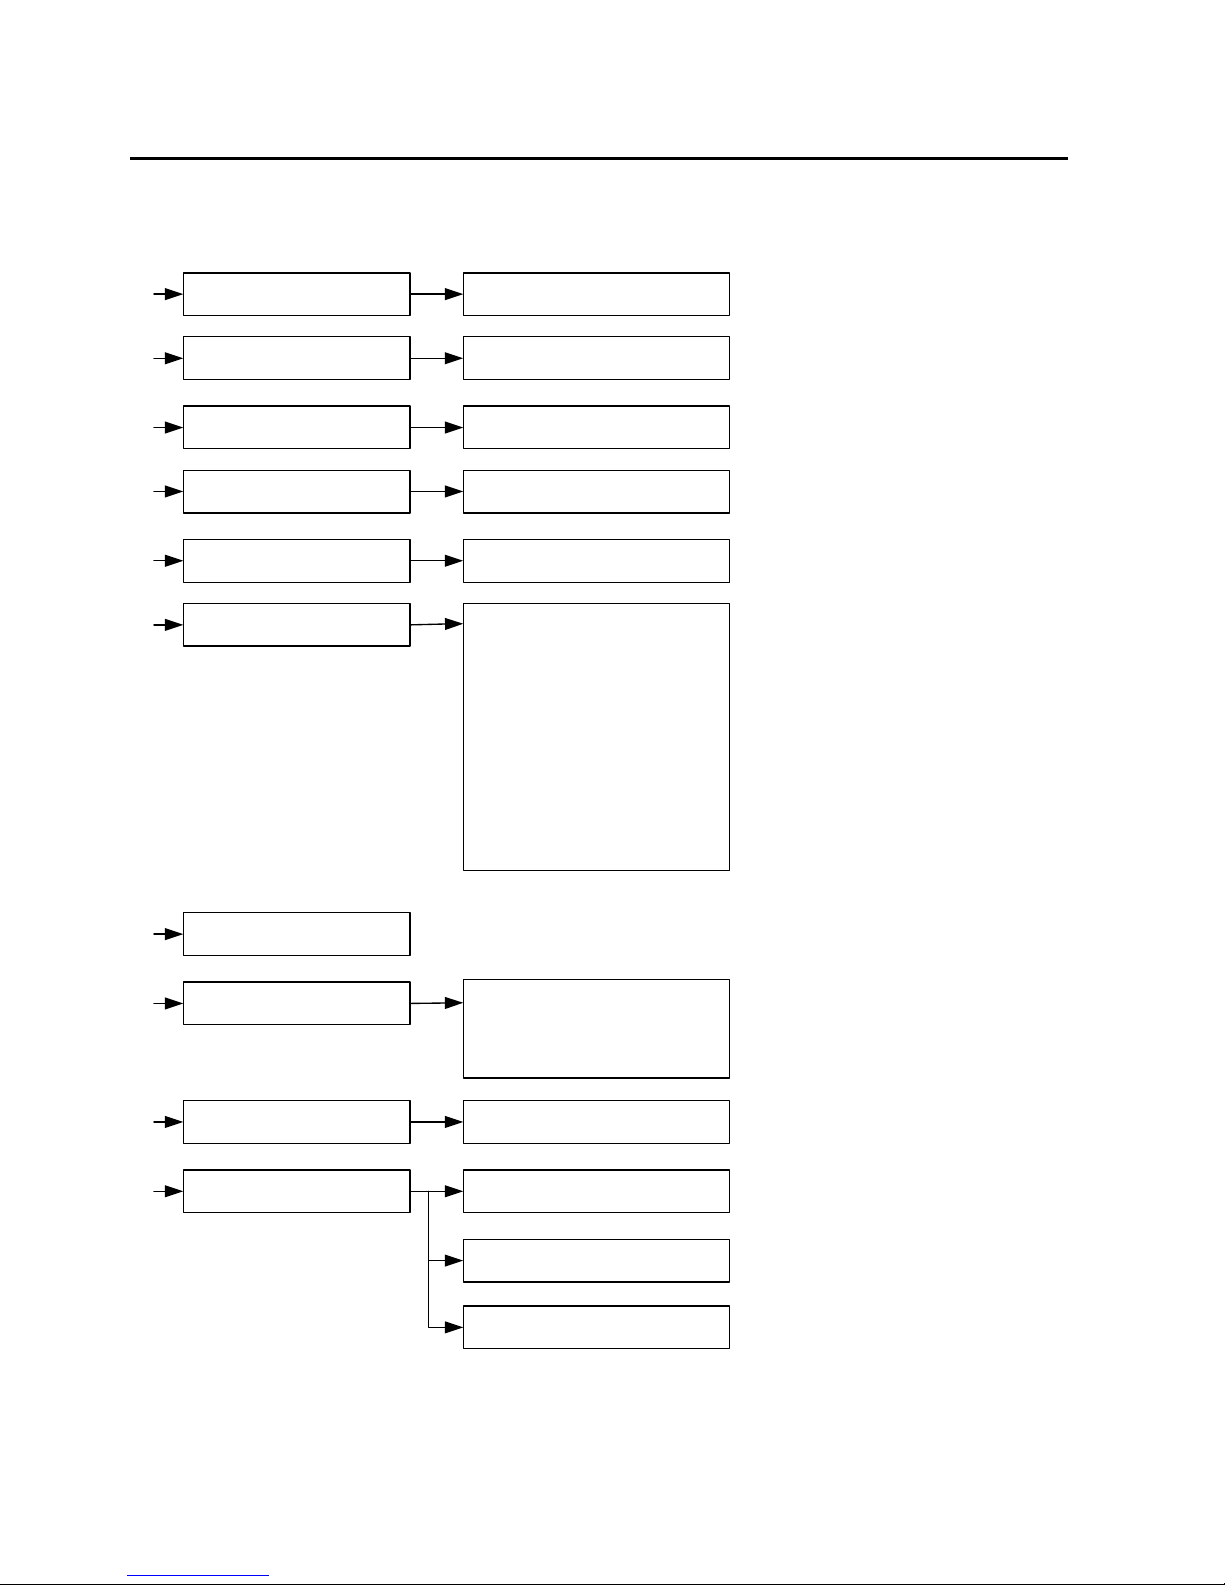
4. START-UP MENU GUIDE & FLOW CHAR 7
5. Menu description before opening up a new run 10
5.1.
Timing Modes 11
5.1.1.
Chrono Mode 11
5.2.
Parameters 12
5.2.1.
Precision 12
5.2.2.
Lock Time (multiple impulse filtering) 12
5.2.3.
Numbering (except PTB SEQ) 13
5.2.4.
Inputs Status 13
5.2.5.
LCD Contrast 13
5.2.6.
LCD Backlight 13
5.2.7.
LCD Delay 13
5.2.8.
Beep 14
5.2.9.
RS232 (PC) 14
5.2.10.
Ethernet 15
5.2.11.
Language 15
5.3.
Speed 16
5.4.
Printer 16
5.5.
Download 16
6. Keyboard shortcuts 17
7. Special characters memorized, printed and sent to the PC 18
8. Special function: RESET CP540 18
9. To open a new run (added or not to a previous run) 19
9.1.
Addition of runs 20
9.2.
BIBO rule 20
9.3.
Ranking (F+ ◄┘) 20
9.4.
Rank a Run 20
10. The existing menus when a run is opened 21
11. Description of the menu (when a run is open) 22
12. Mass Start or Group Start (GRP) 23
12.1.
Start with a timing impulse 23
12.2.
Start a defined time 23
13. Changing the paper roll 24
14. Autonomy / Batteries 25
15. Information about Timing Modes 26
16. Example of Timekeeping sessions 28
16.1.
SEQUENTIAL Mode 28
16.2.
NET TIME Mode 29
16.3.
PARALLEL SEQUENTIAL Mode 31
16.4.
PARALLEL DIFFERENTIAL Mode 33
16.5.
TRAINING Mode 34
17. Download a new version of Software and/or language 35
18. RS232 and Ethernet Protocol 35
19. ETHERNET LINK CONFIGURATION 36
19.1.
Configuration of your PC IP address 36
19.2.
In SKI PRO, MSPORT PRO etc. 37
19.3.
Ethernet connection test : 38
20. Technical specifications 39
21. Accessories 40
22. Firmware JUMPING – V.CJ 43

TAG Heuer Timing Page 3 / 44
1. The Keyboard
ON/OFF
Power ON – Hold
ON
down for 5 seconds to turn power ON
Power OFF – Press Fand follow the instructions on the LCD display.
F
Menu – To enter or to exit the menu and sub-menus
▲
▼
UP and DOWN keys to explore the menu and to scroll through the unassigned memorized
times
DOWN key to deactivate the Automatic numbering of the channels
◄┘
ENTER
– to confirm menu selection, time, date or competitor number in the
RECALL
function.
R
RECALL
– to access the unassigned memorized times of a channel for identification with a
competitor number. Direct times identification is also possible.
*
ERROR
– to cancel a wrong number you entered or to confirm an option.
Interruption of the printing.
Numbering of forerunners with
*
+ N°
0
-
9
Numerical keyboard – to enter a time, the date, a competitor number or a distance.
E1
–
E4
To confirm a competitor number for one of the channels.
False START, INTER or FINISH and confirmation of a channel deactivation ▼+ (E1 – E4).
1
–
4
Green Manual keys for timing impulses or start the time (synchronisation)
1
–
4
Red Manual keys to unblock and block the External inputs (
Input 1
–
4
).
Inputs are blocked when a black bar is shown on the LCD display ▬
Warning
The manual timing keys (1 to 4) do not guarantee timing precision. Only two simultaneous
impulses can be processed at a time from the manual keys

TAG Heuer Timing Page 4 / 44
2. Rear Connectors
INPUT
1 to 4 Inputs for timing impulses.
Working contacts without potential (short circuit or open collector)
Ex: Manual contactor (HL18), photocells (HL2-31 / HL2-35), Start Gates (H7-1 / HL7-
3), radio receiver (HL610, HL620 etc)
Respect the correct polarity!
POWER
For an external power supply.
HL540-1 adaptator (110-220Vac / 12 Vdc) or 12Vdc batteries via HL520-17
connection cable.
RS232
Bi-directional communication with a PC (ONLINE or OFF-LINE) with selectable baud
rates (2400 / 4800 / 9600 Bds (default) and 32k or 56k Bds)
Upgrade of the new software for CP540
Timing data transfer from one CP540 to another.
With “Display Mode”, this allows standard communication with TAG Heuer or Alge
displays boards
ETHERNET
Bidirectional communication with a PC or a Network (LAN) with other CP540, PC
display board or printer.

TAG Heuer Timing Page 5 / 44
3. Quick operation guide
The exceptional performance of Chronoprinter CP540 is guaranteed with its simplicity of use, the
hallmark of TAG Heuer timing philosophy
3.1. Battery installation & replacement
To open the battery cover, use your thumbs to firmly push it in the direction of the arrow.
Insert the batteries, respecting the correct polarity, as indicated at the bottom of the compartment.
WARNING
To guarantee the security of your timekeeping, it is recommended to use your CP540 with
the internal batteries in a well-charged state, or with the Docking - BATT.
Always remove the batteries if you don’t use your CP540 for several days.
If you forget to do this, the batteries could leak and seriously damage the device. The
warranty does not cover this problem.
The time of day, the date, the memorized runs and the selected parameters are saved by a
small internal battery.
3.2. Switch the CP540 ON and Synchro
1) Press ON for 5 seconds
2) The LCD display will show
LCD Screen
a) 4 black bars indicating that the
external Inputs are blocked (1 to 4).
The time of day is memorized in the
CP540 (internal or after a SYNCHRO).
b)
Symbol indicates you that the
power supply is connected
c) The date
d) The memory available
e) The Timing Mode used the last time
f) How to enter the menu.
▬▬
14:24:59
▬▬
Date <DMA> 14/11/2007
Memory Available 25000
NET TIME
ENTER THE MENU F
a)
b)
c)
d)
e)
f)

TAG Heuer Timing Page 6 / 44
INNOVATION
The CP540 provides a visual (on the LCD) and audio alarm if an external input remains in
short-circuit. This feature allows you to observe the status of TAG Heuer’s new “direct-
response” photocells (HL2-31 & HL2-35 – serial number up to 7000) and allows the
timekeeper to instantly determine if a photocell is out of alignment.
3) The same message is printed with the device N° (ID) and the software version, along with the
timing mode and the main parameters used during your last timing session.
4) If the CP540 doesn’t print, enter the menu (F), select PRINTER ON and validate ◄┘. You
should check your batteries and replace if necessary.
5) Example of how to start a new Timing session:
a) Enter into the menu (F)
b) Clear the memory.
c) Timing mode (you may change this if desired)
d) Parameter (If changes are needed – Precision, Blocking, etc.)
e) Synchro (manual at Time of the Day to correspond with other systems, or time proposed
by you on the CP540, or start at 00:00)
f) Open a new run (begin the timing session)
PLEASE NOTE
If the same Timing Mode is reconfirmed through this menu (Mode Chrono) sequence, the
parameters by default are restored.

TAG Heuer Timing Page 7 / 44
4. START-UP MENU GUIDE & FLOW CHAR
Power OFF CP540
Open New Run
Synchro
Clear Memory
Rank a Run
T m ng Modes
Yes / No
Ready for T m ng n the
selected mode
L st of Runs
Yes / No
PTB SEQ 1 – 4
PTB SEQ 5 – 8
NET TIME
NET TIME + 2 INTER
PARALLEL SEQ
PARALLEL DIFF
START – FINISH
START – FINISH + 2 INTER
SPLIT 1 – 4
SPLIT 5 – 8
SPLIT / LAP
Manual or External
Speed m / sec
Km / h
M les / h
Noeuds
Speed 1 (2 – 3 – 4)
Start - Input N°
F n sh - Input N°
D stance
Pr nter Yes / No
Download To Pr nter
To PC
L st of runs
L st of runs
To Chrono RS232
Parameters Refer to the follow ng pages

TAG Heuer Timing Page 8 / 44

TAG Heuer Timing Page 9 / 44
RS232 To PC Bauds Rates
2'400 Bds
9'600 Bds
9'600 Bds Ctrl Flux
38'400 Bds
57'600 Bds
ALGE D splay
TAGHeuer HL960/HL990 Runn ng T me
T me of Day
Blank the Board
2'400 Bds
9'600 Bds
9'600 Bds Ctrl Flux
Ethernet ON / OFF
Language Engl sh / França s
by default: 192.168.1.50
TAGHeuer HL970
Bauds Rates
2'400 Bds
9'600 Bds
9'600 Bds Ctrl Flux
Bauds Rates
2'400 Bds
9'600 Bds
9'600 Bds Ctrl Flux
Runn ng T me
T me of Day
Blank the Board
Advert s ng 1...16
Runn ng T me
T me of Day
Blank the Board
Pr nt Sett ng
Parameters / next

TAG Heuer Timing Page 10 / 44
5. Menu description before opening up a new run
To enter the MENU, press F. To select an option use the ▼and ▲keys and confirm with ◄┘.
⇒
Power OFF Switch off the device.
⇒
Open New Run Start a new timing session after having closed the previous run.
⇒
Synchro
Manual or External When the CP540 is powered ON, the memorised Time of Day and
Date proposed is the one used during the last timing session.
Use Synchro Manual for a new Time of Day setting or to synchronize
with other systems to a preset Time of Day. (Do not forget to introduce
the Date)
It is also possible to synchronize the time from 00:00 (only in SPLIT
and SPLIT/LAP mode) when a restart back to zero may be required.
⇒
Clear Memory Use only when you start a new timing session and you are sure you do
not need to retain previous runs in the device’s memory!
⇒
Rank a RUN of a single run,
or the addition of two or more runs.
(Example: ranking from the addition of 3 runs)
List of runs
►03 + 02 T
►03
►02 + 01
►02
►01
General ranking from the addition of run 03 and 02 T
Ranking of run 03 (added to run 02 T)
General ranking from the addition of runs 02 and 01 (calls it 02 T)
Ranking of run 02 (added to run 01)
Ranking of only run 01
Or with 2 run added (ex 03 + 01). First select one of the 2 runs.

TAG Heuer Timing Page 11 / 44
5.1. Timing Modes
5.1.1. Chrono Mode
PTB SEQUENTIAL 1 to 4 and 5 to 8
Sequential recording of time-of-Day on 4 or 8 channels (if 2 CP540 are connected together with
RS232 connection) directly to an external PC.
Uses bi-directional communication with a PC running TAG Heuer or Split Second (USSA / CLUB
/ NASTAR) software, where it is possible to print all net times, current ranking and even the
competitor name and affiliation directly on the CP540 printer.
NET TIME
Stand-Alone net timing using Start and Finish times with automatic or manual numbering. Keypad
shortcuts of corrections and RECALL of memorized times for later identification or modification.
Ranking list and total time results, including if several runs occur, are added.
BIBO available in Alpine Ski mode.
NET TIME + 2 Inter
Start, with 2 intermediate times and finish time. Automatic or manual numbering. Also enables
ranking and addition of runs.
PARALLEL SEQUENTIAL
Independent Start and Finish times on parallel race courses with competitor numbers.
Ranking list of single or added runs (same as with NET TIME mode).
New items: with this mode you have the possibility to set a Count Down
PARALLEL DIFFERENTIAL
Time difference at the finish on parallel race courses.
Penalty and list of runs.
START – FINISH
Stand-Alone net timing using Start and Finish times with automatic or manual numbering. Keypad
shortcuts of corrections and RECALL of memorized times for later identification or modification.
This mode is similar to NET TIME mode; the difference is in the results calculation. For details,
please consult point 5.2.1
Ranking list and total time results, including if several runs occur, are added.
BIBO avalable in Alpine Ski mode.
START – FINISH
Start, with 2 intermediate times and finish time. Automatic or manual numbering. Ranking and
addition of runs.
This mode is similar as NET TIME mode. The difference is in the results calculation. Please
consult the point 5.2.1
TRAINING
Start with two intermediate and finish times (automatic numbering).
Run ranking and listing for each competitor in different runs.
SPLIT
Split times, partial times or lap times with competitor numbering. Ranking or listing of a
competitor’s lap times
SPLIT / LAP
Split Times with competitor numbering

TAG Heuer Timing Page 12 / 44
5.2. Parameters
5.2.1. Precision
The timing PRECISION (which can be selected at start up, or assigned by default) refers to the
race results
Two calculation modes are available:
«NET TIME
»
calculation
«
RE
A
L
TIME
»
calcula
tion
Ex : with a result to 1/100 sec Ex : with a result to 1/1000 sec
Start Time N°121 12:34:56.136 Start Time N°121 12:34:56.136
Finish Time N°121 12:35:59.354 Finish Time N°121 12:35:59.354
Result 1:03.21 Result 1:03.218
The last digit of the calculation is truncated.
Timing Modes
With
truncation
Without
truncation
NET TIMES
NET TIMES + 2 INTER
PARALLEL SEQUENTIAL
TRAINING
PTB SEQUENTIAL
PARALLEL DIFFERENTIAL
START – FINISH
START – FINISH + 2 INTER
SPLIT
SPLIT / LAP
Results by default are 1/100 sec Results by default are 1/1'000 sec
Selectable timing resolution
from 1 sec to the 1/10'000 sec Selectable timing resolution
from 1 sec to 1/100'000 sec.
ATTENTION!
The RS232 and Ethernet ports always communicate the time of day to the PC with the same
timing resolution as given on the CP540’s printer.
This avoids calculation and results errors, often observed if you compare the results given
by the timing device to the software running on your PC.
5.2.2. Lock Time (multiple impulse filtering)
Lock-out time of the 4 inputs is selectable from 0.01 to 9.99 seconds.
To enter 1.00 sec, press 1 – 0 – 0 and validate with ◄┘.
The minimum lock-out time of 0.01 sec should not be used with any mechanical triggering
device (bounce may cause several impulses received).
ATTENTION
For your convenience, default lock times are pre-programmed for
each timing mode, and can be modified by you.
.

TAG Heuer Timing Page 13 / 44
5.2.3. Numbering (except PTB SEQ)
Manual or Automatic competitor numbering assigned to any of the 4 inputs.
Automatic: in ascending UP order or in reference to a previous run ranking order (or BIBO)
Manual: enter the competitor’s N° + (E1 – E4) normally before a timing impulse is received.
5.2.4. Inputs Status
Selection of Inputs and their timing info functions info (transmit / received)
Three statuses
Transmit
Close
Received
The default status of the input is as follows (after switching off the CP540)
E1 E2 E3 E4
The inputs are reported as « Transmit »
Example :
CP540 (A) records Starting Time
CP540 (B) records Finish Time
Download the Start time from CP540 (A) into the CP540 (B) for the net time calculation and
from CP540 (B) into the CP540 (A).
Configure the Input as follows
CP
540 (A)
–
Start
CP
540 (B)
–
Finish
E1
E2
E3
E4
E1
E2
E3
E4
The input’s status should be specifically programmed when several CP540’s need to
communicate together via RS 232 or with GSM Docking station.
Thus, each Chronoprinter will be able to receive recorded information at the Start and Finish
point.
5.2.5. LCD Contrast
LCD screen Backlight adjustment with ▲plus / ▼less, and validate with ◄┘ (30% is the
default setting)
5.2.6. LCD Backlight
Adjusts the brightness of LCD Backlight.
100% is the default setting (with an external power supply connected)
30% is the default setting (when running only on internal batteries)
It is recommended to set the value at 0% during daylight conditions to guarantee the best
internal battery life.
5.2.7. LCD Delay
LCD duration of the currently displayed information. Adjust with ▲Plus / ▼Less,
then validate ◄┘ (5 seconds is the default setting)

TAG Heuer Timing Page 14 / 44
5.2.8. Beep
Audio signal activation (ON or OFF).
Default setting is: ON
5.2.9. RS232 (PC)
To PC with selectable serial Port:
Baud rate is selectable: 2'400 / 9'600 / 38’400 / 57'600.
9'600 Bds is the default setting.
To Display
•Running Time on the TAG Heuer display (HL960 / HL 970 / HL990 / HL965 / HL980) and
other display as Alge.
•Running Time of Day of the CP540
•Blank command to the Display
Running time is the default setting
Display duration of net times is adjustable from 1 to 59 seconds using the ▲Plus / ▼Less
arrows, then validate with ◄┘ (10 seconds is the default setting).
To HL960 / 990 / 970
The CP540 now also automatically updates any of the scoreboard displays listed
above.
With the HL970 it is also possible to store competitor names and numbers within the
HL970 control box.
When connecting the CP540 to the HL970 you are able to display the following
information.
Running time at 1/10 of second.
During the race
B I B 1 2 : 3 4 . 5 6
F I R S T - L A S T N A M E
End of the race
R k : R N K T I M
E
F I R S T - L A S T N A M E
For more information, please refer to the Matrix Display HL970 user’s manual

TAG Heuer Timing Page 15 / 44
To HL970 / 980
With this setting, you will have the right to display some information directly from the
CP540 to the LED Display (HL970 or HL980).
Running time at 1 of second.
►Net Time / Start-Finish / Training / PTB Sequential
Line 1 Running time / Net Time
Line 2 Comp #
Line 3 Speed 1 (if selected)
Line 4 Ranking
►Parallel Diff / Seq
Line 1 / 3 Comp #
Line 2 / 4 Penalty / Result
►Split Line 1 Comp #
Line 2 Split Time
Line 3 Number of Split
Line 4 Total Split
•Time of Day
•Blank display (Blanking)
By default : Running time.
Display time : from 1 to 59 sec with adjustment ▲Plus / ▼Minus,
then validate with ◄┘(by default 10 sec)
5.2.10. Ethernet
Activation ON or OFF.
Actif port : 7000, 13500, 13501, 13502 et 13503
NOTE:
The Ethernet communication port has continuous power consumption, and therefore is OFF by
default. It must be turned ON each time you power up the Chronoprinter.
5.2.11. Language
The CP540 is programmed in English and French.
German and Italian languages are available for download from our website:
www.tagheuer-timing.com

TAG Heuer Timing Page 16 / 44
5.3. Speed
Selectable Speed unit of measurement is m/s, Km/h, Miles/h and Knots. Four different speed
measurements can be configured between the 4 inputs.
Ex: for Speed 1 between inputs 2 and 3 at a distance of 10 meters:
Start Press 2, and validate ◄┘
Stop Press3, and validate ◄┘
Distance To input the distance between the photocells in millimetres:
Press 10’000 and validate ◄┘.
Use to correct any input error. Re-enter the input correctly then validate ◄┘
When finished (for instance, if only one speed trap is to be configured) simply press F.
PLEASE NOTE
Speed measurements are possible in all the timing modes above, with the exception
of PARALLEL DIFFERENTIAL.
5.4. Printer
Printer may be ON or OFF.
To guarantee the best printing autonomy, the speed of the printer is electronically controlled based on
the voltage of the batteries.
If the voltage decreases, the printing speed will slow down.
If the batteries fall below a certain voltage threshold, the printer will automatically stop. The running
Time of Day on the LCD will flash.
To restore the printer, connect an external power supply and then turn the printer ON again from the
menu F.
If an external power supply is connected when you turn ON the CP540, the printer will be
automatically ON.
5.5. Download
- To PC: downloads all of the times memorized in one run or in all runs through the RS232 port.
- To Printer: reprints all times memorized in one run or in all runs.
Be sure your batteries are fresh (if not connected to the external power supply) and that there is
adequate paper, especially if you will be printing many times.
Press to stop the printing at any time.
- To Chrono RS232: to download the time from a run from a Chronoprinter to another one. It is
important to set correctly the Input (see chapter 5.2.4)

TAG Heuer Timing Page 17 / 44
6. Keyboard shortcuts
These important functions will help you during your timing sessions. They are similar for most of the timing
modes except PTB SEQUENTIAL.
Pay close attention to these shortcuts and to the RECALL function. They allow you to act quickly in case
of errors or unexpected situations.
N° + E1
To input or to change a competitor N° before a Start,
or before a Start in Parallel SEQ on the blue course,
or before a Finish in Parallel DIFF on the blue course.
N° + E2
To input or to change a competitor N° before the 1
st
intermediate,
or before a finish in Parallel SEQ on the blue course.
N° + E3
To input or to change a competitor N° before the 2
nd
intermediate,
or before a finish in Parallel SEQ on the red course.
N° + E4
To input or to change a competitor N° before the finish,
or before the Start in Parallel SEQ on the red course,
or before the finish in Parallel DIFF on the red course
+ N ° + E1
Fo
re
runners
numbering at the Start (time calculate but not ranked)
(
E1
–
E4
) To un-identify a competitor already started, passed at an intermediate point or
finished (false Start, false Intermediate, false Finish).
The un-indentified (unassigned) times can be recalled with RECALL.
(Ex: R+ E4 for the finish time) for re-identification with a competitor N° or with 0
(zero) to cancel them (C).
+ (E1 –E4)
To restore the previous situation (UNDO) if one or several un-assignments were
made by error.
▼
+ (
E1
–
E4
) To disable auto numbering at Start, intermediate or finish.
Start times, intermediate or finish times are then memorized without competitor
N°. The unassigned times can be recalled with RECALL for re-identification.
R
+ (
E1
–
E4
)
RECALL
function to recall all memorized times that are unassigned or not
identified, for identification with a competitor N° or with 0to cancel (C).
N° +
R
+ (
E1
–
E4
) Recall of a competitor N° to be modified a cancelled. The time of a competitor N°
can then be modified or unassigned.
Recall the time for a new identification, or to cancel it with 0.
▼
+
R
+ (
E1
–
E4
) To disable auto numbering and direct access to
RECALL
for an immediate
identification of the unassigned times received.
F
+
◄┘
Ranking of a single run, or of the addition of two or more runs.
N° +
R
+
0
To abort
a competitor N° (DNF)
Quick action to cancel the start time of a competitor (C).
Warning:
The cancelled times (C) with N° + R +0 are memorized but can’t be recalled.
If you made a mistake, it’s necessary to insert the missing Time of Days
manually (via menu)
N° +
R
+
0
.
To disqualify
a competitor N° (DSQ).
Quick action to cancel both the start and the finish times of a competitor
Note:
Normally a disqualification is the function of a race jury. However, use this
function if no race jury exists and you desire to remove the athlete from the
ranking due to disqualification.

TAG Heuer Timing Page 18 / 44
IMPORTANT
The CP540 will accept multiple times of the same competitor N° at the start and at the
finish. The times taken into account in the ranking are the last one’s recorded.
With each new start or finish, the proceeding times are automatically unassigned.
It’s strongly recommended to identify or to cancel these times as soon as possible.
This action will simplify your timekeeping.
NOTE
This does not apply in the TRAINING MODE, whereby several runs for a competitor can be
memorised for later analysis.
7. Special characters memorized, printed and sent to the PC
–
When a time is unassigned (false start, inter or finish)
Any time modified through a manipulation of start number
+
Any time inserted manually through INSERT TIME (Menu)
=
Any time repeated through DUPLICATE (Menu)
C
Any time cancelled through N° + R + 0 or after a DNF or DSQ
#
Any Start or Finish time of a forerunner ( + N°)
8. Special function: RESET CP540
A general RESET can be achieved by pushing the mini switch located below the battery cover RESET.
For this operation use a small unfolded paper clip or a needle.
WARNING
After a RESET, the memory is cleared and all parameters are restored.
To achieve a RESET, the CP540 batteries should have a good life or alternatively connect
the external power supply. The RESET is available with CP 540 ON or OFF.

TAG Heuer Timing Page 19 / 44
9. To open a new run (added or not to a previous run)
RUN OPEN – READY FOR TIMING
OPEN A RUN

TAG Heuer Timing Page 20 / 44
9.1. Addition of runs
Before to close a run, be sure that the results are correct. It is not possible to make further
modifications after a run is closed.
If you want to add a previous run to the new one, select your choice in the menu List of Runs. After
that, the CP540 will ask you “Activate BIBO?” in the NET TIME START – FINISH Modes.
It is also possible to combine 2 runs already closed.
Select Rank a run, one of the run you want to add.
9.2. BIBO rule
BIBO is a very familiar feature in Alpine Ski racing.
It refers to the establishment of a reverse running order of a certain number finishers from the results
of a proceeding run. The input of a BIBO value as required. Most FIS and USSA events use “flip 30”.
In other words, the top 30 finishers from the first run will run in reverse order in the second run.
Ex: If you flip the 1
st
30 competitors, the start order will refer to the competitor ranked from the 30
th
position to the 1
st
and then to the 31
st
and up.
If BIBO is not activated, the starting order will refer to the ranking of the proceeding run.
PLEASE NOTE
If several competitors are ranked with the same time (tie) at the 30th position in the
proceeding run, BIBO will take in account these entire competitors N°’s.
9.3. Ranking (F+ ◄┘)
General ranking of the actual run.
9.4. Rank a Run
Ranking of the actual run or proceeding runs.
Table of contents
Other TAG Heuer Printer manuals