Taipeng 2127018 User manual

IMPORTANT. PLEASE READ CAREFULLY AND RETAIN FOR FUTURE REFERENCE
If you experience any product malfunction, defect or are missing any parts,
please contact our customer service department at 1-855-586-8118 or
servicec @ taipengchina.com. Our hours of operation are Monday - Friday,
8:30 AM to 5:30PM EST.
Assembly Manual
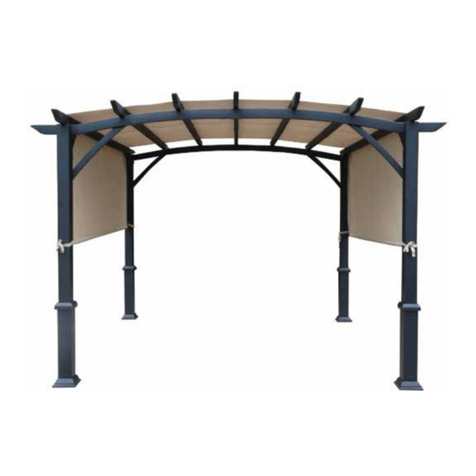
12 ft x 12 ft / 3.66 m x 3.66 m cosmos Pergola
ITM. / ART. 2127018
0101
406 cm / 159.84 in / 159.84 po
366 cm / 144.09 in / 144.09 po
242 cm / 95.28 in / 95.28 po

SAFETY INFORMATION
PREPARATION
Before beginning assembly of product, make sure all parts are present. Compare parts with
package contents list and hardware contents list. If any part is missing or damaged, do not
attempt to assemble the product.
Estimated Assembly Time: 3 hours.
Tools Required for Assembly (not included in the box):
Screwdriver Safety goggles
Hammer Gloves Stepladder
Hardhat Electric drill Percussion drill
For the best assembly and usage experience, please read through all steps before attempting to
assemble, operate or install the product
•WARNING:It is the consumer’s responsibility to comply with any building codes, ordinances,
zoning limitations, or local homeowner’s restrictions and obtain any required permit, before
purchase and installation of the products.
• WARNING: KEEP ALL FLAME AND HEAT SOURCES AWAY FROM THIS GAZEBO FABRIC.
This item meets the CPAI-84 flammability requirements. The fabric may burn if left in continuous
contact with any flame source. The application of any foreign substance to the tent fabric may
cause the flame-resistant properties ineffective.
• In the case of any high winds or high amounts of rain/snow, please remove the mosquito net,
clear the snow from the roof immediately and check for damage before continuing use.
CAUTION
SET UP YOUR GAZEBO PROPERLY
• This product is heavy so do not attempt to assemble this item alone. For the best and safest
assembly experience, we recommend four (4) adults.
• Keep all children, pets and other obstructions away from assembly area.
• If any part is missing or damaged, do not attempt to assemble the product.
• In order to avoid damage to the gazebo and it's components, please use the appropriate tools.
• Do not use the structure as support.
• Check all bolts on a regular basis to maintain the sturdiness and safety of the structure.
• Keep instruction manual for future use.
• Do not climb on top of the gazebo. Falling off the gazebo can result in serious injury,
possibly even death.
EXAMINE YOUR GAZEBO
• Examine occasionally to ensure there are no loose parts.
• If loose parts are found, they should be retightened immediately.
02

Components
1
1
2
2
4
6
C
A4
B4
C1
C4
C5
D
E
E1
C6
4
4
D1 8
1
1
C2
C3
14
F
F1 2
Post
Post Corner
Crossbeam Left
Crossbeam Right
Crossbeam Left
Crossbeam Right
Crossbeam Left
Crossbeam Right
Decoration Cap
Track Beam
Top Crossbeam
Left Inclined Strut
Right Inclined Strut
Crossbeam Connector
Crossbeam Connector
03

H4
I
J
4
G
J1
6
6
3
J2 2
4
2
G1
G2
K
L
M
1
4
F2 3
2
G3
1
N12
Pulley
Crossbeam Connector
Top Crossbeam Shield
Track Beam Shield
Crossbeam Shield
Crossbeam Shield
Base
Base Cover
Left Cloth-inserted Pipe
Right Cloth-inserted
Pipe
Fixed Tube
Roof
Sidewall
Draw Cord
04

6
O
A A Bolt\Flat Washer (m6*15)
Bolt (m6*15)
Bolt (m6*15)
Bolt\Flat Washer (m6*30)
Bolt\Plastic Washer (m6*115)
B B 14
4
164
1
8
12
DD
E E
HH
FF
CC
1
1
Pulley
Wrench
Allen Wrench
Allen Wrench
Hardware
II
JJ
KK
LL
16
1
1
Allen Wrench
Sleeve
Expansion bolt
GG
48
Hanger
05

Step 1
Fig 1
I
B
A
AA
A
B
Fig 2
1.1. Insert the Post (A) into the Base Cover (I) and connect it to the Base (H) with Bolt (AA). See Fig 1.
1.2. Connect the Post Corner (B) to the Post (A) with Bolt (AA), please pay attention to the installation
direction. See Fig 2.
AA
A
B
AA
A
B
Ix4 AAx24
A
AA
AA
I
H
Ax4 Bx4 Hx4
06

2.1.
Slide the Hanger (GG) into the Mosquito net Rod above the
Crossbeam Left
(C/C2).
See Fig 3.
2.2.Insert the Crossbeam Connector (F/F1) into the Crossbeam Left (C/C2), and connect them with
Bolt (AA). Insert the Crossbeam Connector (F/F1) into the Crossbeam Right (C1/C3), and connect
them with Bolt (AA). Connect the Crossbeam Shield (G2) to the Crossbeam (C/C1/C2/C3) with
Bolt (AA). See Fig 4.1-4.4.
2.3. Connect the Decoration Cap (C6) to the Crossbeam (C/C2/C1/C3) with Bolt (DD). See Fig 5.
Step 2
AA
C/C2 F1
Fig 4.3
Fig 4.4 Fig 5
Fig 4.1
Fig 3
F
C/C2
C/C1/C2/C3
DD
G2
G2
C1/C3
Leave the hole,
do not put on the Bolt
C
C/C2
C1
C6
Fig 4.2
C/C2
F
F1
AA
C/C2 C1/C3
C6
AA
AA
AA
AA
G2
C1/C3
C2 C3
C6
G2
x12 pcs
GG
CX1 C1 x1 Fx2
F1x2 G2x2 AAx16
C2X1 C3 x1 C6x4 DDx8 GGx24
07

3.1.
Slide the Hanger (GG) into the Mosquito net Rod above the
Crossbeam
(C4/C5).
See Fig 6.
3.2. Insert the Crossbeam Connector (F) into the Crossbeam Left (C4) and connect them with Bolt (AA).
Insert the Crossbeam Connector (F) into the Crossbeam Right (C5) and connect them with Bolt (AA).
Connect the Crossbeam Shield (G3) and the Crossbeam (C4/C5) with Bolt (AA). See Fig 7.1-7.4.
Fig 7.4
Step 3
Fig 7.2 Fig 7.3
C4 C5
C4
C4
G3
G3
G3
C4
F
F
Fig 7.1
F
AA AA
AA
AA
AA
AA
F
C4 C5
C5
C5
Fx4 G3x2 AAx16
C4x2 C5x2
Fig 6
C4
x12 pcs
GG
GGx24
08

Step 4
DD
Fig 8.1
O
OO
D
6PCS
Fig 8.2 Fig 8.3
Fig 8.4
DD
F2 F2
AA
DD
G1
G1
AA
4.1. Insert the Pulley (O) into the Track Beam (D). See Fig 8.1.
4.2. Insert the Crossbeam Connector (F2) into the Track Beam (D) and connect them with Bolt (AA).
Insert the Track Beam Shield (G1) into the Track Beam (D).Connect the Track Beam (D) and Track
Beam Shield (G1) to the Crossbeam Connector (F2) with Bolt (AA). See Fig 8.2-8.4.
F2x1
Dx2 G1x1 AAx4
Ox6
D
09

Step 5
Fig 9.1
N
D
6PCS
DD
NN
DD
NN
Fig 9.2 Fig 9.3
Fig 9.4
DD
F2 F2
AA
DD
G1
G1
AA
5.1. Insert the Pulley (N) into the Track Beam (D). See Fig 9.1.
5.2. Insert the Crossbeam Connector (F2) into the Track Beam (D) and connect them with Bolt (AA).
Insert the Track Beam Shield (G1) into the Track Beam (D).Connect the Track Beam (D) and Track
Beam Shield (G1) to the Crossbeam Connector (F2) with Bolt (AA). See Fig 9.2-9.4.
F2x2
Dx4 G1x2 AAx8
Nx12
D
10

6. Insert the Crossbeam Connector (F) into the Top Crossbeam (D1) and connect them with
Bolt(AA). Insert the Top Crossbeam Shield (G) into the Top Crossbeam (D1). Connect the Top
Crossbeam (D1) / Top Crossbeam Shield (G) to the Crossbeam Connector (F) with Bolt (AA).
See Fig10.1-10.3.
D1x8 Fx8 Gx4 AAx32
Step 6
Fig 10.1-Fig 10.3
D1 D1
Fig 10.1
D1
F
F
Fig 10.2
Fig 10.3
F
F
D1 D1
D1 D1
G
AA
AA
AA
AA
AA
G
AA
11

7.1. Connect the Post Corner (B) to the Crossbeam (C/C1/C2/C3) with Bolt (AA). See Fig.11.
7.2. Connect the Left Inclined Strut (E) to the Crossbeam Left (C/C2) and the Post (A) with Bolt (AA).
See Fig 12.1.
7.3. Connect the Right Inclined Strut (E1) to the Crossbeam Right (C1/C3) and the Post (A) with
Bolt (AA). See Fig 12.2.
Step 7
Fig 12.1 Fig 12.2
Fig 11
Ex2 E1x2 AAx32
12
AA
AA
E
C/C2
AA
E1
A
C1/C3
A
A
E
E1
C
C6
C1
E
E1
A
A
C2
C3
AA
A
C/C1/
C2/C3
B
AA

8.1. Connect the Post Corner (B) to the Crossbeam (C4/C5) with Bolt (AA). See Fig 13.1-13.2.
8.2. Connect the Right Inclined Strut (E1) to the Crossbeam Right (C5) and the Post (A) with Bolt (AA).
Connect the Left Inclined Strut (E) to the Crossbeam Left (C4) with Bolt (AA). See Fig 14.1-14.2.
CC1
C3 C2
E
E1
E1
E
E1
E1
E
E
C6
C6
C4
C5
C5
C4
E
C
A
C5
E1
AA
AA AA
E1
C1
A
C4
E1
C1
A
C4
E
AA
AA
B
C6 C6
C6
E
C
A
C5
AA
B
C6
Step 8
Ex2 E1x2 AAx32
Fig 14.1
Fig 13.2
Fig 14.2
Fig 13.1
13

9. Connect the Track Beam (D) to the Crossbeam (C/C1/C2/C3) with Bolt (BB). See Fig 15.1-15.2.
Step 9
D
N
N
O
D
D
D
D
D
Fig 15.1
C
C1
C3
C2
C4
C5
C4
C5
D
C/C1/C2/C3
BB
BBx6
Fig 15.2
D
C/C2
C1/C3
BB
14

10. Connect the Top Crossbeam (D1) to the Crossbeam (C/C1) with Bolt (BB). See Fig 16.
BBx8
Step 10
D1
D1
D1
D1
D1
D1
D1
D1
Fig 16
D1
C/C1/C2/C3
BB
15

Fig 18
C2/C3
CC
J2
J2
K
K
Fig 17
J2 J2
JJ1
Step 11
D
D
D
MD
D
D
J
J
J
J
J
J
J1
J1
J1
J1
J1
J1
J2
J2
16

11.1. Connect the Left Cloth-inserted Pipe (J) to the Right Cloth-inserted Pipe (J1). See Fig17.
11.2. Insert the Fixed Tube (J2) into the Roof (K), then connect them to the Crossbeam (C2/C3) with
Bolt (CC). See Fig18.
11.3. Insert the Left Cloth-inserted Pipe (J) and the Right Cloth-inserted (J1) into the Roof (K).
Connect the Pulley (N) to the Cloth-inserted Pipe (J/J1) with the Bolt (EE) respectively.
Connect the remaining Cloth-inserted Pipes (J/J1) in the same way. See Fig19.
Note: The Fixed Tube (J/J1) must go through the middle of the Pulley (O).
11.4. Connect the Rope Loop (M) to the Left Cloth Pipe (J) and the Right Cloth Tube(J1). and make
the hangers on the Rope Loop (M) go through the Crossbeam (C/C1) ,then hang it onto the
D-shaped hangers. See Fig 20.
Fig 19
Fig 20
J/J1
K
K
K
EE
Jx6
J1x6
J2x2 EEx12 CCX4
KX1 MX1
D
O
N
O
M
J
J1
M
C/C1
17

Step 12
12. Hang the Sidewall (L) on the crossbeam using the Hanger (GG) preassembled on the crossbeam.
See Fig 21.
Fig 21
LX4
L
GG
L
C/C1/C2/C3/C4/C5
18

A
I
HH
KK
A B
C D
HHx16
HH
KK
Step 13
13.Using an electric concrete drill, drill holes into the concrete floor, corresponding to the holes in
Base (H). Insert Expansion bolt (HH) into the holes and hammer into place, using a hammer.
Fasten Expansion bolts (HH), make sure the base (H) are totally grounded.See Fig 22.
Fig 22
L
19

CARE AND MAINTENANCE
• For cleaning, use a mild detergent solution, rinse with water, and allow to air dry.
Do not use acetone, abrasive, or other special detergents as they would be harmful to the
product’s finish.
• Due to the nature of steel, surface oxidation (rusting) will occur if this protective coating is
scratched. This is a natural process. To minimize this condition, it is recommended that care be
taken when assembling and handling the product in order to prevent the paint from being
scratched.
This warranty does not affect your statutory rights. In case of any malfunction of your COSTCO
product (failure, missing part, etc.), please contact one of our service technicians at our
toll-free service line at 1-855-586-8118 from EST 9 AM to 5 PM, Monday to Friday.
MADE IN CHINA
FABRIQUÉ EN CHINE
HECHO EN CHINA
Distributed by:
Costco Wholesale Corporation
P.O. Box 34535
Seattle, WA 98124-1535
USA
1-800-774-2678
www.costco.com
Costco Wholesale Canada Ltd.*
415 W. Hunt Club Road
Ottawa, Ontario
K2E 1C5, Canada
1-800-463-3783
www.costco.ca
* faisant affaire au Québec sous
le nom les Entrepôts Costco
Importado por:
Importadora Primex S.A. de C.V.
Blvd. Magnocentro No. 4
San Fernando La Herradura
Huixquilucan, Estado de México
C.P. 52765
RFC: IPR-930907-S70
(55)-5246-5500
www.costco.com.mx
Costco Wholesale Iceland ehf.
Kauptún 3-7, 210 Gardabaer
Iceland
www.costco.is
Costco Wholesale Australia Pty Ltd
17-21 Parramatta Road
Lidcombe NSW 2141
Australia
www.costco.com.au
Costco France
1 avenue de Bréhat
91140 Villebon-sur-Yvette
France
01 80 45 01 10
www.costco.fr
Costco Wholesale UK Ltd /
Costco Online UK Ltd
Hartspring Lane
Watford, Herts
WD25 8JS
United Kingdom
01923 213113
www.costco.co.uk
Costco Wholesale Japan Ltd.
3-1-4 Ikegami-Shincho
Kawasaki-ku, Kawasaki-shi,
Kanagawa 210-0832
Japan 0570-200-800
www.costco.co.jp
Costco Wholesale Spain S.L.U.
Polígono Empresarial Los Gavilanes
C/ Agustín de Betancourt, 17
28906 Getafe (Madrid) España
NIF: B86509460
900 111 155
www.costco.es
Costco Wholesale Korea, Ltd.
40, Iljik-ro
Gwangmyeong-si
Gyeonggi-do, 14347, Korea
1899-9900
www.costco.co.kr
Costco (China) Investment Co., Ltd.
Room 1003, Block 2, 2388 Xiupu Road,
Pudong New Area, Shanghai
China 201315
+86-21-6257-7065
Costco Wholesale New Zealand Limited
2 Gunton Drive
Westgate
Auckland 0814
New Zealand
Costco Wholesale Sweden AB
Saluvägen 5
187 66 Täby
Sweden
20
Table of contents
Other Taipeng Outdoor Furnishing manuals
Popular Outdoor Furnishing manuals by other brands

Breezesta
Breezesta PB-1600 Assembly

RioOutdoors
RioOutdoors 6F-WSC installation instructions

tikamoon
tikamoon Olia CHA0010 quick start guide

Mercia Garden Products
Mercia Garden Products 0628LOG171-V4 General instructions

leco
leco Melanie instructions

Safavieh Outdoor
Safavieh Outdoor PAT7011 quick start guide

Stabilezelte
Stabilezelte Sahara 3x4 Meter Assembly instructions

Safavieh Outdoor
Safavieh Outdoor Evert PAT6750 Assembly instructions

Outdoor Essentials
Outdoor Essentials Picnic Table 9334 Assembly instructions

BENITO
BENITO Urban Aparcabicis Seguro VBS04 quick start guide

Tiger
Tiger INS40 Assembly instructions

Forever Redwood
Forever Redwood THE SUNSET PATIO PAVILION Assembly instructions