Talk To Me Technologies zuvo PLUS User manual

OnWord™qwerty
User Guide for zuvo™PLUS
Speech-Generating Devices
Find more resources online:
talktometechnologies.com (click Support)OW 126 04-20-21


Table of contents
Communication
Typing on the keyboard ......................................2
Using Word Prediction .......................................3
Working with saved phrases ..................................4
Message retrieval...........................................5
Message Banking ..........................................6
Beyond Communication
Creating text and email documents in Notepad ...................7
Zuvo Control for television ....................................8
Zuvo Control for lights, fans and more ..........................9
Printing ..................................................10
Email....................................................10
Accessing the web using Internet browser ......................11
Audiobooks ..............................................11
Social media..............................................12
Technical
Connecting to WiFi.........................................13
Software updates..........................................13
Pairing a mobile phone .....................................14
Adding music .............................................15
Taking pictures............................................16
Import pictures via USB drive ................................17
Backing up vocabulary sets..................................18
Important Note: If these instructions do not match your current vocabulary set, please
contact Technical Support for assistance.

2
Typing on the keyboard
Use the keyboard to type novel words or sentences. There are several
function buttons to make typing quick and easy.
Select Speak to play your message.
Select More to access numbers and punctuation. Select the
button 3 times to return to the keyboard.
Select Delete Word to remove an entire word.
Select the Rest button to pause eyegaze access if your eyes need
a rest. It will turn red when Rest Mode is activated. Select the Rest
button again to reactivate eyegaze access. Rest will also rest all
access types including switches, pointer, and touch access.
Select Shift to capitalize. Press the button quickly two times to
activate caps lock.
Select Backspace to delete a single character.
Select Settings to adjust various settings like volume, dwell speed,
calibration and shutting down the device.
Select My Phrases to toggle to the Phrases page.
Select Clear to erase everything from the Speech Display bar.
Select Back to return to the previous page.
Undo: enables you to reverse any edits you make in your chat
writing area.
Save My Place: allows you to start a message and save it for
later to nish.
Retrieve: allows you to retrieve the message you started and want
to nish editing.

3
Using Word Prediction
Use Word Prediction to reduce the time it takes to create a message as
well as the number of buttons you need to select. Word Prediction will
suggest what word might be coming next in your message (shown in
yellow).
Word Prediction will remember the words and phrases you frequently use
and suggest those words rst.
Chat History (shown in blue): All previously spoken words and phrases can
be accessed under > More.
As you type letters, it will start to guess and give you various suggestions
for what the next word might be. If you see the word you want, simply
select the word from the Word Prediction line, and it will be displayed in the
Speech Display bar.

4
Working with saved phrases
Typing and saving phrases to cells is a quick and easy way to prepare in
advance for anticipated conversations such as a doctors visit or shopping
trip.
To save the phrase in the
speech display bar, tap
Save > select an empty
cell in your grid or tap
an existing cell and it
will be placed before the
selected cell.
From the My Phrases
page, navigate to
keyboard page > type
message > Back > select
appropriate category.
Your phrase is now saved
for future use!
As you create more
phrases, the More button
will be automatically
created to allow you to
scroll through and access
all of your newly saved
phrases!
To delete a saved phrase,
select the Delete >
choose a cell to remove
in the words list.

5
Message retrieval
Sometimes you may be unable to complete a saved message and want to
nish it later.
Navigate to the keyboard page.
Start typing a phrase. If you are unable to nish the paragraph or sentence,
select Save my Place to nish later.
An icon will briey appear letting you know
that your phrase was saved.
When you are ready to nish your paragraph or
sentence, select Retrieve on the keyboard page.
Select the phrase you would like to nish. It will appear back onto the
keyboard page for you to nish and add to your saved phrases.
If you want to remove unnished phrases,
select Remove from list. The phrases will
turn red. Select the one you want to delete,
and it will be removed.

6
Record in the Message Banking page
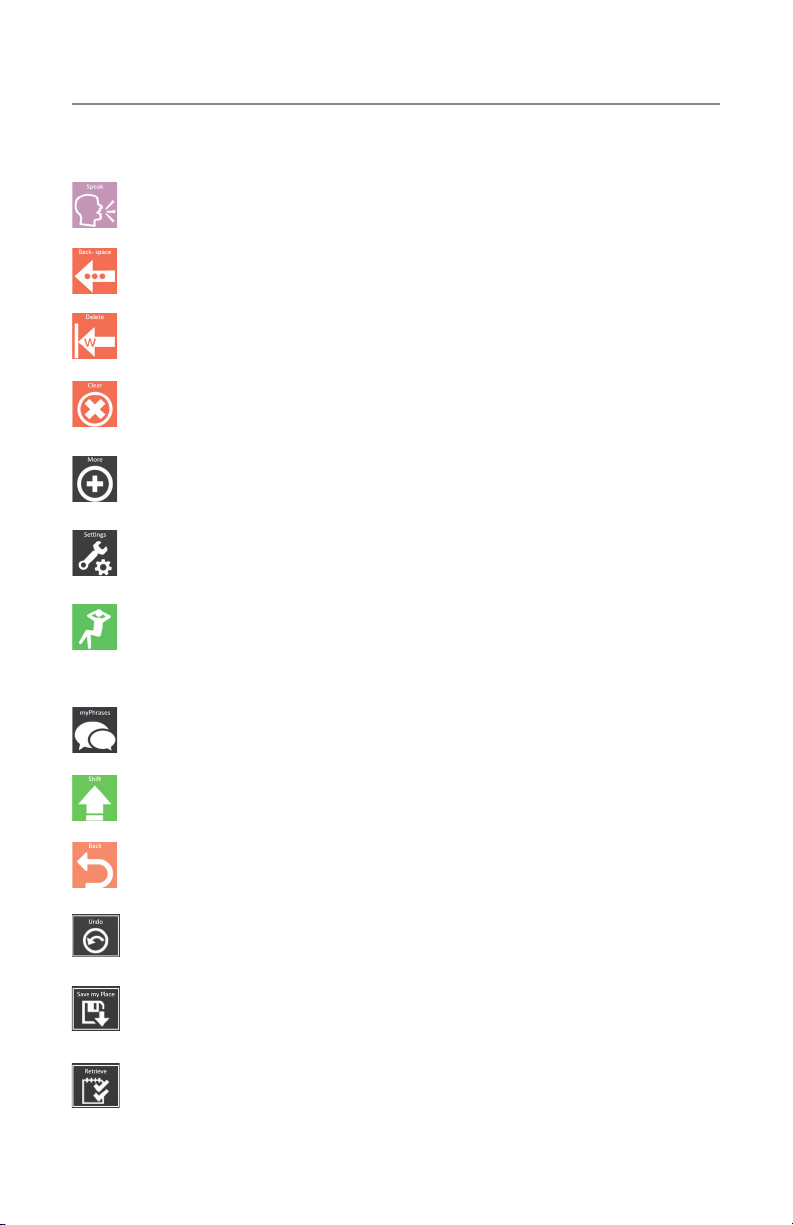
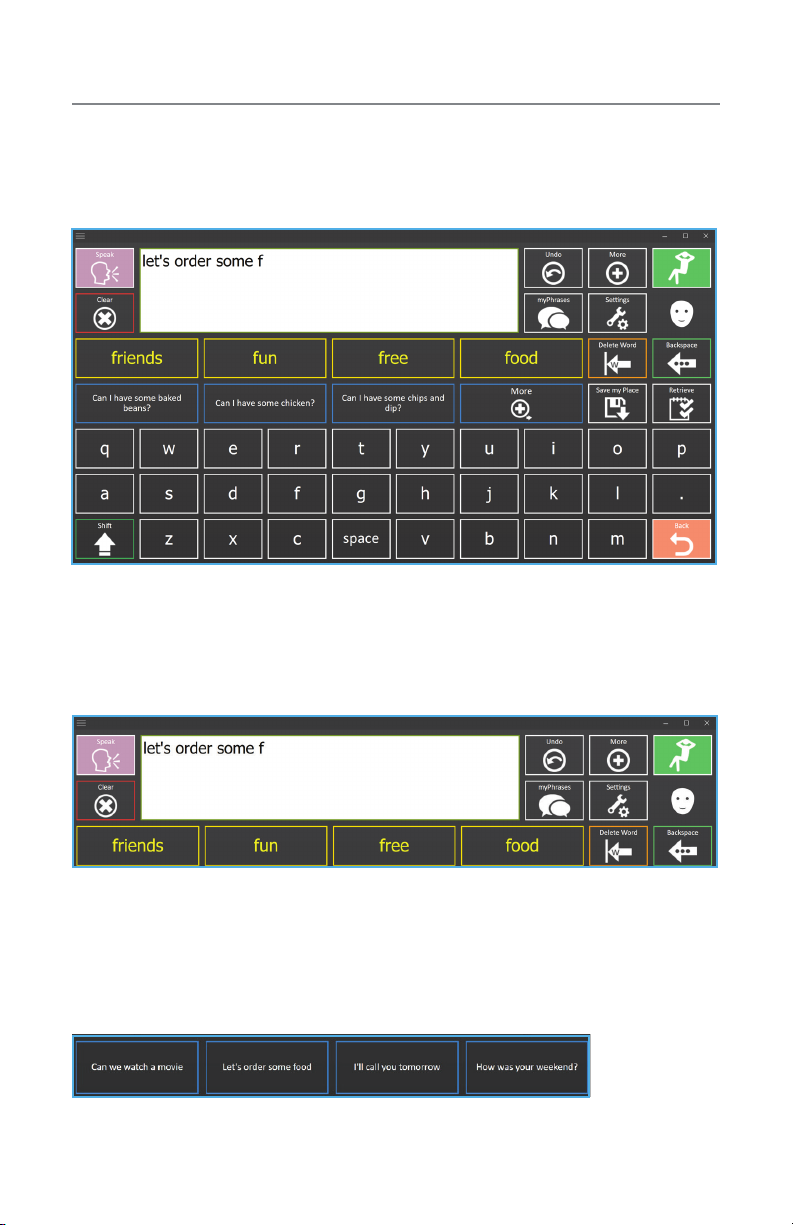
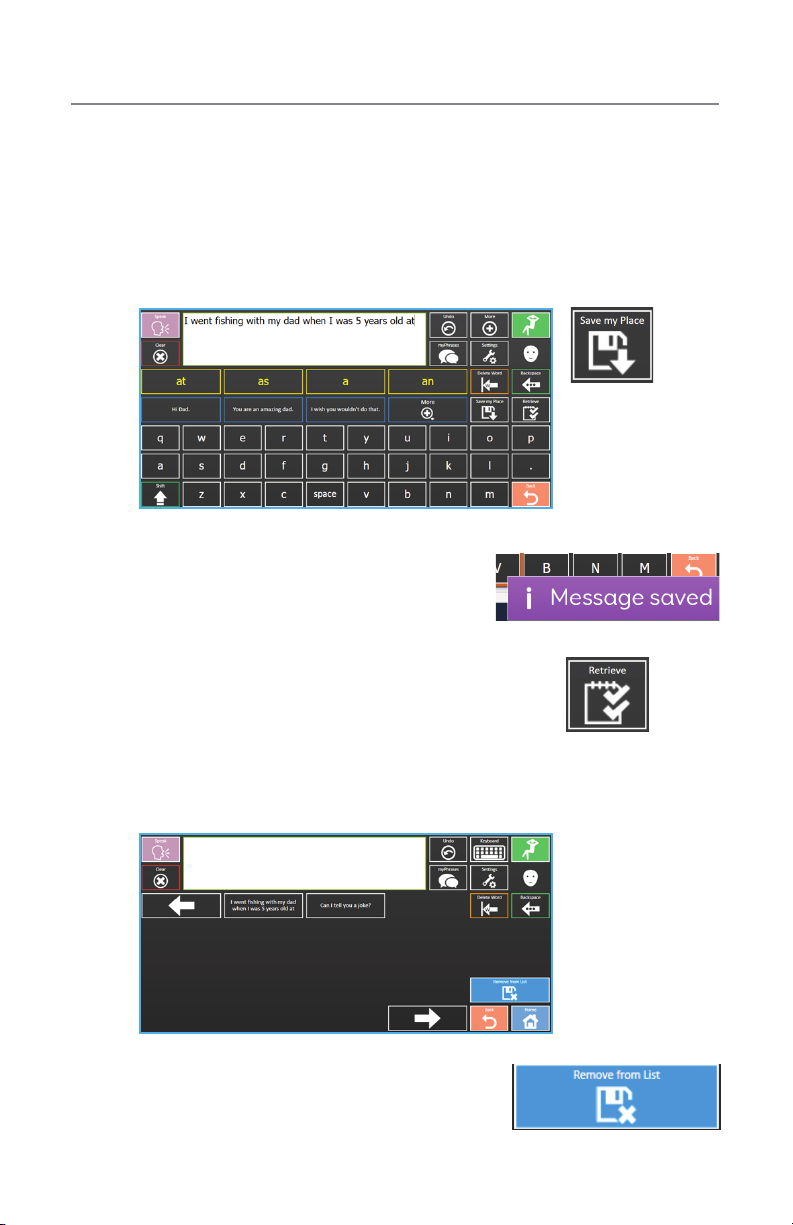
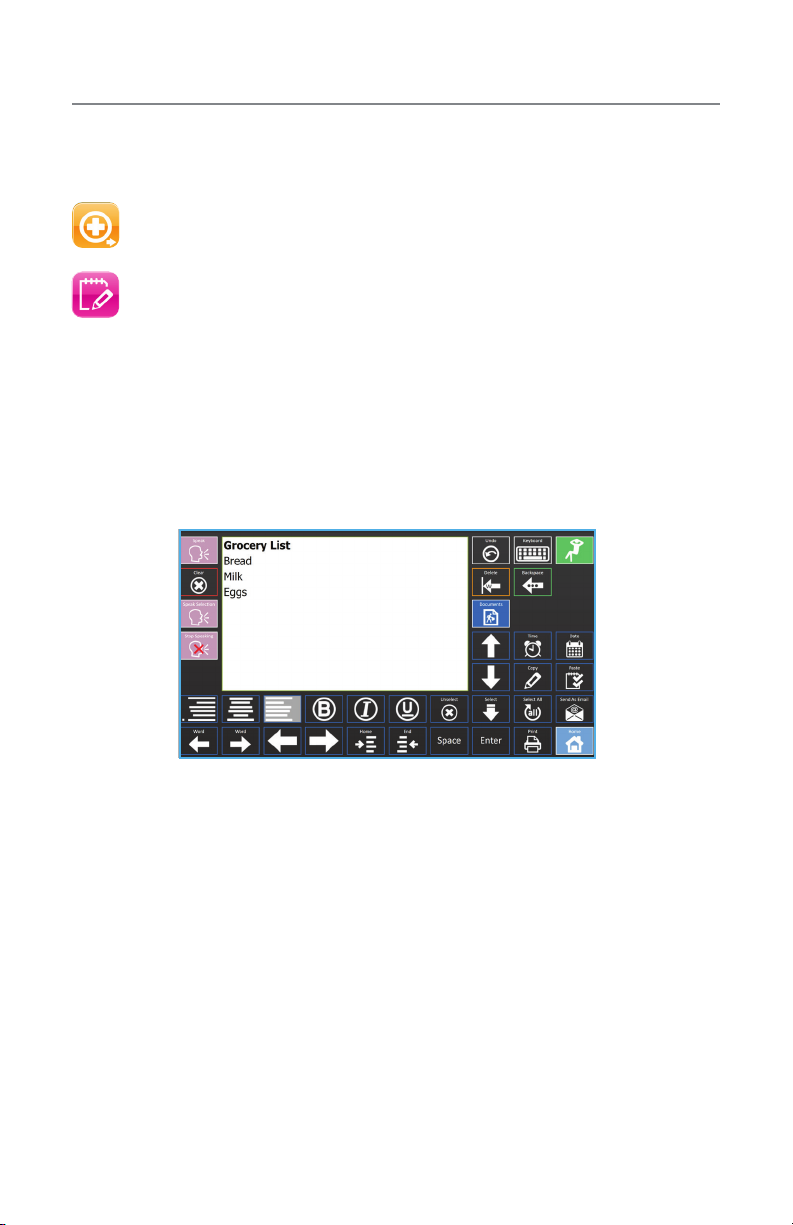
1. On the Keyboard, type out the message you are going to bank.
2. Select My Phrases > Message Banking > Record/Stop Recording >
speak the desired message aloud > Record/Stop Recording.
3. Your message will now be added to the Message Banking page.
Message Banking
Message Banking allows a user to record their own voice onto their
device. This feature is utilized by those who currently have the ability to
naturally speak, but may lose their natural speech at some point due to a
degenerative diagnosis (e.g. ALS). A user can message bank single words
or entire sentences.
4. Under Label For Cell, type the text to be displayed on the button > OK
> OK.
5. Your message will now be added to the Message Banking page.
4. Under Label For Cell, type the text to be displayed on the button > OK
> OK.
5. Your message will now be added to the Message Banking page.
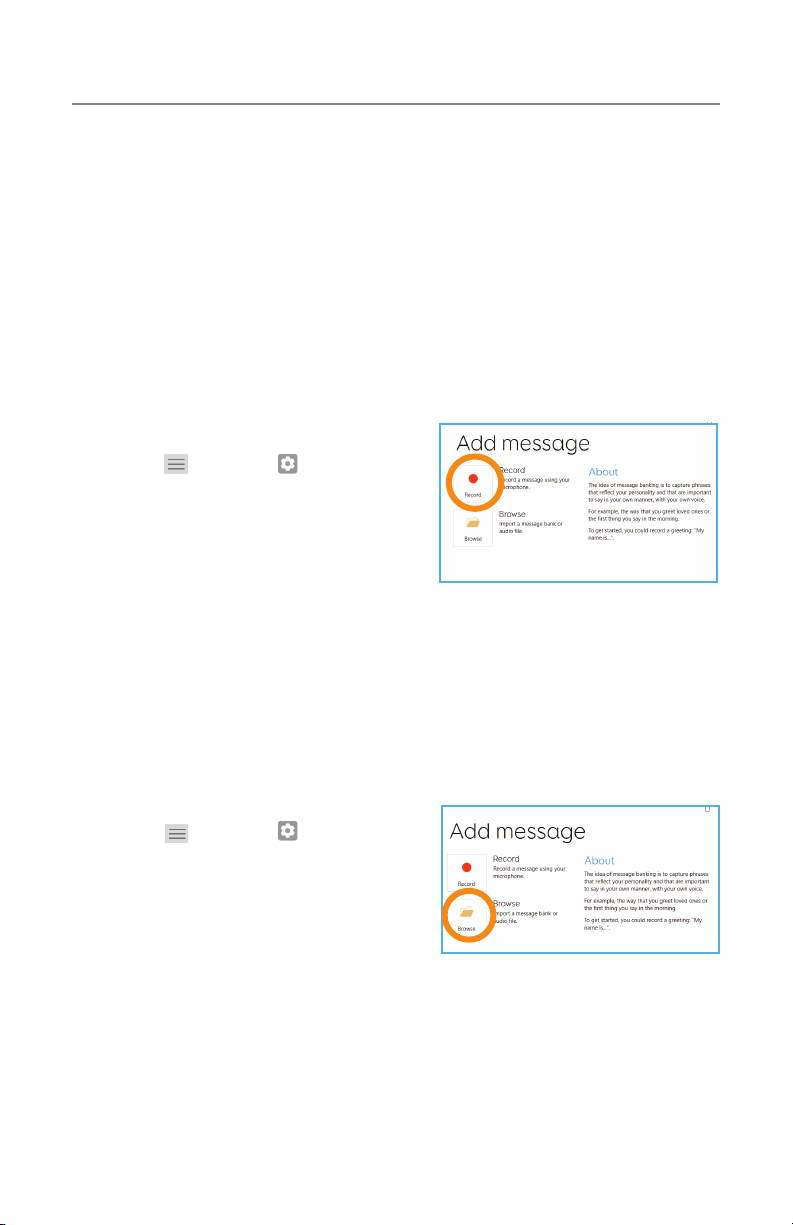
Record on the Settings page
1. Select (Menu) > Settings >
Speech > Message Banking > Add >
Record > speak the desired message
aloud > Stop.
2. Select Listen to play back your
recording.
3. Under Full Text, type out the message
in writing.
Load a pre-recorded audio le
1. Select (Menu) > Settings >
Speech > Message Banking > Add >
Browse > locate the audio le > Open.
Note: audio les must be MP3, m4a, wav, or
wma
2. Select Listen to play back your
recording.
3. Under Full Text, type out the message
in writing.

7
Creating text and email documents in Notepad
Easily create, email and print letters, grocery lists and more with the
Notepad application. The formatting page helps to compose, save, and
edit letters and other documents.
3. Once your message is complete, select the Format icon on the
keyboard to further stylize and align your document.
4. Choose the Select icon to highlight individual words and lines, or
choose Select All to apply a style to the entire document. By choosing
the Select icon, you can highlight word by word or line by line. Once
highlighted, you can choose how you would like to edit the words.
5. When you have completed formatting your work, select Send as Email
to send your work as an email or Documents to save it as a document.
At this point, your work is automatically saved to your device.
1. On the homepage, select More icon.
2. Select Notepad icon > to start a new document select New
and the keyboard will appear. Type your message.
Tip: Refer to page 9 (“Printing”) for how to connect your printer to your device. Refer to
pages 9 (“Connecting to WiFi”) and 10 (“Email”) to connect to the Internet and congure
contacts and email settings before emailing documents.

8
Zuvo Control for television
8. Use Transmit Now button to test functionality.
8. Repeat steps 2 through 7 for remaining buttons on page.
9. Click Finish Editing > Yes to save.
Tip: Please contact TTMT Support with any questions regarding the conguration of
television control.
Zuvo ECU (Environmental Control Unit) allows you to use your eyes, switch
scanning and other access methods to control your television volume,
channels, cable box, and more!
Congure television buttons via Infrared Control
1. Navigate to the ECU page.
2. Click (Menu) > Edit Grid > select the button you wish to program.
3. If the button action is set to anything other than Infrared follow steps 4
through 6. If it is already set to Infrared, skip ahead to step 7.
4. In the command section, remove the incorrect action by clicking the X
to the right of the action name.
5. Click Add Command > Click the magnifying glass in the top right
corner of the Add Command window and search “infrared” > Infrared
> Next > select UUIRT from the Transmitter drop down menu.
6. Click Start Learning and follow on-screen prompts to learn the remote
function.
7. On the left-hand panel under Commands, click Learn > Start
Learning > follow on-screen prompts to learn the remote function.

9
Zuvo Control for lights, fans and more
Obtain maximum comfort levels by switching lights, fans and other devices
on and off using your ECU!
Connect a Z-Wave to your device for light control
1. Click (Menu) > Settings > Environment Control >
Transmitters > Add > Z-Wave > Congure > choose COM3 or
COM4 from the Port drop down menu.
2. Click Add and press the button on your Z-Wave to learn.
3. Plug a lamp into the outlet on your Z-Wave marked with .
4. Select the light switch and use the Transmit Now button to conrm
functionality.
Congure light switch buttons on ECU page
1. Navigate to ECU page for lights & appliances.
2. Click ( Menu) > Edit > select button Light Switch 1 > select switch
in drop down menu > choose On in the second drop down menu.
3. Select button Light Switch 1 > select switch in drop down menu >
choose Off in the second drop down menu.
4. Repeat process for remaining light switches.
5. Click Finish Editing > Yes to save.
Note: Make sure Mode on the left-hand panel is set to On or Off, according to the name of
each button. Also, you may need to reboot device after adding light switches.
5. Click Rename and name it “Light Switch 1”. Repeat steps 2 through 4
to add additional light switches and rename as needed.

10
Printing
Email
Check your inbox messages by accessing your email on your locked or
unlocked device!
1. (Menu) > Settings > Accounts > Email.
2. Select your email provider. With Google, Outlook and Yahoo accounts,
you will then enter your user name and password. Click Test to verify.
Tip: Certain email providers require specic settings to be applied to connect with your
device (e.g. Gmail and Yahoo!).
3. If none of the above are your email providers, select IMAP and SMTP.
Enter information requested from email provider or in your email
settings.
Tip: Please contact TTMT Support with any questions regarding the conguration of your
email account.
With a compatible Bluetooth printer, you can print documents from within
Notepad.
1. Set up printer per printer instructions, and turn printer Bluetooth ON.
2. On desktop, Windows icon > Settings > Devices >
Printers & Scanners > Add a Printer > select your printer.
3. In Grid 3, (Menu) > Settings > Computer > under devices
select printer you connected via Bluetooth > Congure printer >
congure settings to your liking > OK > OK.

11
Accessing the web using Internet browser
Select the green Internet icon from the home screen to access the web.
Big Scroll / Little Scroll
This function allows you to navigate up and down
on the page at different intervals. Little Scroll has
a 0.1 second time gap while Big Scroll has a 0.6
second time gap.
Next Link / Jump 5 Links
This is located on the Web Links page. This will
allow you to skip by a single link or ve links on a
web page depending on button selected.
Favorites
Save all your favorite websites here for easy
access. To add a website, navigate to desired
webpage > Favorites > Add Page.
Web Links
Provide selectable buttons for each web link on the
page.
Audiobooks
Listen to Audiobooks downloaded or purchased through Audible on your
device.
Set up an Audible account on www.audible.com to download or
purchase books. Third party fees may apply. Contact TTMT Support for
details on set-up.
Listen to audiobooks on your device with Windows Media Player or iTunes.

12
Social media
Unlocked devices can access Facebook, YouTube, Twitter and other social
media applications and/or web sites.
1. On the homepage, select Social Media icon.
Tip: Use buttons surrounding the browser window to navigate and perform specied
functions. The area highlighted with a red border is where commands will be executed. Refer
to Facebook, YouTube and Twitter support for detailed information regarding posting status
updates, sharing les, etc.
2. Select the application you wish to use.
Facebook
Scroll up and down your newsfeed,
post to your wall or talk to your
friends with Facebook Messenger.
YouTube
Get instant access to millions of
videos with our new YouTube app.
Twitter
Publish, favorite, retweet and
reply to tweets with only a few
selections.

13
Connecting to WiFi
Available on PLUS models only. Contact Customer Care for more
information on unlocked devices.
Connect to your WiFi network
1. While still in Settings and WiFi in the On position > select Show
available networks
2. Select your network and enter your password.
3. Press Connect. The status will switch to connected/secured.
Activate WiFi
1. Exit of Grid 3.
2. Click Windows icon >
Settings > Network and
Internet.
3. In the left-hand column,
select WiFi, and move slider
to On position.
Software updates
Be sure to update the software on your unlocked device regularly.
1. If an update is needed for your device, you will see an orange circle with
an exclamation point in the upper right hand toolbar. To update, press
that orange circle (Alerts icon).
2. Select Install. Grid 3 will update
upon installation.

14
Pairing a mobile phone
Connect an iPhone mobile phone for calling
1. On your device, go to Settings > Devices.
2. Click the +next to Add Bluetooth or other device > Bluetooth > iPhone
> Connect > follow on-screen instructions to pair the iPhone and
device.
Connect an Andoid mobile phone for texting and calling
1. Check to make sure you have Bluetooth switched On, both on your
phone and your speech-generating device.
2. Open Grid 3, select the Menu and select Settings > Phone.
Discoverable phones will appear on this screen.
Tip: If you don’t see your phone on the list, you may need to set your phone to be
Discoverable.
On iPhone, this is a toggle on the Settings > Bluetooth screen. On
Android phones, this can vary; certain phones have a discoverable
toggle on the Bluetooth settings screen, other phones only become
discoverable if the Bluetooth settings screen is open.
3. Next, connect to your chosen phone’s name to begin pairing.
Your phone will display a notication to conrm, often with a pin code.
Select ‘Conrm’ or ‘Yes’ to continue pairing.
Tip: Your communication aid may show a similar prompt, ignore this!
You may also get a couple of additional prompts and notications on
your phone while it pairs. These are to allow Grid access to various
functions. Accept all of these.

15
1. Load your music onto a USB drive and insert USB drive into the USB
port on your device.
2. On the desktop of your device, select Start Menu > File Explorer >
select your USB drive from the panel on the left side of the window >
select the music les you wish to transfer to the device and Copy them.
4. Paste the music les into the Music folder on your device, then open
them in Windows Media Player. The songs will automatically upload
from Music folder. Check they loaded properly by starting one of your
songs, then start Grid 3. Do NOT have Grid 3 open when you are
putting the songs in the music folder.
6. Select a song and listen!
Note: only purchased songs can be played, not songs from streaming services.
5. On the OnWord homepage, select Music icon. Songs will
automatically upload from Windows Media Player.
Adding music
Listen to your downloaded music on your device.

16
Taking pictures
Your device can be used as a camera to take pictures to add to vocabulary
buttons, or keep them in an album to share with family and friends!
3. To take a picture, select Take Photo.
4. To view the pictures you’ve taken, select Camera Photos.
1. On the homepage, select More icon.
2. Select Camera icon.

17
Import pictures via USB drive
Import existing pictures onto the device to add them to vocabulary buttons
or keep in an album to show family and friends!
1. Load your pictures onto a USB drive.
2. Insert USB drive into the USB port on your device.
3. On the desktop of your device, select Start Menu > File Explorer >
USB drive.
4. Drag the pictures you want right into the Pictures folder along the left
side of the screen.
5. You can then view your imported pictures by selecting More > Camera
> Camera photos > My Pictures.

18
Backing up vocabulary sets
Easily back up and restore user accounts in Grid 3.
Back up
1. (Menu) > Settings > Select Username Zuvo > Backup User
2. Give the le a name and store in the location you would like. You can
also email the stored vocabulary set to yourself in case your device
becomes damaged.
Restore
1. Navigate to Grid Explorer.
2. (Menu) > Users > Restore Backup.
3. Navigate to location of backup > select backup le > Open.
Table of contents
Other Talk To Me Technologies Recording Equipment manuals

Talk To Me Technologies
Talk To Me Technologies wego A User manual

Talk To Me Technologies
Talk To Me Technologies zuvo 12-D User manual

Talk To Me Technologies
Talk To Me Technologies wego A User manual

Talk To Me Technologies
Talk To Me Technologies wego A User manual

Talk To Me Technologies
Talk To Me Technologies wego A User manual

Talk To Me Technologies
Talk To Me Technologies wego A User manual