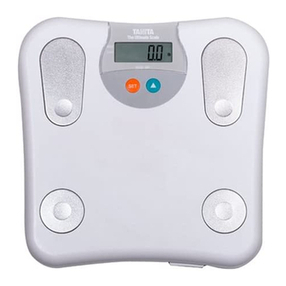
Tanita BF-2000 User manual

Model : BF-2000
MANUAL
Instruction Manual
Read this Instruction Manual carefully and keep it for future reference.
Manual de instrucciones
Lea detenidamente este manual de instrucciones y guárdelo para futura referencia.
Radio Wireless Body Fat Monitor

Table of Contents
Introduction ...........................................................................................................................1
Features and functions...........................................................................................................1
Preparations before use.........................................................................................................2
Getting accurate readings ......................................................................................................2
Using TANITA Wireless Remote Display (D-1000plus and D-1100plus) ................................3
Troubleshooting .....................................................................................................................6
Table des matières
Introducción...........................................................................................................................7
Prestaciones y funciones .......................................................................................................7
Preparaciones antes del uso ..................................................................................................8
Cómo obtener lecturas exactas..............................................................................................8
Utilizando el Display TANITA Remoto Inalambrico (D-1000plus y D-1100 plus)....................9
Resolución de fallos.............................................................................................................13

1
Introduction
Thank you for selecting a Tanita Body Fat Monitor. This monitor is one in a wide range of home
healthcare products produced by Tanita.
This Instruction Manual will guide you through the setup procedures and outline the key features.
Please keep it handy for future reference. Additional information on healthy living can be found on our
website www.tanita.com.
Tanita products incorporate the latest clinical research and technological innovations.
All data is monitored by our Tanita Medical Advisory Board to ensure accuracy.
Note: Read this Instruction Manual carefully and keep it handy for future reference.
Safety Precautions
People with an electronic medical implant, such as a pacemaker, should not use a Body Fat Monitor as it passes a low-level electrical
signal through the body, which may interfere with its operation.
Pregnant women should use the weight function only. All other functions are not intended for pregnant women.
Do not place this monitor on slippery surfaces such as a wet floor.
Important Notes for Users
This Body fat monitor is intended for children (ages 5-17) with inactive to moderately active lifestyles.
The body fat monitor function is not intended for pregnant women, professional athletes or bodybuilders.
Note: Body fat percentage estimates will vary with the amount of water in the body, and can be affected by dehydration or over-
hydration due to such factors as alcohol consumption, menstruation, illness, intense exercise, etc. It is recommended that if
possible all readings should be taken at the end of one’s day since in the morning after rising from sleep, hydration levels are
at their lowest.
Tanita takes no responsibility for any kind of damage or loss caused by the monitor, or any kind of claim made by a third
person.
Features and functions
Measuring Platform Accessories
1. Indicator light (Green and Red)
2. Ball-of Foot Electrodes
3. Heel Electrodes
4. AA-Size Batteries (4)
5. Carpet Feet (4)

2
Preparations before use
Inserting the Batteries
Open the battery cover on the back of the measuring platform. Insert the supplied
AA-batteries as indicated.
Note: Be sure that the polarity of the batteries is set properly. If the batteries are
incorrectly positioned the fluid may leak and damage floors. If you do not intend
to use this unit for a long period of time, it is advisable to remove the batteries
before storage.
Please note that the included batteries from the factory may have decreased energy levels
over time.
Positioning the Monitor
Place the measuring platform on a hard, flat surface where there is minimal vibration to
ensure safe and accurate measurement.
Use carpet feet when the scale is used on soft surface, such as rugs or carpetings.
Note : To avoid possible injury, do not step on the edge of the platform.
Handling Tips
This monitor is a precision instrument utilizing state-of-the-art technology.
To keep the unit in the best condition, follow these instructions carefully:
• Do not attempt to disassemble the measuring platform.
• Avoid excessive impact or vibration to the unit.
• Place the unit in an area free from direct sunlight, heating equipment, high humidity, or extreme temperature change.
• Never submerge in water. Use alcohol to clean the electrodes and glass cleaner (applied to a cloth first) to keep them shiny; avoid
soaps.
• Do not step on the platform when wet.
• Do not drop any objects onto the platform.
• Do not use this scale while operating transmitters (such as a cell phone) as this may affect your results.
• If not in use for a prolonged period of time it is recommended that you remove the batteries.
Getting accurate readings
To ensure accuracy, readings should be taken without clothing and
under consistent conditions of hydration. If you do not undress,
always remove your socks or stockings, and be sure the soles of your
feet are clean before stepping on the measuring platform. Be sure
that your heels are correctly aligned on the measuring platform. Don’t
worry if your feet appear too large for the unit -accurate readings can
still be obtained if your toes overhang the platform.
It is best to take readings at the same time of day. Try to wait about
three hours after rising, eating, or hard exercise before taking
measurements.
While readings taken under other conditions may not have the same
absolute values, they are accurate for determining the percentage of
change as long as the readings are taken in a consistent manner. To
monitor progress, compare weight and body fat percentage taken
under the same conditions over a period of time.
Note : An accurate reading will not be possible if the soles of your feet are not clean, or if your knees are bent or you are in a sitting
position.
Open as shown.
Direction of
the batteries.
Heels centered on
electrodes
Toes may overhang
measuring platform
Detachable Carpet Feet (only for
piles up to 0.28” ( 7 mm) thick)

3
Using TANITA Wireless Remote Display (D-1000plus and D-1100plus)
1.Initial Setting (Clock Setting)
Insert batteries into the remote display and then press
any front panel button to set the clock.
1) Set Hour
Press s/t buttons to set hour and then press SET.
The unit will beep once to confirm.
2) Set Minute
Press s/t buttons to set minute and then press
SET.
The unit will beep twice to confirm the programming.
• Resetting Clock
Press the clock button on the bottom of the remote display.
Then follow the clock setting procedure 1) and 2).
2.Pairing the remote display and the BF-2000 (”platform”)
The platform needs to pair with the applicable remote display before measurements are attempted.
Pairing compatible remote displays: D-1000plus and D-1100plus
1) Before proceeding,
a) Install the batteries in the platform.
b) Install the batteries and set the clock in the remote display.
c) The platform and the remote display are within 17 feet (5 m) of each other.
2) Press and hold OFF button for 2 seconds on the
remote display. The remote display will show
"1234" for selecting a personal number. Select the
preferred personal number which will be paired
with the platform using s/tbuttons and press
the SET button to confirm.
3) The remote display will show "SEt-P". Select "YES"
or "no" using s/tbuttons, and press the SET
button to confirm,
a) "YES": The pairing process will continue to the next step.
b) "no": The pairing process will be cancelled and then the
clock will be displayed.
4) Input the 5 digit serial number found on the bottom
of the platform using s/tbuttons and press the
SET button to confirm.
Cancellation-1: Press the OFF button to cancel during the pairing process and then the clock will be displayed.
Cancellation-2: The pairing process will be cancelled if inactive for 1 minute and then the clock will be displayed.
Note : • “ 00000 ”, “ 000001 ” and more than “ 65535 ”.
These serial numbers are not allowed. Please input the correct serial number.
• The serial number is located on the bottom of the platform.
Continued on the next page. t
Backlight Button
Upright Position
Battery Cover

4
5) Once the pairing process is completed with the platform, the remote
display shows "donE" and then the clock will be displayed. If the remote
display shows“ P-Err ”, please try the pairing process again.
Note : To confirm the paired serial number on each personal number after completion the pairing process:
Press and hold the SET button for 2 seconds on the remote display. The remote display will show "-1-". Select the per-
sonal number using s/tbuttons, and press the SET button to confirm. The display shows the paired serial number for
3 seconds. "-----" is shown if there is no serial number stored for selected personal number.
3.Setting and storing personal data in the remote display
You will receive readings only if data has been programmed into the Tanita remote display.
1) Select Personal Data Number
Use the SET button to activate the unit. Use s/tbuttons to select a personal data number. Press SET button.
2) Set Age (Applicable Age: 5 - 17)
Use s/tbuttons to select age. Press SET button.
3) Select Female or Male
Use s/tbuttons to select Female ( )/ Male( ). Press SET button.
4) Specify Height
Use s/tbuttons to select height. Press SET button to confirm.
The remote display will beep twice and the display will flash all data three times to confirm the programming.
The display will turn to the clock.
4.Taking body composition readings
1) Before proceeding, make sure that the platform and remote display are within 17 feet (5 m) of each other.
2) Press t(User) button to turn the unit on and then press s/tbuttons to select personal data number.
(Do not stand on the platform.)
3) Press the SET button to confirm your personal number.
4) When the remote display and platform are paired, the platform will
beep once, and the Green Indicator Light on the platform will blink.
5) Step onto the platform while the Green Indicator Light is blinking.
6) After the measurement is complete, the platform will beep twice,
readings will automatically show on the remote display (Refer to fig. 1).
7) Carefully step off platform after measurement is complete.
8) At anytime during and after the“Auto Display Process”, the user may
use s/tbuttons to scroll through the different results. For advanced
scrolling, the user may press and hold s/tbutton.
Upon reading the desired readings, release the button to view the
result, readings will appear for 30 seconds before the unit automatically
shuts off.
Weight
Body Fat %
Body Water %
Muscle Mass
Physic Rating
BMR or DCI
Metabolic Age
Bone Mass
Visceral Fat Rating
n/a
n/a
n/a
n/a
n/a
n/a
n/a
BF-2000 Displayed Readings
fig.1
Warning Do not use the body fat reading feature of this product if you have a pacemaker or other electronic implanted medical
device. The body fat monitor function is not intended for pregnant women, professional athlete or bodybuilders.

5
Healthy Range Indicator
Underfat : Below the healthy body fat range. Increased risk for health problems.
Healthy : Within the healthy body fat percentage range for your age/gender.
Overfat : Above the healthy range. Increased risk for health problems.
Obese : High above the healthy body fat range. Greatly increased risk of obesity-related health problems.
5.Recall Function
The previous readings of the following features can be obtained using the recall function.
• Weight • Body Fat %
To obtain previous readings, press the SET button while the current readings are being displayed.
The display will show the previous readings. To see other previous readings, press s/tbuttons for each desired reading.
Press SET again to go back to the current result display.
6.Programming The Guest Mode (Applicable Age: 5 - 17)
Guest mode allows you to program the unit for a one-time use without resetting a personal data number.
Press sbutton to activate the unit. Then follow the steps: Set Age, Select Female or Male, and Specify Height.
7.Taking Weight Measurement Only
Press the Weight-only key.
Step onto the platform while the Green Indicator Light is blinking.
After the measurement is complete, the platform will beep twice, readings will automatically show on the remote display.
Carefully step off platform after measurement is complete.
8.Switching The Weight Unit Mode (kg / lb)
Select your preferred weight unit mode using the weight mode switch on the bottom of the remote display.
Warning Do not use the body fat reading feature of this product if you have a pacemaker or other electronic implanted medical
device. The body fat monitor function is not intended for pregnant women, professional athlete or bodybuilders.

6
Specifications
BF-2000
Weight Capacity
330lb / 150kg
Weight Increments
0.2lb / 0.1kg
Power Supply
DC 6V (AA Battery - LR6 x 4 included)
Power Consumption
100 mA maximum
Temperature Range of usage
41°F - 95°F / 5°C - 35°C
FCC WARNING
Changes or modifications not expressly approved by the party responsible for compliance could void the user's authority to operate
the equipment.
Troubleshooting
• Do not step onto the platform before the platform beeps once and the Green Indicator Light blinks.
• Do not step off until after hearing a double beep or the Green Light remains solid (stops blinking), the measurement is taken, and
the readings are displayed on the applicable device (e.g. Tanita Remote Display, and/or PC).
• If you do not step onto the platform within 30 seconds after Green Indicator Light begins blinking, the power will shut-off
automatically.
•Interference may occur if multiple platforms are present. Please use only one platform in any given area.
• Constant Red Indicator Light
Make sure socks or stockings are removed, and the soles of your feet are clean and properly aligned on the measuring platform.
(see p.2)
Make sure to step onto the platform only after it has beeped twice or the Green Indicator Light is blinking.
The unit cannot accurately measure your weight if it detects movement. Please stand on the platform keeping movement to a
minimum.
If Body Fat Percentage is more than 75%, readings cannot be obtained from the unit.
Reading cannot be obtained if the weight capacity is exceeded. Weight capacity is 330lb (150kg).
• Blinking Red Indicator Light
Batteries are low. When the Red Indicator Light is blinking, replace the batteries immediately, since weak batteries will affect the
accuracy of your measurements. Change all the batteries at the same time with new batteries.
Federal Communications Commission and
Canadian ICES Notice
This equipment has been tested and found to comply with the limits for a Class
B digital device, pursuant to part 15 of the FCC Rules. These limits are designed
to provide reasonable protection against harmful interference in a residential
installation. This equipment generates, uses and can radiate radio frequency
energy and, if not installed and used in accordance with the instructions, may
cause harmful interference to radio communications. However, there is no
guarantee that interference will not occur in a particular installation. If this
equipment does cause harmful interference to radio or television reception,
which can be determined by turning the equipment off and on, the user is
encouraged to try to correct the interference by one or more of the following
measures:
• Reorient or relocate the receiving antenna.
• Increase the separation between the equipment and receiver.
• Connect the equipment into an outlet on a circuit different from that to which
the receiver is connected.
• Consult the dealer or an experienced radio or television technician for help.

7
Introducción
Gracias por elegir el monitor corporal Tanita.
Este monitor es uno de entre una amplia gama de productos domésticos para el cuidado de la salud
producidos por Tanita. El presente manual de instrucciones le guiará a través de los procedimientos de
configuración inicial y le explicará las funciones de las teclas.
Consérvelo a mano para consultas futuras. En nuestro sitio web www.tanita.com podrá encontrar
información adicional sobre cómo llevar una vida sana.
Los productos Tanita incorporan los resultados de las últimas investigaciones clínicas e innovaciones
tecnológicas.
Toda la información es controlada por el Consejo Médico Consultivo de Tanita para garantizar su
precisión.
Nota : Lea detenidamente este manual de instrucciones y téngalo a mano para futura referencia.
Precauciones de seguridad
Las personas con un implante médico electrónico tal como un marcapasos, no deberían usar un Monitor de Composición Corporal,
ya que una señal eléctrica de bajo nivel, pasa a través del cuerpo y esta puede interferir con su operación.
Las mujeres embarazadas solamente deberán utilizar la función de peso. Ninguna de las demás funciones está pensada para mujeres
embarazadas.
No coloque este monitor sobre superficies resbaladizas, como por ejemplo un suelo mojado.
Tanita no acepta ninguna responsabilidad por ningún tipo de daño material o pérdida causados por este monitor, ni por ningún tipo
de reclamación presentada por terceros.
Notas importantes para los usuarios
Este analizador de grasa corporal está diseñado para el uso por parte de adultos y niños (5–17 años de edad) con un estilo de vida de
inactivo a moderadamente activo.
La función de monitor de grasa corporal no está diseñada para embarazadas, atletas profesionales o culturistas.
Nota : Los cálculos del porcentaje de grasa corporal variarán según la cantidad de agua en el cuerpo, y pueden ser afectados por la
deshidratacióno la hiperhidratación, causadas por factores como el consumo de alcohol, la menstruación, una enfermedad, el
ejercicio intenso, etc. Se recomienda de ser posible que todas las lecturas se tomen al final del día, ya que al levantarse en la
mañana, los niveles de hidratación son los más bajos.
Tanita no se responsabiliza de ningún tipo de daño o pérdida ocasionados por estas unidades, o de ningún tipo de
reclamación efectuada por terceras personas.
Prestaciones y funciones
Báscula Accesorios
1. luz Indicadora (Verde y Roja)
2. Electrodos para la planta del pie
3. Electrodos para el taIón
4. Pilas tamaño AA (4)
5. Pies de alfombra (4)

8
Preparaciones antes del uso
Instalación de las pilas
Abrir la tapa de las pilas situada en la parte posterior de la báscula. Insertar como se
indica las baterías AA suministradas.
Nota : Asegúrese de situar correctamente la polaridad de las pilas. Si coloca las pilas
de manera incorrecta, el líquido puede derramarse y dañar el suelo. Si no tiene
intención de utilizar esta unidad durante un período de tiempo prolongado, se
recomienda sacar las pilas antes de guardarla.
Tenga en cuenta que es posible que las pilas suministradas de fábrica se hayan gastado
con el paso del tiempo.
Colocación del monitor
Coloque la báscula en una superficie dura y lisa con una vibración mínima para asegurar
una medición segura y precisa.
Use los pies de la alfombra cuando se usa la báscula en la superficie suave como las
alfombras o alfombrado de pelusa.
Nota : Para evitar posibles lesiones, no pise el borde de la plataforma.
Recomendaciones de manejo
Este monitor es un instrumento de precisión que utiliza tecnología de vanguardia.
Para mantener la unidad en condición óptima, siga estas instrucciones cuidadosamente:
• No intente desmontar la báscula.
• Evite que la unidad reciba golpes o vibraciones excesivas.
• Sitúe la unidad fuera del alcance de la luz directa del sol, calefacciones y radiadores, humedad elevada o cambios extremos de
temperatura.
• No lo sumerja nunca en agua. Utilice alcohol para limpiar los electrodos y limpiacristales (aplicado mediante un trapo) para
mantenerlos brillantes; evite utilizar jabones.
• Evite la humedad al subirse a la plataforma.
• Evite que caiga cualquier objeto sobre el aparato.
• No use esta báscula usando los aparatos de transmisión (como un teléfono celular), puedan afectar en el resultado de la medición.
• Se recomienda quitarle las baterías, si no va a usarse por un largo período de tiempo.
Cómo obtener lecturas exactas
Para asegurar la precisión, las lecturas se deberían tomar desnudo
y bajo condiciones constantes de hidratación. Si no se desviste,
quítese siempre los calcetines o medias y asegúrese que los
pies estén limpios antes de subirse a la báscula. Asegúrese que
sus talones estén alineados correctamente con la plataforma de
medición. No se preocupe si sus pies son demasiado grandes para la
báscula: se pueden conseguir lecturas exactas incluso si sus dedos
sobresalen de la báscula.
Es mejor tomar las lecturas a la misma hora del día. Intente esperar
unas tres horas después de levantarse, de comer o de hacer ejercicio
antes de tomar las medidas.
Aunque las lecturas realizadas bajo otras circunstancias pueden no
tener los mismos valores absolutos, tienen la precisión necesaria
para determinar el porcentaje de cambio, siempre que las lecturas se
tomen de manera consistente.
Para controlar el progreso, compare el peso y porcentaje de grasa
corporal tomado en las mismas condiciones durante un período de
tiempo.
Nota : No será posible realizar una lectura precisa si las plantas de los pies no están limpias, si dobla las rodillas o si está sentado.
Abrir como se
muestra.
Sentido de las
pilas.
Talones centrados
en los electrodos
Talones centrados
en los electrodos
Pies de alfombra
intercambiable (solamente
para pelusa hasta 0,28”
( 7 mm))
9
Utilizando el Display TANITA Remoto Inalambrico (D-1000plus y D-1100 plus)
1.Programación de inicio
(programar reloj)
Colocar las baterias dentro del display remoto y
presionar cualquier botton del panel frontal para
configurar el reloj.
1) Configurar Hora:
Presione el botón s/t para fijar la hora y luego
presione SET.
La unidad emitirá un pitido de confirmación.
2) Configurar Minutos:
Presione el botón s/t para fijar los minutos y
luego presione SET, la unidad emitira un sonido
doble para confirmar la programación.
• Reconfiguración de la Hora:
Presione el botón de la parte superior del display, posteriormente regrese al paso número 1) y 2).
2.Sincronizar el display remoto y la plataforma BF-2000 (plataforma)
La plataforma requiere sincronizarse con el display remoto antes de realizar cualquier medición.
Sincronizanizando el Display Remoto D-1000 plus y D-1100plus
1) Preparación:
a) Instalar las baterias en la plataforma.
b) Instalar las baterias en el display configurar el reloj.
c) Colocar la plataforma dentro de un perimetro de 17 pies (5m ) alrededor del Display Remoto.
2) Presione y mantenga presionado el boton OFF del
display remoto por 2 segundos. El display remoto
muestra en panatalla "1234" para seleccionar la
clave personal. Selecciones su numero personal
preferido - el cual se utilizara para sincronizar la
pantalla remota con la plataforma - con los botones
s/ty presione SET para confirmar.
3) El display remoto muestra "SEt-P". seleccionar "YES"
o "no" usando los botones s/t, presione SET para
confirmar,
a) "YES": Indica que la sincronización se realiza en el
siguiente paso.
b) "no": Indica que la sincronización se cancela y la función
de reloj regresa a la pantalla.
Continue en el siguiente t
Botón Backlight
Posición Vertical
Cubierta de Baterias

10
4) Indicar el numero serial de 5 digitos que se encuentra por debajo de la plataforma utilizar los botonees s/ty
después presione SET para confirmar.
Cancelar 1:Presione OFF para cancelar el proceso de cancelación la función de reloj regresa a la pantalla del display.
Cancelar 2:El proceso de sincronización sera cancelado si se encuentra inactivo por 1 minuto y la funcion de reloj
regresa a la pantalla del display.
Nota : • “ 00000 ”, “ 00001 ” y mas de “ 65535 ”.
Estos numero de serie no son permitidos. Favor de introducir el numero de serie correcto.
• El número de serie se encuentra impreso en la parte trasera de la plataforma de la unidad.
5) Una vez completado el proceso de emparejamiento con la pataforma el display remote muestrs " donE " y la
función de reloj s e muestra en pantalla. Si el display remoto muestra“
P-Err ”por favor intente el emparejamiento nuevamente.
Nota : Para confirmar que se ha sincronizado el numero de
serie en cada numero personal despues de completar el
emparejamiento:
Presione y sostenga el boton SET por 2 segundos en el display remoto. EL display remote muestra "-1-" Seleccione
el número personal usando los botones s/ty presione SET para confirmar. EL display muestra el número de serie
emparejado por 3 segundos "-----" se muestra si no hay ningún número de serie guardado para elegir numero personal.
3.Configuración y de los datos peronsale en el display remoto
Los resultados de la medición se transmitiran si la función de Data es programada en el display remoto.
1) Selección del número de información personal
Utilice el botón SET para activar la unidad. Utilice los botoness/tpara seleccionar un número personal. Pulse SET.
2) Configuración de la edad(Aplica para edades: 5 – 17 años)
Utilice los botones s/tpara seleccionar la edad. Pulse SET.
3) Selección de sexo
Utilice los botones de Arriba/Abajo para seleccionar Mujer ( ) u Hombre ( ). Pulse SET.
4) Especificación de la altura
Utilice los botones s/tpara seleccionar la altura. Pulse el botón SET para confirmar.
La pantalla remota emitirá dos pitidos y la pantalla mostrará de forma intermitente todos los datos tres veces para confirmar la
programación.
El display regresa a función reloj.

11
4.Cómo realizar las mediciones de composición corporal
1) Antes de realizar el procedimiento asegurarse que la plataforma y el display remoto se encuentra dentro de un
area de 17 pies ( 5m) respecto de cada uno.
2) Pulse el botón t(Usuario) para encender la unidad y después pulse los botones s/tpara seleccionar el
número de información personal.
(No se pare sobre la báscula.)
3) Pulse el botón SET para confirmar su número personal.
4) Cuando la plataforma y el display han sido sincronizados la plataforma emite un sonido beep y la luz verde de la
plataforma empieza a parpadear.
5) Párese sobre la báscula mientras el indicador de luz verde está parpadeando.
6) Después de que se haya completado la medición, la báscula emitirá dos pitidos y las lecturas se mostrarán
automáticamente en la pantalla remota.(pasar a figura 1).
7) Una vez que la medición se haya completado, bájese con cuidado de la báscula.
8) En cualquier momento durante o tras el“proceso de visualización automática”, el usuario puede utilizar los
botones s/tpara desplazar a los distintos resultados. Para un desplazamiento avanzado, mantiene presionado
el botón s/t. Tras leer las lecturas deseadas, suelte el botón para ver el resultado. Las lecturas aparecerán
durante 30 segundos antes de que la unidad se apague automáticamente.
Figura 1
BF-2000 Lectura en display remoto
Peso 4
Porcentaje de grasa corporal 4
Porcentaje de agua corporal total No disponible
Masa muscular No disponible
Tipo de cuerpo No disponible
BMR o DCI No disponible
Edad metabólica No disponible
Masa Osea No disponible
Nivel de adiposidad visceral No disponible
Aviso No haga uso de la prestación de lectura de grasa corporal disponible en este producto en el caso de que le haya sido
implantado un marcapasos u otro dispositivo médico electrónico. La función de monitor de grasa corporal no es apta
para mujeres embarazadas, atletas de alto rendimiento o fisicoculturistas.

12
Indicador de los niveles saludables de grasa corporal
Por debajo : Bajo en grasa; por debajo del margen saludable de grasa corporal. Aumento del riesgo de problemas
de salud.
Saludable : Saludable; dentro del margen saludable de grasa corporal para su edad/sexo.
Por encima : Alto en grasa; por encima del margen saludable. Aumento del riesgo de problemas de salud.
Obeso : Obeso; muy por encima del margen saludable de grasa corporal.
Aumento considerable del riesgo de problemas de salud relacionados con la obesidad.
5.Función de recuperación
Las lecturas anteriores de las siguientes opciones pueden obtenerse utilizando la función de recuperación.
• Peso • Porcentaje de grasa corporal
Para obtener las lecturas anteriores, pulse el botón SET mientras se muestran las lecturas actuales. La pantalla mostrará las
lecturas anteriores. Para ver otras lecturas anteriores, pulse s/t para cada lectura deseado. Vuelva a pulsar SET para regresar a
la pantalla de resultados actual.
6.Programación del modo invitado(Aplica para edades : 5 – 17 años)
El modo invitado le permite programar la unidad para usar una sola vez sin tener que restablecer el número de información
personal.
Pulse el botón spara activar la unidad. A continuación, siga estos pasos: Especifique la edad, el sexo y la altura.
7.Utilizar solamente la función de peso
Pulse la tecla Weight-only (solo peso).
Párese sobre la báscula mientras el indicador de luz verde está parpadeando.
Después de que se haya completado la medición, la báscula emitirá dos pitidos y las lecturas se mostrarán automáticamente en
la pantalla remota. Una vez que la medición se haya completado, bájese con cuidado de la báscula.
8.Cambio de modo de peso
Seleccione su modo de peso favorito utilizando el botón de cambio de modo de peso situado en la parte inferior de la pantalla
remota.
Aviso La función de monitor de grasa corporal no es apta para mujeres embarazadas, atletas de alto rendimiento o fisico-
culturistas. La función de monitor de grasa corporal no es apta para mujeres embarazadas, atletas de alto rendimien-
to o fisicoculturistas.

13
Especificaciones
BF-2000
Capacidad de peso
150kg
Incrementos de peso
0.1kg
Alimentación
CC 6V (Se incluyen 4 pilas LR6-AA)
Consumo de energía
Máximo de 100 mA
Intervalo de temperaturas de uso
41°F - 95°F / 5°C - 35°C
ADVERTENCIA FCC
Los cambios o modificaciones que no estén explícitamente aprobados por la parte legal responsable podrían invalidar la autoridad
del usuario para operar el equipo.
Aviso de la Comisión Federal de Comunicaciones (FCC)
de EE.UU. y de la ICES de Canadá
Este equipo ha sido sometido a pruebas y cumple con los límites de un
dispositivo digital Clase B, según la parte 15 de las Reglas FCC. Estos límites
están diseñados para proporcionar una protección razonable contra interferencia
dañina, en una instalación residencial. Este equipo genera, usa y puede emitir
energía de radiofrecuencia y, si no está instalado y se usa de acuerdo con las
instrucciones, puede causar interferencia dañina a las comunicaciones de radio.
Sin embargo, no hay garantía de que no ocurrirá interferencia en una instalación
en particular. Si este equipo causa interferencia dañina a la recepción de radio o
de televisión, que se puede determinar al apagar y encender el equipo, entonces
se sugiere al usuario que trate de corregir la interferencia mediante una o más
de las medidas siguientes.
• Reoriente o reubique la antena de recepción.
• Aumente la separación entre el equipo y el receptor.
• Conecte el equipo a un tomacorriente en un circuito distinto a aquél al cual
está conectado el receptor.
• Consulte con el vendedor o con un técnico con experiencia en radio o
televisión, para que le proporcione ayuda.
Resolución de fallos
• No se pare en la plataforma antes de que emita un sonido y el indicador de luz verde este intermitente.
• No se baje hasta escuchar un doble sonido o que la luz verde permanezca fija (deje de estar intermitente), la medición se toma y
las lecturas se muestran en el dispositivo correspondiente (ej. Reloj Garmin, Pantalla Remota Tanita, y/o PC).
• Si no se sube a la plataforma dentro de 30 segundos después que el indicador de luz verde empiece a estar intermitente, se
apagará automáticamente.
•Se puede producir interferencia si hay múltiples plataformas presentes. Por favor utilice sólo una plataforma
en cada área.
• Luz Indicadora Roja Constante
Asegúrese de quitarse las medias y que las plantas de sus pies estén limpias y debidamente alineadas sobre la plataforma de
medición. (ver pág. 8)
Asegúrese de subirse a la plataforma solamente después de que ha sonado dos veces o que el Indicador de Luz Verde esté
intermitente.
La unidad no puede medir con precisión su peso si detecta movimiento. Párese sobre la plataforma y permanezca lo más quieto
posible.
Si porcentaje de grasa corporal es mayor al 75%, no se podrán obtener lecturas en la unidad.
Si se supera la capacidad de peso, no se podrán obtener lecturas. La capacidad de peso es de 330 lb (150 Kg.).
• Luz Indicadora Roja Intermitente
Las baterías están bajas. Cuando la luz indicadora roja esté intermitente, reemplace inmediatamente las baterías, ya que las
baterías débiles afectarán la precisión de sus mediciones. Cambie todas las baterías al mismo tiempo por baterías AA nuevas.

Representative TANITA Europe B.V.
Hoogoorddreef 56-E
1101 BE Amsterdam
The Netherlands
Tel: +31-20-560-2970
Fax: +31-20-560-2988
www.tanita.eu
TANITA India Private Limited
A-502, Mittal Commercia,
Off. M. V. Road (Andheri Kurla Road),
Marol, Andheri-East,
Mumbai 400 059
Tel: +91-22-3192-6107
Fax: +91-22-2859-9143
www.tanita.in
TANITA Corporation of America, Inc.
2625 South Clearbrook Drive
Arlington Heights, IL 60005 USA.
Tel: +1-847-640-9241
Fax: +1-847-640-9261
www.tanita.com
TANITA Health Equipment H.K. Ltd.
Unit 301-303 3/F Wing On Plaza,
62 Mody Road, Tsimshatsui East,
Kowloon, Hong Kong
Tel: +852-2834-3917
Fax: +852-2838-8667
www.tanita.asia
Manufacturer TANITA Corporation
1-14-2, Maeno-Cho, Itabashi-ku,
Tokyo, Japan 174-8630
Tel: +81-3-3968-7048
Fax: +81-3-3968-2661
www.tanita.co.jp
ISO 9001 Certified
© 2013 TANITA Corporation. BF2000 7801(1)-1307MA
U.S. Patent No. 6,473,641
U.S. Patent No. 6,477,409
U.S. Patent No. 6,480,736
U.S. Patent No. 6,487,445
U.S. Reissue Patent No. 37,954
Other patents pending
This product is ANT+ certified and is compatible with ANT+ display
devices and applications that support the following data:
To learn more visit http://www.thisisant.com/modules/mod_product-directory.php
Table of contents
Languages:
Other Tanita Scale manuals

Tanita
Tanita BF-681 User manual

Tanita
Tanita WB-3000 User manual

Tanita
Tanita HD 372 User manual

Tanita
Tanita BF-689 User manual

Tanita
Tanita BC-732 User manual

Tanita
Tanita 1583 User manual

Tanita
Tanita UM-028 User manual

Tanita
Tanita INNER SCAN BC-532 User manual

Tanita
Tanita 1584 User manual

Tanita
Tanita BF-558 User manual

Tanita
Tanita Ironman Innerscan BC-549 User manual

Tanita
Tanita BC-718 User manual

Tanita
Tanita KW-002 User manual

Tanita
Tanita FitScan BC-1100F User manual

Tanita
Tanita UM-040 User manual

Tanita
Tanita InnerScan BC-551 User manual

Tanita
Tanita KD-407 User manual

Tanita
Tanita InnerScan BC-554 User manual

Tanita
Tanita KD-403 User manual

Tanita
Tanita BF-662W User manual