Taramp's SMART CHARGER AUTOCONTROL 120 User manual


01
A TARAMPS, localizada à Rua Abílio Daguano, 274 Res. Manoel Martins - Alfredo Marcondes - SP,
CEP 19.180-000, garante este produto contra defeitos de projeto, fabricação, montagem e/ou
solidariamente em decorrência de vícios de projeto que o torne impróprio ou inadequado ao uso a que se
destina, pelo prazo de 12 meses, a partir da data de aquisição.
Em caso de defeito no período de garantia, a responsabilidade da TARAMPS limita-se ao conserto ou
substituição do aparelho de sua fabricação.
•Produtos danificados por instalação incorreta, infiltração de água, violação por pessoas não autorizadas;
Esta garantia exclui:
• Lacre de garantia rasurado ou rasgado;
•Defeitos provocados por acessórios, modificações ou equipamentos acoplados ao produto;
•O produto apresentar danos decorrentes de quedas, impactos ou da ação de agentes da natureza
(inundações, raios, etc.);
•Custos de retirada e reinstalação do equipamento, bem como seu transporte até o posto de assistência
técnica;
•Casos onde o produto não seja utilizado em condições normais;
•Danos de qualquer natureza, consequentes de problemas no produto, bem como perdas causadas pela
interrupção do uso.
Termo de garantia
Assistência técnica
Contamos com redes de Assistência Técnica por todo o Brasil e estamos sempre prontos para atender
suas dúvidas e necessidades.
www.taramps.com.br/pt/rede-de-assistencias-tecnicas ou entre em contato com o Departamento de
assistência técnica de fábrica:
CEP: 19.180-000
Para localizar uma Assistência Técnica Taramps Electronics perto de você, basta acessar nosso site:
Taramps Electronics
Rua: Abílio Daguano, nº 274
E-mail: [email protected]
Fones: (18) 3266-4050 / 99749-3391
• Recomendações importantes
02 • Introdução
03 • Ligações na rede elétrica
04 • Conector de saída e alimentação
05 • LEDs Indicadores e sistema de proteção
•Apresentação
• Assistência técnica
01 • Termo de garantia
06 • Modo de operação
• Recargas de bateria e alimentação do amplificador
07 • Características técnicas
Índice

02
Recomendações importantes
Apresentação
1- Jamais utilize extensões com bitola inferior à recomendada. Certifique-se que a tomada e a
rede elétrica suportam a corrente necessária para alimentação da fonte (vide pág. 3 / 4).
5- Caso a fonte não seja utilizada por longos períodos, recomendamos desligar da tomada.
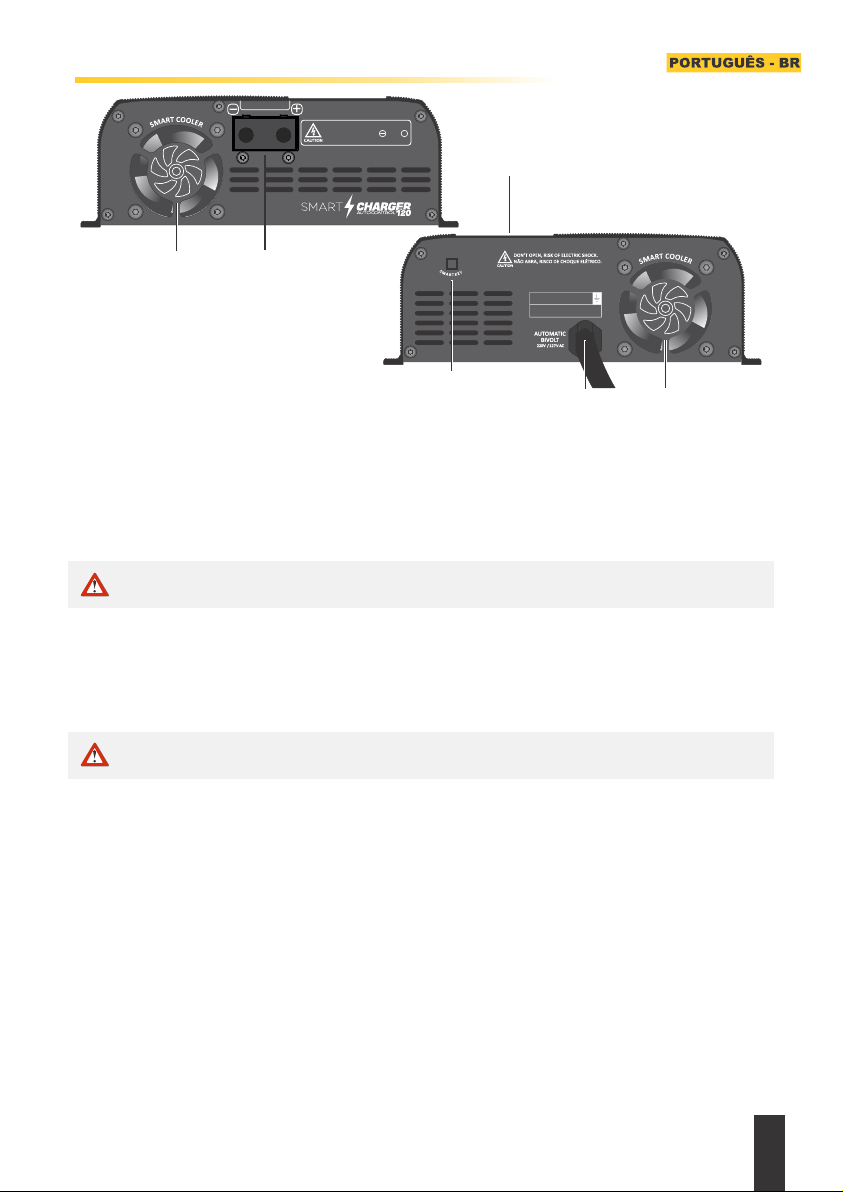
2- A Smart Charger 120A possui sistema “bivolt automático” - reconhece automaticamente a
voltagem da rede elétrica e se ajusta para a mesma. Para que a fonte tenha o rendimento
esperado, a voltagem da tomada deverá estar acima de 90V (rede de 127V) ou acima de 190V
(rede de 220V).
6- Não instalar a fonte em local com exposição direta de luz solar.
3- Instalar a fonte em local firme e arejado. Nunca instale a mesma em laterais de caixas de som,
devido à vibração.
4- A fonte não possui partes internas que possam receber manutenção pelo usuário. Não abra
a mesma, risco de choque elétrico.
- Ao ser utilizada somente como fonte (sem baterias) a tensão de saída da fonte é ajustada
automaticamente para 12,6V.
- Durante a recarga das baterias, se o sistema de som for acionado, a fonte identifica
automaticamente a necessidade de carga e ajusta sua saída para 14,4V. Caso não for
identificado mais variações na saída, a fonte retoma para o sistema de carga smart ou flutuação.
- Proteção contra curto circuito na saída. ATENÇÃO: NUNCA INVERTA A POLARIDADE.
A Fonte / Carregador SMART CHARGER apresenta alta tecnologia e recursos inteligentes e
eficientes para RECARGA de baterias e/ou ALIMENTAÇÃO de sistema de som automotivo. Com
destaque:
- Detecção automática das características da carga ligada em sua saída. Caso esteja com
baterias, a fonte analisa as características e condições das mesmas e faz a recarga buscando a
melhor performance. Se o nível de carga das baterias estiver crítico, a fonte ajusta
automaticamente a corrente de saída, fazendo carga smart das baterias.
- Ao completar a carga das baterias, a fonte oscila periodicamente entre as tensões 14,4V / 13,8V
/ 12,6V; fazendo os ciclos de flutuação e equalização das baterias. Esse processo diminui o
aquecimento interno das baterias, melhorando a eficiência de retenção de carga.
Introdução
Parabéns pela compra de um produto Taramps.
Desenvolvido em moderno laboratório, com a mais alta tecnologia e profissionais altamente
qualificados.
Caso haja dúvida mesmo depois da leitura deste manual, entre em contato com nosso suporte
técnico pelo número de telefone 18-3266-4050 ou pelo nosso site www.taramps.com.br.
Este manual explica todos os recursos, operações e orientações para solucionar dúvidas que
possam surgir em sua instalação. Reserve algum tempo para lê-lo atentamente e garantir uma
instalação adequada e o uso de todos os benefícios que este produto pode oferecer.
A Taramps reserva o direito de modificar o conteúdo deste manual sem aviso prévio e nem obrigatoriedade de
aplicar as modificações em unidades anteriormente produzidas.
Segurança
No decorrer da leitura deste manual, fique atento aos símbolos de segurança.
Este símbolo como "Cuidado" tem como objetivo alertar o usuário sobre
instruções importantes. O não cumprimento das instruções pode resultar em
riscos ao usuário ou danos ao produto.
CUIDADO

CUIDADO
É indispensável a instalação de um disjuntor próximo a fonte.
CABOS BATERIA:
Não utilize cabos com bitolas inferiores a recomendada:
Disjuntor: 120A
Cabo: 21mm²
03
Ligações na rede elétrica
IMPORTANTE: Qualquer ligação na fonte deverá ser feita com a mesma desligada.
TOMADA: A tomada deverá ser dimensionada de forma a suportar a corrente máxima
consumida pela fonte.
Caso a instalação elétrica não esteja adequada, a performance e rendimento da fonte serão
comprometidos.
Recomendamos que a instalação elétrica seja feita por um profissional qualificado.
O usuário deverá confirmar se a tomada/quadro de força estão adequados para a instalação do
produto de acordo com a tensão de uso.
Não utilize extensões com bitolas menores que a recomendada:
220V: _____2,5mm²
127V: _____4mm²
Comprimento máximo de 10 metros.
EXTENSÃO: (Opcional, não acompanha o produto).
CUIDADO
+
-
Este equipamento possui plugue que atende ao novo
padrão brasileiro de plugues e tomadas (NBR 14136)
conforme resolução Conmetro nº 11/2006.
- O Plugue que acompanha a fonte é de 20A.
- Não recomendamos usar com adaptadores em
tomadas de 10A.

Conector de saída e alimentação
04
1 - SMART COOLER: Um sistema inteligente que controla o funcionamento dos coolers e
ventilação variando sua velocidade de acordo com a temperatura e a corrente de saída. Este
sistema garante uma maior vida útil aos coolers e proporciona um ambiente mais silencioso
pois os coolers só entram em operação em caso de necessidade.
Obs. Caso a fonte seja desligada (porém mantida conectada à tomada) e sua temperatura
esteja elevada, o SMART COOLER poderá ficar acionado em baixa velocidade por até
20 minutos.
(Veja as bitolas recomendadas na página 03).
IMPORTANTE: Nunca inverter a polaridade. Fazer a ligação da(s) bateria(s) e sistema de som
com a fonte desligada.
3 - SMART KEY (ON/OFF): Esta tecla liga e desliga a fonte.
2 - OUT BATTERY: Para ligar os cabos positivo (+) e negativo (-) na bateria ou equipamentos
12 Volts.
Com a fonte desligada, um toque curto (1 segundo) liga a fonte.
Com a fonte ligada, um toque longo (2 segundos), desliga a fonte.
Obs. Caso a fonte seja desconectada da tomada estando ligada, ao conectar novamente na
tomada a fonte estará ligada.
Verifique as especificações recomendadas para a entrada de energia na página 3.
· Através desta tecla é possível configurar modo de operação com tensão fixa da fonte. Ver
modo de operação na pág. 06.
6 - SMART LED: Leds indicadores das funções da fonte.
5 - VOLTÍMETRO: Mostra a tensão de saída da fonte ou das baterias conectadas. Com a fonte
desligada o display fica ligado por até 10 segundos.
4 - ENTRADA DE ENERGIA: Cabo de alimentação com plugue de 20A.
A SMART CHARGER é bivolt automático (127V / 220V).
5 e 6 (Adesivo)
+
NUNCA INVERTA A POLARIDADE
DON’T REVERSE THE AND
OF THE BATTERY
OUT BATTERY +
1 2
/
O
F
N
F
O
Power Cable / Cabo de Alimentação
Internal wires / Cabos internos
Green & Yellow = Earth Wire
Verde e Amarelo = Terra
Brown / Blue
Marrom / Azul = Vac
314
CUIDADO Antes de efetuar qualquer ligação na (s) bateria (as), certifique de que as
polaridades estão corretas.
CUIDADO O cooler e as aberturas de ventilação são responsáveis pelo resfriamento da fonte
quando está em uso, por isto não poderá ser obstruído.

05
Exemplo função Smart Charger:
Preenchimento dos LEDs no inicio
Analise: Bateria descarregada / Carregando...
Preenchimento dos LEDs até a metade
Analise: Bateria parcialmente carregada / Carregando...
Preenchimento dos LEDs até o final. Após o preenchimento todos LEDs mantém aceso por
5 segundos.
Analise: Bateria carregada.
em stand by.
Fonte
Fonte
em funcionamento.
Os LEDs acendem conforme maior é a corrente de
saída da fonte.
A fonte identificou variação na saída ou está no
modo tensão fixa.
Os LEDs acendem de forma gradual, mostrando o
nível da carga, quanto maior a quantidade de LEDs
acendendo, maior é o nível da carga da bateria.
*Veja exemplo abaixo.
Detectado bateria em nível muito crítico (<6V)
conectada na saída da fonte.
Detectado bateria em nível muito alto (>16V)
conectada na saída da fonte.
LEDs indicadores e sistema de proteção
Condições
Smart LEDs
LEDs aceso em
baixa intensidade
2 LEDs aceso
Função Amperímetro
LEDs piscando 3x
LEDs piscando 2x
LEDs piscando 6x por segundo
continuamente
LEDs piscando, 1 segundo aceso e
1 segundo apagado
3 LEDs piscando
3x
2x
6x Detectado curto na saída da fonte.
Automaticamente a fonte volta a verificar a saída a
cada 5 segundos.
Atuação da proteção contra alta temperatura. A
fonte desliga a saída e aguarda a temperatura
interna abaixar.
Falta de conexão com a bateria ou bateria muito
ruim. A fonte fica aguardando uma nova conexão.
Ex: Ao tirar o cabo de um dos pólos ou desligar o
disjuntor da bateria.
Função Smart Charger

06
Recargas de baterias e alimentação do amplificador
Modo de operação
(**) Ver disjuntor recomendado pelo fabricante no manual do amplificador.
(*) Utilizar disjuntor conforme indicado no manual de cada fonte.
(***) Usar alimentação individual conforme as especificações de cada fonte (Ver recomendações pág. 03).
O Sistema de carga inteligente analisa e monitora o estado das baterias e a potencia/consumo dos
amplificadores.
Nesse caso, além de recarregar as baterias, a fonte Smart Charger 120A atua como auxiliar das
baterias na alimentação dos amplificadores.
A fonte poderá ser utilizada para recarga de variados tipos de capacidades de baterias 12V. Para a
versão SMART CHARGER 120A, o melhor desempenho é obtido para recarga de baterias (ou banco
de baterias) entre 60Ah e 1800Ah de capacidade nominal.
As funções SMART da fonte buscam otimizar a recarga das baterias aplicando
carga lenta quando necessário e alternando entre os modos de carga, flutuação e
equalização das baterias automaticamente. Além disso a fonte monitora
constantemente sua saída e identifica quando um amplificador esta consumindo
uma carga alta necessitando assim da potencia máxima da fonte ‘’Modo Fonte’’.
- Baixa carga → Ciclos: I constante → V constante → Flut./EQ.
BATERIA:
- Boa carga → Ciclos: V constante → Flut./EQ.
- Poderá ir para carga ciclo de corrente ( I ) constante.
MODO SMART: A fonte faz automaticamente todo gerenciamento das configurações de
tensão e corrente da saída.
LIGAR A FONTE: As principais analises ocorrem nesta etapa;
- Poderá ir para carga ciclo de tensão ( V ) constante.
MODO TENSÃO FIXA: É possível fixar a tensão de saída da fonte e desabilitar as funções
SMART. Para isso, com a fonte desligada, pressione a tecla SMART KEY por 5 segundos. O Smart
LEDs mostram a configuração. Após isso cada vez que pressionar (1S) a SMART KEY, o modo é
alterado obedecendo essa sequência: SMART > 12,6V > 13,8V > 14,4V... Para salvar a
configuração, mantenha pressionada a tecla SMART KEY por 2 segundos.
Auto analise da (s) bateria (as). Sem bateria a tensão de saída permanecerá fixa em 12,6V.
ANALISE DAS CONDIÇÕES DA BATERIA:
AMPLIFIER

Características técnicas
Dimensões (LxAxP):
Peso:
Potência Máxima de Saída:
Consumo Máx. em Rede 220V:
Eficiência Média:
Alimentação:
Faixa de Tensões em Rede 127V:
Faixa de Tensões em Rede 220V:
Corrente Nominal Máx. de Saída(*):
Potência Máx. de entrada:
Consumo em Stand by (desligada, porém conectada
a tomada:
Consumo Máx. em Rede 127V:
Flutuação Máxima em plena carga (120A @14.2V):
Fusível de Entrada (interno):
Tensões de Saída:
07
Bivolt Automatic (127 / 220VAC)
90 140V AC
190 250V AC
120A (±5%)
1700W
88%
22A
2900VA(***) ou
1900W (FP: ~0,65 capacitivo)
3W
20A
12,0V ~ 14,5V (**)
3,28Kg
<2%
231x81x299mm
13A
—Proteção de curto: Desliga momentaneamente a saída caso um curto seja detectado.
Observações:
(*)Corrente nominal de saída, medida com carga resistiva, voltagem de saída da fonte = 12,6V e voltagem
da rede elétrica = 127V / 220V.
(***) Para uso com geradores, considerar a potência em VA.
—Proteção térmica: Reduz a potência de saída caso a temperatura interna se eleve, voltando
automaticamente a potência máxima com a redução da temperatura.
(**) Tensão variável dependendo do modo de operação, podendo ter valores menor que 12,0V quando
estiver em carga lenta ou proteção térmica.

08
Índex
TARAMPS, located at Rua Abílio Daguano, 274 Res. Manoel Martins - Alfredo Marcondes - SP,
ZIP 19.180-000, warrants this product against design, manufacturing, assembly and/or joint
and several defects due to design flaws that make it unsuitable or inappropriate for its intended
use, for a period of 12 months from the date of purchase.In the event of a defect within the
warranty period, TARAMPS' liability is limited to repairing or replacing the device
manufactured by It.
•Products that were damaged by incorrect installation, water infiltration, tampering by
unauthorized individuals.
• Defects caused by accessories, modifications or equipment attached to the product;
•The product presents damage resulting from drops, impacts or the action of agents of nature
(floods, lightning, etc.);
•Damages of any kind, resulting from problems with the product, as well as losses caused by
discontinuation of use.
•Cases in which the product is not used under regular conditions;
•Costs of removal and reinstallation of the equipment, as well as its transport to the technical
assistance location;
• Scratched or torn warranty seal;
This warranty does not include:
Technical assistance
For international support, check on our website:
www.taramps.com.br/en/rede-de-assistencias-tecnicas or contact direct the factory support:
Phones: +55 18 3266-4050 / +55 18 99749-3391
E-mail: ser[email protected]om.br
Warranty term
ENGLISH
09 • Introduction
• Important recommendations
•Presentation
08 • Warranty term
• Technical support
10 • Electrical network connections
11 • Output & power connector
12 • Led indicators & protection system
13 • Operation mode
• Battery recharges & amplifier powering
14 • Technical features

09
Important recommendations
Presentation
2- The Smart Charger 120A has an “automatic bivolt” system - it automatically recognizes the
voltage of the electrical network and adjusts itself to it. For the power supply to have the
expected performance, the outlet voltage must be above 90V (127V network) or above 190V
(220V network).
5- If the power supply is not going to be used for a long period, we recommend unplugging it
from the power outlet.
1- Never use extensions with a gauge smaller than the recommended. Make sure that the
socket and the electrical network can handle the necessary current to power the power supply
(see page 10 / 11).
3- Install the power supply in a firm and well-ventilated place. Never install it on the sides of
speakers boxes, due to vibration.
6- Do not install the power supply in a place with direct exposure to sunlight.
4- The power supply has no user-serviceable internal parts. Do not open it, risk of electric shock.
The SMART CHARGER Power Supply / Charger features high technology and smart and efficient
features for RECHARGING batteries and/or POWERING a car sound system. Highlighting:
- When used only as a power supply (without batteries) the power supply output voltage is
automatically adjusted to 12.6V..
- During battery recharge, if the audio system is turned on, the power supply automatically
identifies the need for charging and adjusts its output to 14.4V. If no more output variations are
identified, the source returns to the smart charging system or float.
- Automatic detection of the load characteristics connected to its output. In case it has
batteries, the device analyzes their characteristics and conditions and recharges them seeking
the best performance. If the battery charge level is critical, the power supply automatically
adjusts the output current, smartly charging the batteries.
- Output short circuit protection. WARNING: NEVER REVERSE POLARITY.
- When charging the batteries, the power supply periodically oscillates between voltages 14.4V
/ 13.8V / 12.6V; doing the battery float and equalize cycles. This process decreases the internal
heat of the batteries, improving charge retention efficiency.
Introdution
Congratulations on your purchase of a Taramps product. Designed in a modern laboratory,
with the highest technology and highly qualified professionals.This manual explains all
features, operations, and guidelines to answer questions that may arise during your
installation. Please take the time to read it carefully to ensure proper installation and use of all
the benefits this product can offer.If there is any question after reading this manual, contact
our technical support at the phone number +55(18)-3266-4050 or through our website
www.taramps.com.br.www.taramps.com.br.
Taramps reserves the right to change the content of this manual without prior notice or obligation to apply the
modifications to previously produced units.
Safety warnings
As you read this manual, pay attention to the safety warning symbols.
The "Caution" symbol is intended to alert the user to important instructions.
Failure to follow instructions could result in risk to the user or damage to the
product.
CAUTION
ENGLISH

OUTLET:The socket must be sized to withstand the maximum current drawn by the power
supply.
The user must check if the outlet/ power board is suitable for installing the product according
to the usage voltage.
If the electrical installation is not adequate, the performance and efficiency of the power supply
will be compromised.
We recommend that the electrical installation be carried out by a qualified professional.
ENGLISH
10
CAUTION
Cable: 21mm² (4AWG)
Circuit Breaker: 120A
BATTERY CABLES:
It is indispensable to install a circuit breaker near the power supply.
Do not use cables with gauges smaller than recommended:
Electrical network connections
IMPORTANT: Any connection to the power supply must be made with the
equipment off.
220V: _____2,5mm² (14 AWG)
Do not use extension cords with gauges smaller than the recommended:
EXTENSION CORD: (Optional, not included with the product).
127V: _____4mm² (12 AWG)
Maximum length of 10 meters.
CAUTION
+
-
This equipment has a plug that meets the new
Brazilian standard for plugs and sockets (NBR 14136)
as per Conmetro resolution nº 11/2006.
- We do not recommend using it with adapters on 10A
outlets.
- The plug that comes with the power supply is 20A.
Circuit Breaker

ENGLISH
11
Output & power connector
IMPORTANT: Never reverse polarity. Connect the battery(ies) and audio system with the power
supply off.
3 - SMART KEY (ON/OFF): This button turns the power supply on and off.With the power
supply turned off, a quick press (1 second) turns the power supply on.
1 - SMART COOLER: An intelligent system that controls the operation of coolers and
ventilation, varying their speed according to temperature and output current. This system
ensures a longer lifespan for the coolers and provides a quieter ambient as the coolers only
come into operation only if necessary.
Note. If the power supply is disconnected from the outlet while being turned on, when
reconnecting it to the outlet, the power supply will be turned on.· Through this key it is possible
to set the operation mode with fixed voltage of the power supply.
See operating mode on page 13.
4 - POWER INPUT: Power cable with 20A plug.
CAUTION
The SMART CHARGER is automatic bivolt (127V / 220V).
2 - OUT BATTERY: To connect the positive (+) and negative (-) cables to the battery or 12 Volt
equipment.
With the power supply on, a long press (2 seconds) turns the power supply off.
Note. If the power supply is turned off (but kept connected to the outlet) and its temperature is
high, the SMART COOLER can be activated at low speed for up to 20 minutes.
Check the recommended power input specifications on page 10.
(See recommended gauges on page 10).
6 - SMART LED: Power supply functions indicator LEDs.
CAUTION
5 -VOLTMETER: Displays the output voltage of the power supply or connected batteries. With
the power supply turned off, the display stays on for up to 10 seconds.
5 e 6 (Sticker)
+
NUNCA INVERTA A POLARIDADE
DON’T REVERSE THE AND
OF THE BATTERY
OUT BATTERY +
1 2
/
O
F
N
F
O
Power Cable / Cabo de Alimentação
Internal wires / Cabos internos
Green & Yellow = Earth Wire
Verde e Amarelo = Terra
Brown / Blue
Marrom / Azul = Vac
314
CAUTION Before making any connections to the battery(ies), make sure you have the
correct polarities.
CAUTION The fans and ventilation openings are responsible for cooling the power supply
when it is in use, so it cannot be obstructed.

ENGLISH
12
Smart Charger Function Example:
LEDs on at start
Analysis: Battery discharged / Charging...
LEDs on halfway
Analysis: Battery partially charged / Charging...
LEDS all the way on: All LEDs will be on for 5 seconds.
Analysis: Battery charged.
stand by mode.
Power supply on
Power supply
in operation.
The LEDs light up as the power supply output
current increases.
The power supply has detected output variation or
is in fixed voltage mode.
The LEDs light up gradually, showing the charge
level, the more LEDs light up, the higher the
battery charge level. *See example below.
Very critical battery level detected (<6V)
connected to the power supply output.
Battery at very high level detected (>16V)
connected to the power supply output .
LED indicators & protection system
Condições
Smart LEDs
LEDs on
low intensity
2 LEDs on
Ammeter function
LEDs flashing 3x
LEDs Flashing 2x
LEDs flashing 6x per second
and continuously
LEDs flashing, 1 second on and
1 second off
3 LEDs flashing
3x
2x
6x Short circuit detected at the power supply output.
The power supply automatically rechecks the
output every 5 seconds.
High temperature protection actuation. The power
supply shuts off the output and waits for the
internal temperature to decrease.
No battery connection or very poor quality battery.
The power supply is waiting for a new connection.
E.g: When removing the cable from one of the poles
or turning off the battery circuit breaker.
Smart Charger Function

Battery recharges and amplifier powering
Operation mode:
(***) Use individual power according to the specifications of each power supply (See recommendations
on page 10)
(**) See manufacturer-recommended circuit breaker in the amplifier manual.
(*) Use circuit breaker as indicated in the manual for each power supply.
In this case, in addition to recharging the batteries, the Smart Charger 120A power supply acts as an
auxiliary to the batteries in powering the amplifiers.
The Intelligent Charging System analyzes and monitors battery status and amplifier
power/consumption.
The power supply can be used to recharge various types of 12V battery capacities. For the SMART
CHARGER 120A version, the best performance is obtained for recharging batteries (or battery bank)
between 60Ah and 1800Ah nominal capacity.
The power supply's SMART functions aim to optimize battery recharging by
applying slow charging when needed and automatically switching between
charge, float, and battery equalization modes. In addition, the power supply
constantly monitors its output and identifies when an amplifier is consuming a
high load, thus requiring the maximum power of the power supply ‘’ power supply
Mode``
SMART MODE: The power supply manages all the output voltage and current settings
automatically.
TURN THE POWER SUPPLY ON: The main analysis take place at this stage;
ANALYSIS OF BATTERY CONDITIONS:
- constant voltage ( V )cycle load.
FIXED VOLTAGE MODE: It is possible to fix the power supply output voltage and disable the
SMART functions. To do this, with the power supply turned off, press the SMART KEY key for 5
seconds. Smart LEDs will display the configuration. After that, every time you press (1S) the
SMART KEY, the mode is changed following this sequence: SMART > 12.6V > 13.8V > 14.4V... To
save the configuration, press and hold the SMART KEY key for 2 seconds
Self analysis of the battery(s). Without battery ,the output voltage will remain fixed at 12.6V.
- constant current ( I ) cycle load.
- Low Charge → Cycles: I constant → V constant → Flut./EQ.
- Good Charge→ Cycles: V constant → Flut./EQ.
BATTERY:
AMPLIFIER
ENGLISH
13

Technical features ENGLISH
09
Voltage Supply:
Rated Max. Output Current(*):
Max. Input Power:
Max. Consumption in 220V Network:
Average Efficiency:
127V Network Voltage Range:
Maximum Output Power:
220V Network Voltage Range:
Max. Consumption on 127V Network:
Consumption in Stand by (off, but connected to
the outlet:
Output Voltages:
Input Fuse (internal):
Dimensions(WxHxD):
Weight:
Maximum Float at full load (120A @14.2V):
14
13A
2900VA(***) or
1900W (FP: ~0.65 capacitive)
3W
120A (±5%)
90 140V AC
1700W
88%
22A
20A
190 250V AC
12,0V ~ 14.5V (**)
Bivolt Automatic (127 / 220VAC)
<2%
231x81x299mm
3.28Kg
Comments:(
—Short circuit protection: Momentarily turns the output off if a short is detected.
*)Rated output current, measured with resistive load, source output voltage = 12.6V and mains voltage =
127V / 220V.
(***)Use with generators, consider the power in VA.
—Thermal protection Reduces the output power if the internal temperature rises, automatically returning
to maximum power as the temperature decreases.
(**) Variable voltage depending on the operating mode, which may be less than 12.0V when under low
load or thermal protection.

MN_013491_R00
Fabricado por / Manufactured by:
TARAMPS ELECTRONICS LTDA
CNPJ / TAX ID: 11.273.485/0001-03
R. João Silvério, 121 • Res. Manoel Martins
Alfredo Marcondes - SP
Indústria Brasileira - Made in Brazil
By:
Table of contents
Languages:
Other Taramp's Batteries Charger manuals
Popular Batteries Charger manuals by other brands

Ravpower
Ravpower Prime RP-PC063 user guide

Duratrax
Duratrax Onyx 245 instruction manual

StarTech.com
StarTech.com USB2PACWH quick start guide

Hamlet
Hamlet XPWNB100PDU user manual

Motorola solutions
Motorola solutions PMPN4095 Series quick start guide

Regal Electro
Regal Electro Valen BC VCC2406 Operation manual