Target CEFG60DAB User manual

ELECTRIC BLANKET
INSTRUCTIONS
FITTED FLEECY
Adjustable Timer 3, 6, 9 & 12 Hour
Note: The specifications and/or components of this product are subject to change without prior notice
Model Number
CEFG60DAB -
Queen Size

Page 2 of 14
Rev 5
1IMPORTANT SAFEGUARDS ................................................................ 3
2Connecting the Controller.................................................................... 5
3Securing Your Electric Blanket ........................................................... 5
4Using The Controller ............................................................................ 7
4.1 Buttons .......................................................................................................... 7
5Using The Controller ............................................................................ 8
5.1 Indicator Lights (LED’s)................................................................................ 8
5.1.1 Heat Settings – Upper Four LED Indicators .............................................. 8
5.1.2 Timer Settings – Lower Four LED Indicators............................................ 8
5.2 Heat Setting ................................................................................................... 8
5.3 Pre Heat ......................................................................................................... 8
5.4 Auto Off Timer............................................................................................... 9
6Overheat Protection............................................................................10
7Recommended Cleaning Instructions ..............................................10
7.1 Treatment For Localised Soiling ............................................................... 10
7.2 Hand Washing (Recommended)................................................................ 11
7.3 Machine Washing........................................................................................ 11
7.4 Drying........................................................................................................... 12
8Servicing Your Blanket and Controller/s.......................................... 12
9Electrical Schematic Diagram ...........................................................13
10 Troubleshooting..................................................................................13
10.1 Troubleshooting Table ............................................................................... 14

Page 3 of 14
Rev 5
Thank you for purchasing our Electric Blanket. Each unit is manufactured to
ensure safety and reliability. Before using for the first time, please read the
instruction manual carefully and keep it for future reference.
1 IMPORTANT SAFEGUARDS
•Before connecting and switching on the blanket, ensure that the voltage indicated on the rating
label corresponds to the mains voltage in your home.
•Read the instructions carefully, in conjunction with the illustrations, before fitting the blanket and
using for the first time.
•If the cord of this blanket is damaged, unplug and discontinue use of the product immediately
then contact the manufacturer.
•Check daily that your blanket is flat, fully spread out and secured before switching it on.
Failure to observe these instructions will result in overheating. This will activate the
overheat safeguard system, thus leaving the blanket inoperative.
Misuse of this blanket will invalidate your warranty.
•Use as an under-blanket only.
•These blankets are not recommended for futons.
•When storing the blanket, allow it to cool down before folding. Fold or roll neatly but not tightly
without sharp bends in the heating elements and store where no other heavy objects will be
placed upon it.
•The blanket should not be used on an adjustable bed. However, if the blanket is used on an
adjustable bed, check that the blanket and cord do not become trapped or rucked, for example, in
hinges.
•The blanket is not to be used by young children unless the controls have been pre-set by a parent
or guardian, or unless the child has been adequately instructed on how to operate the controls
safely.
•This appliance is not intended for use by persons (including children) with reduced physical,
sensory or mental capabilities, or lack of experience and knowledge, unless they have been given
supervision or instruction concerning use of the appliance by a person responsible for their
safety.
•Make sure that the heating area (on any side of the bed) does not fall over the edge of the
mattress, that the attachments are adequate and suited to the mattress, and that the instructions
are read before using the blanket.
•This blanket is not intended for use by young children or infirm persons without adequate
supervision.
•Electric blankets are intended for human use only. Not for animals and pets
•Prolonged application at the highest heat setting can result in skin burns.

Page 4 of 14
Rev 5
•Do not tuck the edges of the blanket in.
•Do not use the blanket rucked or folded.
•Keep the control away from an open window.
•Do not use pins as these may damage the electric wiring.
•Be sure that this blanket is used only on an alternating current supply circuit of the correct
voltage.
•The flexible supply cord and switch must, as far as practicable, be kept outside of the bed covers.
Do Not Cover the Controller.
•Do not switch the power on if the blanket is wet or in a folded state.
•Switch off the power outlet and remove the plug from the mains when the blanket is not in use.
•Bed clothes should not be folded back when the blanket is switched on. Do not leave heavy
objects on the bed, e.g. folded blankets, suitcases etc. when the unit is switched on as this will
trigger the over temperature device and render the blanket PERMANENTLY inoperable. This may
also invalidate the warranty.
•Arrange the blanket so that the elements are not under the pillows and/or bolsters.
•Do not dry-clean this blanket. Cleaning liquid may have a damaging effect on the insulation
covering of the heating unit. Follow washing directions located on the blankets rating label. (Foot
end of the blanket) and in this Instruction Manual.
•Persons suffering from bed-wetting should not use this blanket.
•If any abnormality or defect in operation is observed, discontinue its use immediately and consult
the distributor regarding its examination and/or repair.
•The blanket should be examined frequently for signs of wear, either of the blanket, controller or
flexible cord. If wear is visible or if any abnormality or defect in operation in the blanket is
observed, discontinue use immediately and consult a qualified and registered person for service.
•The blanket must not be used over or under a water bed.
•Depending on the controller type, you may notice a blue flash in the switch when moving from
one setting to another. This is NOT dangerous and is caused by the copper parts making contact.
•It is recommended that your electric blanket is inspected by a qualified and registered person
after 3 years of use.
•This blanket is intended for domestic use only. It is not intended for use in hospitals or the like.
•Switch off from the power outlet and remove plug when the blanket is not in use.
•Only use the controller/s supplied with this blanket.

Page 5 of 14
Rev 5
2 Connecting the Controller
Turn Off Power and Remove the Plug from the Wall Socket
*The controller socket/s are located on the underneath of the blanket*
•To fit the controller plug, simply hold the socket with one hand and push the
controller plug all the way until the locking tab locates over the lug on top of the
controller plug.
•To remove the controller, lift the locking tab up with your finger and pull the
controller plug directly out. Do Not Pull the controller cable and Do Not try and
pull the controller plug out without lifting the locking tab as you will damage the
socket.
•Feed the power plug and controller out through the slit in the side skirt at the
head end.
•Do Not fold, roll or kink the cable. Allow the cable to hang freely.
•Ensure the cable is not pulled so tight that it bends hard at the blanket connector
end.
NOTE: Ensure that the electric blanket is sized to suit your mattress i.e. queen
sized electric blanket must be used on a queen sized mattress. Do not use a
single bed blanket on a double, queen or king size mattress. The blanket top
must not hang over the edges of the mattress.
3 Securing Your Electric Blanket
Note: Your electric blanket should be placed directly onto the mattress.
If using a mattress protector, this goes over the electric blanket.

Page 6 of 14
Rev 5
FAILURE TO FOLLOW THESE FITTING INSTRUCTIONS MAY TRIGGER THE
OVERHEAT PROTECTION SYSTEM AND RENDER THE BLANKET
PERMANENTLY INOPERATIVE. THIS MAY INVALIDATE THE WARRANTY.
IMPORTANT:
•With the controller/s hanging on the outside of the skirt, place the blanket onto
the mattress with the controller connection/s at the HEAD END of the bed.
NOTE: Electric blankets MUST NOT be used on top of the user (as with a
normal blanket), instead they must be firmly secured to the mattress.
•Fit the side skirts around the edges of the mattress then use the elastic skirt to
ensure that the blankets fits snugly around the sides and underneath the
mattress.
•Spread the skirt around the mattress edge ensuring even tension and making
sure the blanket is placed evenly over the mattress then ensure that the blanket
is flat and crease free.
Note: Care should also be taken if you are using a continental quilt because heat
will build up more quickly than with other bed coverings. A short period may only
be needed to reach maximum temperature depending on the insulation density of
your quilt. This also applies if using additional bed blankets.
•The blanket top should not be tucked in at the sides.
•Make your bed in the usual manner.
•When you are satisfied that the blanket is fitted correctly, plug the controller/s into
the wall power socket and turn on.
IMPORTANT: DO NOT COVER THE CONTROLLERS AT ANY TIME
Head
Foot

Page 7 of 14
Rev 5
4 Using The Controller
•Use your Electric Blanket with Detachable Controller Model GW420/1 Only.
•Do not use any other controller for this blanket.
•The two push buttons on the controller are backlit for easy viewing at night.
•The buttons will be illuminated when pressed and the lights will time out after
approximately 5 to 10 seconds.
NOTE: Ensure the On / Off Switch located on the back of the controller is in
the ON position.
4.1 Buttons
Top button operates the heat settings.
Lower button operates the “Time to Off” setting.
Temperature
Select Button
Timer Adjust
Button
Power ON / OFF
Switch
Heat Level
Indicators
Timer
Indicator

Page 8 of 14
Rev 5
5 Using The Controller
5.1 Indicator Lights (LED’s)
Note: Top button operates the Heat Settings.
Lower button operates the “Time to Off” setting.
5.1.1 Heat Settings – Upper Four LED Indicators
•(0) Blue: Power Available (Not Heating)
•(1) Green: All Night (Low)
•(2) Orange: All Night (Medium)
•(3) Red: Pre Heat (High)
5.1.2 Timer Settings – Lower Four LED Indicators
•(3) One Green Light: Three Hours to Auto Off
•(6) Two Green Lights: Six Hours to Auto Off
•(9) Three Green Lights: Nine Hours to Auto Off
•(12) Four Green Lights: Twelve Hours to Auto Off (Default Setting)
Note: When the controller has timed out, the blanket will revert to the “0” heat
setting.
Turn off and unplug the blanket when not in use for prolonged periods.
5.2 Heat Setting
•Ensure the On / Off Switch located on the back of the controller is in the ON
position, then press the Heat button once.
The Heat Setting “1” and “12 Hour to Auto Off” will be selected by default.
•Press the Heat button again and Heat Setting “2” will be selected.
•Press again and the Pre Heat Setting “3” will be selected.
•Press once more and the controller will reset to Heat Setting “0” and the timer
lights will extinguish.
5.3 Pre Heat
The controller has a pre-heat facility in order for you to warm your bed prior to
getting into it.
The time taken to pre-heat the bed will depend on the ambient temperature of the
bedroom and whether an electric blanket has been used to air the bed on a regular
basis.

Page 9 of 14
Rev 5
At normal ambient temperature you should allow approximately 60 - 90 minutes on
the level “3” (Pre Heat) setting indicated by the Red Light.
You may get into bed sooner while the bed is still warming up, but please DO NOT
leave the blanket set on the Preheat setting (No. 3) while you are in the bed.
A cold room or bed that has not been used for some time may require a greater
length of time on the pre-heat.
Note: For safety reasons, the switch will automatically turn down from the Preheat
setting (No. 3) to the highest All Night setting (No. 2) after approximately 3 hours.
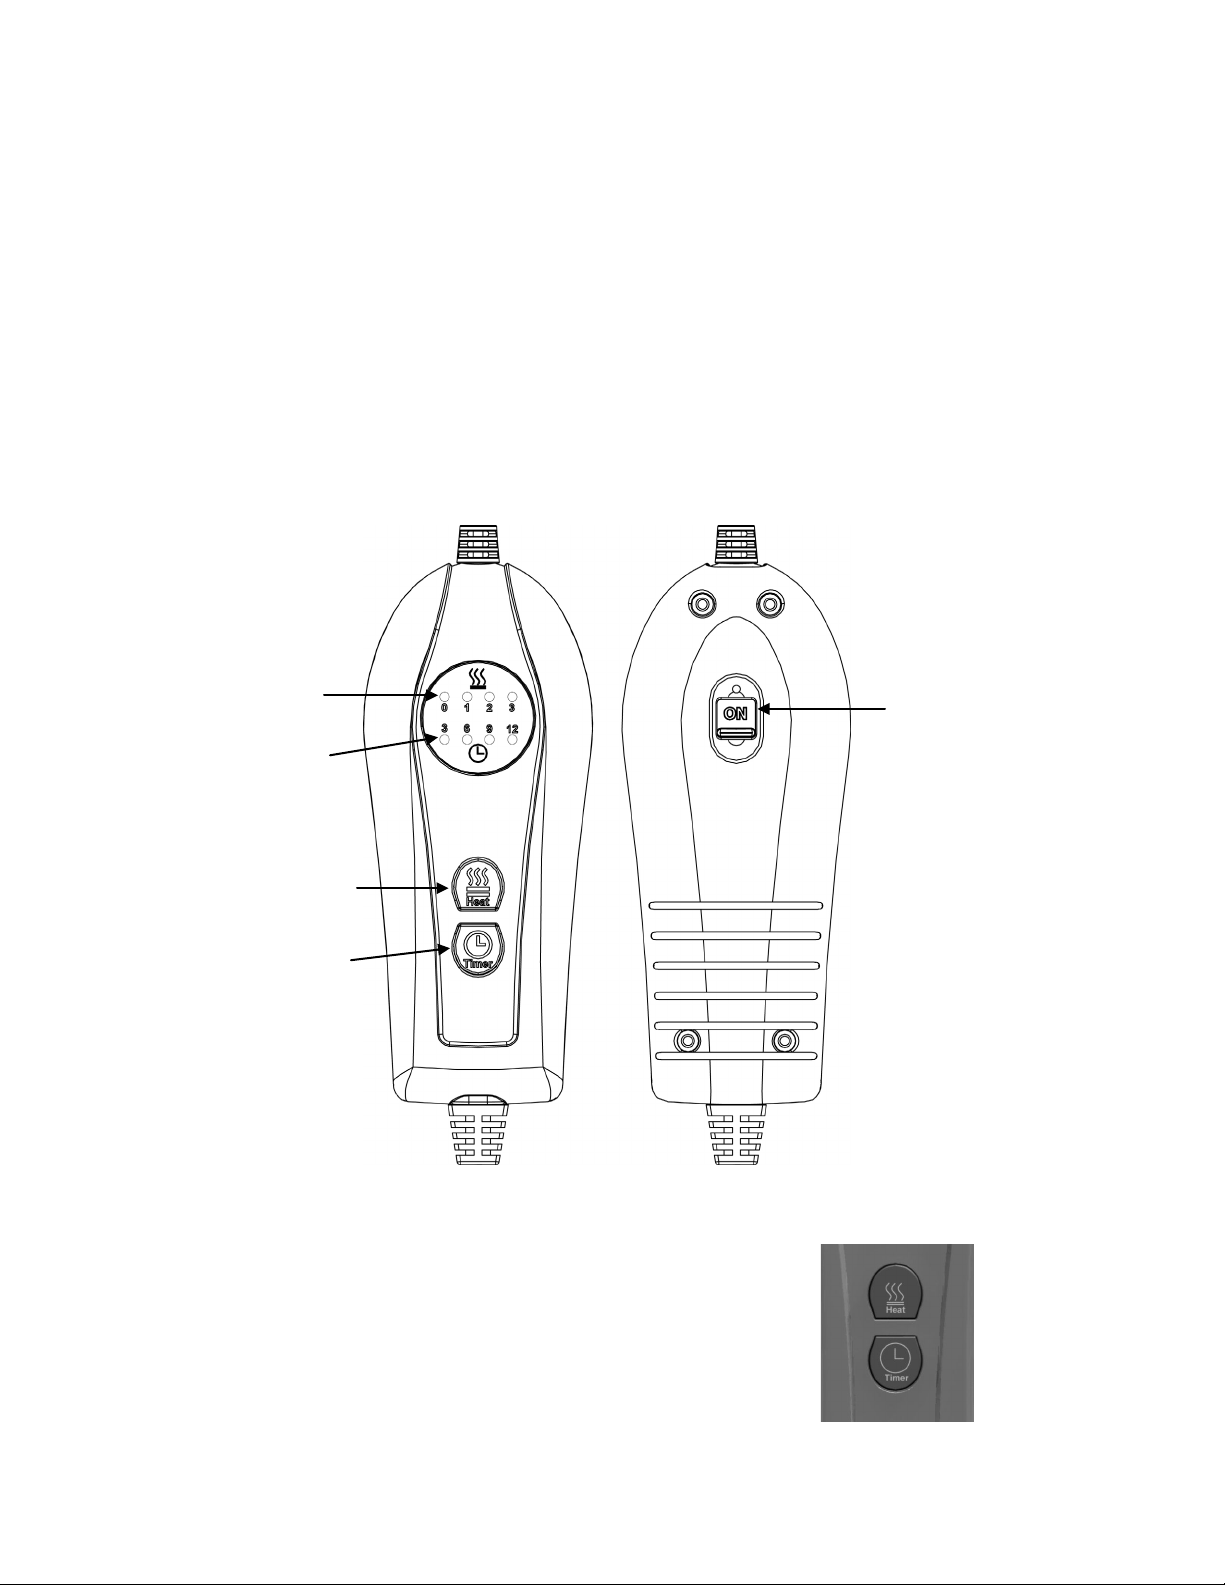
5.4 Auto Off Timer
•The controller is fitted with an adjustable “Auto Off Timer” function in steps of 3
hours, 6 hours, 9 hours and 12 hours. This will turn power off to the heating
elements after the selected time has expired.
•To set the required off period from when the controllers’ Heat Setting has been
set, press the Timer Button once.
The timer will change from the default 12 hour down to 3 hour.
Press again and the timer will change up to 6 hour.
Press again and the timer will change up to 9 hour
Press again and the timer will change up to 12 hour, and so on.
•Therefore: If you select 3, the controller will turn power off to the elements
approximately 3 hours later, which is indicated by the Timer Indicator LED’s
extinguishing and the Blue light (Heat Setting “0”) illuminating showing the
elements have turned off and the controller is now in Standby Mode.
•If you select 6, the controller will turn power off to the elements approximately
6 hours later, which is indicated by the Timer Indicator LED’s extinguishing
and the Blue light (Heat Setting “0”) illuminating showing the elements have
turned off and the controller is now in Standby Mode.
•If you select 9, the controller will turn power off to the elements approximately
9 hours later, which is indicated by the Timer Indicator LED’s extinguishing
and the Blue light (Heat Setting “0”) illuminating showing the elements have
turned off and the controller is now in Standby Mode.
•If you select 12, the controller will turn power off to the elements approximately
12 hours later, which is indicated by the Timer Indicator LED’s extinguishing
and the Blue light (Heat Setting “0”) illuminating showing the elements have
turned off and the controller is now in Standby Mode.

Page 10 of 14
Rev 5
•Should you want to reset the timer during the heating period, press the Heat
Button until the lights cycle around to Heat Setting “0” “Blue light”, wait at
least 5 seconds, then select your desired Heat Setting and “Time to Off”
setting again.
This will reset the timer and will start to count down again from the Hour
selected.
Note: If you do not wait for at least 5 seconds on Heat Setting “0”, the timer
will not reset.
You will know if the timer has reset as when you press the Heat button,
after waiting for at least 5 seconds, all four Lower Timer lights will illuminate
indicating 12 Hours to Off.
6 Overheat Protection
•The blanket is fitted with an overheat safeguard system.
•This offers protection against overheating or damage to the elements by
disengaging the power to the elements before overheating hazards occur.
•Should there ever be a problem with the heating element in the blanket, it will
automatically close down the operation and the blanket will turn off.
•The switch must not be covered. The switch has built in protection, so that if the
switch overheats, it will automatically close down the operation.
•Should this occur, the blanket will turn off.
Please refer to the Troubleshooting Guide in the back of this manual
before calling the service department or before returning the blanket.
7 Recommended Cleaning Instructions
Ensure all controllers are unplugged from the power point and from
the electric blanket before cleaning
7.1 Treatment For Localised Soiling
Never Use Hot Water as the blanket may shrink and will void your warranty.
•The area affected should be sponged gently using a natural wool detergent or
mild soap flakes dissolved in lukewarm water (30°C Max), followed by two
consecutive spongings using clean, soap-free lukewarm water.

Page 11 of 14
Rev 5
•Lightly compress the treated area between two towels to absorb excess water
and then spread the blanket out flat to dry in a shady area.
Do Not Wring or Spin Dry the blanket.
•The connections to the blanket must be kept free of moisture.
7.2 Hand Washing (Recommended)
Never Use Hot Water as the blanket may shrink and will void your warranty.
•Place the Blanket in lukewarm (30°C Max) water (bathtub or large laundry tub is
ideal) mixed with either a natural wool detergent or with mild soap flakes.
•Soak your blanket for approximately five minutes, and then gently squeeze the
soapy water through the blanket.
•Rinse your blanket thoroughly with clean lukewarm water until no more suds are
visible and allow water to drain off the blanket.
Do Not Wring or Spin Dry the blanket.
7.3 Machine Washing
•Remove the controller/s and place your Blanket in the washing machine with
either a natural wool detergent or with mild soap flakes.
•Set your machine to the Delicate Wool or Gentle cycle (without Spin Dry) and
set the water temperature to warm (30°C Max). Do Not Wash With HOT Water.
•When the cycle has finished, allow water to drain off the blanket
Do Not Wring the blanket. Do Not Spin Dry

Page 12 of 14
Rev 5
7.4 Drying
•Spread the blanket out on a clean surface (e.g. a large table) to dry in a shady
area.
•Your blanket can also be dried on a clothes line provided the blanket is not
creased or folded and as long as pegs are not used on the element areas of the
blanket.
Note: The blanket must be thoroughly dried (including controller sockets) before
being re-fitted to your bed.
With normal use it is recommended that you hand wash your blanket once a
year.
8 Servicing Your Blanket and Controller/s
NOTE: There are no user serviceable parts in this blanket.
•The blanket should be examined frequently for signs of wear, either of the
blanket, controller or flexible cord. If wear is visible or if any abnormality or defect
in operation in the blanket is observed, discontinue use immediately and consult
a qualified and registered person for service.
•It is recommended that your electric blanket is inspected by a qualified and
registered person after 3 years of use.
•If the blanket is not operating correctly, please check the Troubleshooting Guide
in the back of this manual before contacting our service department.

Page 13 of 14
Rev 5
9 Electrical Schematic Diagram
10 Troubleshooting
If none of the remedies in the following table fix the problem, you can remove the
controller from the other side of the bed (excluding all single size blankets) and
test it to determine if it is the original controller or the blanket which is at fault.
If you deem the controller to be faulty, Please call the service department for a
replacement controller.
•If the new controller fails to resolve the problem and you need to return the
blanket to the retailer, we please ask that:
oThe unit is packed carefully back into its original packaging.
oOriginal proof of purchase is attached.
oA brief note attached to the blanket explaining the reason why it is being
returned.

Page 14 of 14
Rev 5
10.1 Troubleshooting Table
Problem Cause Remedy
No Power to
Controller / No
indicator lights /
No Display
The Main Switch of the controller may be in the Off
Position
Slide the switch (located on the back of the controller)
to the ON Position.
The Power Plug may not be plugged in to the power
point and switched on.
Ensure the power plug is inserted into the powerpoint
correctly and switch on.
There may be no power to the power point Ensure there is power to the power point. Test with
another appliance such as a table lamp.
The controller has overheated and blown the Over-
Temp thermal fuse
If all the above are okay, the over temperature safety
device has activated. Contact the service department
Lights / Display
are on but not
heating
Detachable Plug from Controller to Blanket is not
fitted or has come loose.
Ensure the detachable plug is fitted correctly into the
socket on the blanket and the locking tab has clipped
over the lug on the plug.
The selected heat setting is too low. Increase the Heat setting
The Auto Off timer has timed out and turned the
element off.
Press the Timer button again to reset the Auto Off
Timer.
Pre-heat time is too short.
Allow the blanket more time to heat the bed. More
time is required depending on the ambient
temperature and the bed temperature.
Lights / Display
are on but cannot
change any of the
settings
Program may have locked up to protect itself due to a
power surge.
Unplug the controller from the powerpoint, wait 2
minutes and then plug in and switch on again.
Display Blinks /
Flashes The controller has overheated
Turn Power Off to the controller at the power point.
Ensure the controller has not been covered with the
bed sheet, blankets, etc.
Ensure there are no external heat sources heating up
the controller (i.e. Electric heater, central heating unit
blowing hot air onto the controller, etc.
Allow the controller to cool down (up to approximately
1 hour or until the Blinking / Flashing Stops) and will
default back to the “0’ setting.
Reposition the controller ensuring it hangs freely, is
not covered or is not in line with any external heat
source, then plug in and switch on at the powerpoint.
Reset your desired heat setting and Auto Time off.
DO NOT COVER THE CONTROLLER
Controller is
continuously
turning off and
showing the “0’
Light
The controller has overheated Please follow the same steps as under “Display
Blinks / Flashes”
The Auto Off timer has activated and turned off the
blanket.
Increase the Auto Off time to extend the On time if
required. Note: Blanket will automatically turn off after
Approx 12 hours if no Auto Off time has been preset.
Lights changes to
“2” when “3” has
been selected.
After approximately 3 hours, the controller will
automatically turn down from the Pre Heat setting to
the highest All Night Setting “2”.
Is built in for personal Safety.
Contr oller is W arm
to Touch This is normal Nothing to be done. Is no cause for alarm.
Table of contents
Other Target Accessories manuals