Teac iTB400 i-TALLBOY User manual

iTB400
i-TALLBOY


14
SPECIFICATIONS
Powersupply:
Maxpower:
L/Rspeakerpowerandimpedance:
Subwooferpowerandimpedance:
Frequencyresponse:
Tunerfrequencyrange:
S/Nradio:
Outputterminals:
USBport:
Multi-mediacardport:
Unitdimension:
Totalweight:
~220-240V/50Hz
60W
215W/4Ohm
30W/6Ohm
20Hz-20KHz+/-3dB
FM88.00-108.00MHz
>80dBWeightA
iPodaudiooutput1
Towtypeaudioinput
Porttype:2.0
Maximumcapacity:16GB
Porttype:SD/MMC
Maximumcapacity:16GB
870240205mm
8.8Kg
Note:Specificationssubjecttochangewithoutpriornotice.Weightanddimensions
areapproximate.

13
COMPATIBILITYINFORMATION
*``MadeforiPod``meansthatanelectronicaccessoryhasbeendesignedtoconnect
specificallytoiPodandhasbeencertifiedbythedevelopertomeetApple
performancestandards.
*Appleisnotresponsiblefortheoperationofthisdeviceoritscompliancewithsafety
andregulatorystandards.
*iPodisatrademarkofAppleInc.registeredintheU.S.andothercountries.
Compatibilityinformation

FOREWORD
THANKS
1
DearCustomer,
Wewouldliketotakethisopportunitytothankyouforpurchasingthisunit.
WestronglyrecommendthatyoucarefullystudytheUserManualbeforeattempting
tooperatetheunitandthatyounotethelistedprecautions.
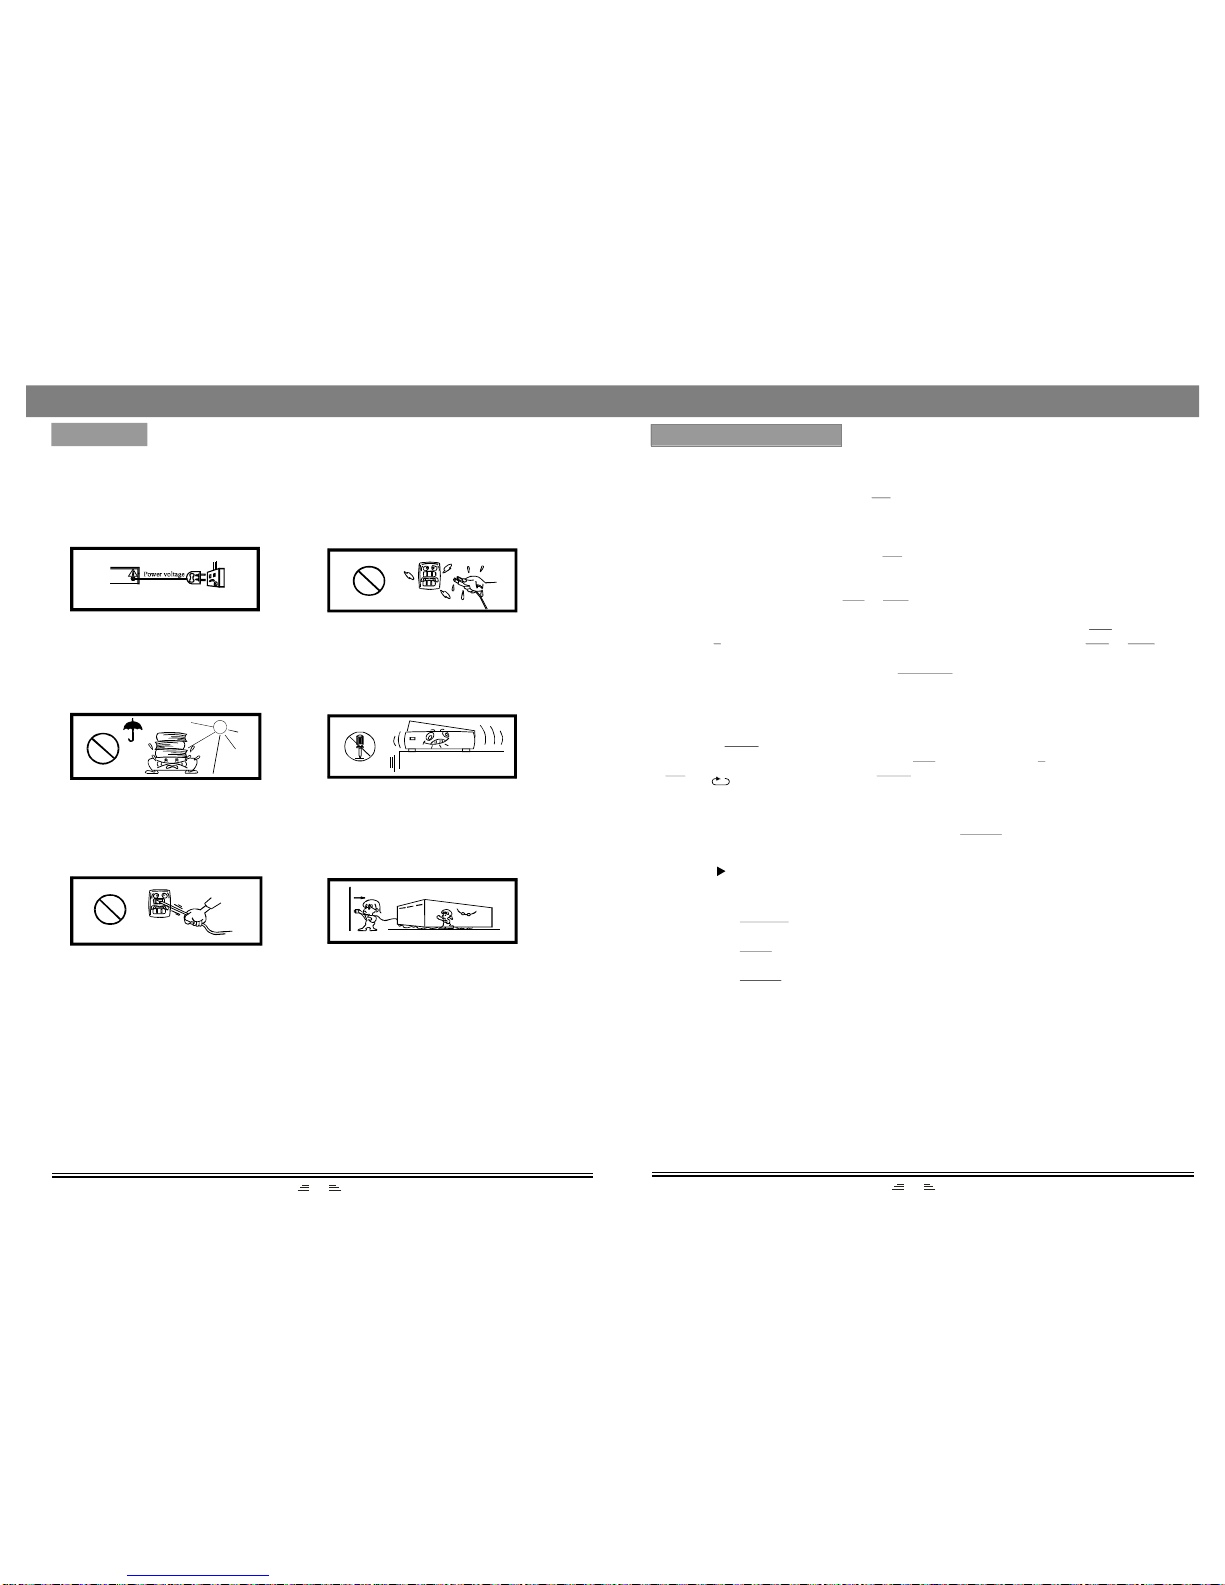
1.Ensurethatthereisaminimumdistanceof5cmaroundtheapparatusforsufficient
ventilation.
2.Theventilationopeningsshouldnotbeobstructedbyanytypeofcoveringsuchas
newspaper,table-cloths,curtains,etc.
3.Nosourcewithanakedflame,suchasalightedcandleshouldbeplacedonornear
thedevice.
4.Theapparatusshouldnotbeexposedtodrippingorsplashingandnoobjectsfilled
withliquids,suchasvases,shouldbeplacedonornearthedevice.
5.Thebatteriesshouldnotbeexposedtoexcessiveheatsuchassunlight,fireorsimilar
heatsources.
6.Thisunitiscontrolledbyamicro-computer,thereforeadisplayerrormayoccurwhen
thereisathunderstorm,staticinterruptionorotherinterference.Inthiscase,please
turnoffthepowerfor10secondsandtheunitwillresettonormalonceitisswitched
on.
12
Powersupplycannotbeturnedon
*Makesurethatthepowercordisfullyinsertedinthepoweroutlet.
TROUBLESHOOTING
Theremotecontroldoesnotwork
*Batteryisusedup
*Thefrontendoftheremotecontrolisnotaimedattheinfraredreceptionpartofthe
player.
Nosound
*Makesurethattheaudiocableisconnectedcorrectlyandsecurelytothebackofyour
unitandtothesoundsystem.
*Makesurethatthesoundsystemissettothecorrectaudioinput.
*Turnyourunitoff,thenbackon.
Theunitdoesnotworkatall
*Theembeddedmicrocomputermayhavefailedbecauseofalightningstrike,static,
orotherinterference.
CONTENT
FOREWORD.....................................................................................................1
CONTENT.........................................................................................................1
WARNING.........................................................................................................2
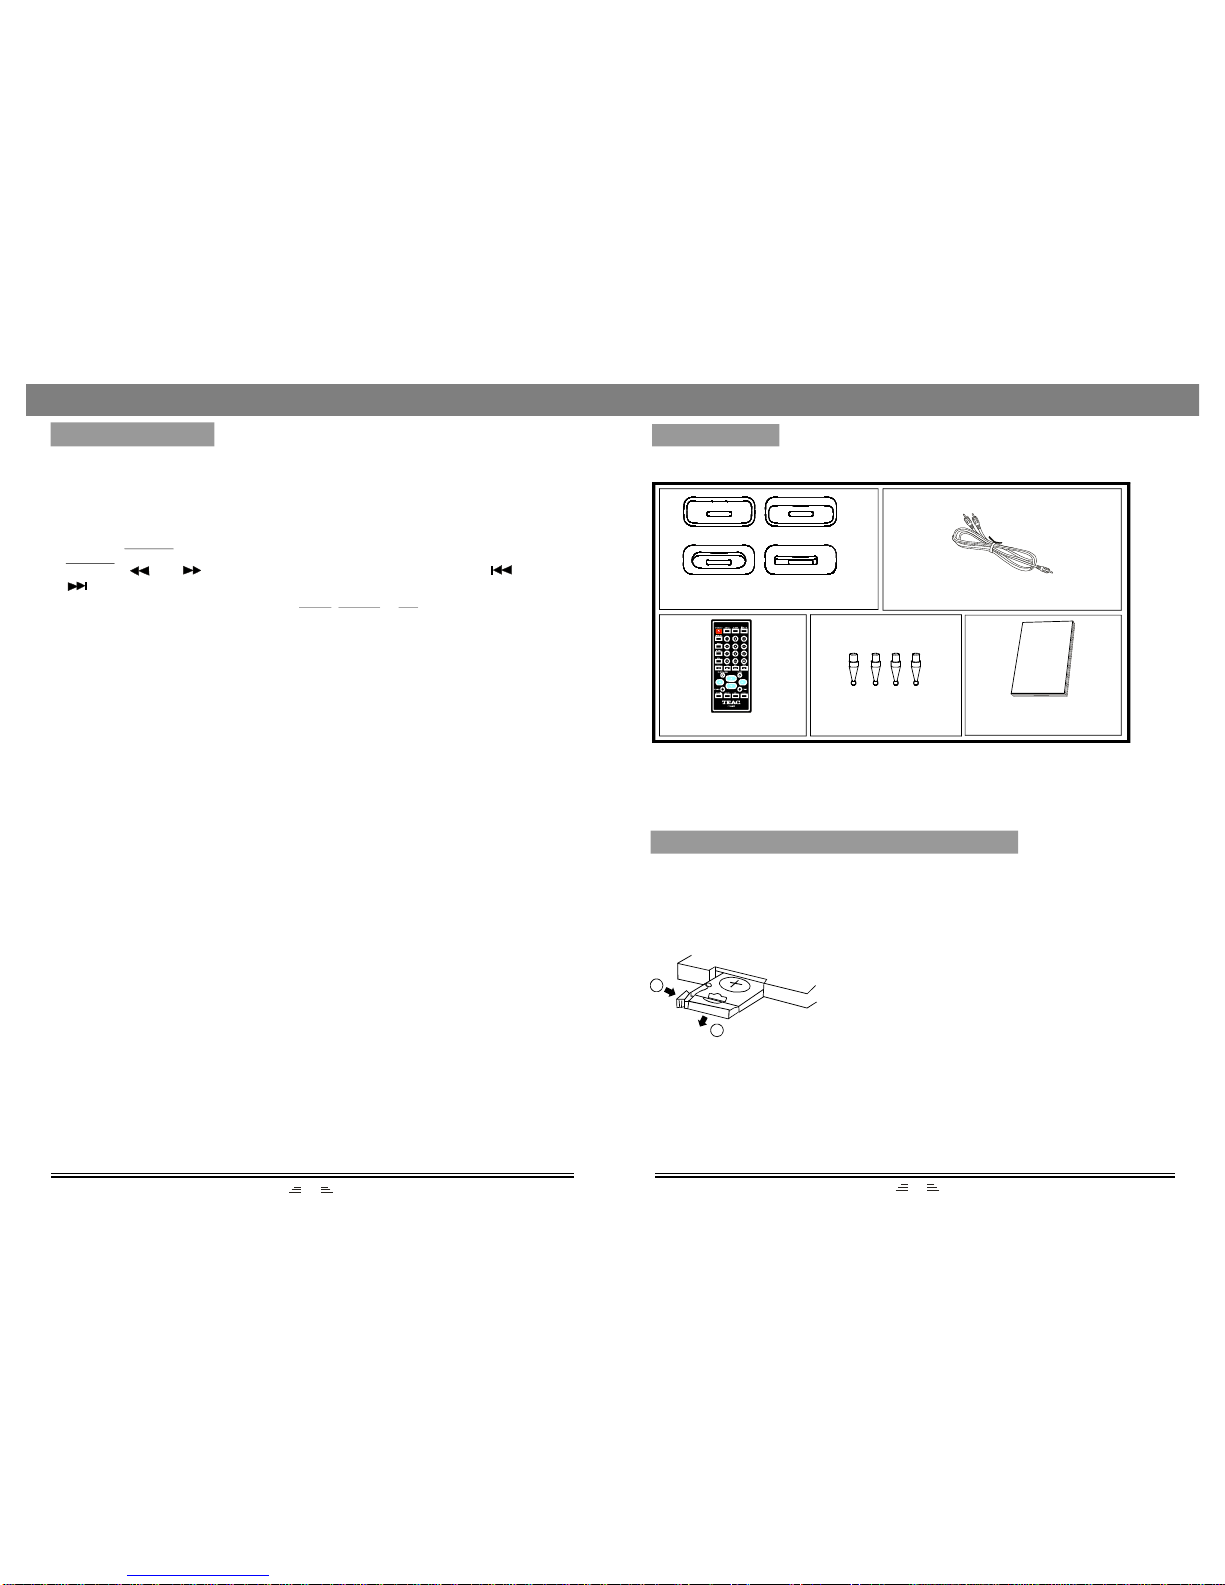
ACCESSORIES................................................................................................3
INSTALLTHEREMOTECONTROLBATTERY................................................3
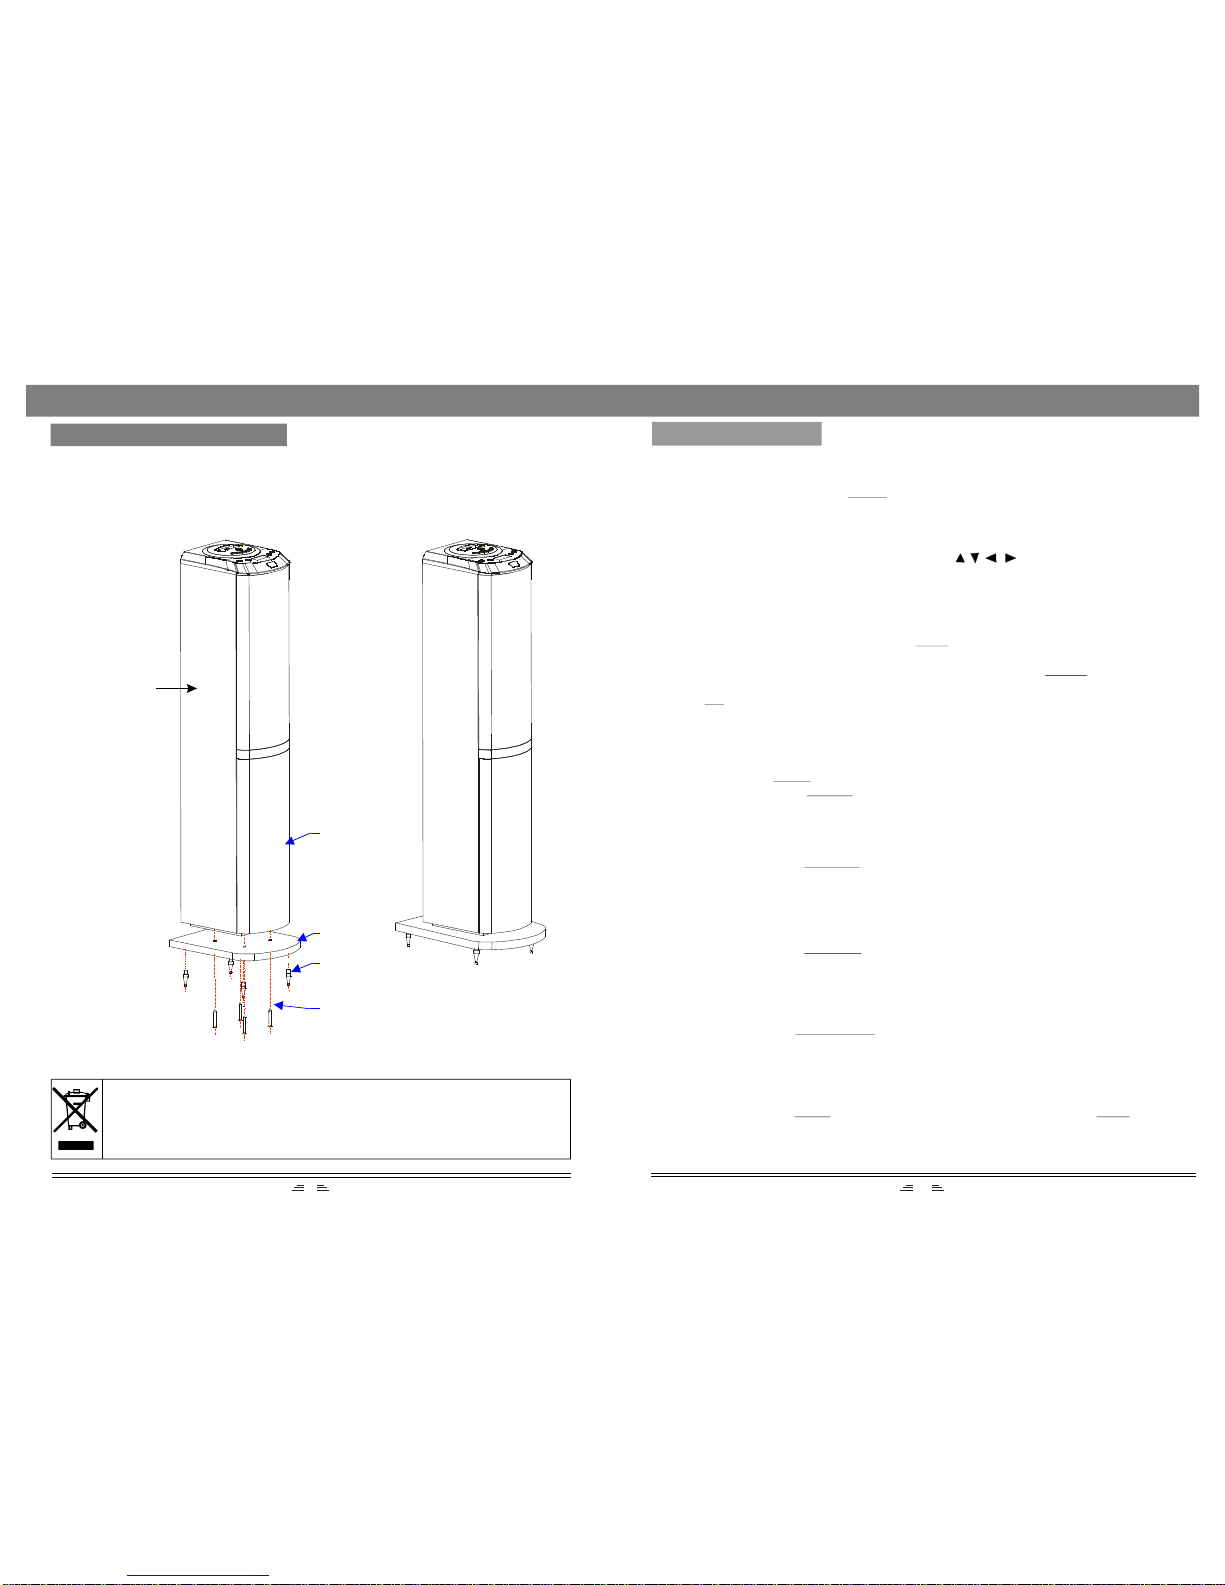
BASEPLATEINSTALLATION..........................................................................4
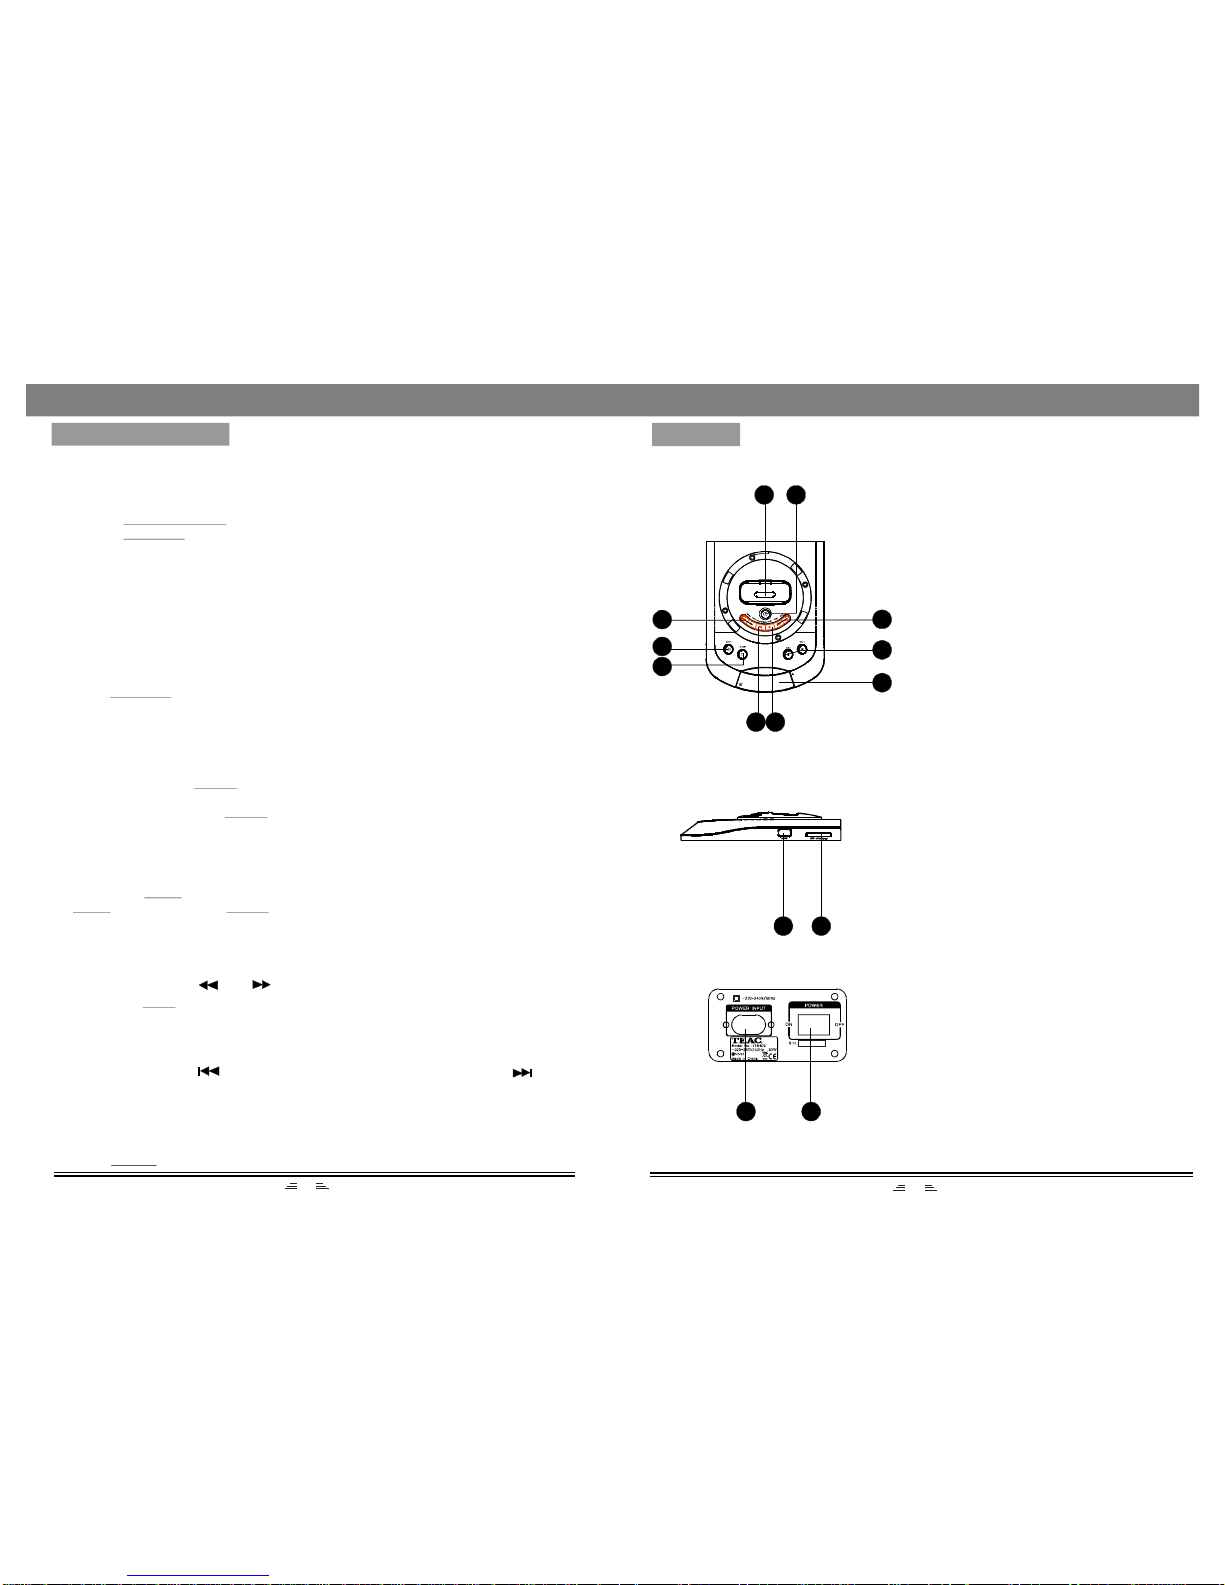
PANELS............................................................................................................5
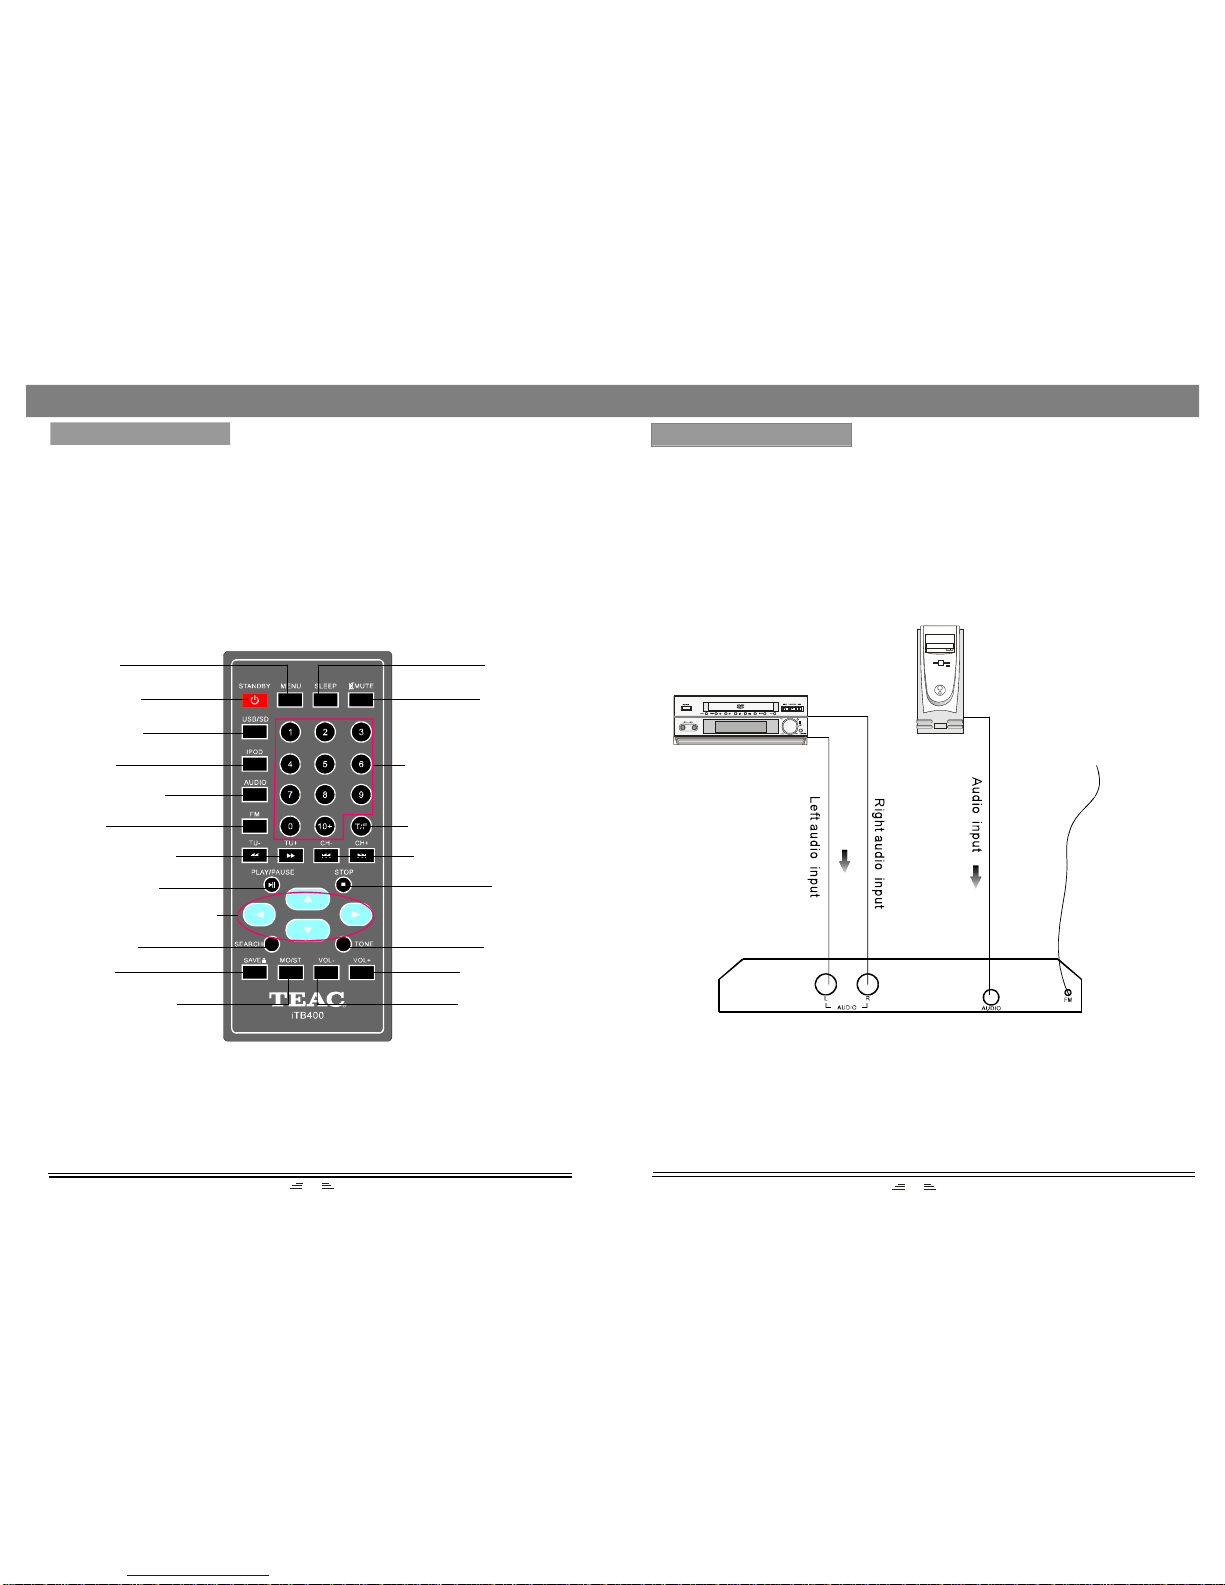
REMOTECONTROL........................................................................................6
SYSTEMCONNECTION..................................................................................7
BASICOPERATION.........................................................................................8
RADIOOPERATION.......................................................................................11
TROUBLESHOOTING....................................................................................12
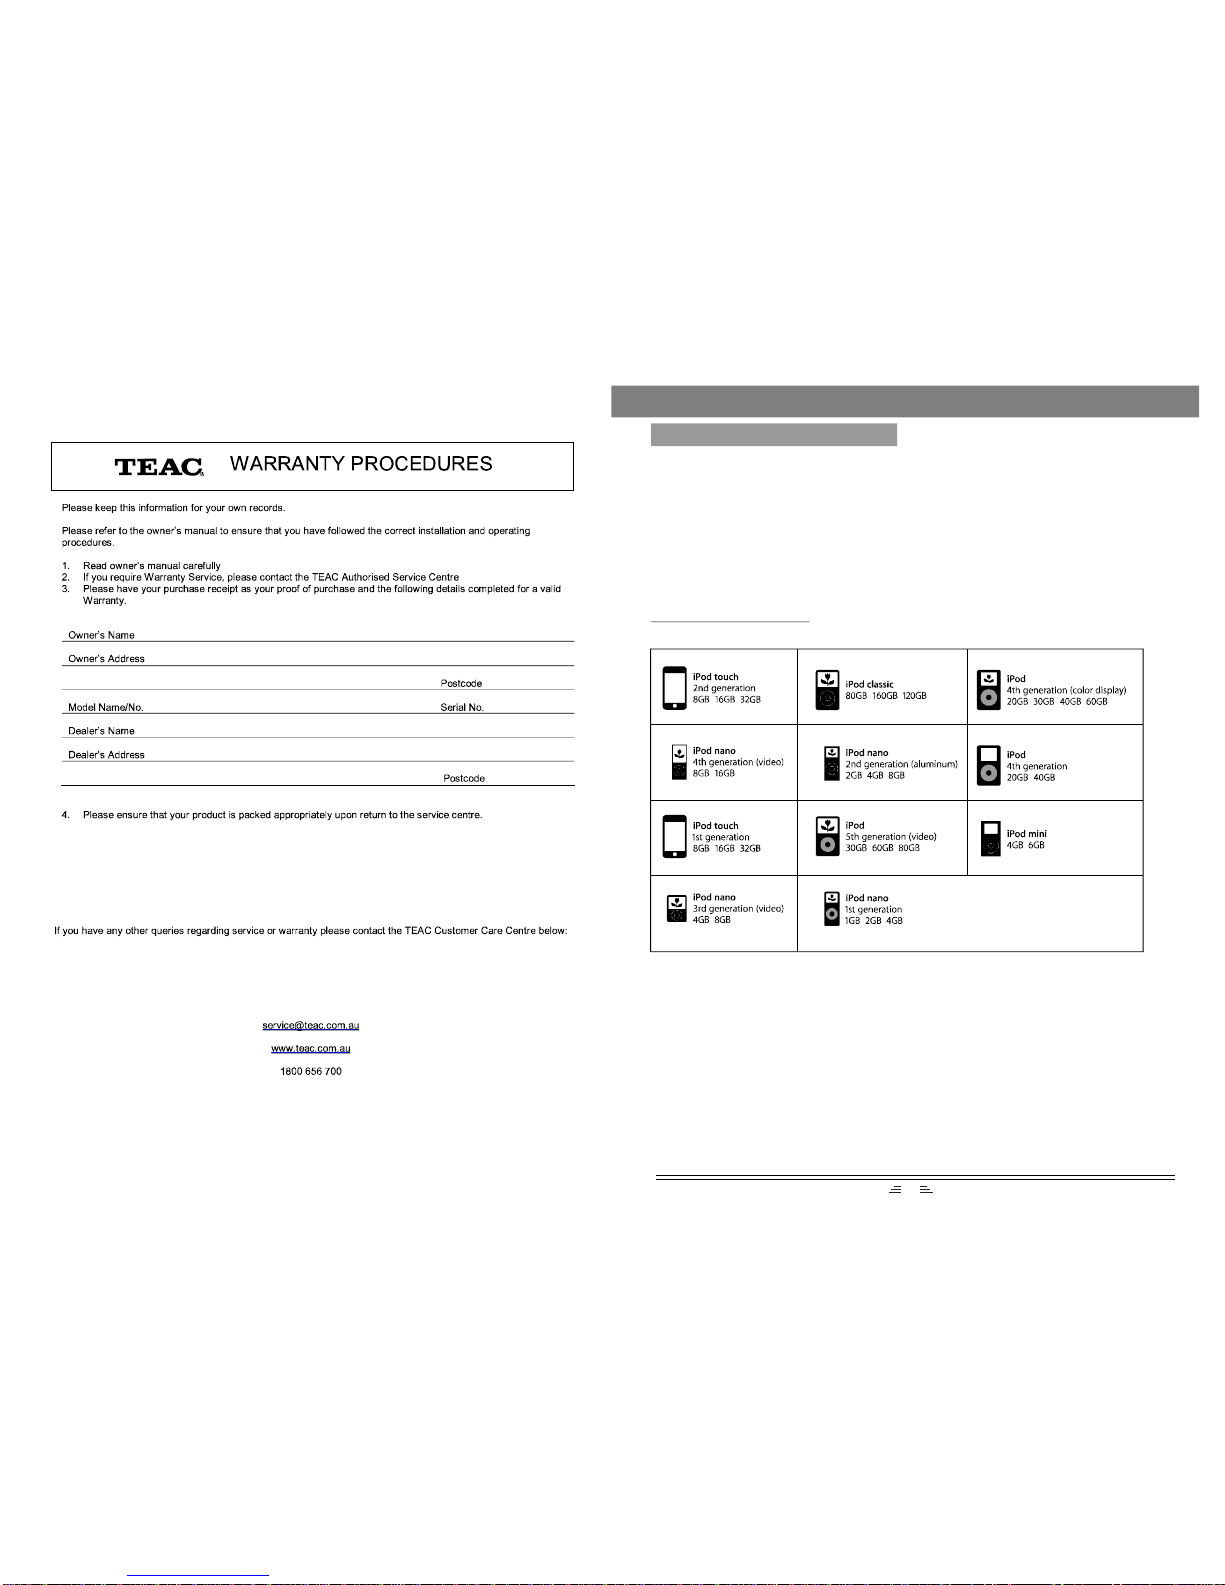
COMPATIBILITYINFORMATION...................................................................13
SPECIFICATIONS..........................................................................................14

Pleasereadandunderstandallthefollowingwarningsandthosemarkedontheunit.
Thisunithasbeendesignedandmanufacturedtoassurepersonalsafety.
Connectonlytoappropriatemain
powerasindicatedontheunitor
UserManual.
Keeptheunitandpowerplug
awayfromwater.
Avoiddirectsunshineand
heatsource. Neveropenthecover,avoid
droppingmetalobjectsintotheunit,
suchasneedle,hairpin,coinetc.
Protectpowercable:avoidstress
andkeepoutofwalkways;donot
pull&bendexcessively.
Unplugthesetfromtheoutlet
whenyoudonotuseitforalong
time.
WARNING
211
1.EnterFMFunction
Whileinoperatingmode,pressthebuttonontheremotecontroltoenterFM
mode.
2.SelectBands
1)Directlyinputfrequency:pressthebuttonontheremotecontrol,theninputthe
frequencythatyouwant.TherangeofFMfrequencyisfrom88.00MHzto108.00
MHz.
2)Selectthebandbypressingorbutton:pressthisbuttontoadjustthe
frequencyupordownastep.ThestepofFMis0.05MHz.
3)Selectsavedstationsbypressingnumberbuttons.Forexample:pressbutton
twice,buttononce,youmayselectthe25thsavedstation.Presstheor
buttontoswitchtothepreviousornextband.
4)Automaticallysearchbands:pressthebutton,thissystemstartsto
searchbandsfromlowtohighfrequencyautomatically.Thesearchedbandare
savedautomatically.Pressthisbuttonagaintostopsearching.
3.SaveBands
Pressthebuttontosavethecurrentfrequency.Forexample:ifyouwantto
save99.3MHzin28thmemorycell,pressbuttontwiceandbuttononce,press
buttontoinput993,thenpressbutton.
Note:````(ontheunit`sdisplayscreen)meansSavingband.
4.SoundtrackSelection
ToselectMonoorStereowhileinFMmode,pressbutton.Whenyouselect
stereo,thedisplayshowsastereosignal.Ifthesignalisnotstrongenough,you
cannotselectStereo.
Note:````(ontheunit`sdisplayscreen)meansStereo.
5.ExitFMMode
1)PressthebuttonontheremotecontroltoexitFMstatus,andswitchto
USB/CARDmode.
2)PressthebuttonontheremotecontroltoexitFMstatus,andswitchtothe
IPODmode.
3)PressthebuttonontheremotecontroltoexitFMstatus,andswitchto
Audioinputmode.
(Pleasevarytheantennadirectiontofindthestrongestsignalforeachstation.)
FM
T/F
TU-TU+
10+
5CH-CH+
SEARCH
SAVE 10+8
T/FSAVE
MO/ST
USB/SD
IPOD
AUDIO
RADIOOPERATION

10
BASICOPERATION
USB/DIGITALCARD
Note:
1)USB-Extensioncableshouldhaveamax.lengthof0.5m.
2)Dependingontheamountofdataandmediaspeed,itmaytakelongerforsystem
toreadthecontentsofmediadevice.Insomecases,readingtimemaybeaslong
as60seconds.Thisisnotamalfunction.
3)Evenwhentheyareinasupportedformat,somefilesmaynotplaydependingon
thecontent.
ItispossibletolistentoaudiofilesusingtheUSBorCARDinterfaceofthisunit.
1.ConnecttheUSBdeviceorCARDwiththisunit.
2.PressthebuttonontheremotecontroltoplaytheUSBorCARD.Press
buttonagaintoswitchbetweenUSBandCARDmodes.
3.Presstheorbuttontofastrewindorfastforward;Presstheor
buttontogotothepreviousornextaudiofiles.
4.ToexittheUSB/CARDmode:Pressthe,orbutton,andswitch
toothermodes.
USB/SD
USB/SD
IPODAUDIOFM
ACCESSORIES
Part1:PlasticAdaptorsforiPodDocking Part2:AudioCable
Part5:UserManual
USERMANUAL
Part3:RemoteControl
60GB 30GB
MINI NANO
Part4:BaseCopperFeet
INSTALLTHEREMOTECONTROLBATTERY
2
1
1.Reversetheremotecontrolandpresstheridged
areatotheright,thenpullthecoveroutatthesame
time.
2.InsertaCR2025lithiumbatteryintothebattery
compartment.Makesurethesymbol+facesup.
3.Replacethebatterycover.
Note:
1)Iftheremotecontrolcanonlyworkwithin
shortdistance,pleasechangeanewbattery.
2)Nevertrytorechargebatteries,short-circuit,
damageorbury.
3)Ifyouwon`tusetheremotecontrolforalong
time,pleaseremovethebattery.
3

9
STOPBUTTON
Inplaystatus,pressthebutton,theplayerwillstopplaying;Pressthe
buttontoresumeplayingmode.
Note:ThisbuttonisunavailableinRadiomode.
STOPPLAY
BASICOPERATION
PLAY/PAUSEBUTTON
Inplaystatus,pressthebuttontopause,pressthisbuttonagainto
continuetheplaying. PLAY/PAUSE
MENUBUTTON
WhileplayingtheiPod,pressthebuttontoreturntothemainmenu.MENU
NUMBERBUTTONS
InRadiostatus,pressthebuttonstoinputthenumberoftherequired
frequencyorband.Formoreinformation,seeRADIOOPERATION.
NUMBER
DIRECTIONBUTTONS
WhileplayingtheiPod,presstheDirectionbuttonstomovethecursor
toselecttheitemyouwant.
IPOD,AUDIO,FMBUTTONS
1)ConnecttheiPodwiththisunit,thenpressbuttonontheremotecontrolto
entertheiPodmode.
2)Correctlyconnectaudiofacility(eg.PC)withthisunit,thenpressbutton
ontheremotecontroltoenjoytheexternalaudioinputsourcesfunction.
3)Pressbuttonontheremotecontroltoenterradiomode.
IPOD
AUDIO
FM
TONEFUNCTION
Inplaystatus,pressbuttonontheremotecontroltoselecttheBassorTreble
adjustingmode;pressthebuttontoadjusttheeffectofBassorTreble.
TONEVOL.+/-
SEARCHBUTTON
InRadiomode,pressthebuttontosearchbandsautomatically;pressagain
tostopsearching. SEARCH
Case
BasePlate
BaseCopperFeet
BasePlateMountingScrew
4
(INSTALLATIONSKETCHMAP) (DESIGNSKETCH)
Note:
Pleaseremovethe
protectivefilm
wheninuse.
BASEPLATEINSTALLATION
Ifatanytimeinthefutureyoushouldneedtodisposeofthisproductpleasenotethat:
Wasteelectricalproductsshouldnotbedisposedofwithhouseholdwaste.Please
recyclewherefacilitiesexist.CheckwithyourLocalAuthorityorretailerforrecycling
advice.(WasteElectricalandElectronicEquipmentDirective)

8
PREPARATION
1)Beforetheunitisturnedon,pleasecheckifalltheconnectionsarerightandsafe.
Thenconnectthemainpower.
2)Pressthebuttononthebackpaneltoturnonthemainpower.
3)Pressthebuttonontheremotecontrol(orfrontpanel)toswitchto
operationmode.
POWERON/OFF
STANDBY
STATEINDICATIONOFDISPLAYSCREEN
1.Inradiomode,thedisplayscreenwillshowthecurrentlytunedfrequencyandthe
mono/stereostatus.
2.InAudio-input,iPodstatus,showthesignalinputandmainvolumestatus.
FASTFORWARDANDFASTREWIND
Inplaystatus,presstheorbuttontofastrewindorfastforward.Pressthe
buttonagainorbuttontoresumeplayingmode.
Note:ThesebuttonsareunavailableinAudioInputmode.
PLAY
PREVIOUSANDNEXT
Inplaystatus,pressthebuttontogotothepreviousaudiofile;pressthe
buttontogotothenextaudiofile.
Note:ThesebuttonsareunavailableinAudioInputmode.
BASICOPERATION
MUTEBUTTON
Ifyoupressthebuttonwhileplaying,soundoutputwillbeswitchedoff.Press
thebuttonagainorthebuttonstoresumethepreviousvolumelevel.
Note:WhenintheMutemode,thecharactersondisplayscreenwillflash.
MUTE
MUTEVOL+/-
STANDBYMODE
Pressthebuttonontheremotecontrol(oronfrontpanel)toswitchto
operationorstandbymode.
Note:Makesurethattheunitisconnectedtothepowersource.
STANDBY
SLEEPBUTTON
Inplaystatus,pressthebuttonontheremotecontrolcontinuously,youcanset
thedifferentsleeptimeforthisunit:10min,20min,30min,60min,90min,120min.
Forexample,ifyoupressthebuttontoselect``10min``,theunitwillenter
sleepmodein10minutes.
SLEEP
SLEEP
VOLUMESETTING
Pressthebuttonstoturnthevolumeupordown.VOL.+/-
5
PANELS
3
1
2
45
67
8
9
10
11 12
13 14
1.FASTREWIND/FASTFORWARD
BUTTONS
2.AUDIOINPUTBUTTON
3.SLEEPBUTTON
4.IPODINTERFACE
5.STANDBYBUTTON
6.PLAY/PAUSEBUTTON
7.STOPBUTTON
8.PREVIOUS/NEXTBUTTONS
9.VOLUME-/+BUTTONS
10.DISPLAYSCREEN
11.USBSLOT
12.MEMORYCARDSLOT
13.POWERSUPPLYINPUT
14.POWERON/OFF

7
SYSTEMCONNECTION
PC
DVDPlayer
Beforeconnectinganyexternalequipment,payattentiontothepicturebelow.
Eachconnectionmustbesafeandfirm.Disconnectpowercableuntilyouhave
finishedalltheconnections.
Note:IfbothAudioinputsareconnected,the3.5mmAudioInwilltakepriority.
FMantenna
6
REMOTECONTROL
NOTE:
1.Aligntheremotecontroldirectlyattheremotecontrolsensorofthedevice.
2.Therangeoftheremotecontroldependsonthehealthofthebattery.
3.Brightlight(sunorartificiallight)shouldnotfalldirectlyattheremotecontrol
sensor.Brightlightwilldecreasetheeffectivenessoftheremotecontrol.
4.Makesurethattherearenoobstaclesbetweentheremotecontrolandthe
remotecontrolsensor.
MENU
STANDBY
USB/SD
IPOD
AUDIOINPUT
FM
TUNE-/+
F.RWD/F.FWD
PLAY/PAUSE
DIRECTIONBUTTONS
SEARCH
SAVE
MONO/STEREO
SLEEP
MUTE
NUMBERBUTTONS
TIME/FREQUENCY
CHANNEL-/+
PREVIOUS/NEXT
STOP
TONE
VOLUME+
VOLUME-
Table of contents
Other Teac Docking Station manuals