Team Orion ProSpec Advantage User manual

INSTRUCTION MANUAL
ENGLISH | GERMAN | FRENCH | ITALIAN | JAPANESE
PROSPEC

Team Orion Advantage Pro Spec2
ENGLISH
www.teamorion.com 3
ENGLISH
Packaging contentsContent
Pro Spec Charger
Crocodile Clips
for Power Source
(red/black)
Balancing Harness
XH type
SLPB 2mm Balancing Wires
(green/blue)
Charge Leads
with Crocodile Clips
(red/black)
Content .............................................................................................................................................. 2
Packaging contents ........................................................................................................................... 3
Charger.............................................................................................................................................. 4
Connections....................................................................................................................................... 5
Introduction ........................................................................................................................................ 6
Power Source .................................................................................................................................... 7
Battery Connection ............................................................................................................................ 8
Main Screen ...................................................................................................................................... 9
Keys.................................................................................................................................................10
Charge Mode ................................................................................................................................... 12
Modifying the charge settings .......................................................................................................... 13
Charging the battery ........................................................................................................................ 16
Modifying the discharge settings ..................................................................................................... 18
Discharging the battery.................................................................................................................... 19
Cycle Mode...................................................................................................................................... 22
Storage charge mode ...................................................................................................................... 25
Extra Functions................................................................................................................................ 27
Troubleshooting ............................................................................................................................... 28
Warnings ......................................................................................................................................... 30
Warranty .......................................................................................................................................... 31
Specications .................................................................................................................................. 32
Notes ............................................................................................................................................... 33
Team Orion Advantage Pro Spec4
ENGLISH
www.teamorion.com 5
ENGLISH
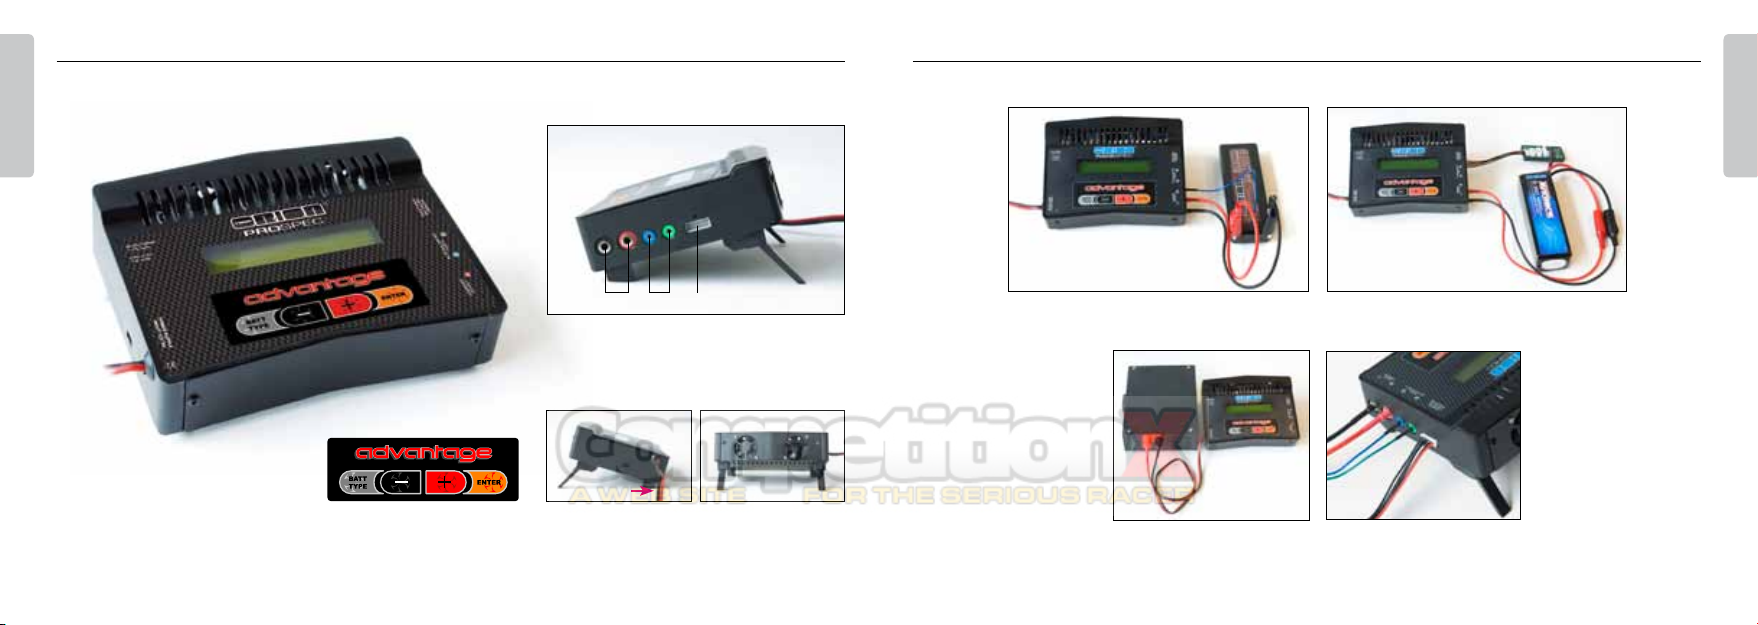
ConnectionsCharger
Car battery connection
(with SLPB balancing wire) Connection of a battery with external
balancing connector
Power Supply Connection Charger and various
connections available
Power supply leads (arrow)Race Spec Panel:
- Batt Type
- Decrease (-)
- Increase (+)
- Enter
Rear twin cooling fans
Pictures show Race Spec charger
1 Battery Connection
2 SLPB 2mm Balancing Ports
3 Balancing Adapter Port
1 2 3

Team Orion Advantage Pro Spec6
ENGLISH
www.teamorion.com 7
ENGLISH
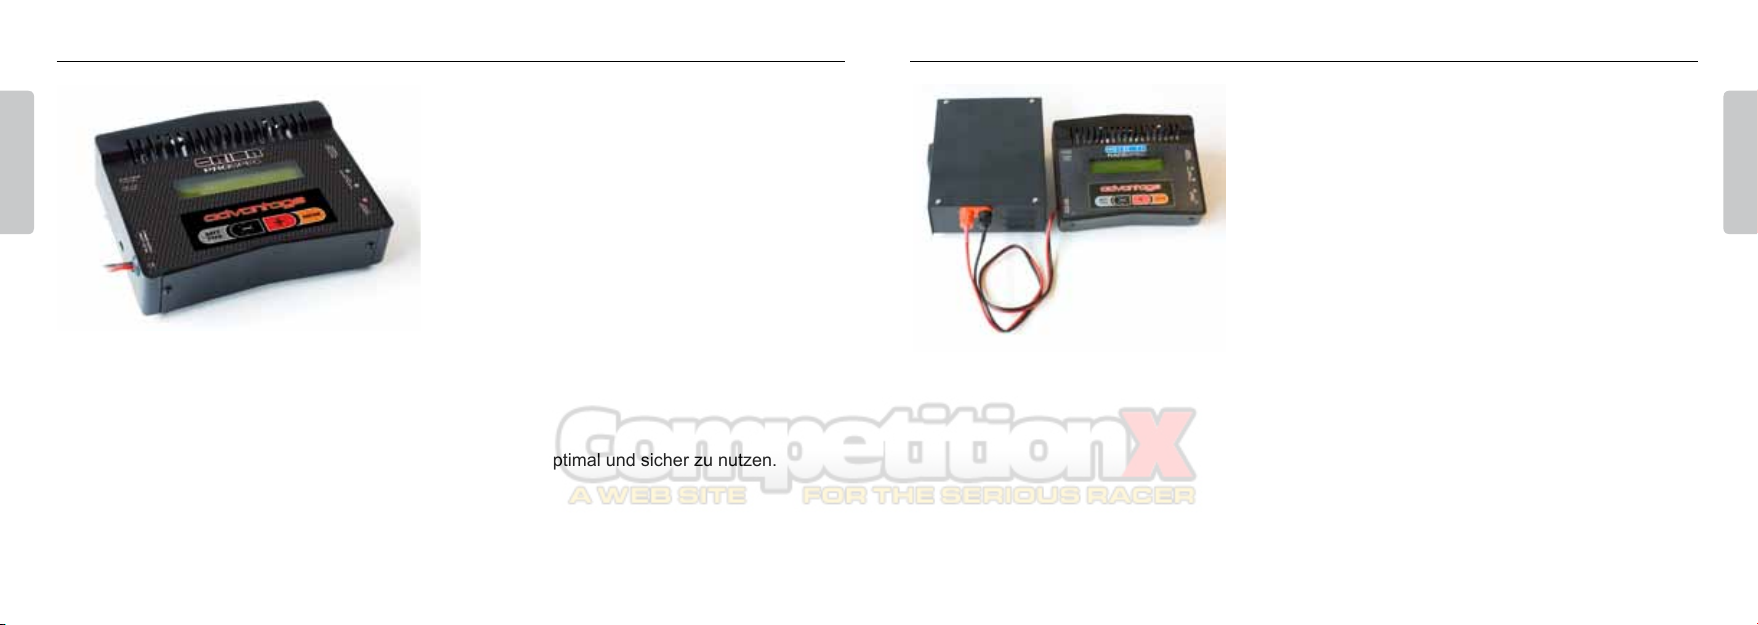
Connect the charger to a stable 10-15VDC power source
(power supply, car battery, etc.), respecting the polarities,
red is positive (+) and black is negative (-).Make sure
the power source is able to supply enough power to
charge the battery at the desired charge rate. The power
required is obtained by multiplying the battery charge
end voltage by the charge amps, for example 2S LiPo =
8.4Vx10A=84W power source required.
Introduction
Thank you for choosing Team Orion’s Advantage Race
charger. This charger features the latest developments
in battery charging technology. It is designed to charge
and discharge NiMH, NiCd, LiPo and LiFe batteries
in the most efcient way possible. Its design is based
on Team Orion’s world championship winning battery
technology.
We have included a special storage charge function to
partially recharge your NiMH, LiPo and LiFe batteries
prior to storage. Doing so will greatly increase their
lifespan. The charger also features 10 user memory
proles so that different settings for different battery packs can be stored. We have pre-programmed
several of the memories to suit the most popular battery types. For LiPo and LiFe batteries, the charger
is also equipped with 2mm balancing connectors and XH type balancing harness for 2S to 6S batteries.
Please read the instructions carefully to ensure that you receive maximum performance and reliability.
Power Source
Picture shows Race Spec charger
Team Orion Advantage Pro Spec8
ENGLISH
www.teamorion.com 9
ENGLISH
Battery Connection
Connect the battery leads to the battery, respecting the polarities, red is positive (+), black is negative
(-). To use balancing, connect the LiPo or LiFe battery balancing connector using the special 2mm
connectors (respecting the color codes) or the balancing harness.
Car battery connection
(with SLPB balancing wire) Connection of a battery with external
balancing connector
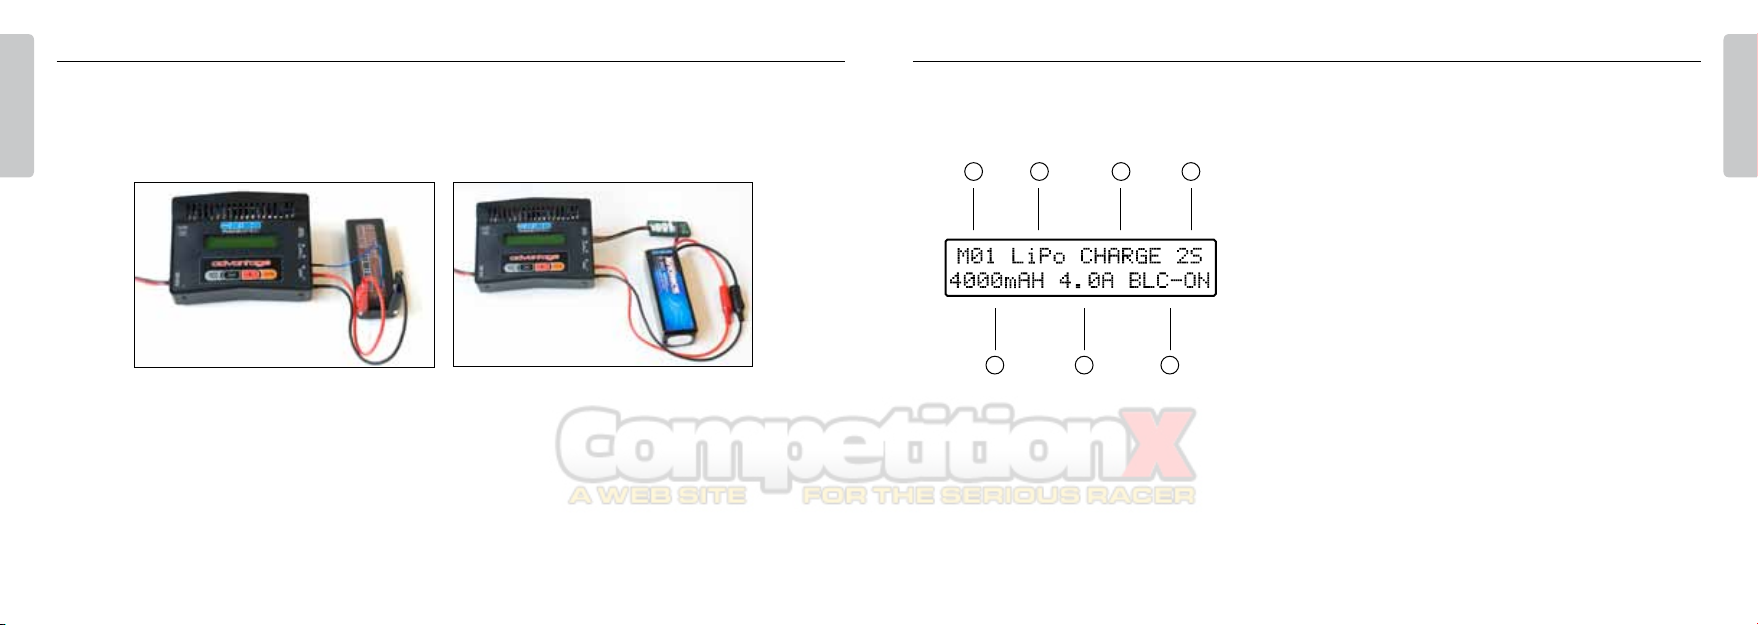
Main Screen
After a short welcome screen, the main screen is displayed. The charger is in charge mode by default.
The main screen is used to display and adjust the battery parameters.
1. Memory prole
2. Battery type
3. Charge, storage, cycle or discharge mode
4. Number of cells
5. Battery capacity
6. Charging current
7.
Delta peak setting or balancing ON/OFF
(depending on the type of battery selected)
1 2 3 4
5 6 7
Pictures show Race Spec charger

Team Orion Advantage Pro Spec10
ENGLISH
www.teamorion.com 11
ENGLISH
Voltage input/output display
(useful for detecting power supply problems)
Battery internal resistance display
LiPo/LiFe individual cell voltage display
The BATT TYPE key is also used to display input and output voltages from the main screen and
battery internal resistance or individual cell voltage (only for LiPo/LiFe with balancing connector)
during or after charge and discharge.
Keys
The charger is equipped with 4 keys to use and adjust
the various functions.
BATT TYPE key:
changes the battery type (NiMH/NiCd/LiPo/LiFe)
DECREASE - key:
decreases the value of the selected setting,
change mode
INCREASE + key:
increases the value of the selected setting, change mode
ENTER key:
save parameter, start or Interrupt actual function, return
to main screen

Team Orion Advantage Pro Spec12
ENGLISH
www.teamorion.com 13
ENGLISH
Charge Mode Modifying the charge settings
Select the memory prole referring to the battery type you wish to charge. If no compatible settings
are available, you will have to make your own settings.
To make your own settings, press the ENTER key to enter setup mode. Select the memory prole
to use, the battery type, the number of cells, the cell‘s capacity, the charge rate (1C by default) and
depending on the battery type, the delta-peak value or if you wish to use balancing or not (only for
LiPo/LiFe with balancing connector).
Once the proper settings are made, press the ENTER key until the battery check and then the charge
screen appear. Your battery is now charging and the charge will be automatically interrupted once
the battery is full.
Follow this procedure to modify the charge settings to meet the battery requirements. From the main
screen, use “+” or “-“ to select charge mode (indicated by CHARGE).
Every memory prole contains settings for each type of battery compatible with the charger. The new
settings will be automatically saved to the memory prole which is actually in use.
Use settings compatible with your battery, always follow the battery manufacturer’s indications.
1. Press the ENTER key, the memory prole selection will blink; use the + or - keys to select the
memory prole you wish to use, from 1 to 10.
LiPo/LiFe battery charge screen
NIMH/NICD battery charge screen
Warning: If you are not familiar with charging batteries, read these instructions carefully. You
must use the proper settings to charge your batteries in a safe and reliable way. Using incorrect
settings can result in damage to personal property and be harmful to people. Always follow the
manufacturer’s charge recommendations.

Team Orion Advantage Pro Spec14
ENGLISH
www.teamorion.com 15
ENGLISH
2. Press the ENTER key, the battery type selection will blink; use the BATT TYPE key to select the
type of battery, NiCd, NiMH, LiPo or LiFe.
3. Press the ENTER key, the number of cells selection will blink; use the + or - keys to select
the number of cells, from 1 to 16 NiCd/NiMH and 1 to 6 LiPo/LiFe.
4. Press the ENTER key, the capacity selection will blink; use the + or - keys to select the capacity
(200 to 9900mAh). As an extra safety measure when charging a NiMH or NiCd battery, the charger
will stop charging if the selected capacity is reached, whether the battery really is 100% full or not.
5. Press the ENTER key, the charge current selection will blink (1C by default), use the +
or - keys to select a different charge current 0.2 to 10A/1-10 cells NiCd/NiMh – 2S-4S LiPo/Life, 0.2
to 5A/11-16 cells NiCd/NiMh – 5S-6S LiPo/Life.
6. Press the ENTER key, depending on the battery type you have selected, the delta-peak value
selection or the balancing selection will blink. Use the + or - keys to select the delta-peak value
(1-20mV/cell) or to switch charge cell balancing ON or OFF (LiPo or LiFe battery only).
7. Press the ENTER key again, the setup is completed.
Charge Current
The charge current is automatically adjusted in relation to the capacity setting. A higher charge current
will charge your battery faster, but it can also overheat and damage the battery. Only change this
setting if you are an experienced user.
Delta-peak adjustment
During charge, a NiCd/NiMH battery voltage increases until the battery is full. Once the battery is full
the battery voltage begins to drop. The delta-peak system measures this drop in voltage and interrupts
the charge once the preset voltage drop value has been reached. A certain amount of overcharge
is usually required to ensure the highest performance from the cells. A higher value will overcharge
your batteries more and a lower value will overcharge your batteries less. Usually NiCd batteries
require a higher value (10mV-20mV/cell) and NiMH batteries require a lower value (0mV-10mV/cell).
It is recommended to use the lowest value that will allow your battery to fully charge without false
peaking (premature delta-peak cutoff). This setting is greatly inuenced by the quality of the battery
you are charging, its age and its wear level.
Balancing
Cell balancing equalizes all the cells within LiPo and LiFe batteries. Balancing ensures optimal charge
and performance and increases safety. Cell balancing can take a long time to complete if the level
of unbalance is high.
If balancing is switched on, the balancing connectors must be connected; if balancing is switched
off the balancing connectors are not required. The charger is equipped with two 2mm balancing
connectors and another connector allows the use of a balancing harness. Different types of balancing
connectors exist and each type requires its own compatible harness.
Note: Only disable balancing if you understand the underlying risks and disadvantages.
Team Orion Advantage Pro Spec16
ENGLISH
www.teamorion.com 17
ENGLISH
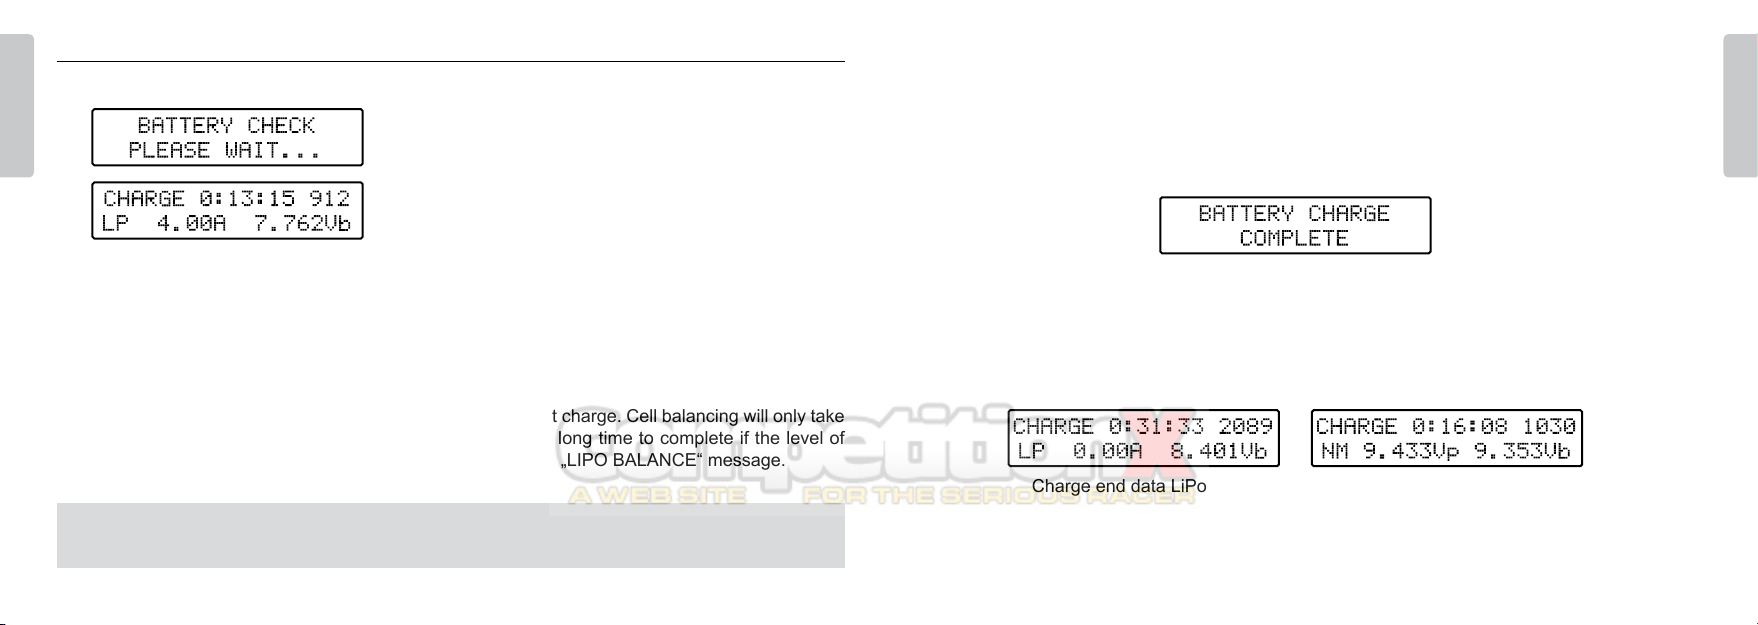
Charging the battery
After you have selected the right parameters and con-
nected the battery, press and hold the ENTER key. The
battery check will be displayed.
If the battery is properly connected and functional the
charge screen will be displayed.
While charging NiMH/NiCd batteries, the charge might be interrupted before the battery is fully charged
(battery should be slightly warm to the touch if it is charged). If this is the case you may restart the
charge process again or try using a higher delta-peak value.
With LiPo or LiFe batteries, if the voltage is too low, the charger will perform a slow charge to increase
the voltage of the cells inside the battery before starting the fast charge. Cell balancing will only take
place at the end of the fast charge; cell balancing can take a long time to complete if the level of
unbalance is high. While balancing, the charger will display the „LIPO BALANCE“ message.
Note: Depending on the conditions of use, the charger thermal protection might activate so that
the charger can cool down. After a brief interruption the charge will resume and continue normally.
The charge will be interrupted when anyone of these conditions is met:
• the automatic delta-peak cut-off system activates
• the charged capacity reaches the preset value (for NiMH/NiCd)
• the charger software has determined that the LiPo/LiFe battery is full.
Press the ENTER key to display the nal charge data, indicating the total charge time, total charged
capacity (in mAh), the battery’s peak voltage (for NiMH/NiCd) and the battery’s nal voltage.
Press the BATT TYPE key to display the battery internal resistance or individual cell voltage (only for
LiPo/LiFe with balancing connector). Press the ENTER key to go back to the charge screen
At the end of the charge cycle,
the “BATTERY CHARGE COMPLETE” message will appear.
Charge end data LiPo/LiFe Charge end data NiMH/NiCd
Team Orion Advantage Pro Spec18
ENGLISH
www.teamorion.com 19
ENGLISH
Follow this procedure to modify the discharge settings from the main screen, use the + or -
keys to select discharge mode from the main screen (indicated by “DISCHARGE”).
You can change the settings if required:
1. Press the ENTER key, the discharge current selection will blink, use the + or - keys to select a
different discharge current (0.1A to 10A, 75W maximum).
2. Press the ENTER key, the discharge cut-off voltage selection will blink, use the + or - keys to select
a different cut-off voltage. The limit is 0.7V for NiCd/NiMH, 2.8V/cell for LiPo and 2.5V/cell for LiFe.
Modifying the discharge settings
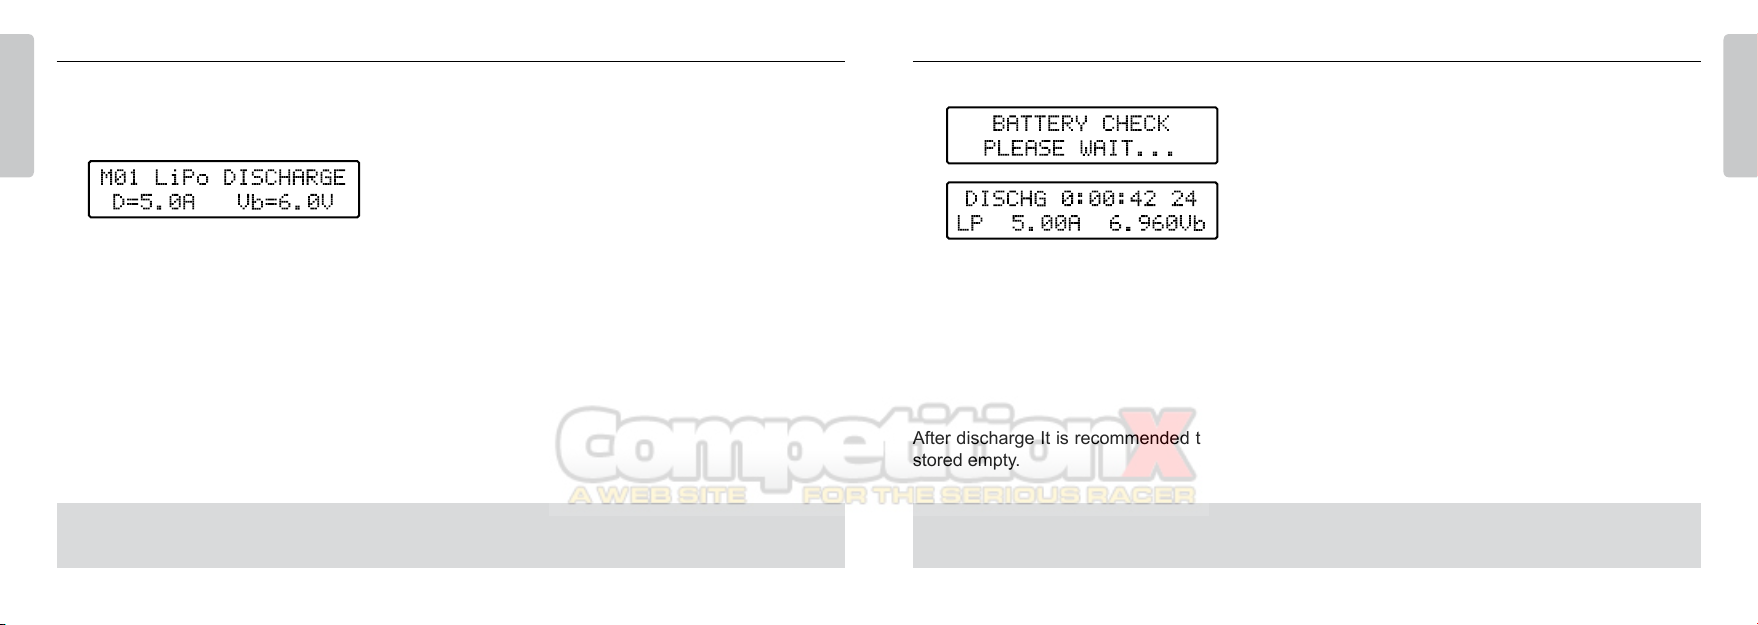
The charger will display the default settings for the
selected type of battery.
Discharging the battery
After you have selected the right parameters to discharge
your battery, press and hold the ENTER key. The battery
check will be displayed.
If the battery is properly connected and functional the
discharge screen will be displayed.
The charger will discharge the batteries down to cutoff value.
With LiPo and LiFe batteries, if the battery voltage is over the cutoff limit, the charger will balance
the cells (if required and balancing mode is switched on) and then discharge the battery down to the
cutoff limit. When balancing, the screen will display the „LIPO BALANCE“ message.
After discharge It is recommended to recharge LiPo and LiFe batteries as they can be damaged if
stored empty.
Note: Depending on the conditions of use, the charger thermal protection might activate so that the
charger can cool down. After a brief interruption the discharge will resume and continue normally.
Note: Changing the default cut-off voltage setting to a lower value can damage the battery. Only
modify this setting if you are an experienced user.
Team Orion Advantage Pro Spec20
ENGLISH
www.teamorion.com 21
ENGLISH
Press the BATT TYPE key to display the battery internal resistance and individual cell voltage (only
for LiPo/LiFe with balancing connector).
Discharge capacity
A battery discharge capacity indicates the storage capacity of a battery. A battery with a higher
discharge capacity will give more effective run-time than a battery with a lower discharge capacity (if
tested and used in the same conditions).
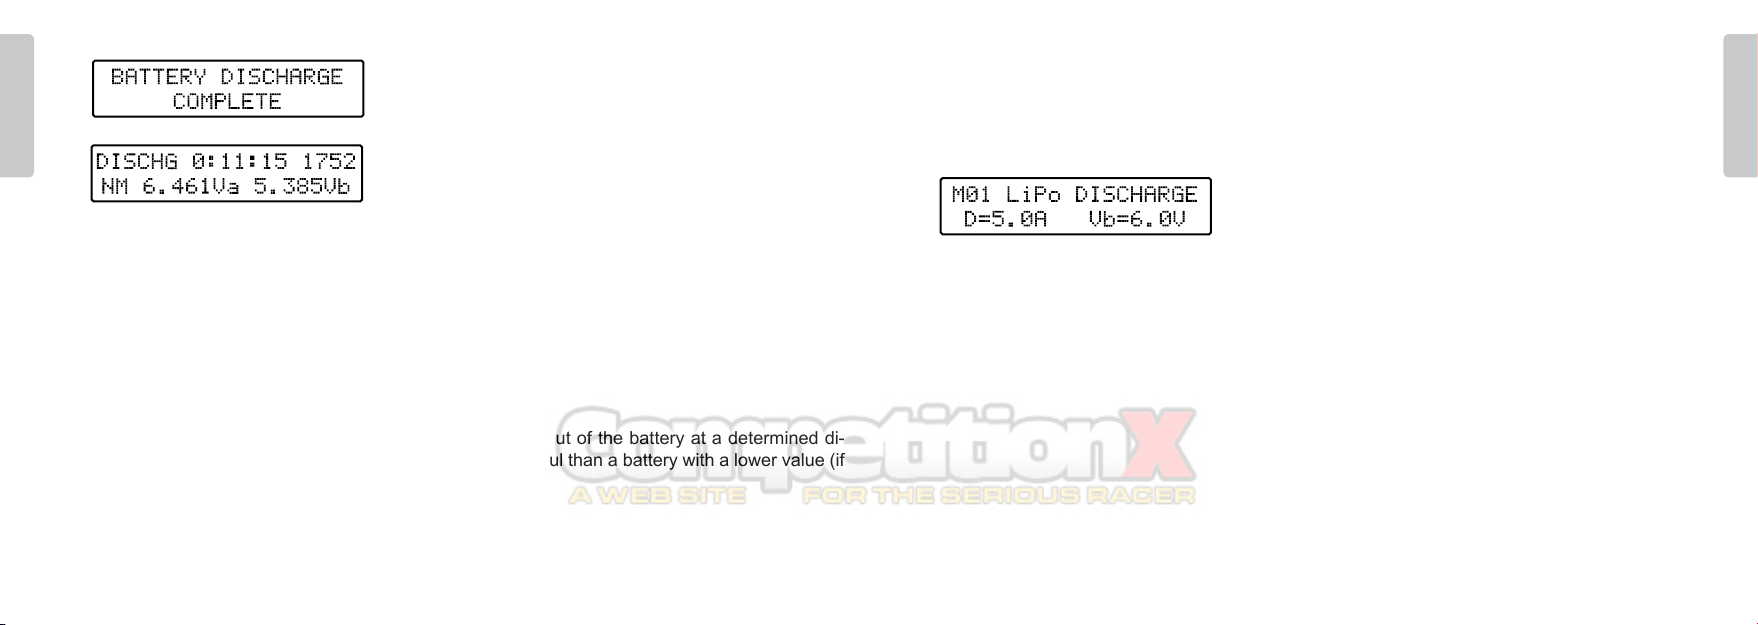
Average discharge voltage
A battery average discharge voltage indicates the power output of the battery at a determined di-
scharge rate. A battery with a higher value will be more powerful than a battery with a lower value (if
tested and used in the same conditions).
At the end of the discharge cycle, the “BATTERY DI-
SCHARGE COMPLETE” message will appear.
Press the ENTER key to display the nal discharge
data, indicating the total discharge time, total discharged
capacity (in mAh), battery’s average discharge voltage
and the battery’s nal voltage.
Internal resistance
A battery internal resistance is an indicator of the battery performance. In general, a battery with a
lower value will be more powerful than a similar battery with a higher value (if tested and used in the
same conditions). You cannot compare batteries using different chemistries.
Press the ENTER key to return to the discharge screen.

Team Orion Advantage Pro Spec22
ENGLISH
www.teamorion.com 23
ENGLISH
Cycle Mode
From the main screen, use the + or - keys to select the
cycle mode from the main screen (indicated by “CYCLE
MODE”). The cycle mode is used to do an automatic
charge->discharge or discharge->charge cycle to your
batteries. Cycling is useful for checking your batteries
performance and regenerating batteries which have been
stored for a certain period of time.
After you have selected the cycling mode, press and hold
the ENTER key. The battery check will be displayed.
The charger uses the actual charge and discharge settings. Make sure that these settings are
compatible with the battery.
From the cycle screen, press “ENTER” and use “+” or “-“ to select if you want to make a charge->
discharge or discharge->charge cycle to your battery. To regenerate batteries, use the charge->
discharge cycle. It is recommended to use only low discharge currents for discharge->charge cycling
as high currents can overheat and damage the battery.
Depending on the type of cycle you have selected, the charge or discharge screen will be displayed.
After discharge It is recommended to recharge LiPo batteries as they can be damaged if stored empty.
Once the cycle is complete, the “CYCLE COMPLETE” message is displayed”.
Charge screen
Charge->discharge cycle
end screen
Discharge screen
Discharge->charge cycle
end screen
Note: depending on the conditions of use, the charger thermal protection might activate so that
the charger can cool down. After a brief interruption the charge or discharge will resume and
continue normally.

Team Orion Advantage Pro Spec24
ENGLISH
www.teamorion.com 25
ENGLISH
Press the ENTER KEY to display the nal charge or discharge data (depending on the cycle mode).
Press the BATT TYPE key to display the battery internal resistance and individual cell voltage (only
for LiPo/LiFe with balancing connector).
Press the ENTER key to go back to the cycle screen.
Charge end data screen Discharge end data
Storage charge mode
From the main screen, press the + or – key to select
storage mode (indicated by „STORAGE“).The special
storage mode will discharge and/or recharge your NiMH,
NiCd, LiPo or LiFe battery so that it is in optimal state for
storage. Doing this will minimize the risk of cell damage
due to deep discharge if the battery is stored for a long
period of time.
Press and hold the ENTER key. The battery check will
be displayed.
The charge and discharge settings of the actual memory prole will be used, make sure that the
settings are compatible with the battery.
If the battery is properly connected and functional, the storage charge will start. If the selected battery
type is NiMH or NiCd, the battery will be discharged, then recharged to 50% of the selected capacity.
With LiPo and LiFe batteries, the battery will be recharged and balanced to 3.85V/cell for LiPo and
3.3V/cell for LiFe. If the voltage is above 3.85V/cell for LiPo and 3.3V/cell for LiFe, the storage charge
will stop as there is enough energy stored inside the batteries for a safe storage.
Team Orion Advantage Pro Spec26
ENGLISH
www.teamorion.com 27
ENGLISH
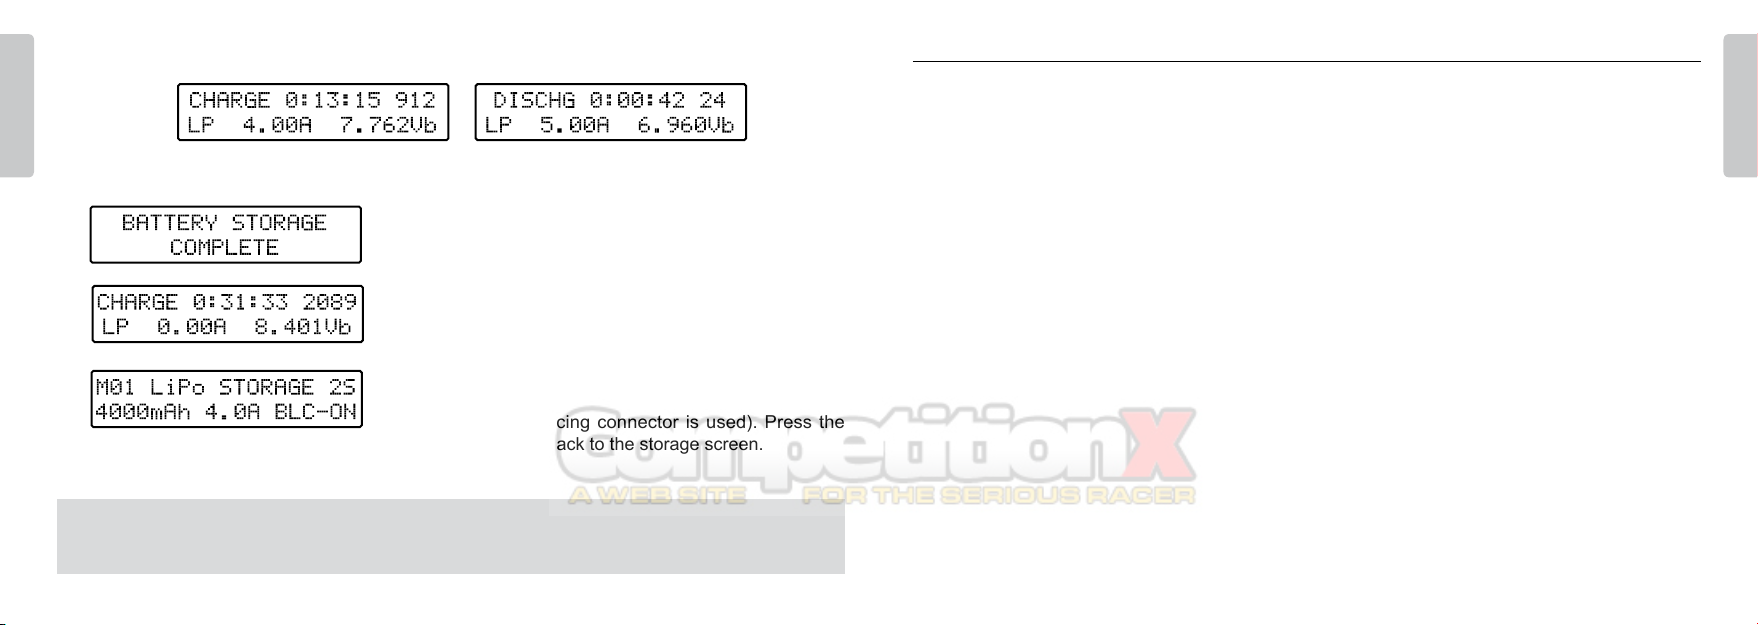
Press the BATT TYPE key to display the battery internal
resistance and individual cell voltage in LiPo and LiFe
mode (if the balancing connector is used). Press the
ENTER key to go back to the storage screen.
Charge screen Discharge screen
Note: depending on the conditions of use, the charger thermal protection might activate so that
the charger can cool down. After a brief interruption the charge/discharge will resume and continue
normally.
At the end of the storage charge cycle, the “BATTERY
STORAGE COMPLETE” message will appear.
Press the ENTER key to display the nal charge data,
indicating the total charge time, total charged capacity (in
mAh) and the battery’s nal voltage.
Extra Functions
To switch the buzzer off (on by default), press and hold the - key while powering up the charger. To
switch the buzzer on, press and hold the + key while powering up the charger.
To display the actual input and output voltages, press and hold the BATT TYPE key from the charge
main screen.
The decrease - and increase + keys are also used to switch the LCD backlight on or off when the
charger is charging or discharging.

Team Orion Advantage Pro Spec28
ENGLISH
www.teamorion.com 29
ENGLISH
Troubleshooting
The charger can display error messages when certain types of problems are detected. In any case
when an error occurs, check the connections, power supply, battery and settings.
This indicates a power supply problem. Check that the power source is providing proper voltage to
the charger (10-15VDC) and that is it powerful enough.
This indicates a problem with your battery or wrong charge/discharge settings. Check the battery
and settings.
This indicates a connection problem with your battery
when charge or discharge is started. Check that the
battery is connected and functional.
This indicates that the selected number of cells is incor-
rect. Check the battery and settings.
This indicates a connection problem or a malfunction with
your battery during charge or discharge. Check that your
battery pack is properly connected and functional.
This indicates that the wrong battery type is selected.
Check the battery and settings.
This indicates a problem with the balancing connector.
Check that the balancing connector is properly connected.
Indicates that the charger is overheating. Wait for the
charger to cool down and resume function, modify your
settings (lower charge or discharge amps) or relocate,
ventilate the charger to improve cooling.

Team Orion Advantage Pro Spec30
ENGLISH
www.teamorion.com 31
ENGLISH
Warnings
• Always setup the charger parameters according to your batteries manufacturer specications.
• This charger is only designed to charge LiPo or LiFe batteries with 1 to 6 cells and NiMH or NiCd
batteries with 1 to 16 cells.
• Never leave the charger unsupervised while it is powered on.
• Never let children operate the charger without supervision from an adult.
•
Use the charger in a well ventilated area, away from people and electrically conductive or
inammable materials.
• The charger and batteries can become hot during use. Take great care before handling them.
•
If the battery has suspicious reactions during the charge or discharge, such as overheating,
venting or leaking, immediately disconnect the battery and store it in a safe location, away from
people and inammable materials.
Warranty
Team Orion guarantees this product to be free from manufacturing and workmanship defects. The
warranty does not cover incorrect installation, components worn by use, or any other problem resulting
from incorrect use or handling of the product. No liability will be accepted for any damage resulting
from the use of this product. By the act of connecting and operating this product, the user accepts
all resulting liability.
Is considered incorrect use:
• Failure to follow instructions.
• Improper use of the product (abusive use, out of spec, etc.).
• Failure to adapt settings for proper function (improper connections, wrong gearing, installation,
setup, etc.).
• Overload, overheating (desoldering, melting, etc.).
• Running in inadequate conditions (damage or rust from rain, humidity, etc.).
• Improper maintenance (presence of dirt, etc.).
• Disassembly, modication by the user (modifying original connectors, wires, components, etc.).
• Mechanical damage due to external causes.

Team Orion Advantage Pro Spec32
ENGLISH
www.teamorion.com 33
ENGLISH
Specications
Circuit Microprocessor controlled advanced digital circuit
Charging Mode: Fast charge, CC/CV and special storage mode
Charging Capability: NiMH/NiCd 1-16 cells, LiPo/LiFe 1-6 cells
Charge current: Adjustable 0.2-10A for 1-10 cells NiCd/NiMh – 2S-4S LiPo/Life, 0.2A-
5A for 11-16 cells NiCd/NiMh – 5S-6S LiPo/Life
Balancing: Adjustable on/off
Delta peak: Adjustable 0-20mV/cell
Discharge Current: Adjustable 0.2-10A (variable with number of cells,75W max)
Discharge Cut-off Voltage: Adjustable
User Prole Memory: 10
Display: Laser Blue LCD
Multi-Protection System: Input and output reverse polarity protection
Input Voltage: 10-15 VDC
Dimensions: 155x120x50mm
Weight: 702gr
Notes

Team Orion Advantage Pro Spec34
DEUTSCH
www.teamorion.com 35
DEUTSCH
PackungsinhaltInhalt
Advantage Pro Ladegerät
2 Krokodilklemmen
für die Stromquelle
(rot/schwarz)
1 Balancer Adapter 2 SLPB 2mm Balancer Kabel
(grün/blau)
2 Ladekabel mit
Krokodilklemmen
(rot/schwarz)
Inhalt ................................................................................................................................................34
Packungsinhalt ................................................................................................................................ 35
Das Ladegerät ................................................................................................................................. 36
Anschlüsse ...................................................................................................................................... 37
Einleitung ......................................................................................................................................... 38
Anschluss an die Stromquelle ......................................................................................................... 39
Anschluss eines Akkus .................................................................................................................... 40
Hauptmenu ...................................................................................................................................... 41
Bedienfelder .................................................................................................................................... 42
Lade-Modus..................................................................................................................................... 44
Lade-Einstellungen verändern......................................................................................................... 45
Den Akku laden ............................................................................................................................... 48
Entlade-Einstellungen verändern .................................................................................................... 50
Den Akku entladen .......................................................................................................................... 51
Formatierungsmodus....................................................................................................................... 54
Lagerungsfunktion ........................................................................................................................... 57
Zusatzfunktionen ............................................................................................................................. 59
Fehlersuche ..................................................................................................................................... 60
Warnungen ...................................................................................................................................... 62
Garantie ........................................................................................................................................... 63
Technische Daten ............................................................................................................................ 64
Notizen ............................................................................................................................................ 65

Team Orion Advantage Pro Spec36
DEUTSCH
www.teamorion.com 37
DEUTSCH
AnschlüsseDas Ladegerät
Anschluss eines LiPo-Akkus für Autos
(mit SLPB Balancer Kabel) Anschluss eines Akkus mit dem
Balancer Adapter
Anschluss an die
Stromquelle Anschluss der Kabel
ans Gerät
Anschlusskabel für
die Stromquelle (Pfeil)
Race Spec Bedienfelder:
- Batt Type
- Vermindern (-)
- Erhöhen (+)
- Enter
Rückseite mit zwei
Ventilatoren
1 Akku-Anschluss
2 SLPB 2mm Balancer Anschluss
3 Balancer Adapter Anschluss
1 2 3
Pictures show Race Spec charger
Team Orion Advantage Pro Spec38
DEUTSCH
www.teamorion.com 39
DEUTSCH
Verbinden Sie das Ladegerät mit einer stabilisierten
10-15V DC Stromquelle (Netzgerät, Autobatterie
etc.). Sorgen Sie dafür, dass die Stromquelle genug
Leistung abgibt, um die erforderlichen Ladeströme zu
erreichen. Die erforderliche Leistung kann berechnet
werden, indem man die Endspannung des Akkus mit
dem Ladestrom multipliziert. Beispiel für einen 2S LiPo
Akku: 8.4Vx10A=84W. Es ist also eine Stromquelle mit
mindestens 84W erforderlich.
Einleitung
Vielen Dank, dass Sie sich für den Team Orion Clubman
LiPo Edition Lader entschieden haben. Dieses Gerät ist
mit der neusten Ladetechnologie ausgestattet.
Dieser Lader ist konstruiert worden, um Akkus des
Typs NiMH, NiCd, LiPo und LiFe möglichst efzient
zu laden und entladen. Das Design basiert auf der
Erfahrung von Team Orion, dank der schon zahlreiche
Weltmeistertitel gewonnen werden konnten.
Wir haben eine spezielle Lagerungs-Ladung entwickelt,
um NiMH-, LiPo- und LiFe-Akkus partiell zu laden und
so optimal zu lagern. Dies verlängert die Lebensdauer
Ihrer Akkus. Der Lader ist mit 10 Speicherplätzen ausgestattet, die es erlauben, verschiedene Ein-
stellungen zu speichern. Für die wichtigsten Akku-Typen haben wir Speicherplätze vorprogrammiert.
Für LiPo- und LiFe-Akkus ist der Lader mit einem 2mm Balancer-Anschluss und einem XH-Anschluss
für 2S und 6S Akkus ausgestattet.
Bitte lesen Sie diese Anleitung sorgfältig durch, um Ihr Gerät optimal und sicher zu nutzen.
Anschluss an die Stromquelle
Picture shows Race Spec charger
Table of contents
Languages:
Other Team Orion Batteries Charger manuals

Team Orion
Team Orion Advantage One 405 User manual

Team Orion
Team Orion Advantage One User manual

Team Orion
Team Orion ADVANTAGE TOUCH DUO V-MAX Instruction manual

Team Orion
Team Orion Advantage ONE 406 User manual

Team Orion
Team Orion Advantage One User manual

Team Orion
Team Orion D48 User manual

Team Orion
Team Orion Advantage ONE 1X6A User manual

Team Orion
Team Orion Advantage One User manual

Team Orion
Team Orion advantage iq605 User manual

Team Orion
Team Orion Advantage Touch Instruction manual


