Team Orion Advantage One 405 User manual
INSTRUCTION MANUAL
BEDIENUNGSANLEITUNG
MODE D‘EMPLOI

Team Orion Advantage ONE 405
2 - English
Thank you for choosing this Team Orion Advantage One
charger. This charger features the latest developments
in battery charging technology. It is compatible with the
most popular battery types and can use either an AC or
DC power source. Please read these instructions carefully
before using the charger.
All instructions, warranties and other collateral documents
are subject to change at the sole discretion of Team Orion.
aWARNING! Read the entire instruction manual
to become familiar with the features of the product
before operating. Failure to operate the product cor-
rectly can result in damage to the product, personal
property and cause serious injury. This is a sophis-
ticated hobby product. It must be operated with
caution and common sense and requires some basic
mechanical ability. Failure to operate this product
in a safe and responsible manner could result in
injury or damage to the product or other property.
This product is not intended for use by children
without direct adult supervision. Do not attempt
disassembly, use with incompatible components or
augment product in any way. This manual contains
instructions for safety, operation and maintenance.
It is essential to read and follow all the instructions
and warnings in the manual, prior to assembly,
setup or use, in order to operate correctly and avoid
damage or serious injury. Not for children under 14
years. This is not a toy.
SAFETY PRECAUTIONS AND WARNINGS
aWARNING! Failure to exercise caution while using
this product and comply with the following warnings
could result in product malfunction, electrical
issues, excessive heat, re and ultimately injury and
property damage. When charging batteries, the use
of a re retardant/proong bag or container (such as
a LiPo safety bag) is strongly recommended.
a
Never simultaneously connect the charger to an AC and
DC power source.
aNever connect the charger to an AC power source with
the DC power cord still connected to the charger.
a
Never leave the charger unattended while it is powered
on.
aNever allow children under 14 years of age to charge
batteries without the supervision of an adult.
a
Never charge the battery while it is inside the RC model.
a
Never attempt to charge dead, damaged or wet bat-
teries.
aNever attempt to charge a battery containing different
types of cells.
a
Never attempt to charge a battery if you don’t have
charge leads with compatible connectors.
ENGLISH

www.teamorion.com
English - 3
a
Never attempt to charge LiPo batteries which are not
equipped with a compatible balancing connector.
a
Never attempt to charge LiPo batteries without connec-
ting their balancing connector to the charger.
a
Never charge other types of batteries than 2 - 4S
(7.4 - 14.8V) LiPo or 1-10 cell (1.2 - 12V) NiMH/NiCd
batteries.
aNever charge batteries in extremely hot or cold places
or place in direct sunlight.
aNever charge batteries near ammable materials.
aNever charge batteries in in the presence of humidity.
a
Never charge a battery if the cables have been pinched
or shorted.
aNever connect the charger if the power cable has been
pinched or shorted.
aNever obstruct the charger’s cooling vents.
a
Never attempt to dismantle the charger or use a da-
maged charger.
aNever drop the charger or batteries.
a
Always make sure you are using a stable power source.
aAlways disconnect the DC power cord before connec-
ting the charger to an AC power source.
a
Always connect the charger to the power source rst
and then connect the battery to the charger. Reverse
the sequence when disconnecting.
aAlways connect the charge lead to the charger before
connecting it to the battery. Reverse the sequence when
disconnecting
a
Always charge only rechargeable batteries designed for
use with this type of charger.
aAlways follow the battery manufacturer charge recom-
mendations.
a
Always make sure you select the correct battery type
setting before charging the battery.
a
Always make sure you select the correct charge set-
tings, before charging the battery.
aAlways make sure you use compatible charge leads.
aAlways connect the battery balancing connector to the
charger when charging LiPo batteries.
a
Always inspect the battery and charger for damage
before charging the battery.
a
Always keep the battery and charger away from any
material that could be affected by heat.
aAlways charge in a well-ventilated area.
a
Always monitor the charging area and have an ABC dry
chemical re extinguisher available at all times.
a
Always end the charging process if the battery becomes
hot to the touch or starts to change form (swell) during
the charge process.
a
Always disconnect the battery after charging and let the
charger cool between charges.
aAlways terminate all processes and contact an authori-
zed retailer or Team Orion if the product malfunctions.
Team Orion Advantage ONE 405
4 - English
ONE4
0
5
1A 2A 3A 4A
--
++
NIMH
START
NIMH
START
NIMH LIPO
LIPO
START
LIPO
START
54
1
3
7
6
2
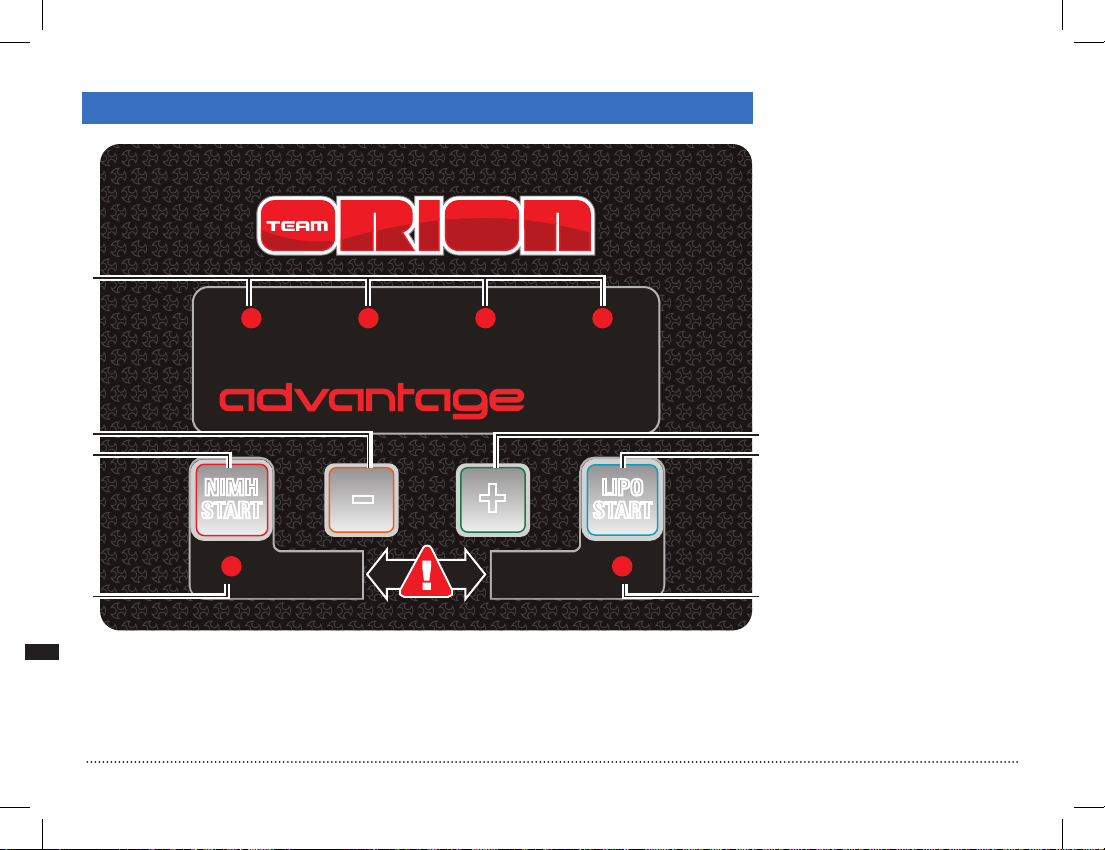
FRONT PANEL
3. LIPO CHARGE LED
Indicates that a LiPo
battery is connected to the
charger. Displays current
LiPo charge status.
4. DECREASE CHARGE
CURRENT KEY
Decrease charge current
setting before starting the
charge.
5. INCREASE CHARGE
CURRENT KEY
Inrease charge current
setting before starting the
charge.
6. NIMH START/STOP KEY
Start/stop NiMH/NiCd
charge.
7. LIPO START/STOP KEY
Start/stop LiPo charge.
1. CHARGE CURRENT DISPLAY LED
Displays charge current setting or actual charge current during charge.
2. NIMH CHARGE LED
Indicates that a NiMH/NiCd battery is connected to the charger. Displays
current NiMH/NiCd charge status.

www.teamorion.com
English - 5
FEATURES
TECHNICAL SPECIFICATIONS
Works with AC and DC power sources
Integrated power supply
Microprocessor controlled
Simplied LED display
1A to 4A adjustable charge current
Charges NiMH/NiCd batteries with batteries to 1 to 10 cells
Charges LiPo batteries with 2 to 4 cells
Integrated balancer w/JST-XH balance ports
Automatic charge cut-off
AC Input voltage 100-240VAC 50/60HZ
DC Input voltage 11-15VDC
Charge current 1 to 4A in 1A increments, 50W max
Balance current 400mA
Compatible batteries LiPo 2 to 4 cells - NiMH/NiCd 1 to 10 cells
Battery connectors 4mm bullet charge outputs / JST-XH balancing
Safety timer 120 minutes
Dimensions 138x125x54mm
Weight 375g

Team Orion Advantage ONE 405
6 - English
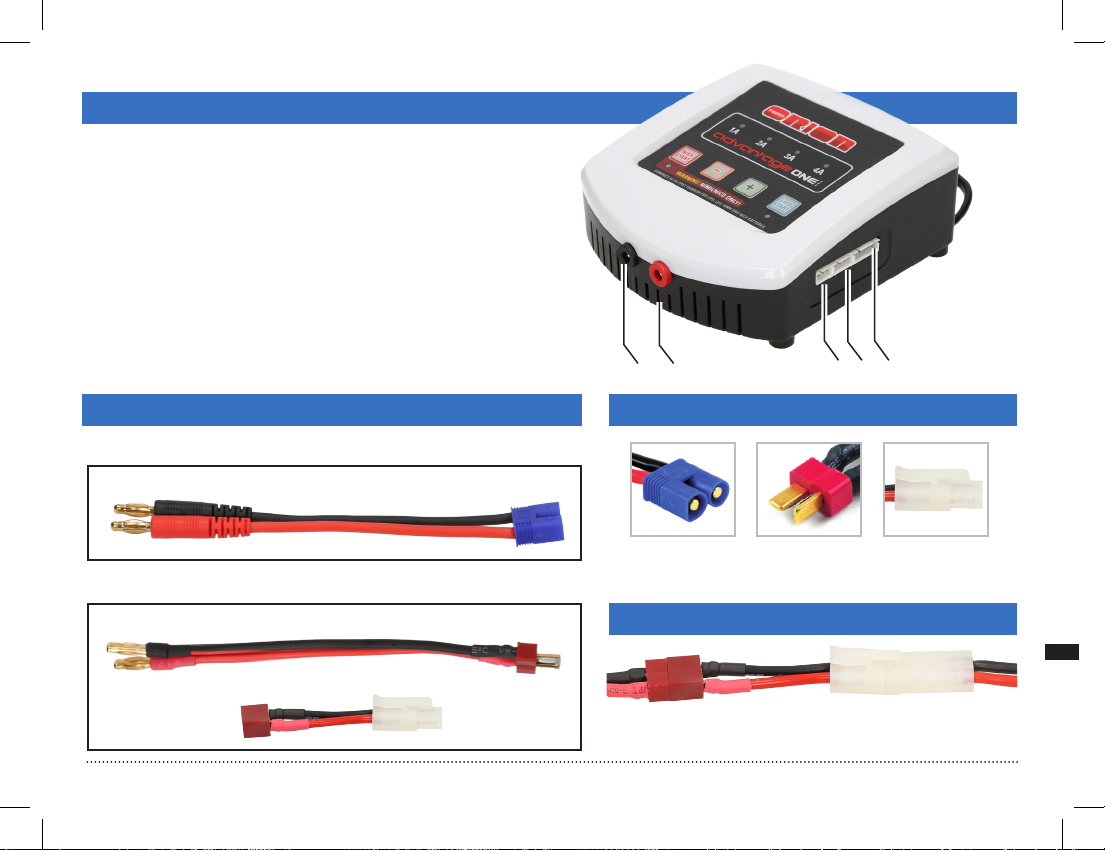
AC/DC POWER INPUT 1. Mains 100-240VAC Power Cord
2. DC Power 11-15VDC Input
AC Power: connect the power cord
to a 100-240VAC mains power outlet.
Make sure the plug is of the same
type as the outlet.
DC power: connect the DC power
cord plug (a) to the DC power connec-
tor (2) and then connect the crocodile
clips (b) to a 11-15VDC power source
such as a car battery or power supply.
Respect the polarities + red positive
and - black negative and make sure
the connection is reliable.
USA CH UKEU
1) AC Power Cord
2
aNever simultaneously connect the
charger to an AC and DC power source.
(a)
DC Power Cable
(b)
aNever connect the charger to
AC power with the DC power cord
connected to the charger.
+
-
www.teamorion.com
English - 7
BATTERY CONNECTIONS
21 3 4 5
1. - Negative Charge Output (4mm)
2. + Positive Charge Output (4mm)
3. 2S Balancing Port (JST-XH)
4. 3S Balancing Port (JST-XH)
5. 4S Balancing Port (JST-XH)
CHARGE LEADS AND ADAPTERS CONNECTORS
EC3®
Connector
Deans®
Connector
Tamiya®
Connector
Deans/Tamiya Adapter
EC3 Charge Lead
US Version:
Other Versions:
Deans Charge Lead ADAPTER CONNECTION
◀ to charger Deans/Tamiya Adapter
(only EU/CH/UK) to battery▶

Team Orion Advantage ONE 405
8 - English
CONNECTING A LIPO BATTERY
1. 2S 7.4V Two Cell LiPo Battery
2. Battery Connectors (Deans)
3. Charge lead
4. 2S Balancing Connector JST-XH
5. 4mm Charge Output (+) positive red
6. 4mm Charge Output (-) negative black
1
2
4
5
6
Connect the charge lead to the charger‘s charge outputs, res-
pecting polarities, red + positive, black - negative. Connect the
battery to the charge lead (use only compatible connectors).
Connect the battery‘s balancing connector to the correct balan-
ce connector on the charger (JST-XH type).
3

www.teamorion.com
English - 9
CONNECTING A NIMH/NICD BATTERY
1
2
1. 6 Cell 7.2V NiMH Battery
2. Battery Connectors (Deans)
3. Charge lead
4. 4mm Charge Output (+) positive red
5. 4mm Charge Output (-) negative black
3
Connect the charge lead to the charger‘s charge outputs, res-
pecting polarities, red + positive, black - negative. Connect the
battery to the charge lead (use only compatible connectors).
4
5

Team Orion Advantage ONE 405
10 - English
POWER SUPPLY
aWARNING! Never connect the charger simulta-
neously to an AC and DC power source. Use only
a compatible and reliable power source. Never
connect the charger to AC power with the DC power
cord still connected to the charger. Do not leave
the charger without supervision while it is powered
on. Always disconnect the charger from the power
source when not in use. Power supply issues can
cause the charger to malfunction and cause re,
damage to the product, to personal property and
cause serious injury.
The charger can be powered from an AC power source
such as mains power outlet or a DC power source such as
a car battery. Only use one type of power source at a time.
AC power source: connect the AC power cord plug into a
100-240VAC power source such as a mains power outlet.
Only connect to an outlet which is compatible with the
power cord plug type.
DC power source: plug the DC power cord into the DC
power connector located at the back of the charger.
Connect the crocodile clips to a 11-15VDC/6A min. power
source. Respect polarities, red is positive + and black is
negative -. Make sure that the connection is reliable.
CHARGING BATTERIES
aWARNING! Always use charge settings which
are compatible with the battery. Always use only
compatible connectors. Always monitor the charging
process. Always disconnect the battery from the
charger once the charge is nished. Always end
the charging process if the battery becomes hot to
the touch or starts to change form (swell) during
the charge process. Failure to carefully setup the
charger and monitor the charge process can result
in re, property damage or injury!
Battery connector : one charge lead with one battery
connector type is supplied with the charger (Deans or
EC3, depending on the version). If your battery uses a
different type of connector, you will have to purchase a
compatible charge lead or adapter separately.
Adapter : a Deans to Tamiya adapter is also included
with certain versions of the charger. This allows you to
charge batteries equipped with Tamiya connectors by
connecting the adapter between the battery and charge
lead.
Safety timer : The charger features a 120 minutes safety
timer. This means that after 120 minutes the charge will
stop whether the battery is fully charged or not. Depending
on the battery type you are charging, you may have to
restart the charge to achieve a full charge of the battery.
YOU CAN STOP THE CHARGE PROCESS AT ANY TIME
BY PRESSING THE NIMH OR LIPO START KEY!

www.teamorion.com
English - 11
Charge current
aWARNING! The minimum charge rate of this char-
ger is 1A, this could be too high for certain batteries.
Using a too high charge current, can overload the
battery and result in re, property damage or injury!
Always follow the battery manufacturer recommen-
dations.
After you have connected the battery, you can adjust the
charge current from 1A to 4A (in 1A steps), using the +
and – keys.
A higher charge current charges the battery faster. The
norm is to use a charge current of 1C, equal to one time
the battery capacity (ex. 4000mAh battery = 4A charge
current).We recommend using the lower charge rate
setting which is the closest to your battery capacity , for
example for a 1200mAh battery use 1A, for a 3300mAh
battery, use 3A.
NOTE : The charge current LED light in relation to the
setting and during the charge they indicate the effective
charge current. Depending on the battery type, the charge
current might be lower than the setting (not all the LED
will be lit).
LiPo batteries
aWARNING! LiPo batteries must be equipped
with two connectors, one for charging and one for
balancing! Never charge a LiPo battery without
connecting its balancing connector to the correct
balancing port on the charger! Never use NiMH
mode to charge a LiPo battery, this will likely cause
the battery to overcharge, fail and risk causing re,
property damage and personal injury.
aCHARGING LIPO BATTERIES WITHOUT BALANC-
ING IS NOT POSSIBLE.
When a LiPo battery is properly connected to
the charger (battery connector + balancing
connector), LiPo charge mode is activated
and the LIPO CHARGE LED flashes green.
Balancing : The charger‘s integrated balancing ports use
JST-XH type connectors. If your battery uses a different
connector type, you will have to purchase compatible
adapters separately. LiPo batteries use different balance
connector sizes depending on the number of cells inside
them; make sure that you are connecting the balancing
connector into the correct balance port on the charger.
Thanks to the balancing function, the charger can measure
the individual cells voltage and adapt the charge process
accordingly. Depending on the cells unbalance and battery
state, the charge will take more or less time to complete.

Team Orion Advantage ONE 405
12 - English
LiPo Charging procedure
Connect the battery to the charger using the charge
lead.
Connect the battery balancing connector to the
correct balance port on the charger.
Verify that the LIPO CHARGE LED ashes green.
Select the charge current 1, 2, 3 or 4A, using the +
and – keys.
Press the LIPO START key to start the charge, the
LIPO CHARGE LED lights solid red.
Once the charge is completed, the LIPO CHARGE
LED lights solid green.
Disconnect the battery.
YOU CAN STOP THE CHARGE PROCESS AT ANY
TIME BY PRESSING THE LIPO START KEY.
NiMH/NiCd batteries
NiMH/NiCd batteries require only one connection to the
charger.
NIMH AND NICD BATTERIES ARE BOTH CHARGED
USING THE NIMH MODE.
WHEN A BATTERY IS CONNECTED TO THE
CHARGE LEAD AND NO BALANCE CONNECTOR
IS PRESENT, NIMH CHARGE MODE IS ACTIVATED
AND THE NIMH CHARGE LED FLASHES GREEN.
NiMH/NiCd Charging procedure
Connect the battery to the charger using the charge
lead
Verify that the NIMH CHARGE LED ashes green
Select the charge current, 1, 2, 3 or 4A, using the +
and – keys.
Press the NIMH START key to start the charge, the
NIMH CHARGE LED lights solid red.
Once the charge is completed, the NIMH CHARGE
LED lights solid green.
Disconnect the battery when the charge is completed
YOU CAN STOP THE CHARGE PROCESS AT ANY
TIME BY PRESSING THE NIMH START KEY.
www.teamorion.com
English - 13
TROUBLESHOOTING
The charger’s LED display information about the charger’s
current state. Refer to the table below for more information.
NOTE: different types of defects can cause the same error
message; we cannot guarantee that the charger’s indica-
tions and the proposed solutions are always appropriate.
LED STATE MEANING / SOLUTION
NIMH CHARGE LED
FLASHING GREEN
NiMH/NiCd battery
connected, no balancing
connector detected.
LIPO CHARGE LED
FLASHING GREEN
LiPo battery connected,
balancing connector
detected.
NIMH CHARGE LED
RED
NiMH/NiCd battery
charging.
LIPO CHARGE LED RED LiPo battery charging.
NIMH CHARGE LED
GREEN
NiMH/NiCd battery charge
complete.
LIPO CHARGE LED
GREEN
LiPo battery charge
complete.
BOTH LED FLASHING
RED
Battery or connection
error, check battery and
connections.
RED + GREEN LED
FLASHING
Power supply issue, check
power source
LIMITED WARRANTY
Team Orion warrants to the original purchaser that the
product purchased is free from defects in materials and
workmanship at the date of purchase. Team Orion reserves
the right to change or modify this warranty without notice
and disclaims all other warranties, express or implied.
This warranty is limited to the original purchaser and is
not transferable. Replacement as provided under this
warranty is the exclusive remedy of the purchaser. This
warranty covers only the products purchased from an
authorized dealer. Third party transactions are not covered
by this warranty. Proof of purchase is required for warranty
claims. Team Orion makes no warranty or representation,
express or implied, about non infringement, merchantabi-
lity or tness for a particular purpose of the product. The
purchaser acknowledges that they alone have determined
that the product will suitably meet the requirements of the
purchaser’s intended use.
PURCHASER’S REMEDY
Team Orion’s sole obligation hereunder shall be that it will,
at its option, repair or replace any product determined by
Team Orion to be defective in the event of a defect, this is
the purchaser’s exclusive remedy. Replacement decisions
are at Team Orion’s sole discretion. This warranty does not
cover cosmetic damage or damage due to acts of God,
accident, misuse, abuse, negligence, commercial use, or
modication of or to any part of the product. This warranty

Team Orion Advantage ONE 405
14 - English
does not cover damage due to improper installation,
operation, maintenance or attempted repair by anyone.
LIMITATION OF LIABILITY
Team Orion will not be liable for special, indirect or
consequential damages, loss of prots or production or
commercial loss in any way connected with the product,
whether claim is based in contract, warranty, negligence,
or strict liability. Further, in no event shall the liability of
Team Orion exceed the individual price of the product on
which liability is asserted. As Team Orion has no control
over use, setup, nal assembly, modication or misuse, no
liability shall be assumed nor accepted for any resulting
damage or injury. By the act of use, setup or assembly the
user accepts all resulting liability. If you as the purchaser
or user are not prepared to accept the liability associated
with the use of this product, you are advised to return this
product immediately in new and unused condition to the
place of purchase.
QUESTIONS, ASSISTANCE AND SERVICE
If you need assistance, please contact your local hobby
store and/or place of purchase. If they cannot provide sup-
port, please contact your local Team Orion representative.
If it is determined that the product should be returned for
service, this will be done at the expense of the user. Team
Orion or the local representative are not responsible for the
merchandise until it arrives and is accepted at their facility.
A copy of the original sales receipt must be included for
warranty consideration. Provided warranty conditions have
been met, your product will be serviced or repaired free of
charge. Service or repair decisions are at the sole discre-
tion of Team Orion. Should Team Orion decide that the
defect is not covered under warranty, Team Orion reserves
itself the right to request payment for servicing, replacing
and/or returning the product to the customer.
Instructions for disposal of WEEE by users in the
European Union
This product must not be disposed of with other waste. Ins-
tead, it is the user’s responsibility to dispose of their waste
equipment by handing it over to a designated collections
point for the recycling of waste electrical and electronic
equipment. The separate collection and recycling of your
waste equipment at the time of disposal will help to con-
serve natural resources and ensure that it is recycled in
a manner that protects human health and the environment.
For more information about where you can drop off your
waste equipment for recycling, please contact your local
city ofce, your household waste disposal service or where
you purchased the product.

www.teamorion.com
English - 15
NOTES

Team Orion Advantage ONE 405
16 - Deutsch
Vielen Dank, dass Sie sich für den Team Orion Advantage
ONE Lader entschieden haben. Dieses Gerät ist mit der
neusten Ladetechnologie ausgestattet. Es ist mit den
beliebtesten Akku-Typen kompatibel und kann an eine 12V
oder 220V Stromquelle angeschlossen werden. Lesen Sie
diese Anleitung und Warnungen vollständig durch.
Änderungen von Anleitungen, Garantie- und Sicherheits-
bestimmungen liegen ausschließlich im Ermessen von
Team Orion.
aACHTUNG! Lesen Sie die Anleitung vor dem
Gebrauch vollständig durch, damit Sie alle Eigen-
schaften des Produkts verstehen. Wird das Produkt
nicht korrekt betrieben, kann dies zu Schäden am
Produkt oder persönlichem Eigentum führen oder
schwere Verletzungen verursachen. Dies ist ein
hochentwickeltes Hobby-Produkt. Es muss mit Vor-
sicht und gesundem Menschenverstand betrieben
werden und benötigt gewisse mechanische Grund-
fähigkeiten. Wird dieses Produkt nicht auf eine
sichere und verantwortungsvolle Weise betrieben,
kann dies zu Verletzungen oder Schäden am Produkt
oder anderen Sachwerten führen. Dieses Produkt
eignet sich nicht für die Verwendung durch Kinder
ohne direkte Überwachung eines Erwachsenen.
Versuchen Sie nicht das Produkt zu zerlegen, es mit
inkompatiblen Komponenten zu verwenden oder auf
jegliche Weise zu erweitern. Diese Bedienungsan-
leitung enthält Anweisungen für Sicherheit, Betrieb
und Wartung. Es ist unbedingt notwendig, vor
Zusammenbau, Einrichtung oder Verwendung alle
Anweisungen und Warnhinweise im Handbuch zu
lesen und zu befolgen, damit es bestimmungsgemäß
betrieben werden kann und Schäden oder schwere
Verletzungen vermieden werden. Nicht geeignet für
Kinder unter 14 Jahren. Dies ist kein Spielzeug.
SICHERHEIT UND WARNUNG
aWARNUNG: Unaufmerksamkeit oder falscher
Gebrauch des Produktes in Zusammenhang mit
den folgenden Warnungen kann zu Fehlfunktionen,
elektrischen Störungen, große Hitzeentwicklung,
FEUER, und tödlichen Verletzungen und Sachbes-
chädigungen führen.
a
Verbinden Sie das Gerät nie gleichzeitig mit einer
12VDC und 220VAC Stromquelle
a
Lassen Sie das Ladegerät niemals unbeaufsichtigt
während des Betriebes.
a
Laden Sie nie defekte, beschädigte oder nasse/feuchte
Akkus.
a
Laden Sie nie einen Akku, der aus verschiedenen
Zelltypen besteht
a
Versuchen Sie nie einen Akku zu laden, von dem sie
nicht das passende Ladekabel besitzen
DEUTSCH

www.teamorion.com
Deutsch - 17
a
Laden Sie ausschließlich Akkus des Typs 2-4S (7.4-
14.8V) LiPo oder 1-10 Zellen (1.2-12V) NiMH/NiCd.
a
Lassen Sie Kinder unter 14 Jahren niemals ohne
Beaufsichtigung der Eltern Akkus laden.
aLaden Sie niemals Akkus in extremer Hitze oder Kälte
oder in direkter Sonneneinstrahlung.
a
Laden Sie niemals in der Nähe von brennbaren Ma-
terialien.
aLaden Sie niemals in der Nähe von Nässe und hoher
Feuchtigkeit.
a
Laden Sie keine Akkus dessen Kabel beschädigt,
punktiert oder gekürzt ist.
a
Verbinden Sie immer zuerst das Ladekabel mit dem
Ladegerät und erst dann den Akku mit dem Ladekabel,
um Kurzschlüsse zu vermeiden. Nach der Ladung zie-
hen Sie zuerst den Akku aus, bevor Sie das Ladekabel
vom Gerät trennen.
a
Schließen Sie niemals das Ladegerät an wenn das
Kabel punktiert oder gekürzt ist.
a
Verdecken Sie nie die Lüftungsöffnungen des Lade-
geräts.
aVersuchen Sie niemals das Ladegerät auseinanderzu-
bauen oder ein beschädigtes Ladegerät in Betrieb zu
nehmen.
aLassen Sie die Akkus oder das Gerät nicht fallen
aVerwenden Sie immer eine stabile Stromquelle.
a
Benutzen Sie ausschließlich wiederauadbare Akkus
die für das Laden mit diesem Ladegerät geeignet sind.
a
Wählen Sie immer den korrekten Akku-Typ bevor Sie
den Akku an das Ladegerät anschließen
a
Wählen Sie immer die korrekten Ladeeinstellungen,
bevor Sie den Akku laden
aVerwenden Sie immer kompatible Ladekabel
a
Prüfen Sie vor dem Laden immer den Akku und das
Ladegerät auf Beschädigungen.
a
Halten Sie Akku und Ladegerät immer fern von brennba-
ren Materialien oder solchen, die von Hitze beschädigt
werden.
aLaden Sie nur in gut belüfteten Räumen
aÜberwachen Sie die Ladung stets und halten Sie einen
Feuerlöscher mit ABC-Löschpulver bereit.
aWenn der Akku heiß wird oder sich aufbläht, beenden
Sie die Ladung sofort.
a
Verbinden Sie das Ladegerät immer zuerst mit einer
Stromquelle, bevor Sie einen Akku anschließen. Gehen
Sie nach Beenden der Ladung in umgekehrter Reihen-
folge vor.
aZiehen Sie den Akku nach der Ladung immer aus und
lassen Sie das Ladegerät zwischen zwei Ladungen
abkühlen.
a
Bei Fehlfunktionen des Geräts beenden Sie alle
Prozesse, trennen das Gerät von der Stromquelle und
kontaktieren ihren Fachhändler oder Team Orion.

Team Orion Advantage ONE 405
18 - Deutsch
ONE4
0
5
1A 2A 3A 4A
--
++
NIMH
START
NIMH
START
NIMH LIPO
LIPO
START
LIPO
START
54
1
3
7
6
2
BEDIENUNG
3. LED für die Anzeige
einer LiPo Ladung
Zeigt an, dass ein LiPo
Akku angeschlossen ist
und informiert über den
Ladezustand des LiPo
Akkus
4. Ladestrom verringern
Ladestrom vor der Ladung
verringern
5. Ladestrom erhöhen
Ladestrom vor der Ladung
erhöhen
6. NiMH Ladung starten/
stoppen
7. LiPo Ladung starten/
stoppen
1. LEDs für die Anzeige des Ladestroms
Zeigt den eingestellten oder aktuellen Ladestrom an.
2. LED für die Anzeige einer NIMH Ladung
Zeigt an, dass ein NiMH/NiCd Akku angeschlossen ist und informiert über
den Ladezustand des NiMH/NiCd Akkus

www.teamorion.com
Deutsch - 19
EIGENSCHAFTEN
TECHNISCHE DATEN
Funktioniert mit 100-240VAC und 11-15VDC Stromquellen
Integriertes Netzteil
Mikroprozessor gesteuert
Vereinfachte LED Anzeige
Ladestrom von 1A bis 4A
Lädt NiCd/NiMH Akkus mit 1-10 Zellen
Lädt LiPo Akkus mit 2-4 Zellen
Integrierter Balancer mit/JST-XH Anschluss
Automatische Ladeabschaltung
Eingangsspannung 100-240VAC 50/60HZ
Ausgangsspannung 11-15VDC
Ladestrom 1 bis 4A in 1A Schritten, max. 50W
Balancerstrom 400mA
Kompatibel mit LiPo-Akkus mit 2 bis 4 Zellen - NiMH/NiCd 1 bis 10 Zellen
Akku-Anschlüsse 4mm Goldstecker, JST-XH-Balanceranschluss
Sicherheitsabschaltung nach 120 Minuten
Abmessungen 138x125x54mm
Gewicht 375g

Team Orion Advantage ONE 405
20 - Deutsch
ANSCHLUSS AN EINE STROMQUELLE
USA CH UKEU
2
aVerbinden Sie den Lader niemals gleichzeitig mit
einer AC und DC Stromquelle.
1. 100-240VAC Netzanschluss
2. 11-15V Gleichstromanschluss
Verbinden Sie den Netzanschluss
mit einer 100-240VAC Stromquelle
oder verwenden Sie das beigelegte
12V-Anschlusskabel, um das Gerät
an eine 11-15VDC Gleichstromquelle
anzuschliessen.
12V Anschluss: Verbinden Sie zuerst
den Stecker a) mit dem Ladegerät
und danach die Krokodilklemmen
b) mit einer Autobatterie oder einem
stabilisierten 11-15VDC Netzteil.
1) Netzanschluss*
* Das Gerät wird mit nur einem Stecker gelie-
fert. Verwenden Sie den passenden Stecker
für Ihre Region.
a)
12V Anschlusskabel
b)
Table of contents
Languages:
Other Team Orion Batteries Charger manuals

Team Orion
Team Orion D48 User manual

Team Orion
Team Orion advantage iq605 User manual

Team Orion
Team Orion Advantage Touch Instruction manual

Team Orion
Team Orion Advantage One User manual

Team Orion
Team Orion Advantage ONE 406 User manual

Team Orion
Team Orion Advantage One User manual

Team Orion
Team Orion ProSpec Advantage User manual

Team Orion
Team Orion Advantage ONE 1X6A User manual

Team Orion
Team Orion ADVANTAGE TOUCH DUO V-MAX Instruction manual

Team Orion
Team Orion TWINSPEC advantage User manual


