TEC TEC SL-5900 Owner's manual

TEC
TECTEC
TEC
TEC Electronic Computing Scale
SL-5900 Series
Document No. EM3-31005F
Original Nov., 1989
(Revised Jan., 1992)
APPLICABLE MODELS
SL-5900-30-C2-US
SL-5900-35-C2-US
SL-5900-35-C4-US
SL-5900-36-C4-US
TOKYO ELECTRIC CO., LTD.

EM3-31005
TABLE OF CONTENTS
Page
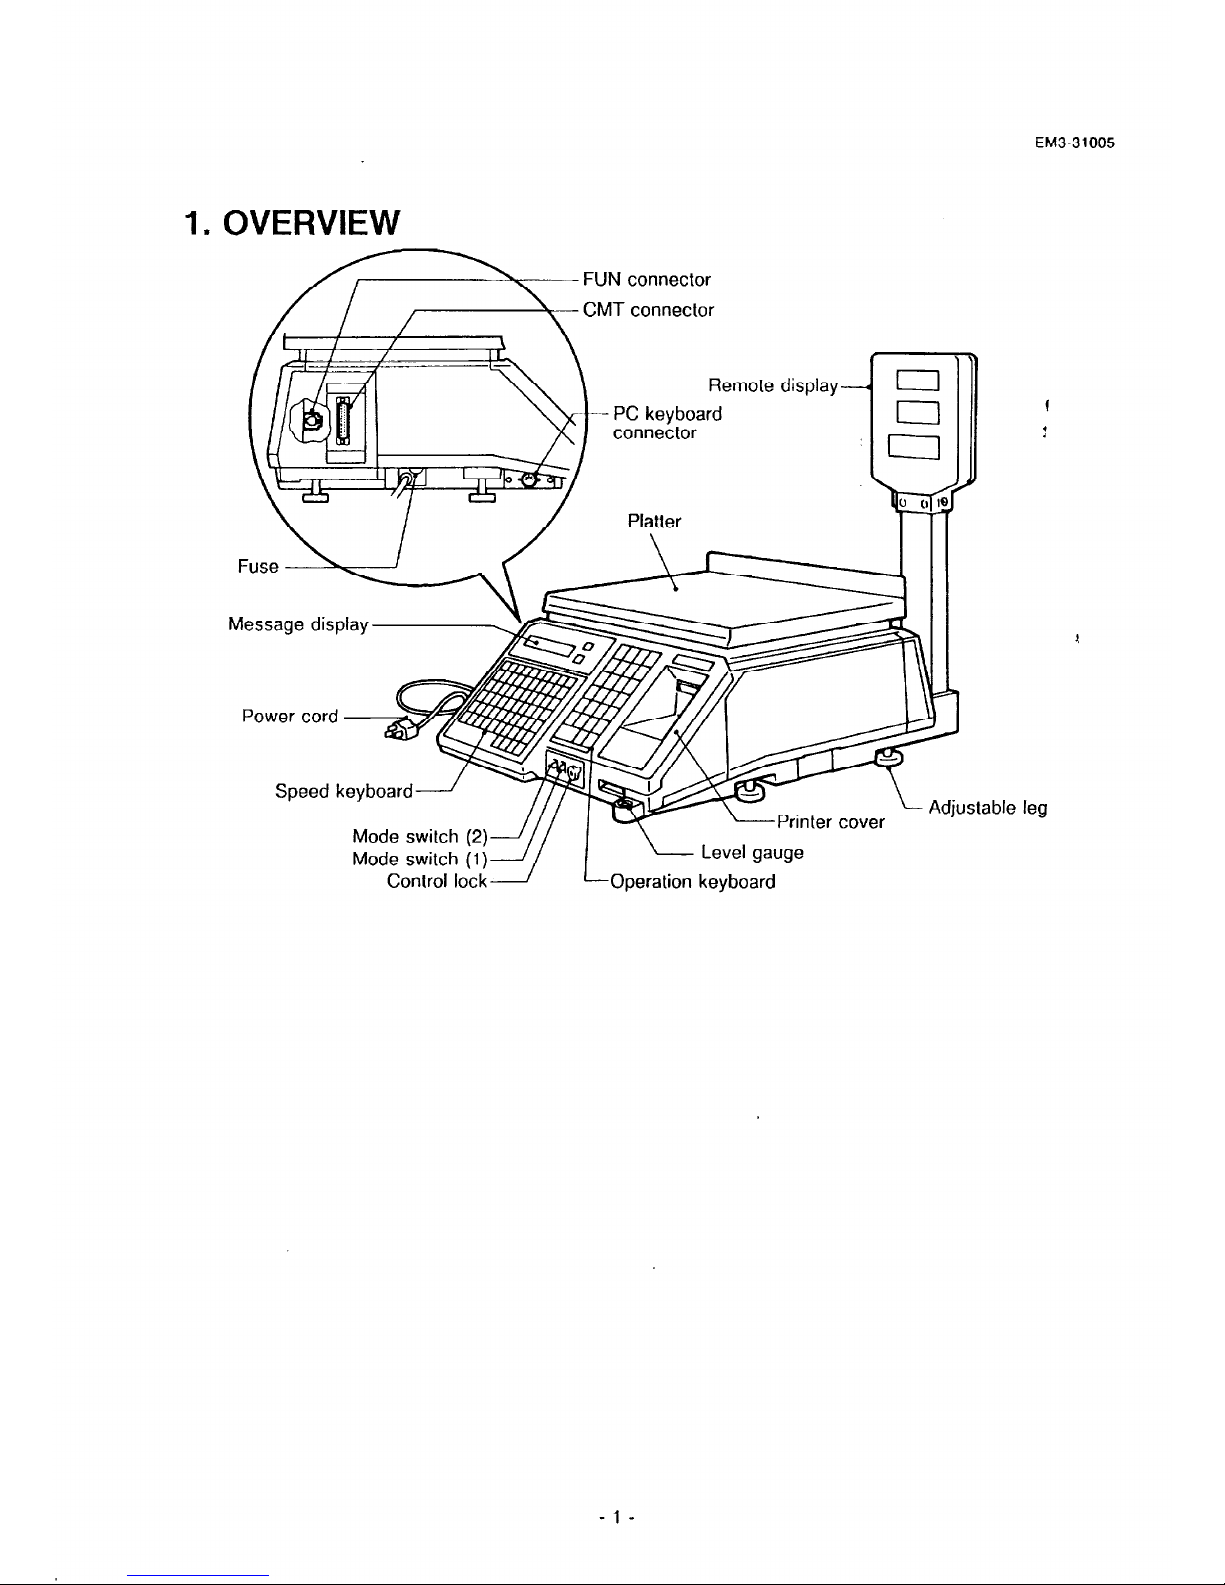
1. OVERVIEW . . . . . . . . . . . . . . . . . . . . . . . . . . . . . . . . . . . . . . . . . . . . . . . . . . . . . . . 1
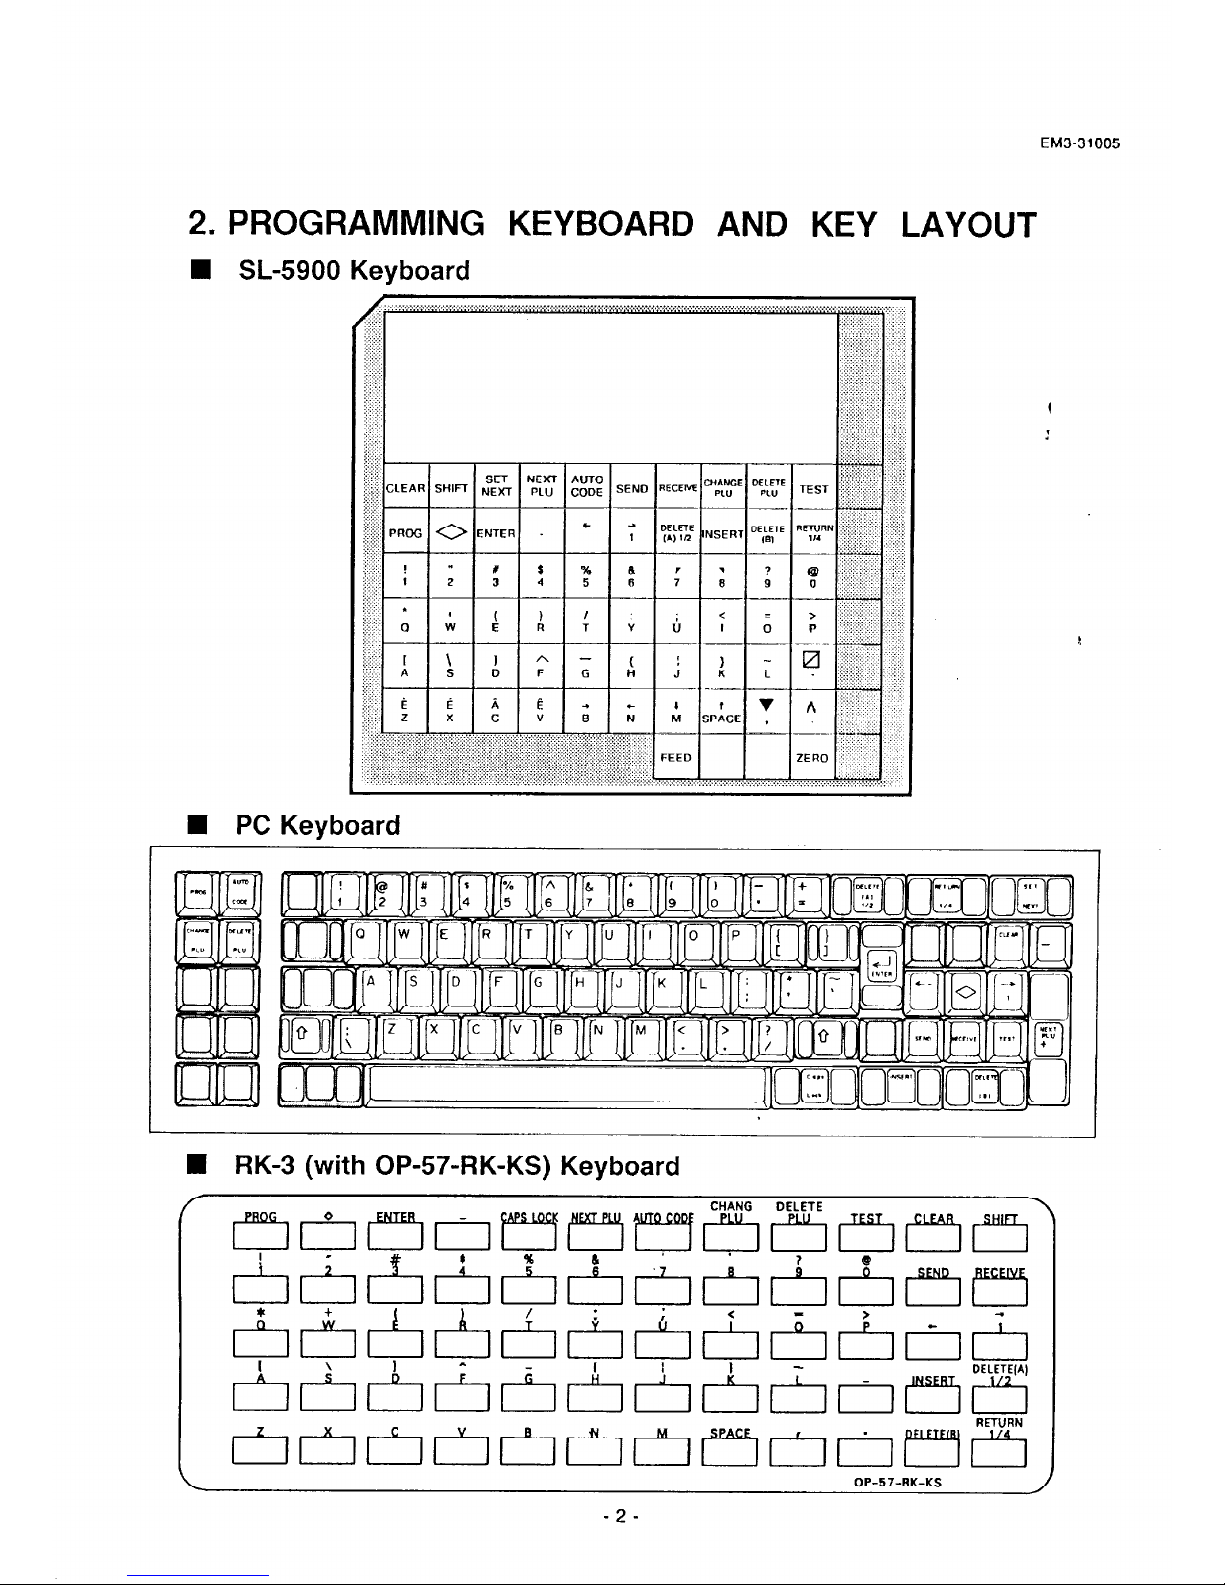
2. PROGRAMMING KEYBOARD AND KEY LAYOUT . . . . . . . . . . . . . . . . . . . . . . . . . . . 2
3. PROGRAMMING KEY FUNCTIONS . . . . . . . . . . . . . . . , . . , , . . . . . . . . . . . . . . . . . 3
4. CONTROL LOCK . . . . . . . . . . . . . . . . . . . . . . . . , . . . . . . . . . . . . . . . . . . . . . . . . . . 5
5. NOTES BEFORE STARTING PROGRAMMING .............................
5.1 Installing PC Keyboard .... , ................. , ................ , ...
5.2 Installing RK-3 Keyboard ......... . ................................
6. PROGRAMMING PROCEDURES .......................................
l
Selection of Programming Menu .....................................
Menu No. 0 :Changing Unit Price ......................................
Menu No. 1 :Setting or Changing PLU Data ...............................
Menu No. 2 :Setting Store Address or Commercial Message ...................
Menu No. 3 :Adjusting Print Position for Label .............................
Menu No. 4 :Setting Date, Time, Machine Number, and Store Number ...........
Menu No. 5 :CMT Operations ........................................
Menu No. 7 :Setting Bar Code Format ..................................
Menu No. 8 :Assigning Speed Keys ....................................
Menu No. 11 Setting Ingredient (for SL-5900-06 type only) ....................
Menu No. 12 :Issuing Confirmation Label (for SL-5900-•5JJ6 only) ..............
Menu No. 13 :Switching On-Line/Local (for SL-5900-[75/176 only) ................
Menu No. 17 :Setting Grade Line (for SL-5900-06 only) ......................
Menu No. 18 :Memory Card (for SL-5900-06 only) ..........................
Menu No. 20 :Transmitting PLU File, Unit Price,
Address or Speed Key (FUN System) ..........................
Menu No. 21 :Setting Clerk Name (for SL-5900-06 only) ......................
Menu No. 22 :Setting Report Message (for SL-5900-06 only) ..................
Menu No. 40 :Setting Print Item ON/OFF #1 ...............................
Menu No. 41 :Setting Print Item ON/OFF #2 ...............................
Menu No. 42 :Setting Average Resistance of Print Head ......................
Menu No. 99 : RAM Clear ............................................
7
7
8
9
14
15
16
17
21
24
25
29
30
31
32
34
36
37
38
39
40
41
l-14-10 Uchlkanda. Chiyoda-ku. Tokyo, JAPAN

EM3-31005
7. OUTLINE OF INITIAL SETTING . . . . . . . . . . . . . . . . . . . . . . . . . . . . . . . . . . . . . . . . 42
8. SWITCH AND KEY FUNCTIONS IN INITIAL SETTING ........................ 43
8.1 Initial Switch .................................................. 43
8.2 Opet-ation Keys ................................................ 43
9. INITIAL SETTING PROCEDURES ....................................... 44
9.1 Before Starting Initial Setting ....................................... 44
9.2 Initial Set Mode [PO] ............................................. 44
9.3 lnitialSetMode[Pl] ............................................. 47
9.4 Initial Set Mode [P2] ............................................. 51
9.5 Initial Set Mode [P3] ............................................. 52
9.6 Initial Set Mode [P4] ............................................. 53
9.7 Initial Set Mode [P5] ............................................. 54
9.8 Initial Set Mode [P6] ............................................. 55
9.9 Initial Set Mode [P7] ............................................. 56
10. FUNCTION TABLE FOR [P2] MODE . . . . . . . . . . . . . . . . . , . . . . . . . . . . . . . . . . . . . 57
11. STANDARD SETTINGS BY COUNTRY OF DESTINATION . . . . . . . . . . . . . . . . . . . . . 72

EM3-31005
1. OVERVIEW
FUN connector
CMT connector
Operation keyboard
-l-

EM3-31005
2. PROGRAMMING KEYBOARD AND KEY LAYOUT
W SL-5900 Keyboard
I
n
PC Keyboard
n
RK-3 (with OP-57-RK-KS) Keyboard

EM3-31005
3. PROGRAMMING KEY FUNCTIONS
Function
unction key. It is also used to release the scale from the
While this key is presse
letter of alphabet, or upper-case character indicated on the upper
f the key top. When this key is released, the shifted status is
current recalled PLU #. It is also used to skip the digit when setting
the bar code format.
used to delete such PLU data.

Function
line to the first line while setting the second line and during the setting
of the commodity name or store address.
This key is used to delete a character when setting the commodity
name or store address. 0 0 0
Fi H This key is used to insert
a
space at the digit when setting the
commodity name
or
store address. 0 0 0
pjy-q This key is used to clear all characters on the current setting line
when setting the commodity name or store address. 0 0 0
~~ This key is used to move the setting line when setting the commodity
name or store address. 0 0 0
Press this key to lock the keyboard into the shifted status. While this
key is pressed down, press a character key to set the small letter of x 0 0
alphabet. When this key is released, the shifted status is cancelled.
NOTE
: When the power is turned off or control lock is switched, the PC keyboard or RK-3 keyboard
will be initialized to select capital letters.
-4-

EM3-31005
4. CONTROL LOCK
The control lock has seven marked positions.
There are two control keys which will operate these locks.
Manager Key
This key (MA) will access the
PROGICMT, REG, OFF,
M.
DOWN, and REWRAP
positions.
l
SE Key
This key (SE) will access all
eight positions.
Each of the following positions on the control lock serves a different function.
IS posrtion 1suse
X (Read)
-5-

EM3-31005
5. NOTES BEFORE STARTING PROGRAMMING
1) Be sure to plug the power plug into an AC outlet.
2) Turn the control lock to “PROGCMT” position, and the scale will be placed in programming mode.
5.1 Installing PC Keyboard
If you set the data with PC keyboard, connect the PC keyboard plug
to
the PC
keyboard
connector.
Then check whether the keys on the PC keyboard can enter information properly or not.
NOTE:
The PC keyboard has its own particular baud rate. During the initial settings, therefore,
make sure to set the SL-5900 baud rate to match the keyboard’s baud rate.
5.2 Installing RK-3 Keyboard
If you set the data with RK-3 keyboard, prepare the Programming Keyboard Adapter OP-57-RK-3
(option) and Programming Keyboard RK-3 (option).
1) Connect the plug of the OP-57-RK-3 to the PC
keyboard
connector.
2) Connect the RK-3 keyboard connector to the OP-57-RK-3 connector.
3) Attach the key-sheet OP-57-RK-KS (accessory of OP-57-RK-3) to the RK-3 keyboard.
4) Check whether the keys on the RK-3 keyboard can enter information properly or not.
-6-

6. PROGRAMMING PROCEDURES
EM3-31005
l
Selection of Programming Menu
Turn the control lock to “PROGCMT”
position.
Select the menu
#. (Refer
to
table
1.)
Depress the PROG key.
Start the programming.
Depress the PROG key. (Finish)
Return the step #2 or select another
mode.
P
P
Pn
P
Menu #.
W Table 1 : Programming Menu Numbers and Their Functions
Menu No. item
0 Changing Unit Price
1 Setting or Changing PLU Data
2 Setting Store Address or Commercial Message
3 Adjusting Print Position for Label
4 Setting Date, Time, Machine Number, and Store Number
5 CMT Operations
7 Setting Bar
Code
Format
8 Assigning Speed Keys
11 Setting Ingredient (for SL-5900-[76 type only)
12 Issuing Confirmation Label (for SL-5900-m/06 type only)
13 Switching On-Line/Off-Line (for SL-5900-m/176 type only)
17 Setting Grade Line (for SL-5900-m type only)
18 Memory Card (for SL-5900-06 type only)
20 Transmitting PLU File or Unit Price Address or Speed Key (FUN System)
21 Setting Clerk Name (for SL-5900-06 only)
22 Setting Receipt Message
40 Setting Print Item ON/OFF #l
41 Setting Print Item ON/OFF #2
42 Setting Average Resistance of Print Head
99 RAM Clear
-7-

EM3-31005
l
Changing Unit Price
The unit price or price in the PLU that is previously stored can be changed with this menu.
PLW.
New unit
price
or price.
O-
I
PROG.
1 0 1
I
ENTER
I
1
2 5
I
ENTER
The setting
label is issued.
(Select another menu or mode.)
31
101
1.25
NOTES:
1.
Recalling a PLU# that has not been stored in the PLU file will result in an error.
The smallest
‘LlJ# in the
nemory is
displayed.
2. It is not available to change the unit price of a PLU if it has been set to “open price”.
-8-

EM3-31005
l
Setting or Changing PLU Data
Setting or changing the contents of PLU (PLU#, UPCX, Commodity Name, etc.).
Menu #.
-
I
AUTO
_ CODE
I
AUTO CODE
1 2 0
for the UPC#. I
- - -
I
ENTER
r
I I
c
I I
PLW.
UPC#.
(continued on next page)
P
Pl
Pl
Pl
Pl
Pl
Pl
Pl
Pl
1
10
10
1
1
2
2
3
I
101
101
0
The smallest
PLU# in the
memory is
displayed.
NOTES: 1. UPC# is set after overwriting with the
data
of AUTO CODE.
ex.1) Input 101
AUTO CODE 1 120--- ex.2) Input - 1234
AUTO CODE 1 120---
UPC# : 120101 UPc# : 120234
2. Contents cannot be set or programmed unless PLLM, UPC#, Commodity Name, etc.
are reset.
-9-

EM&31 005
Commodity
name.
2nd line
setting.
I,l,lylEIRI
l-l
ENTER
Quantity.
Unit price or
priCt3.
Unit price flag.
C
ENTER
l- Open price.
1 5 0
(for US)
(for US)
(for CA&G)
? ENTER
r 1OOg)
w
1
cl
ENTER
a
2
(continued on next page)
PI
Pl
P
PI
Pl
PI
Pl
Pl
Pl
Pl
PI
PI
PI
4
5
0
10
0
3
0.00
1.50
L-l
L-2
L-4
L-l 00
0
-lO-

EM341 005
Shelf life.
Tare weight.
2 0
+ a
I I
I 1
ENTER
No (standar
WEIGH
mode
-O-
BY COUNTmode -
1 +
FIX PRICE
mode
(for US only) I
ENTER
4 _
PROG.
(Select another menu or mode.)
NOTES:
Pl
Pl
Pl
Pl
Pl
Pl
Pl
Pl
D
or 1
-
1. The commodity name can be set in two lines. Each line can contain up to 26 characters
including spaces. Before setting the second line, depress the RETURN key.
2. When the quantity is 1 or more
(PLU
in BY COUNT mode), the unit price flag is skipped
automatically.
3. When the quantity is 1 or more (PLU in BY COUNT mode), the tare weight setting is skipped
automatically even if the tare weight setting has been enabled.
-ll-

EM3-31005
H Changing PLU Number
Menu #.
Current PLUX.
New PLU#.
1
I
PROG.
I
CHANGE
PLU
3 3
ENTER
I
3 5
47
L3
PROG.
(Select another menu of mode.)
P
Pl
Pl
Pl
Pl
Pl
Pl
P
NOTES: 1. It is not available to change to a PLU# which has already been used in the PLU file.
2. The PLU number cannot be changed unless the PLU# is reset.
- 12 -

EM%31 005
H Deleting PLU Data
Menu R.
PLU#.
I
ENTER
(Select another menu or mode.)
P
Pl
Pl
Pl
Pl
NOTE: All the data programmed for PLU#103 in the PLU file is deleted. If the scale goes into error
during a PLU deletion, it has not been reset or PLu# designated in the above procedure had
not been preset in the PLU file.
- 13 -

EMS31005
l
Setting Store Address or Commercial Message
With the SL-5900 scale, the store address or a commercial message can be set in the memory.
Menu #.
a
PROG.
or commercial
cl
PROG.
(Select another menu or mode.)
P
P2
.:.’
::;.
.:.:
:::
::::
3
,g
.:.:
..:.
.>i ..
2
1 0
P
2
NOTE: The store address or a commercial message can be set in two lines.
Each line can contain up to 26 characters including spaces. Before setting the second line,
depress the RETURN key.
- 14-

EM3-31005
l
Adjusting Print Position for Label
When a printed data position deviates from the normal position in the forward
or backward
direction
along the label feed direction, adjust the print position using the following procedure.
Menu X.
Feed value.
(O- 199)
Commodity name
position. (0 - 9)
Address position.
(O-9)
P3 Ll
P3 Ll
1 gradatic r=l dot= :O.154mm
P3 L2
P3 L2
5
t
6
1 gradatic I= 3 dots = 0.462mn
P3 L3
P3 L3
5
t
4
1 gradatic I= 3 dots = 0.462mn
P3 Ll
P
~
110
3
I
Standard value
(Select another menu or mode.}
-
NOTE: When the print position for a commodity name is lowered or raised, the print position for the
address is also lowered or raised. After adjusting the print position for the commodity name,
make sure to confirm the print position of the address.
Star
Star
lard \ralue
lard \ralue
- 15 -

EM-31 005
l
Setting Date, Time, Machine Number, and Store Number
Menu #.
Date.
(ex. Dec. 1, 1989)
Time. (ex. 15 : 30)
Machine #.
Store #.
Month (01 - 12)
Day (01-31)
Hour (00-23)
Minute (00 - 59)
(Select another menu or mode.)
P
P4
P4
P4
P4
P4
P4
P4
P
113089
12
1201
120189
800
15
1530
16
7
12018:
A
75
,::;:j
,::.::.
.;,.:
:::;:j
......
.I/.
.....
::,.:.
..I...
.A...
..
:...:)
..:.:x
ia
C
S
C
S
:urrent
etting date
Zurrent
etting time.
NOTES:
1. Express all time in a 24 hour military format.
2. The SL-5900 will check details of date (time) input, and any wrong date (time) will result in an
error mode. The correct date (time) should be re-entered after depressing the CLEAR key.
-16 -

EM3-31005
l
CMT Operations
The SL-5900 is designed to interface with a Cassette Magnetic Tape loader.
The CMT loader allows the transfer of the entire PLU file from the SL-5900 to magnetic tape.
This can be accomplished in a number of operation steps. In turn, information from the magnetic
tape can also be transferred to another SL-5900.
Menu #.
SAVE
(5900+cMT)
VERIFY
(5900 = CMT)
LOAD
(59004lvlT)
VERIFY
(5900 = CMT = SL66
LOAD
(5900tCMTtSL66
Rewind the
Tape.
D
-3 b
12--+
(for SL-5900-050)
(for SL-5900-~/06)
I
(Select another menu or mode
4
P
P5
P5
P5
P5
P5
P5
P5
P
3
5
1
2
3
12
13
n
5
w
j:’‘:‘-y..:
.: .:.:.:::::
:’ ,p::;::
:k:
$ .+:::c::
gg.L:
,fy,:
2..
.A....
..:...
,. x...::
B
-3,
-17-
Table of contents
Other TEC Scale manuals

TEC
TEC TEC EO1-31001 User manual

TEC
TEC TEC EM1-31071 User manual

TEC
TEC SL-4700 series User manual

TEC
TEC TEC EM1-31015 User manual

TEC
TEC TEC EM-31061A User manual

TEC
TEC TEC SL-9000-ESB-X SERIES User manual

TEC
TEC TEC SL59 SERIES User manual

TEC
TEC TEC SL59 SERIES User manual

TEC
TEC TEC EM1-31059 User manual

TEC
TEC SL-5300 SERIES User manual