Teccpo AJ23 User manual

User Manual
Delta Sander
SALES NO.:TAMS23P
MODEL NO.:AJ23

Company:Shenzhen Allsight E-business Co., Ltd
Web: www.teccpotools.com
Facebook: www.facebook.com/Teccpo.US
E-mail:[email protected]
Add.: Room 104, Building P09, south China City
Electronic trading Center, Longgang District, Shen Zhen, CHINA
Made in China

English 01~08
Contents
TECCPO is committed to providing the best After-sale Service,
we strive for your FIVE STAR satisfaction!

WARNING
Read all operating instructions carefully and comply with them.
Do not allow familiarity with power tools breed carelessness or contempt.
NOTICE
The term "power tool" in the warnings refers to your mains-operated (corded) power tool /
appliance or battery-operated (cordless) power tool / appliance
Work Area Safety
Keep work area clean and well lit. Cluttered or dark areas invite accidents.
Do not operate power tools in explosive atmospheres, such as in the presence of flammable
liquids, gases or dust. Power tools create sparks which may ignite the dust or fumes.
Keep children and bystanders away while operating a power tool. Distractions can cause you
to lose control.
Electrical safety
Power tool plugs must match the outlet. Never modify the plug in any way. Do not use any
adapter plugs with earthed (grounded) power tools. Unmodified plugs and matching outlets
will reduce the risk of electric shock.
Avoid body contact with earthed or grounded surfaces, such as pipes, radiators, ranges and
refrigerators. There is an increased risk of electric shock if your body is earthed or grounded.
Do not expose power tools to rain or wet conditions. Water entering a power tool will increase
the risk of electric shock.
Do not abuse the cord. Never use the cord for carrying, pulling or unplugging the power tool.
Keep cord away from heat, oil, sharp edges or moving parts. Damaged or entangled cords
increase the risk of electric shock.
When operating a power tool outdoors, use an extension cord suitable for outdoor use. Use of
a cord suitable for outdoor use reduces the risk of electric shock.
If operating a power tool in a damp location or where water and electricity in close proximity is
unavoidable, use an earth-leakage circuit-breaker such as a residual current device (RCD) or
ground fault circuit interrupter (GFCI) protected supply. Use of an RCD or GFCI reduces the
risk of electric shock.
Tools marked “Double Insulated” do not require grounding. They have a special double
insulation system which satisfies OSHA requirements and complies with the applicable
standards of Underwriters Laboratories, Inc., the Canadian Standard Association, and the
National Electrical Code.
Personal safety
Stay alert, watch what you are doing and use common sense when operating a power tool. Do
not use a power tool while you are tired or under the influence of drugs, alcohol or medication.
A moment of inattention while operating power tools may result in serious personal injury.
Prevent unintentional starting. Ensure the switch is in the off-position before connecting to
power source and/or battery pack, picking up or carrying the tool. have the switch on invites
accidents.
Remove any adjusting key or wrench before turning the power tool on. A wrench or a key left
attached to a rotating part of the power tool may result in personal injury.
Do not overreach. Keep proper footing and balance at all times. This enables better control of
- 01 -
1.
a)
b)
c)
2.
a)
b)
c)
d)
e)
f)
g)
3.
a)
b)
c)
d)
It is important to understand these instructions and to acquaint yourself with the tool, its
correct usage and all safety requirements. Failure to to do so may result in electric shock, fire
and/or serious personal injury.
Keep this owners manual in a safe and readily-available place.
If you give the tool to any other person, give them these operating instructions as well.
•
•
•
•
美

the power tool in unexpected situations.
Dress properly. Do not wear loose clothing or jewellery. Keep your hair, clothing and gloves
away from moving parts. Loose clothes, jewellery or long hair can be caught in moving parts.
If devices are provided for the connection of dust extraction and collection facilities, ensure
these are connected and properly used. Use of dust collection can reduce dust-related
hazards.
WARNING
Use personal protective equipment. Always wear eye protection. Protective equipment such
as dust mask, strong gloves, non-skid safety shoes, hard hat, or hearing protection used for
appropriate conditions will reduce personal injuries. Always use certified e.g. ANSI safety
equipment.
Wear protective safety glasses with side shields. The operation of any power tool can
result in flying debris. Everyday prescription eyeglasses are NOT protective safety
glasses.
Wear hearing protection. Under some conditions and duration of use, the operation of
this power tool may become noisy and affect hearing.
Wear a dust mask. Some dust created by power sanding, sawing, grinding, drilling, and
other construction activities, contain harmful chemicals. Reduce your risk of exposure to
these chemicals: work in a well ventilated area, and work with approved safety equipment,
such as those dust masks that are specially designed to filter out microscopic particles.
General Power Tool Use and Care
Do not force the power tool. Use the correct power tool for your application. The correct power
tool will do the job better and safer at the rate for which it was designed.
Do not use the power tool if the switch does not turn it on and off. Any power tool that cannot
be controlled with the switch is dangerous and must be repaired.
Disconnect the plug from the power source and/or the battery pack from the power tool before
making any adjustments, changing accessories, or storing power tools. Such preventive
safety measures reduce the risk of starting the power tool accidentally.
Store idle power tools out of the reach of children and do not allow persons unfamiliar with the
power tool or these instructions to operate the power tool. Power tools are dangerous in the
hands of untrained users.
Maintain power tools. Check for misalignment or binding of moving parts, breakage of parts
and any other condition that may affect the power tool's operation. If damaged, have the
power tool repaired before use. Many accidents are caused by poorly maintained power tools.
Keep cutting tools sharp and clean. Properly maintained cutting tools with sharp cutting edges
are less likely to bind and are easier to control.
Use the power tool, accessories and tool bits etc. in accordance with these instructions, taking
into account the working conditions and the work to be performed in a hazardous situation.
Have your power tool serviced by a qualified repair person using only identical replacement
parts. This will ensure that the safety of the power tool is maintained.
Specific Power Tool Safety Warnings
Hold the tool by its insulated gripping surfaces when performing an operation where the tool
may contact hidden wiring or its own cord.
Unplug the sander before changing accessories. Accidental startups may occur if sander is
plugged in while changing an accessory.
Always wear safety goggles and a dust mask when sanding, especially when sanding
overhead.
A suitable breathing respirator must be worn while sanding chemically pressure treated
e)
f)
g)
h)
i)
4)
a)
b)
c)
d)
e)
f)
g)
h)
5)
1)
2)
3)
4)
- 02 -
WARNING
Some dust created by power sanding, sawing, grinding, drilling and other construction
activities contains chemicals known to cause cancer, birth defects or other reproductive harm.
Some examples of these chemicals are: Lead from lead- based paints, Crystalline silica from
bricks, cement, other masonry products, Arsenic and chromium from chemically-treated lumber.
Your risk from these exposures varies, depending on how often you do this type of work. To reduce
your exposure to these chemicals work in a well ventilated area, and work with approved safety
equipment, such as dust masks that are specially designed to filter out microscopic particles.
CAUTION
Risk of injury due to vibrations. Vibrations may, in particular for persons with circulation
problems, cause damage to blood vessels and/or nerves. If you notice any of the following
symptoms, stop working immediately and consult a doctor. Numbness of body parts, loss of sense
of feeling, itching, pins and needles, pain, changes in skin colour.
You can reduce the risks considerably by following the tips below:
In The Box
- 03 -
Maintain the device in accordance with the instructions in the operating instructions.
Avoid working at low temperatures.
When it is cold, make sure your body and your hands, in particular, are kept warm.
Take regular breaks and move your hands at the same time to promote circulation.
–
–
–
–
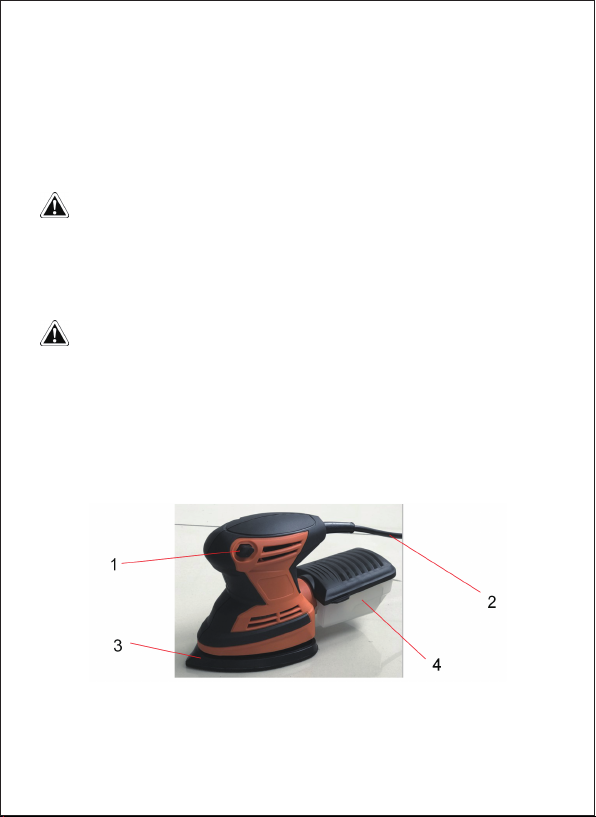
On/Off switch
Power Cord
Sanding baseplate
Dust box
1.
2.
3.
4.
objects.
Always wear ear protection during extended periods of operation.
Whenever possible, use clamping devices or other suitable means to secure the workpiece to
a firm surface.
Do not sand wet materials (e.g., wallpaper) or moist surfaces. Penetration of water into the
machine increases the risk of an electric shock.
Do not use sandpaper larger than needed. Extra paper extending beyond the sanding pad can
also cause serious lacerations.
Use the dust bag and empty it frequently. Do not throw sanding dust on an open fire because
materials in particle form may be explosive.
5)
6)
7)
8)
9)

Sandpaper 12pcs
Dustbox 1pc
For cleaning, deburring, smoothing, and sanding metal, wood, and plastic surfaces. Effective
removal of corrosion and surface contamination. Finish on metal surfaces. Smoothing wood
surfaces, removal of wood fibres before and after priming.
The unit is designed exclusively for non-commercial use to dry-sand wood, metal, plastic, plaster
and varnished surfaces. The appliance is not suitable for sanding plaster-based substrates.
SPECIFICATIONS
Model
Motor: 120V/60HZ 1.6A
No load speed: 15500R/MIN
Papertype: Hook & loop
OPERATING INSTRUCTIONS
INSTALLING AND REMOVING THE ABRASIVE DISC
CAUTION
For your safety, always turn off the switch and unplug the sander from the power source
before performing any maintenance or cleaning.
Replacement Sandpaper
Uses universal Velcro 3 7/8 in. x 5 1/2 in. detail sanding sheets with hook and loop backing found
in most home improvement stores. Sanding sheets can have holes, removable discs or slots.
To Remove.
- 04 -
Unplug the sander.
Remove all sanding dust or dirt from the sanding pad fig. 2
Align the holes on the abrasive disc with the holes in the sanding pad, making sure that the pad
is centered and the edges are aligned with the edges of the sanding pad.
Note: The holes in the abrasive disc must line up with the sanding pad holes for the dust
collection system to function properly.
Press the abrasive disc to the pad.
1.
2.
3.
4.
Unplug the sander.
Peel the disc off the sanding pad.
1.
2.
Fig.2

INSTALLING AND REMOVING THE DUST BOX
Your tool is equipped with a dust box , empty it frequently during use and before storing the sander.
Note: The sander’s dust collection system will only work if the sandpaper has holes that line up
with the dust collection holes in the baseplate (there are 4 other holes in the baseplate for the
screws). Sanding dust is only partially absorbed. Some dust remains on the work piece.
CAUTION
Be extremely careful of dust disposal, materials in fine particle form may be explosive. Do
not throw sanding dust on an open fire. Combustion from mixture of varnishes, lacquers,
polyurethane, oil or water with dust particles can occur if there is a static discharge, spark
introduced in the box, or excessive heat.
ON/OFF SWITCH
NOTICE
Always hold the sander off the work piece when turning the switch on or off. Contact the work piece
after the sander has reached its full speed and remove it from the work before turning the switch
off. Operating in this manner will prolong the tool life and will greatly increase the quality of your
work.
This random orbit sander is equipped with a ON/OFF switch, located on the front of the handle.
Make sure that the switch is in the off position (the “0” position, Fig. 4), then plug in the tool.
- 05 -
To install dust box, align the notches on both sides of dust bag with the buckles on both sides of
dust port and push the dust bag completely onto place over the dust port on the back of the
sander (Fig. 3).
To remove dust box , simply pull away from the tool.
1.
2.
TO TURN OFF: press the switch to the off position (the ”0” position, Fig. 4).
TO TURN ON: press the switch to the on position (the “I” position, Fig. 5).
1.
2.

Always hold the sander off the work piece when turning the switch on or off. Run the sander for a
few seconds before contacting the work piece and remove it from the work piece before turning the
switch off.
Contact the work piece with minimal pressure. If the sander is not removing enough material, try
a heavier grit piece of sandpaper.
Note:
Maintenance
CAUTION
For your safety, always turn off the switch and unplug the sander from the power source
before performing any maintenance or cleaning.
Periodic maintenance of your sander allows for long life and trouble free operation. The sander can
generate considerable quantities of sanding residue. A cleaning and maintenance schedule should
be maintained. As a common sense and preventive maintenance practice, follow these
recommended steps:
- 06 -
Inspect the pad; check it for wear or damage.
Keep the ventilation slots of the motor clean to prevent overheating of the motor. Remove all
dust from the ventilation slits of the motor. Use a vacuum cleaner or a brush.
Electric tools are subject to accelerated wear and possible premature failure when they are
used to work on fiberglass, wallboard, spackling compounds or plaster. The chips and grindings
from these materials are highly abrasive to electrical tool parts, such as bearings, brushes,
commutators, etc. Consequently, it is not recommended that this tool be used for extended work
1.
2.
3.
To minimize sanding marks, keep the sander moving slowly while it is touching the work piece.
Occasionally stop the sander and check the sandpaper for tears, wear, or fraying. If necessary,
replace the sandpaper.
Empty the dust bag regularly in order to ensure the optimum removal of dust by suction.
From time to time, clean the dust exhaust opening with a dry brush.
CIean the housing only with a damp cloth, do not use any solvents!
a.
b.
c.
d.
e.

Troubleshooting
CAUTION
Disconnect power supply before service.
- 07 -
on any fiberglass material, wallboard, spackling compound, or plaster. During any use on these
materials, it is extremely important that the tool is cleaned frequently by blowing with an air-jet.
Use a soft clean and damp cloth to wipe the tool housing. A mild detergent can be used but
nothing with alcohol, petrol or other cleaning agent. Never use caustic agents to clean plastic
parts.
The sander requires no additional lubrication.
4.
5.

- 08 -
Problem
Tool will not start.
Possible cause
Cord not connected.
No power at outlet.
Fault correction
Tool’s thermal reset breaker
tripped (if equipped).
Tool operates slowly.
Performance
decreases over
time.
Excessive noise or
rattling.
Overheating
Extension cord too long or wire
size too small.
Sandpaper is worn or damaged. Replace as needed.
Have authorized service center
replace brushes
Carbon brushes worn or damaged.
Internal damage or wear. (Carbon
brushes or bearings, for
example.)
Forcing tool to work too fast.
Accessory misaligned.
Sandpaper is worn or damaged.
Blocked motor housing vents
Motor being strained by long or
small diameter extension cord.
Eliminate use of extension cord. If
an extension cord is needed, use
one with the proper diameter for its
length and load.
Wear ANSI-approved safety
goggles and NIOSH-approved
dust mask/ respirator while
blowing dust out of motor using
compressed air.
Check and correct accessory
alignment.
Allow tool to work at its own rate.
Replace as needed.
Have authorized service center
service tool.
Eliminate use of extension cord. If
an extension cord is needed, use
shorter/ heavier gauge cord.
Check that cord is plugged in.
Check power at outlet. If outlet is
unpowered, turn off tool and check
circuit breaker. If breaker is
tripped, make sure circuit is right
capacity for tool and circuit has no
other loads
Turn off tool and allow to cool.
Press reset button on tool.
Have authorized service center
service tool.
Internal damage or wear. (Carbon
brushes or switch, for example.)
This manual suits for next models
1
Table of contents
Other Teccpo Sander manuals


