Techni-Lux Ultra LED Series User manual

Information specifically for:
DL-BAR1CWA45

Table of Contents
- 1 -
IMPORTANT INFORMATION................................................................................
UNPACKING..........................................................................................................
SAFETY INSTRUCTIONS......................................................................................
INTRODUCTION....................................................................................................
FEATURES............................................................................................................
SPECIFICATIONS.................................................................................................
PRODUCT VIEW....................................................................................................
SETUP...................................................................................................................
Mounting..........................................................................................................
Fixture Linking.................................................................................................
AC Power........................................................................................................
OPERATING INSTRUCTIONS..............................................................................
Menu Map.......................................................................................................
Test Mode........................................................................................................
System Setup.................................................................................................
DMX mode.....................................................................................................
Master/Slave mode.........................................................................................
Program mode...............................................................................................
Auto mode......................................................................................................
Sound mode...................................................................................................
Edit Colors......................................................................................................
Edit Effects.....................................................................................................
SERVICE...............................................................................................................
Lens Replacement..........................................................................................
General Maintenace.......................................................................................
2
3
3
4
4
5
5
5
5
6
6
6
7
8
8
9
14
14
14
15
15
16
16
16
17

- 2 -

Immediately upon receipt, carefully unpack and inspect the fixture to verify that all parts are
present and have been received in good condition. If any parts appear damaged from shipping
or the shipping carton shows signs of mishandling, retain all packing material for inspection and
notify the shipper immediately. Save all original packing and carton. In the event that the
merchandise is to be returned, the original carton and packing must be used. The customer will
be billed for a new carton and packing if merchandise is received without the original carton and
packing. The plastic bag shipped with the fixture can be used to keep the fixture clean if stored
or installed in a temporarily dusty environment. Do not operate fixture with plastic bag in place.
The packing and carton are designed to provide the fixture with protection during
shipping. Save original packing and documentation for warranty, service and return
issues. Additional charges will be applied to return items not received in original or
incomplete packing.
Returned merchandise must be sent prepaid, in the original packing with a Return
Merchandise Authorization number (RMA) clearly listed on the shipping label. Items
sent by Freight Collect or without a RMA number will be refused. Call your sales
person and request a RMA prior to shipping. Be prepared to provide the model number,
serial number and a brief description of the nature of the return. Shipping damage
resulting from inadequate packaging is the customer’s responsibility. Customer will be
charged additional shipping charges to return products received in non original packing
and or cartons.
Physical damage must be reported to the Freight Carrier or Shipping Company upon
receipt of merchandise. Damage incurred in shipping is the responsibility of the Freight
Carrier or Shipping Company. It is the customer's obligation in the event that
merchandise is received damaged caused by shipping to notify the Freight Carrier or
Shipping Company immediately. All other claims not related to damage incurred during
shipping must be made to the Dealer or Distributor within 7 (seven) days of receiving
merchandise.
UNPACKING
SAFETY INSTRUCTIONS
Save shipping materials
Claims
Returns
- 3 -
!
WARNING!!! To reduce the risk of fire, electric shock, or injury to
persons, follow these important safety instructions:

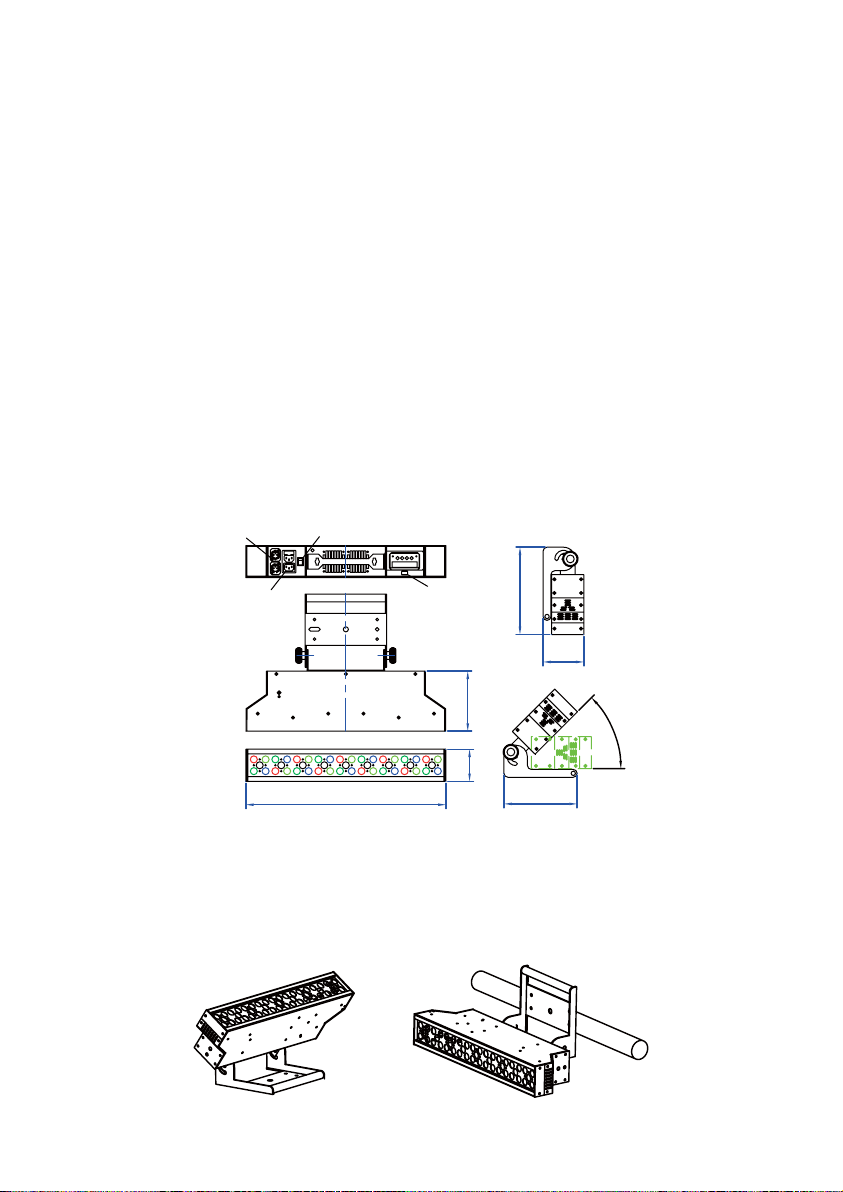
This high power RGBWA color mixing bar features 45 LEDS for medium to long throw
applications. Each LED is independently controllable by DMX, giving the designer enormous
creative freedom. Using the USB port and a standard PC computer, one can update the
software & customize the internal color/effect library. Please read this user guide thoroughly
before operation. Proper use and care of this product will prolong the life of this device.
INTRODUCTION
FEATURES
- 4 -
▪This product is intended for indoor use only!
▪Always turn off, unplug power and allow fixture to cool before servicing.
▪Ensure that fixture is properly grounded.
▪Please keep this User Guide for future consultation.
▪Always make sure that you are connecting to the proper voltage and that the
line voltage you are connecting to is not higher than that stated on decal or rear
panel of the fixture.
▪To prevent risk of fire or shock, do not expose fixture to rain or moisture.
▪The unit must be installed in a location with adequate ventilation, at least
50cm from adjacent surfaces. Be sure no ventilation slots are blocked.
▪Always disconnect from power before servicing or replacing fuse.
▪Make sure power cord is never crimped or damaged.
▪Do not look into the beam from a distance of less than 40 cm (16 inches).
▪Do not stare into the beam for extended periods at a short distance.
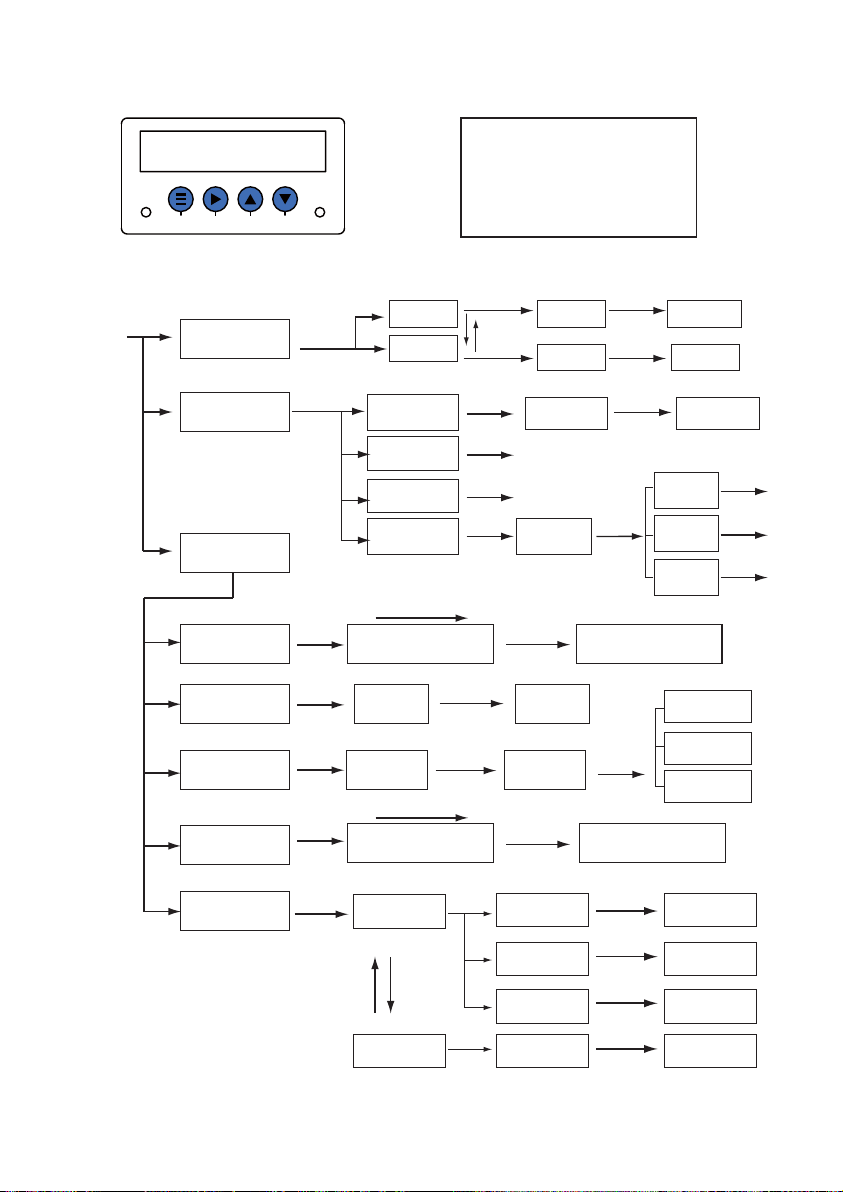
►KEY FEATURES
▪4 Operating modes
PROGRAM / AUTOMATIC / SOUND ACTIVATION / DMX
▪5 DMX modes with ID addressing: 3,7, 21, 46, 47chs.
▪50 updatable preset colors
▪12 editable and updatable programs
▪6 built-in and fixed programs
▪Onboard programming Functionality enables programming without
external DMX controller
▪Sequential running and time setup of programs in Stand Alone
▪Built-in automated programs via master/slave or DMX
▪Program and recall custom programs via master/slave or DMX
▪USB connector for color/effect programs updating through USB device
▪Thermal management system ensures long life of LEDs
▪Automatic fan speed responding to internal temperature
▪5-pin XLR In/Out
▪Blue LCD display of 16 x 2 digits
▪Factory default reset
▪Power failure memory

SPECIFICATIONS
PRODUCT VIEW
SETUP
- 5 -
►ADDITIONAL FEATURES
▪Fast 400Hz refresh frequency for video friendly flicker-free operation
▪Dimmer 0-100%
▪Strobe 1-30 fps
▪Power In/Out for daisy-chain
▪Adjustable floorstand/mounting bracket
▪Interchangeable optical lens system
▪Light source: 45 x 1.2w / 400mA LEDS
9 LEDS of each - Red, Green, Blue, White, Amber
▪Beam angle: 10°, 15°(pre-installed), 25°,30°, 45°
▪Power consumption: 90W
▪Power Input: 100-240vAC 50/60Hz
▪Size: 20.1" x 5.82" x 9.25"
▪Weight: 8.5kgs/18.7Lbs
1
0
DMX out DMX in Power switch
Power out Power in USB port
0°~180°
511
82 153
187
104
223
Mounting
This fixture is designed for floorstand up for lighting and truss mounting.

OPERATING INSTRUCTIONS
- 6 -
Fixture Linking
To run your light shows of one or more fixtures using a DMX-512 controller or to run
synchronized shows on two or more fixtures in master/slave operating mode, you need DMX
cables to link the units from DMX IN to DMX OUT.
AC Power
The fixture is designed to work on 100V-240V 50Hz/60Hz.
Warning: All fixtures must be connected to circuit with a suitable Earth Ground.
IMPORTANT!!! Safety cables must always be used. The safety cable must be
capable of holding 10 times the weight of the fixture.
This fixture offers 4 working modes: Program, Auto, Sound, DMX. In Program, Auto and Sound
mode, multiple units can be linkable via master/slave to run a synchronal system.
1. Connect the fixtures to main power supply.
2. Turn on power switch and LED indication on Control Panel on back of the unit lights up.
3. Wait for some seconds till LCD display reads:
4. Press buttons on Control Panel to set up and operate.
UltraLED
System Ready

- 7 -
Menu Map
Up
Down
Up
Down
Up
Down
Up
Down
Up
Down
Up
Down
Up
Down
Up
Down
System Setup
[Slave Number]
System Setup
Factory Reset
System Setup
Previous Set
System Setup
[Update]
Update Item
[software]
Update
[software]
Update
[colors]
Update
[effects]
Slave Number
[xx]
Slave Number
[01~30]
Enter
Enter
Enter please wait...
please wait...
Enter
Down
Up
Enter
Enter
Enter
Enter
Enter
Enter
Enter
Enter
Enter
Enter
Enter
Enter
Enter
Enter
Enter
Up
Down
Up
Down
Up
Down
Up
Down
Up
Down
Menu
System Mode
[xxx]
System Mode
[DMX]
Addr Mode ID
[xxx] x xx
Addr Mode ID
[0-512] 1-5 1-30
Up
Down
Enter
ProgStep Time
xxxxs
ProgStep Time
1-181-18 1-240s
System Mode
[Slave]
Slave ID
[XX]
Slave ID
[1-30]
System Mode
[Program]
Prog Number
[xx]
Prog Number
[1-18]
Prog.xx Effect
[1-12]
Prog.xx Color
[1-50]
Prog.xx Speed
[1-99]
System Mode
[Auto]
System Mode
[Sound]
System Setup
[xxx]
Test Mode
[xxx]
Test
[LED]
Test LED
[RED]
Test Fan
[ON]
Test Fan
[ON-OFF]
Test LED
[R,G,B, W,A]
Test
[FAN]
Sensitivity
[xx]
Sound Effect
[xx]
Sound Color
[xx]
Sound Program
[1-12]
Sound Program
[13-16]
Sensitivity
[1-99]
Sound Effect
[1-12]
Up
Down
Sound Effect
[xx]
Sound Effect
[1-12]
Sound Color
[1-50]
When navigating the menu:
Use “UP” button to move up.
Use “DOWN” button to move down.
Use “Enter” button to move right.
Use “MENU” button to move left.
Power Menu Enter Up Down DMX
Control Panel

- 8 -
Test Mode is designed to test LEDs and fans if they are all working properly.
1. Press MENU botton till display reads [Test Mode] , press Enter button to enter Test Mode.
2. Use Up/Down button to select [Test LED] or [Test Fan], then press Enter button to reach Test
LED or Test Fan.
3. Press Up/Down to test Red, Green, Blub, White and Amber LEDs or test fan ON/OFF.
In this mode, you can update software, color and effect library, reset to factory default or previous
setup, set up total number of SLAVE units in daisy chain for Master/Slave mode.
►UPDATE SOFTWARE/COLORS/EFFECTS
1. Download the latest software, LUX45C and LUX45E from: http://www.techni-lux.com.
2. Edit your colors by changing value of Red, Green, Blue, White and Amber. A maximum of 50
colors can be defined.
1. Press MENU button till LCD display reads , then use Up/Down button to
select [Previous Set].
2. Press Enter button and wait for some seconds.
►PREVIOUS SETTING
This allows you to go to the previous setting after Factory default Reset.
►FACTORY RESET
Factory default settings as below:
Starting DMX channel: 001
DMX mode: 1
1. Press MENU button till LCD display reads , then use Up/Down button to
select [Slave Number] and press Enter button to enter.
2. Use Up/Down button to set up a number of total Slave units.
►SLAVE NUMBER SETUP
In Master/Slave mode, you need to set up a total number for Slave units on the Master unit in order
to run color flow through the daisy chain.
Test Mode
System Setup
NOTE! During operating Fans will be turned off when internal
temperature is below 40°C and will be on automatically over that
level.
Important! Make sure your USB device is formatted in FAT
mode before recording updating software/colors/effects under
ROOT directory in USB device.

3. Edit your effects by changing value of 1 or 0. 1 stands for ON and 0 for OFF. The Lux Pixel45 is
devided into 9 pixels and you can set each pixel to 1 (ON) or 0 (OFF) for desireable effect. Each
effect program can contain up to 18 steps and total 12 effect programs can be editable.
4. Record your color and effect files under ROOT DIRECTORY in USB device.
5. Insert USB device in the USB connector on back of Lux Pixel45.
6. Press MENU button till [System Setup] shows up, then use Up/Down button to select System
Setup [Update] and press Enter button to enter.
7. Use Up/Down button to select Update Item: software, colors, effects. Then press Enter button to
proceed. Wait for some seconds till messange shows “ succeed”.
1. Press MENU button till display reads “System Mode [ xxx ]” , then use Up/Down button to select
[DMX] and press Enter button to enter and LCD displays:
In DMX mode, there are 5 modes for selection: 3ch, 7ch, 21ch, 46ch and 47ch mode.
2. Use Enter button to move cursor among [Addr , Mode, ID] and Up/Down button to set up starting
DMX address, Mode and ID number.
ID number is created for DMX fixture with large number of DMX channels and allows one to control
multiple units independently or simultaneously on a small DMX console. The figure below shows a
simple DMX layout. On the same starting channel, say 001, there are three units with 3 different ID
numbers. You can use the 1st channel to target different units and backward channels to program.
DMX Mode
►
DMX control with ID number
Addr
[xxx] x
Mode ID
xx
Addr Mode
[001] 1
ID
1
DMX Addr.: 001
ID No.:01
DMX Addr.: 094
ID No.:01
DMX Addr.: 047
ID No.:01
DMX Addr.: 093
ID No.:02
DMX Addr.: 001
ID No.:02
DMX Addr.: 001
ID No.:03
DMX Addr.: 047
ID No.:02
1
01
01
0
1
0
1
0
1
0
1
0
- 9 -
NOTE: ID number is activated only when Mode 5 is
selected. Under Mode 1~4, ID number is invalid.

- 10 -
DMX Channels
Mode 1: 3 DMX channels
Note: All the effects and colors above are either from factory default settings or customized
library.
ch.1: effects
001-022 effect_1
000 All Off
1-255
slow to fast
023-046 effect_2
047-069 effect_3
070-092 effect_4
093-115 effect_5
116-139 effect_6
140-162 effect_7
163-185 effect_8
186-208 effect_9
209-231 effect_10
232-254 effect_11
255 effect_12
000-005 color_1
006-010 color_2
011-015 color_3
016-020 color_4
021-026 color_5
027-031 color_6
032-036 color_7
037-041 color_8
042-046 color_9
047-052 color_10
053-057 color_11
058-062 color_12
063-067 color_13
068-072 color_14
073-078 color_15
079-083 color_16
084-088 color_17
089-093 color_18
094-098 color_19
099-104 color_20
105-109 color_21
110-114 color_22
115-119 color_23
120-124 color_24
125-130 color_25
131-135 color_26
136-140 color_27
141-145 color_28
146-150 color_29
151-156 color_30
157-161 color_31
162-166 color_32
167-171 color_33
172-176 color_34
177-182 color_35
183-187 color_36
188-192 color_37
193-197 color_38
198-202 color_39
203-208 color_40
209-213 color_41
214-218 color_42
219-223 color_43
224-228 color_44
229-234 color_45
235-239 color_46
240-244 color_47
245-249 color_48
250-254 color_49
255-255 color_50
ch.2: colors ch.3: speed
Mode 2: 7 DMX channels
Channel
1 Red 0-255 Intensity 0 -100%
0-255 Intensity 0 -100%
255-0 Intensity 100% - 0
2 Green
3 BLue
4 White
5 Amber
6 Master Dimmer
7 Strobe
005-255 Strobe from slow to fast
000-004 No Function
Function

- 11 -
Mode 3: 7 DMX channels x 3 sections
Channel
1 Red 0-255 section 1: Intensity 0 -100%
0-255 section 1: Intensity 0 -100%
255-0 section 1: Intensity 100% - 0
2 Green
3 BLue
4 White
5 Amber
6 Master Dimmer
7 Strobe
8 Red
9 Green
10 BLue
11 White
12 Amber
13 Master Dimmer
14 Strobe
15 Red
16 Green
17 BLue
18 White
19 Amber
20 Master Dimmer
21 Strobe
005-255 section 1: strobe slow to fast
000-004 No Function
005-255 section 1: strobe slow to fast
000-004 No Function
005-255 section 1: strobe from slow to fast
000-004 No Function
0-255 section 2: Intensity 0 -100%
255-0 section 2: Intensity 100% - 0
0-255 section 3: Intensity 0 -100%
255-0 section 3: Intensity 100% - 0
Function
section 1 section 2 section 3

- 12 -
Mode 4: 47 DMX channels
Channel
1 0-255 Pixel 1 Red: 0 -100%
0-255 Pixel 1 Green: 0 -100%
0-255 Pixel 1 White: 0 -100%
0-255 Pixel 1 Blue: 0 -100%
0-255 Pixel 1 Amber: 0 -100%
2
3
4
5
6
7
Function
8
0-255 Pixel 2 Red: 0 -100%
0-255 Pixel 2 Green: 0 -100%
0-255 Pixel 2 White: 0 -100%
0-255 Pixel 2 Blue: 0 -100%
0-255 Pixel 2 Amber: 0 -100%
0-255 Pixel 8 Blue: 0 -100%
0-255 Pixel 8 White: 0 -100%
0-255 Pixel 9 Red: 0 -100%
0-255 Pixel 8 Amber: 0 -100%
0-255 Pixel 9 Green: 0 -100%
0-255 Pixel 9 Blue: 0 -100%
0-255 Pixel 9 White: 0 -100%
0-255 Pixel 9 Amber: 0 -100%
9
10
38
39
40
41
42
43
44
45
46
47
255-0 ALL Intensity 100% - 0
005-255 ALL strobe from slow to fast
000-004 NoFunction

- 13 -
Mode 5: 46 DMX channels with ID number
Channel
1 ID No. select
Function
2
3
4
5
6
7
8
9
10
38
39
40
41
42
43
44
45
46
0-255 Pixel 1 Red: 0 -100%
000-005: All IDs
006-014: ID# 1
015-023: ID# 2
024-031: ID# 3
032-040: ID# 4
041-048: ID# 5
049-057: ID# 6
058-066: ID# 7
067-074: ID# 8
075-083: ID# 9
084-091: ID# 10
092-100: ID# 11
101-109: ID# 12
110-117: ID# 13
118-126: ID# 14
247-254: ID# 29
255: ID# 30
127-134: ID# 15
135-143: ID# 16
144-151: ID# 17
152-160: ID# 18
161-169: ID# 19
170-177: ID# 20
178-186: ID# 21
187-194: ID# 22
195-203: ID# 23
204-212: ID# 24
213-220: ID# 25
221-229: ID# 26
230-237: ID# 27
238-246: ID# 28
0-255 Pixel 1 Green: 0 -100%
0-255 Pixel 1 White: 0 -100%
0-255 Pixel 1 Blue: 0 -100%
0-255 Pixel 1 Amber: 0 -100%
0-255 Pixel 2 Red: 0 -100%
0-255 Pixel 2 Green: 0 -100%
0-255 Pixel 2 White: 0 -100%
0-255 Pixel 2 Blue: 0 -100%
0-255 Pixel 2 Amber: 0 -100%
0-255 Pixel 8 Blue: 0 -100%
0-255 Pixel 8 White: 0 -100%
0-255 Pixel 9 Red: 0 -100%
0-255 Pixel 8 Amber: 0 -100%
0-255 Pixel 9 Green: 0 -100%
0-255 Pixel 9 Blue: 0 -100%
0-255 Pixel 9 White: 0 -100%
0-255 Pixel 9 Amber: 0 -100%

- 14 -
1. Press MENU button till display reads “System Mode [xxx]”, then use Up/Down button to select [Auto]
and press Enter button to enter. LCD display reads:
In this mode, you can combine 12 editable, 6 built-in programs and running time of each program
without external DMX controller.
Auto Mode
1. Use DMX cables to link all the units together.
2. On the Master unit, set its System Mode in [ Program ], [ Auto ] or [ Sound ]. Also, you need to set
Slave Number for total number of Slave units. i.e., there are 5 Slave units (not including Master unit)
in the daisy chain, then Slave Number is 5.
3. All other units are to be set as “ System Mode [ Slave ] ”, press Enter button to reach “ Slave ID [XX]”,
then use UP/DOWN button to set ID number sequentially from 1, 2, 3...
4. Operate the Master unit to run the whole system.
1. Press MENU button till display reads “System Mode [ xxx ], then use Up/Down button to select
[Program] and press Enter button to enter.
2. Use Up/Down button to select program number, then press Enter button to access Program Effect
[x], Program Speed [x], Program Color [x].
3. Press Up/Down button to select effect, color and speed for that program.
Program Number [13]: 50-color step changing
Program Number [14]: Color flowing in Red, Green, Blue, White and Amber
Program Number [15]: 50-color crossfade
Program Number [16]: Falling star effect in white color
Program Number [17]: RRGGWBBAA flashing
Program Number [18]: Pulse close effect
Note: 1. Effects [1-12] and Colors [1-50] are from factory default settings or customized library.
2. Speed 1 ~ 99 goes from fast to slow.
In Master/Slave mode, a maximum of 31pcs units can be linked together to run in sync. One of the
unit functions as Master and all other units are to be set as Slave. All the Slave units receive data from
the Master unit. In order to run color flow through the daisy chain, you need to set Slave ID for each
Slave unit.
In this mode, you can combine effect, color, speed on Program [1] to [12]. From Program 13] to [18],
running speed is selectable.
Master / Slave Mode
Program Mode
Up
Down
Prog Number
[xx]
Prog Number
[1-18]

- 15 -
2. Press Enter button to move forward and Up/Down button to select step (1-18) and Program number
(1-18), time (1-240s) for each step/program.
ProgStep Time
xx xxxs
1. Press MENU button till display reads “System Mode [xxx]”, then use Up/Down button to select [Sound] and
press Enter button to enter. LCD reads:
2. Press Up/Down button to select Sound Program.
3. When Sound Program [1-12] is selected, press Enter button to access Effect, Color and Speed, then use
UP/DOWN button increase or decrease the values.
4. When Sound Program [13-16] is selected, only sound sensitivity is selectable.
Sound Mode
Sound Program
[ xx ]
3. Press MENU button to exit and run in Auto mode.
1. Download LUX45C (Color file) from www.techni-lux.com.
2. Open the file and edit your colors by changing the value of Red, Green, Blue, White and Amber. A
maximum of 50 colors can be customized.
Edit Colors
Note:
Sound sensitivity [1-99] goes from the highest to lowest level.

SERVICE
- 16 -
1. Download LUX45C (Color file) from www.techni-lux.com.
2. There are 12 effect programs with 18 steps maximum each can be edited.
3. The unit is devided into 9 pixels and you can decide ON/OFF for each pixel. The numbe “1” stands for
ON and “0” for OFF.
Edit Effects
IMPORTANT!!! Do not change file name of color and effect file. Also, when editing your
colors and effects don’t make notes with words containing letters of “p” and “s”. Make
sure you record the files under root directory in USB device.
Lens Replacement
The unit comes with 15-degree lens pre-installed at the factory. However, the lens system is
interchangeable and this gives you options to change lens of different beam angle. Please follow the below
instructions for proper replacement/installation.
1
1
2
2
3
3remove
remove

- 17 -
1. Remove side metal covers.
2. Remove plastic front cover.
3. Remove UP & DOWN screws that hold the lens kit and take out the complete lens kit.
4. Replace lens kit and follow reverse steps to close the fixture.
IMPORTANT!!! When replacing the lens assembly, please make sure that the power is
disconnected from the fixture beforehand.
LEDs on PCBs are sensitive to ESD (electrostatic discharge). Take precautions to avoid
ESD damage during service.
General Maintenance
To maintain optimum performance fixtures should be cleaned frequently. Unplug fixture from power. Use a
vacuum or air compressor and a soft brush to remove dust collected on external vents and internal components.
Clean all glass gently when the fixture is cold with a mild solution of glass cleaner or Isopropyl Alcohol and a soft
lint free cotton cloth or lens tissue.
IMPORTANT INFORMATION!
In order to optimise the recovery and recycling of the materials
that old appliances contain and reduce the impact on human
health and the environment, ensure that this product is recycled
at the end of its life.

10900 Palmbay Drive • Orlando, FL 32824 U.S.A.
Voice: 407-857-8770 Fax: 407-857-8771
www.techni-lux.com
This manual suits for next models
1
Table of contents
Other Techni-Lux Lighting Equipment manuals

Techni-Lux
Techni-Lux DL-BAR04TC16O/B User manual

Techni-Lux
Techni-Lux bSCULPT 200 LED User manual

Techni-Lux
Techni-Lux BL-125S User manual

Techni-Lux
Techni-Lux DL-PAR38C75/B User manual

Techni-Lux
Techni-Lux DL-PAR46RGB/B User manual

Techni-Lux
Techni-Lux DL-FLEXILED100TC/B User manual

Techni-Lux
Techni-Lux DL-BAR05C126 User manual

Techni-Lux
Techni-Lux mzSCULPT TH-SCLPMZ100WW/B User manual