manuals.online logo
Brands
  1. Home
  2. •
  3. Brands
  4. •
  5. Technoline
  6. •
  7. Measuring Instrument
  8. •
  9. Technoline WL 1030 User manual

Technoline WL 1030 User manual

EN1
WL 1030 –Instruction manual
Overview
EN2
A –Front view
A1 –CO2 low alert icon
A2 –CO2 high alert icon
A3 –CO2 moving chart indicator
A4 –CO2 readout
A5 –CO2 sound alarm icon
A6 –CO2 warning icon
A7 –MIN icon
A8 –MAX icon
A9 –Ventilation recommendations
A10 –Humidity high alert icon
A11 –Humidity low alert icon
A12 –Indoor temperature
A13 –Indoor humidity
B –Side view
B1 –Power adapter connection point
C –Back view
C1 –“DIMMER” button
C2 –“-“ and “CALIBRATE” button
C3 –“MEM” button
C4 –“CO2/RH% / SET” button
C5 –“ALARM CO2” button
C6 –“+“ and “°C/°F” button
C7 –Insert DC jack to power up your item
C8 –AC/DC power adapter
C9 –Connect AC plug to household power socket
Main features
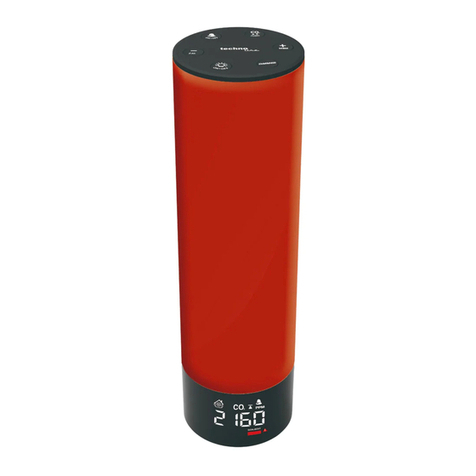
•Triple color displays of CO2 level, temperature and relative humidity
•Non-dispersive infrared (NDIR) gas sensor for CO2 detection
•Wide CO2 measuring range from 400 to 5000 PPM
•Color display of ventilation recommendation on basis of CO2
concentration in the air
•Instant and time weighted average of CO2 reading (15 minutes / 8
hours)
EN3
•Max-Min-Average value memory of last 24 hours
•Adjustable CO2 high or low value alert with optional alarm sound for
high value alert
•Adjustable humidity high or low value alert (visual only)
•Automatic baseline calibration on CO2
•Backlight with adjustable brightness levels
•Built-in memory chip to save settings when power is off
•Table standing
•Power supply: 5V~1.2A adaptor KA0601A-0501200EUS (included)
Installation
Plug in the enclosed 5V-1.2A AC/DC adaptor to an AC wall outlet and then
the DC jack to the back left side of your WL 1030 (B1). The display will
come on with the relevant temperature and relative humidity.
Your CO2 reading shows “150” and starts to countdown in seconds with a
moving chart. Relevant CO2 data will be displayed within 2.5 minutes. It will
continue to calibrate itself and will display the correct CO2 data within 24
hours.
If the AC power is interrupted, the monitor does not work; the display and
the backlight are turned off. The settings of your item will be kept by the
internal memory chip so your WL 1030 will function again after the AC
power resumes.
Ventilation recommendation on the basis of CO2 concentration in the
air
Measuring range
Display status
Over 2000 ppm eq
1501 –2000 ppm eq
1001 –1500 ppm eq
EN4
601 –1000 ppm eq
400 –600 ppm eq
Your CO2 monitor measures and displays the CO2 in PPM with color
ventilation recommendations:
The icons flash when the current CO2 exceeds 2000 ppm.
To set high alert and low alert of CO2 and humidity
1) Press and hold the “CO2/RH% / SET” button (C4), the CO2 digits “400”
(default) flash and the icon (A1) appears. Press the “+“ or the “-“ button
to adjust the low alert level of CO2 in steps of +/- 10 PPM. Lowest alert level
is 400 PPM.
2) Press the “CO2/RH% / SET” button (C4) again, the CO2 digits “2000”
(default) flash and the icon (A2) appears. Press the “+“ or the “-“button
to adjust the high alert level of CO2 in steps of +/- 10 PPM. The highest
CO2 alert level is 5000 PPM.
3) Press the “CO2/RH% / SET” button (C4) again, the humidity digits “35%”
(default) flash and the icon (A1) appears. Press the “+“ or the “-“ button
to adjust the low alert level of RH% in steps of +/-1%. Lowest alert level is
20%.
4) Press the “CO2/RH% / SET” button (C4) again, the humidity digits “70%”
(default) flash and the icon (A2) appears. Press the “+“ or the “-“ button
to adjust the high alert level of RH% in steps of +/-1%. Highest alert level is
95%.
5) Press “CO2/RH% / SET” button (C4) again to confirm and end setting.
The WL 1030 returns to normal display mode.
EN5
Notes:
Press and hold the “+“ or the “-“ button to accelerate the setting
process.
Your WL 1030 will store your settings and exit the alert set mode when
no button is pressed in approximate 10 seconds.
4 different alert set-ups:
CO2 low alert (default setting 400 ppm eq.)
CO2 high alert (default setting 2000 ppm eq.)
Humidity low alert (default setting 35%)
Humidity high alert (default setting 70%)
When the measured CO2 or humidity reaches the set high / low alert level,
the related (A2) or (A1) icon appears and flashes to remind you.
To use the acoustic CO2 alarm (for high alert)
1) Press the “ALARM CO2”button (C5) once to turn on the CO2 alarm.
When the alarm is on, the CO2 sound alarm icon (A5) appears on the
display.
2) When the measured CO2 reaches the set high alert level, both the
(A2) and CO2 sound alarm icon (A5) flash and an audible beep sound will
be given continuously. The beep sound will accelerate when the measured
CO2 level exceeds more over the set alert level.
If this happens, please open the windows, adjust the air ventilation and
avoid too many people gathering together to improve the air quality of your
environment.
3) Press the “ALARM CO2”button (C5) button to disable the CO2 sound
alarm. icon (A2) remains flashing if CO2 exceeds the set high alert.
To view the maximum (MAX), minimum (MIN), 15-minute, 8-hour time
weighted average value memory
EN6
1) Press the “MEM”button (C3) one at a time to view the maximum =>
minimum record of the CO2, temperature and humidity (MAX or MIN icon
appears) and then the 15-minute => 8-hour time weighted average of the
CO2 level (15 M or 8Hr appears at the lower LCD).
Note: You need to power on your monitor for at least 15 minutes to display
the relevant last 15-minute weighted average of CO2 level (and also power
on 8 hours to display the last 8-hour weight average).
2) When the Max / Min /15-M / 8-Hr reading is being displayed, press and
hold the “MEM”button (C3) to reset all records (A4, all digits on the display
become “----“) and your monitor will start to store data for the next 24-hour
period.
To calibrate the CO2 sensor
This monitor is factory calibrated to a 400 PPM CO2 standard
concentration.
Caution: Do not manually calibrate the monitor in an environment of
unknown CO2 concentration.
Automatic baseline calibration: Your monitor is equipped with a smart
chip so that it will automatically calibrate itself to reduce the drift of the CO2
sensor for long time usage. It will calibrate itself automatically at the
minimum CO2 reading detected during 7 days of continuous monitoring.
Note: Make sure the place you put your monitor at is well ventilated (with a
CO2 level near 400 PPM) for at least one hour everyday, or you move the
monitor to such a well ventilated room for a few hours everyday to perform
Automatic Baseline Calibration.
Manual calibration of the CO2 sensor
1) Place your CO2 monitor in a 400 PPM calibration surrounding. Power it
on and wait for a few minutes until the first CO2 reading is displayed. Then
EN7
press and hold the “CALIBRATE”button (C2) until “CAL” flashes on the
display.
2) In around 20 minutes, the blinking will stop and the initial calibration is
completed. Your CO2 monitor will return to normal display mode and will
continue the calibration in the background. It takes 24 hours to let your
monitor run and display the correct CO2 level.
Note: Please wait for your CO2 monitor to complete the calibration process
by itself. Do not press the “CALIBRATE” button (C2) or any other button
during the process.
Temperature
In normal display mode, press the “°C/°F” button (C6) to switch between
temperature display in °C or °F.
To adjust the display brightness
Press the “DIMMER” button (C1) to adjust the brightness of the display from
High to Low to Off.
Troubleshooting
No display or functions
Check the AC/DC adaptor is properly connected.
Response time
Ensure the air flow channels at the back of the monitor are not blocked or
covered.
CO2 reading shows “Err”
The CO2 sensor is not working properly. Unplug the AC/DC adapter (C8)
for 10 seconds to insert it to your monitor again.
Care and maintenance
1. Place your monitor on a stable surface, away from sources of direct
sunlight or excessive heat or moisture.
EN8
2. Clean your monitor with a soft cloth moistened only with mild soap and
water. Stronger agents such as Benzine, thinner or similar materials
can damage the surface of the item. Make sure the monitor is
unplugged before cleaning.
3. Do not open the back case or tamper with any components of this
monitor.
4. Do not plug in any other AC/AC or AC/DC adaptor with incorrect
specifications or voltage.
CO2 levels and guidelines
Below are some CO2 reference levels in general:
400~600 ppm Background (normal) outdoor air level.
600~1,000 ppm Typical level for occupied spaces with good
air exchange.
1,000 ~1,500 ppm Start ventilation of the room.
1,500~2,000 ppm Level associated with complaints of
drowsiness and poor air. Ventilation
recommended!
2,000~5,000 ppm Level associated with headaches, sleepiness,
and stagnant, stale, stuffy air. Poor
concentration, loss of attention, increased
heart rate and slight nausea may also be
present. Ventilation strongly recommended!
>5,000 ppm Exposure may lead to serious oxygen
deprivation resulting in permanent brain
damage, coma, and death. Requires
immediate ventilation!
Declaration of conformity
Hereby, Technotrade declares that this product WL 1030 are in compliance
with the essential requirements and other relevant provisions of Directive
2014/53/EU and ROHS 2011/65/EC. The original EU declaration of
conformity may be found at: www.technoline.de/doc/4029665610306
EN9
Specifications
CO2
Measurement range : 400 –5000 PPM
Resolution : 1 PPM
Accuracy : +/-5% +50 PPM
Warm up time : 1 minute
Temperature range : 0°C to 50°C / 32°F to 122°F
Temperature resolution : 0.1°C / 0.2°F
Relative humidity range : 20% - 95%
Relative humidity resolution : 1%
Operating temperature : 0°C to 50°C / 32°F to 122°F,
< 95%, non-condensing
Out of range display
CO2 : 400 (≤400 PPM) /
HI (≥5000 PPM)
Temperature : LO (≤0°C / 32°F) /
HI (≥50°C / 122°F)
Relative humidity : 20% (≤20%) /
95% (≥95%)
Power supply : 5V DC, 1.2A adaptor
Default Settings
CO2 alert : Low - 400, High –2000
RH% alert : Low –35%, High –70%
CO2 sound alert : Off
Temperature : °C
Display brightness level : High
Precautions
The item is intended to be used only indoors.
Do not subject the item to excessive force or shock.
Do not expose the item to extreme temperatures, direct sunlight, dust or
humidity.
Do not immerse in water.
Avoid contact with any corrosive materials.
EN10
Do not dispose this item in a fire as it may explode.
Do not open the inner back case or tamper with any components of this
item.
Use the product only for its intended purpose!
Consideration of duty according to the law of electrical devices
This symbol means that you must dispose of electrical
devices separated from the General household waste when it
reaches the end of its useful life. Take your item to your local
waste collection point or recycling centre. This applies to all
countries of the European Union, and to other European
countries with a separate waste collection system.

Other Technoline Measuring Instrument manuals

Technoline MA10402 User manual

Technoline

Technoline MA10402 User manual

Technoline WZ 1300 User manual

Technoline

Technoline WZ 1300 User manual

Technoline WL 1025 User manual

Technoline

Technoline WL 1025 User manual

Technoline WL 1045 User manual

Technoline

Technoline WL 1045 User manual

Technoline COST MANAGER User manual

Technoline

Technoline COST MANAGER User manual

Technoline COST MANAGER User manual

Technoline

Technoline COST MANAGER User manual

Technoline WL 1020 User manual

Technoline

Technoline WL 1020 User manual

Technoline WZ 1200 User manual

Technoline

Technoline WZ 1200 User manual

Technoline Mobile Alerts MA10001 User manual

Technoline

Technoline Mobile Alerts MA10001 User manual

Technoline WS 9420 User manual

Technoline

Technoline WS 9420 User manual

Technoline EA 3000 User manual

Technoline

Technoline EA 3000 User manual

Technoline WS 7060 User manual

Technoline

Technoline WS 7060 User manual

Popular Measuring Instrument manuals by other brands

Fluke 321 Calibration information

Fluke

Fluke 321 Calibration information

Crown RTA-2 instruction manual

Crown

Crown RTA-2 instruction manual

Siemens SITRANS F Hardware installation instructions

Siemens

Siemens SITRANS F Hardware installation instructions

PRESIDIUM PGCG User handbook

PRESIDIUM

PRESIDIUM PGCG User handbook

Sper scientific 850070 manual

Sper scientific

Sper scientific 850070 manual

Delton 90K manual

Delton

Delton 90K manual

Kipp & Zonen SMP series quick start guide

Kipp & Zonen

Kipp & Zonen SMP series quick start guide

Klein Tools CL380 instruction manual

Klein Tools

Klein Tools CL380 instruction manual

dacell DN-70 user manual

dacell

dacell DN-70 user manual

Elster F96Plus Installation and user guide

Elster

Elster F96Plus Installation and user guide

hager EC379M User instructions

hager

hager EC379M User instructions

RAM ODM808 user manual

RAM

RAM ODM808 user manual

Brymen BM157s user manual

Brymen

Brymen BM157s user manual

Magnusson 3663602816324 manual

Magnusson

Magnusson 3663602816324 manual

Applent Instruments AT528 user guide

Applent Instruments

Applent Instruments AT528 user guide

Rohde & Schwarz FSVA operating manual

Rohde & Schwarz

Rohde & Schwarz FSVA operating manual

Mannesmann 99995 instruction manual

Mannesmann

Mannesmann 99995 instruction manual

Status Pro T430 user guide

Status Pro

Status Pro T430 user guide

manuals.online logo
manuals.online logoBrands
  • About & Mission
  • Contact us
  • Privacy Policy
  • Terms and Conditions

Copyright 2025 Manuals.Online. All Rights Reserved.