Tecmobile R50 User manual

R50 User Manual
Dual SIM
1
2
DUALSIM
MNOJKL
ABC DEF
GHI
PQRS TUS
WXYZ

1) Introduction 4
1.1) Overview 4
1.2) Box Contents 5
1.3) Button Functions 6
2) Getting Started 8
2.1) Installing the Battery, SIM Card
and Memory Card 8
2.2) Charging the Battery 11
2.3) Powering ON/OFF 12
3) Making Phone Calls 13
3.1) Making a Call Using the Keypad 13
3.2) Making a Call from Contacts 13
3.3) Answering a Call 13
3.4) Adjusting the Volume 13
4) Messages 14
4.1) SMS Settings 14
4.2) MMS Settings 14
4.3) Composing a SMS 15
4.4) Composing a MMS 15
4.5) Save the Information as a Draft 16
4.6) Reading and Replying to a
Message 16
4.7) Forwarding Messages 17
4.8) Deleting Messages 17
5) Proles 18
6) Phone Settings 20
6.1) Menu Settings 20
6.2) Call Settings 20
6.3) Phone Settings 23
6.4) Display Settings 24
6.5) Security Settings 24
6.6) Management 26
Contents

7) Managing Contacts 27
7.1) Creating Contacts 27
7.2) Editing Contacts 28
7.3) Searching for a Contact 28
7.4) Deleting a Contact 29
8) Using Bluetooth 30
8.1) Turning ON Bluetooth and making
your phone Visible (Discoverable) 30
8.2) Pairing with a Bluetooth Device 30
8.3) Un-Pairing a Bluetooth Device 31
8.4) Sending and Receiving Files 31
9) Multimedia 32
9.1) Video Recorder 32
9.2) Video Player 32
9.3) Image Browser 32
9.4) Recorder 33
9.5) FM Radio 34
10) Audio Player 36
11) Camera 37
12) Tools 38
12.1) Alarm 38
12.2) Calendar 39
12.3) eBook 40
12.4) Calculator 40
13) File Manager 41
14) Internet 42
14.1) Internet Service 42
14.2) APN Settings 43
15) Legal Information 44
16) Health and Safety 48
17) Declaration of Conformity 55
Page: 4
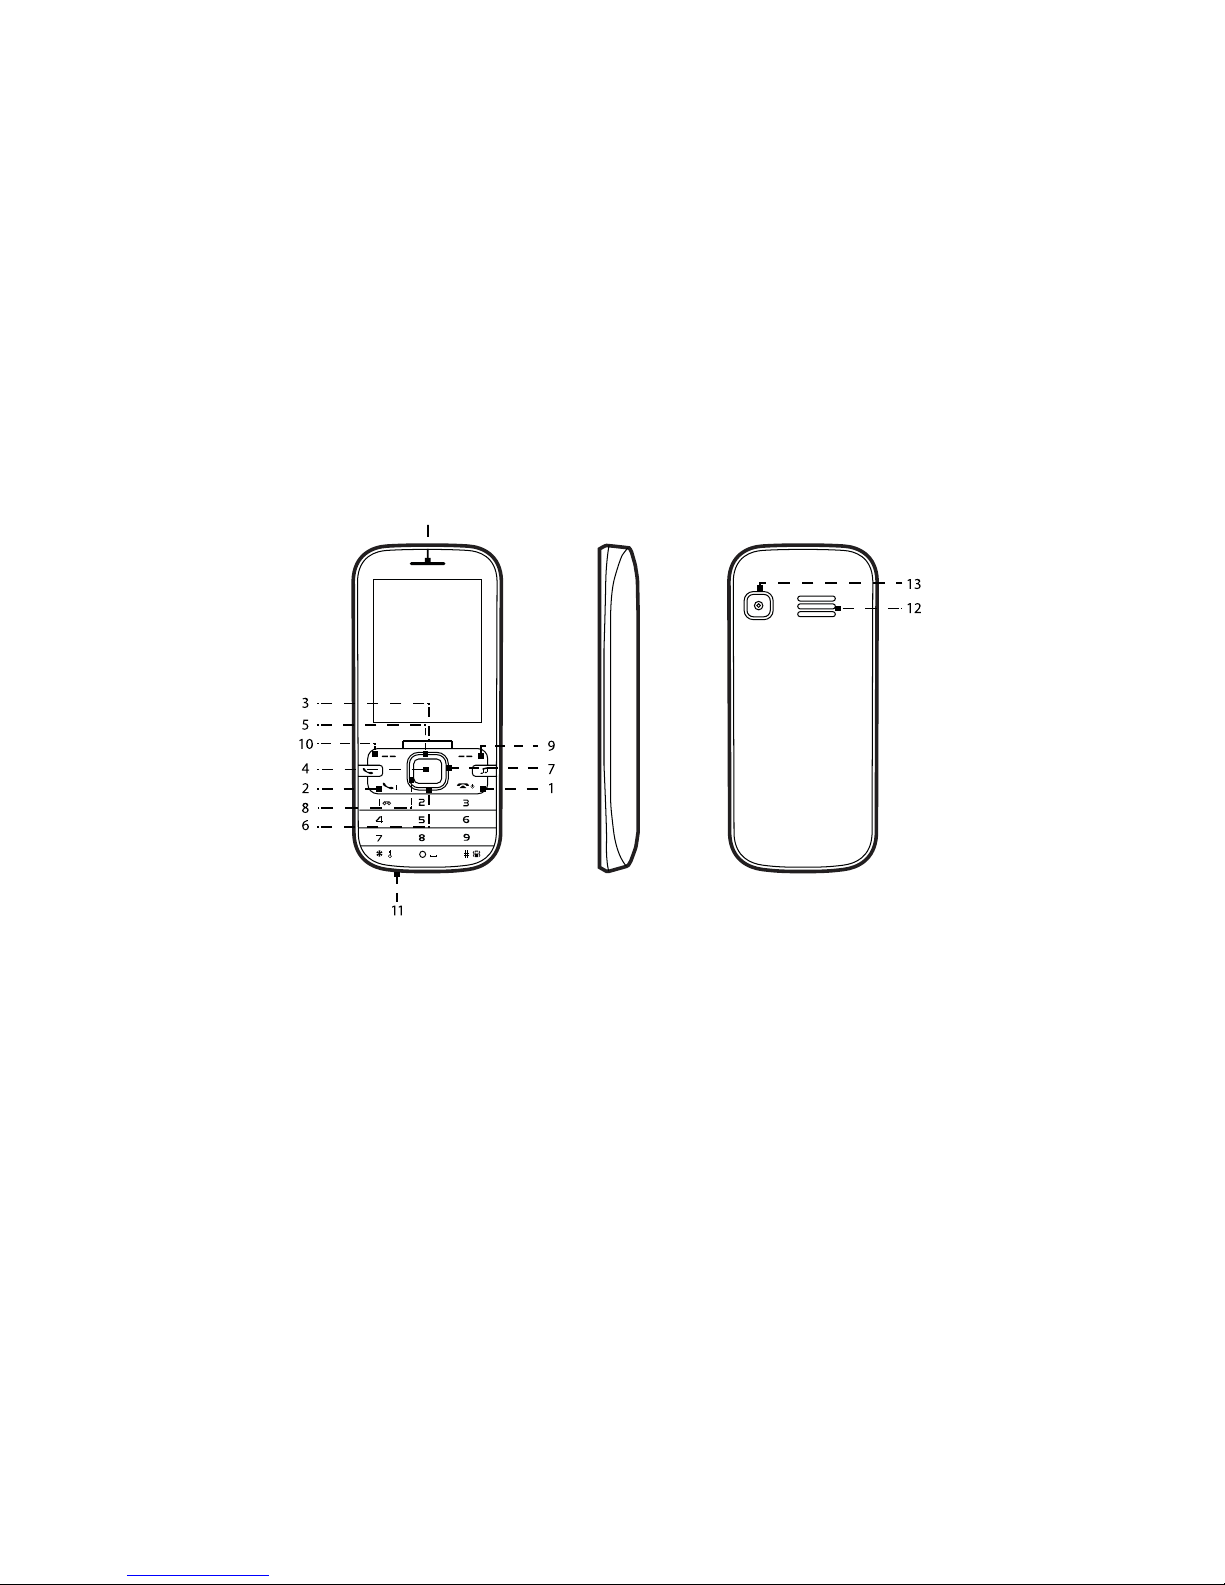
1.1) Overview
1) Introduction
1 Power ON/OFF/End button
2 Send button
3 Navigation button
4 OK button
5 Up button
6 Down button
7 Right button
8 Left button
9 Right soft button
10 Left soft button
11 Mini USB/ Audio/Charger jack
12 Speaker
13 Camera
14 Earpiece
MNOJKL
ABC DEF
GHI
PQRS TUS
WXYZ
14

Page: 5
1.2) Box Contents
Please check the box includes the following components. If there are any items missing
please contact your supplier.
- Handset - Headset
- Power Adaptor - Data Cable
- Quick Start-Up Guide

Page: 6
1.3) Button Functions
Power ON/OFF/End Button
- When the phone is OFF, press to turn ON the phone.
- When the phone is ON and the screen is unlocked, press to turn OFF the phone.
Navigation Button
Up Button
- During an active call, press to increase the volume on the earpiece.
- When not on a call, press to go to shortcuts.
- Whilst listening to the FM radio, press to increase the volume.
- Use this button to navigate the Main menu.
Down Button
- During an active call, press to decrease the volume on the earpiece.
- When not on a call, press to go to alarm.
- Whilst listening to the FM radio, press to decrease the volume.
- Use this button to navigate the Main menu.

Page: 7
Left Button
- In standby mode use this button to go to sounds.
- Whilst listening to the FM radio, press to search for a lower radio frequency.
- Use this button to navigate the Main menu.
Right Button
- In standby mode use this button to add a new contact.
- Whilst listening to the FM radio, press to search for a higher radio frequency.
- Use this button to navigate the Main menu.
Right Soft Button
- Press the Right Soft button to select the corresponding function on the bottom
right hand side on the screen.
Left Soft Button
- Press the Left Soft button to select the corresponding function on the bottom left
hand side on the screen.
Page: 8
2.1) Installing the Battery, SIM Card and Memory Card
Your phone comes with a rechargeable Lithium-ion battery and is designed to use only
manufacturer-specied original batteries and accessories. Battery performance depends
on many factors, including network conguration, signal strength, the temperature of the
environment in which you operate your phone, the features and/or settings you select
and use, items attached to connecting ports, your voice, data, and other program usage
patterns.
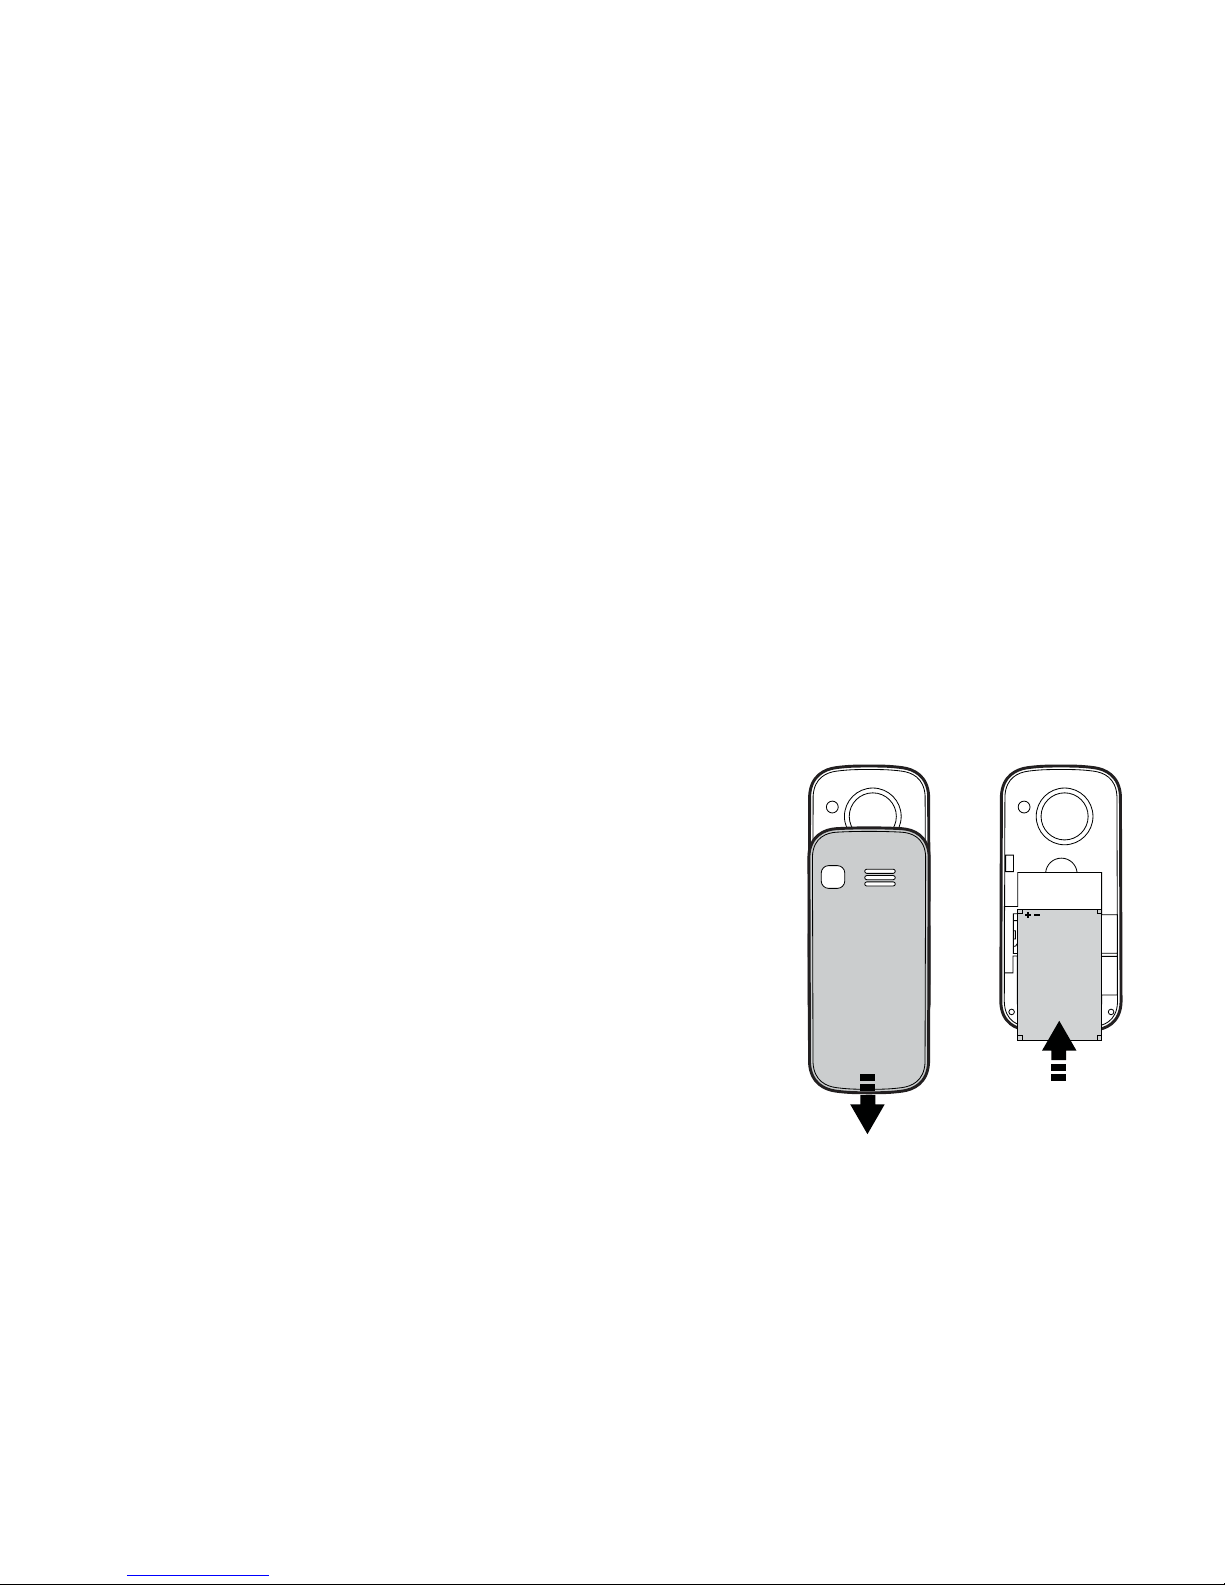
Installing the Battery and SIM card.
1. Make sure that your mobile phone is powered OFF.
2. Remove the back cover.
3. Pull the battery up and remove it from the mobile phone.
2) Getting Started
SIM1SIM2
SIM1SIM2
Page: 9
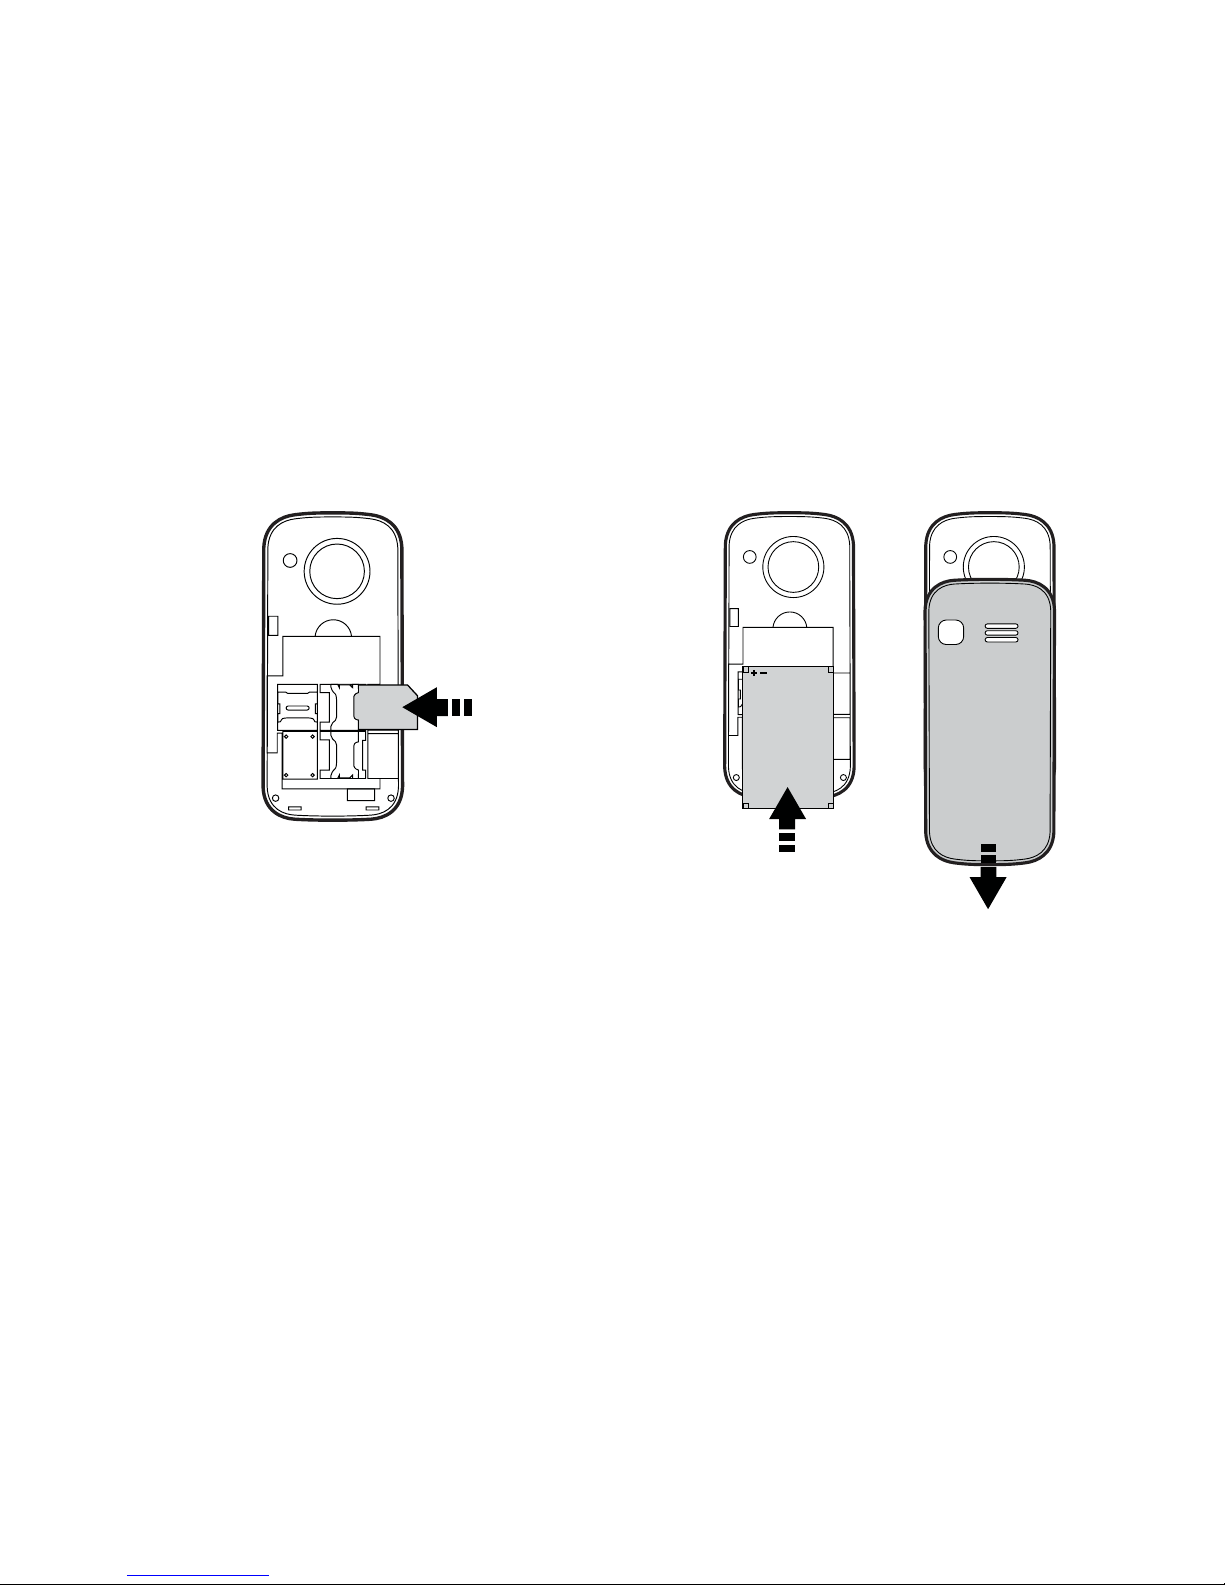
4. Slot the SIM card into place.
Always ensure the SIM card is
inserted correctly before replacing
the battery.
5. Replace the battery into position
and slide the back cover into place
until you hear a click.
SIM1SIM2
SIM
SIM1SIM2
SIM1SIM2
Page: 10
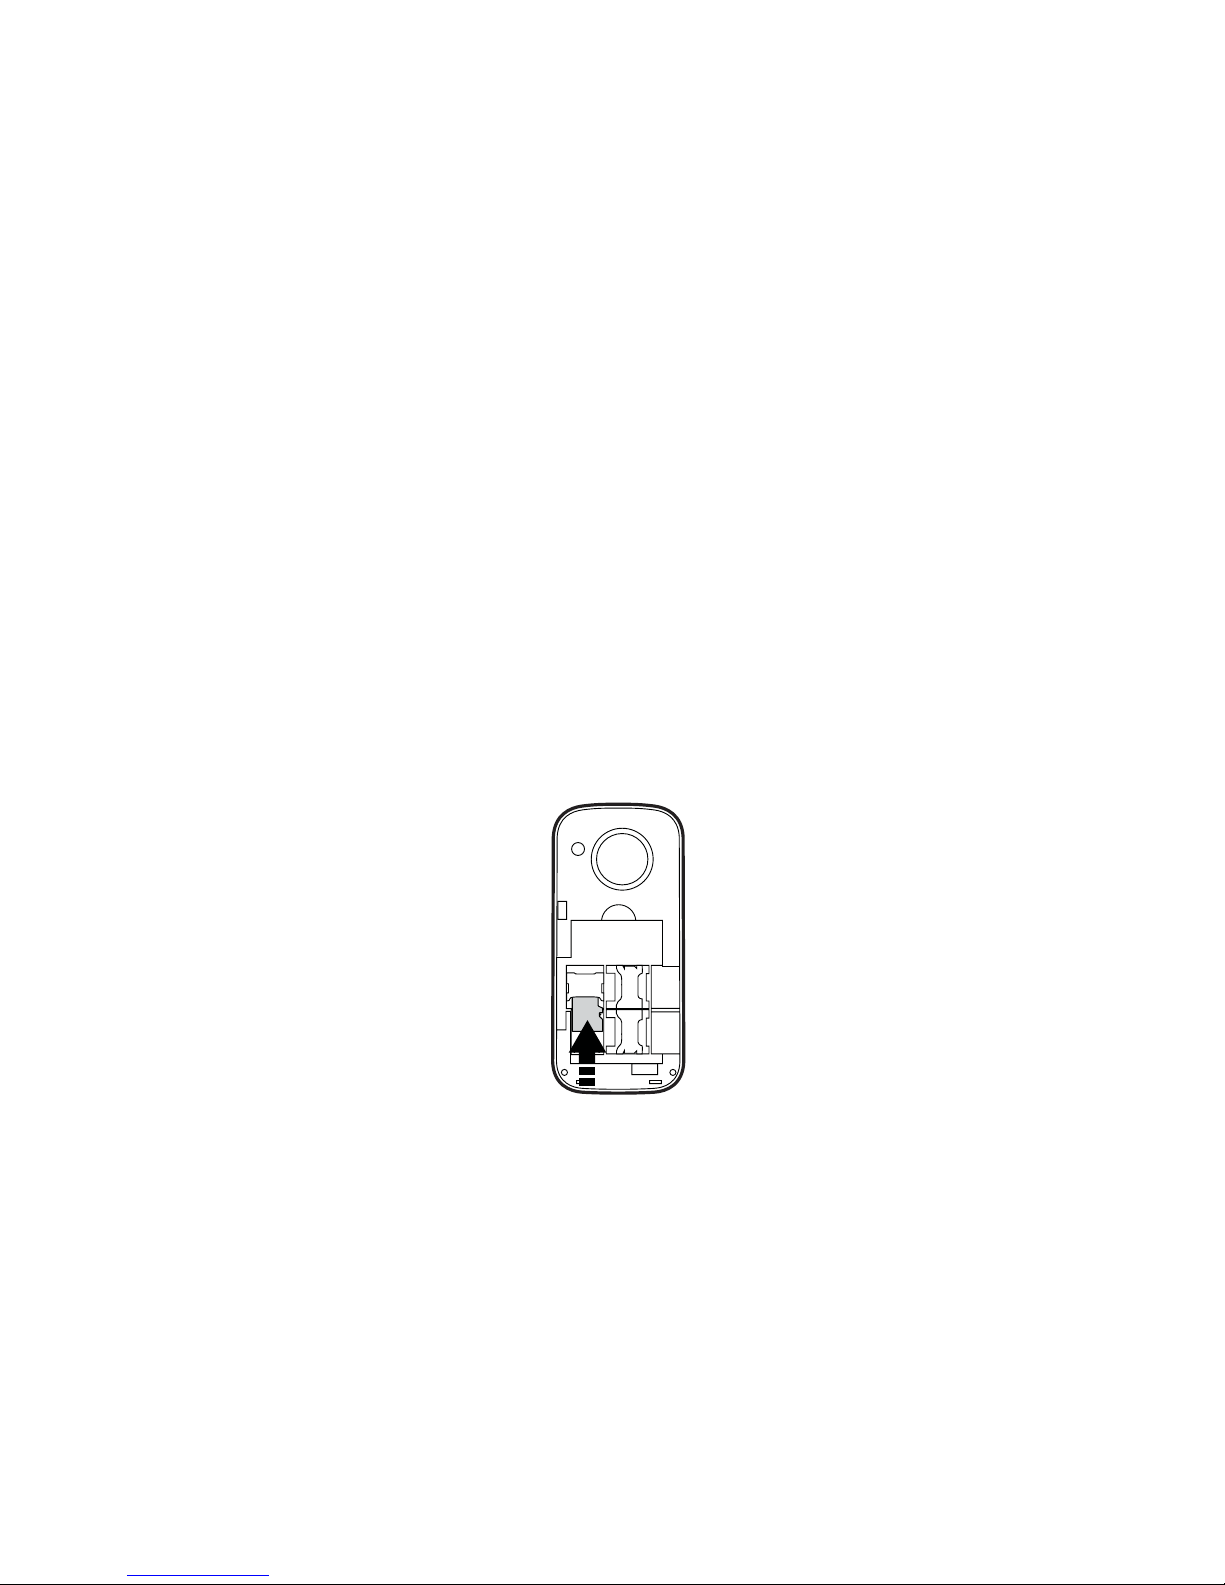
Installing the Micro SD Memory Card.
1. Make sure that your mobile phone is powered OFF.
2. Remove the back cover.
3. Pull the battery up and remove it from the mobile phone.
4. Slide the micro SD card holder to the Open position and ip the holder upwards.
5. Insert the memory card into the holder and click it back into place.
6. Slide the holder to the Lock position to secure it into place.
7. Insert the battery and the back cover.
SIM1SIM2

Page: 11
2.2) Charging the Battery
Only use the power adaptor and USB data cable provided in this pack to charge your
phone. There are 2 methods for charging the battery.
Charging the battery with the Power Adaptor and USB data cable.
1. Install the battery correctly in the phone.
2. Connect one end of the USB data cable into the charger port on the phone.
3. Attach the other end to the Power adaptor.
4. Connect the adaptor to a standard AC wall outlet.
5. When charging is complete, unplug the adaptor from the AC wall outlet and
disconnect the cable from the phone.
Charging the battery with a computer and USB data cable.
1. Connect the mini USB end of the data cable into the charging port on the phone.
2. Attach the USB end of the data cable to the USB port on the computer.
3. When charging is complete, disconnect the cables from the handset and
computer.

Page: 12
2.3) Powering ON/OFF
Ensure the SIM card and battery have been inserted correctly into your phone before
attempting to power ON.
Press and hold the Power ON/OFF/End button for 3 seconds to power ON/OFF your
phone.

Page: 13
3.1) Making a Call Using the Keypad
1. In Standby mode, input the contact number on the keypad.
2. Press the Send button to make a call.
3. Press the Power ON/OFF/End button to terminate a call.
3.2) Making a Call from Contacts
1. In Standby mode, press Left Soft button to access the Menu.
2. Use the Navigation button to select Contact and scroll through the
Contact List.
3. Choose your contact and press the Send button to make the call.
3.3) Answering a Call
When there is an incoming call, the phone will display the information on the screen.
Press the Send button to answer the call.
Press the Power ON/OFF/End button to terminate or reject the call.
3.4) Adjusting the Volume
In an active call press the Up/ Down button on the Navigation button to increase or
decrease the volume.
3) Making Phone Calls

Page: 14
4.1) SMS Settings
1. In the Standby mode, press the Left Soft button to access the Main menu.
2. Use the Navigation button to select Messages > Options > Settings > SMS to
access the submenu.
SIM1 msg centre: Edit and save SIM1 message centre number.
SIM2 msg centre: Edit and save SIM2 message centre number.
Message validity period: Period which a message will stay on your SMS centre if not
sent because the recipient was ofine.
Status report: Enable this option to know when the recipient receives your message.
Save sent messages: Enables you to save your sent messages.
Preferred storage: Enables you to save the SMS to the SIM card or to the phone.
SMS backup: Backup messages from your phone into your SD memory card or from
your SD memory card to your phone (Import or Export).
4.2) MMS Settings
1. In the Standby mode, press the Left Soft button to access the Main menu.
2. Use the Navigation button to select Messages > Options > Settings > MMS to
access the submenu.
3. Edit the following submenu to set your MMS settings:
4) Messages

Page: 15
SIM1 MMS account: Set to Automatic, to enable your 3G/EDGE connection through
your data plan. Contact your network operator for more information.
SIM2 MMS account: Set to Automatic, to enable your 3G/EDGE connection through
your data plan. Contact your network operator for more information.
Send options: Set your delivery reports and MMS sending options.
Receive options: Set your arrival reports and MMS receipt options.
Play audio: Select your desired storage location for pictures, music or video les
received via MMS.
Restore default: View the storage capacity remaining or used.
4.3) Composing a SMS
1. In Standby mode, press the Left Soft button to access the Main menu.
2. Use the Navigation button to select Messages > Write message > New SMS.
3. Type your message.
4. Enter a contact number or select the desired recipient from the Contact List.
4.4) Composing a MMS
1. In the Standby mode, press the Left Soft button to access the Main menu.
2. Use the Navigation button to select Messages > Write message > New MMS.
3. Insert recipient, subject, type your message and add an attachment.
4. Select Options > Send.

Page: 16
4.5) Save the Information as a Draft
When composing a message, the MMS or SMS can be saved to the Draft box by
pressing Power On/OFF/End button or going to Options and select Save to Drafts.
To edit the message
1. In Standby mode, press the Left Soft button to access the Main menu.
2. Use the Navigation button to select Messages > Draft.
3. Highlight the desired message to edit and press the OK button.
4. Edit your message and select Options > Send.
5. Enter a contact number or select the desired recipient from the Contact List to
send the message.
4.6) Reading and Replying to a Message
The phone will display an icon on the screen to notify you of a New Message received.
Press the Left Soft button to View the message.

Page: 17
4.7) Forwarding Messages
1. In the Standby mode, press the Left Soft button to access the Main menu.
2. Select Messages and go to the message you want to forward.
3. Select Options >Forward.
4. Edit your message and select Options > Send To or press the OK button.
5. Enter a contact number or select the desired recipient from the Contact
List to send the message to.
4.8) Deleting Messages
1. In Standby mode, press the Left Soft button to access the Main menu.
2. Use the Navigation button to select Messages > Inbox.
3. Open the desired message and select Options > Delete to remove the message

Page: 18
By setting your prole you can customise ring settings, volume, call alerts, message alerts,
alarm and calendar reminders, key tones, battery low alert and power ringtone.
You can choose between various prole modes:
General, Silent, Vibrate, Indoor, Outdoor and Earphone.
1. In standby mode, press the Left soft key button to access the Main menu.
2. Use the Navigation button to go to Prole.
3. Choose and edit the desired prole:
General/ Silent/ Vibrate/ Indoor/ Outdoor/ Earphone
4. Press the Left soft button to see the available options: Activate, Customise and
Rename.
5. Choose Customise to edit your prole and make the desired changes on the following
settings:
5) Proles

Page: 19
Ring settings: Select the desired call and message ringtones from Fixed tones or from
your memory card.
Adjust volume: Choose and adjust the volume for all your alerts.
Call alert: Select the desired alert for your incoming calls: Ringtone, Vibrate, Silent,
Vibrate then ring or Ring and vibrate.
Message alert: Select the desired alert for your messages: Ringtone, Vibrate, Silent or
Ring and vibrate.
Alarm & calendar reminder: Select alarm options and calendar reminders.
Key tone: Enable or disable the sound on your keypad.
Battery low alert: Activate an alert for when your battery is running low.
Power ringtone: Enable or disable a ringtone for when powering ON/OFF your phone.

Page: 20
6.1) Menu Settings
1. In Standby mode, press the Left Soft button to access the Main menu.
2. Use the Navigation button to select Settings to access the submenu to display the list
of options to change your phone settings.
6.2) Call Settings
1. In Standby mode press Left Soft Button to access the Main menu.
2. Use the Navigation button to select Settings > Call settings.
3. Edit the following elds to change your call settings:
Dual-SIM: Select SIM card to be used and set a preferred name for each of your SIM cards.
You can also activate a feature that enables you to reply to a message with the SIM which
received the message or call (Reply by original SIM).
Network selection: Select preferred network, this can be done manually or automatically.
Call divert: Edit divert call options for each of your SIM cards.
6) Phone Settings
Table of contents
Other Tecmobile Cell Phone manuals

Tecmobile
Tecmobile TITAN 600 User manual

Tecmobile
Tecmobile Titan 550 User manual

Tecmobile
Tecmobile Titan 150 User manual

Tecmobile
Tecmobile R30 User manual

Tecmobile
Tecmobile Q50 User manual

Tecmobile
Tecmobile R30 User manual

Tecmobile
Tecmobile Titan 550 User manual

Tecmobile
Tecmobile Titan 150 User manual

Tecmobile
Tecmobile MXC-545 User manual

Tecmobile
Tecmobile You 40 User manual


