Tecmobile You 40 User manual

1
You 40 User Guide
850/ 2100 MHz
Single/Dual SIM

2
CONTENTS
1) Introduction
1.1) Overview 3
1.2) Box Contents 3
2) Get Started
2.1) Set Up Your Phone 4
2.2) Navigate Your Phone 5
2.3) Use the Touchscreen . 6
2.4) Unlock the Screen 6
3) Make Yourself at Home
3.1) Change the Wallpaper 7
3.2) Ringtones & Other Sounds 7
3.3) Make a Phone Call 7
3.4) Messaging . 9
3.5) Access Your Contacts 12
3.6) Arrange & Work with Apps 13
3.7) User Folders 14
3.8) Manage Notifications 14
4) Use Some Apps
4.1) Find Your Contacts 15
4.2) Use Email 16
4.3) Manage Your Calendar . 16
4.4) Camera 17
4.5) Music 18
4.6) Manage Downloads 18
5) Tune Performance
5.1) Optimise Battery Life 19
5.2) Optimise Data Usage 20
5.3) Optimise Memory Usage . 21
6) Enter & Edit Text
6.1) Use the Keyboard 22
6.2) Type Text by Speaking 23
7) Connect to Networks & Other Devices
7.1) Mobile Networks 23
7.2) Wi-Fi Networks 24
7.3) Portable Wi-Fi Hotspot . 24
7.4) VPN (Virtual Private Network) . 25
7.5) More Wireless & Network Settings 26
7.6) Bluetooth 26
8) Manage Accounts
8.1) Add or Remove Accounts 27
8.2) Change Backup & Reset Options 28
9) Secure Your Phone
9.1) Set Screen Lock 29
9.2) Work with Certificates 29
10) Legal Information 31
11) Health & Safety 32
12) Declaration of Conformity 34
3
1. INRODUCTION
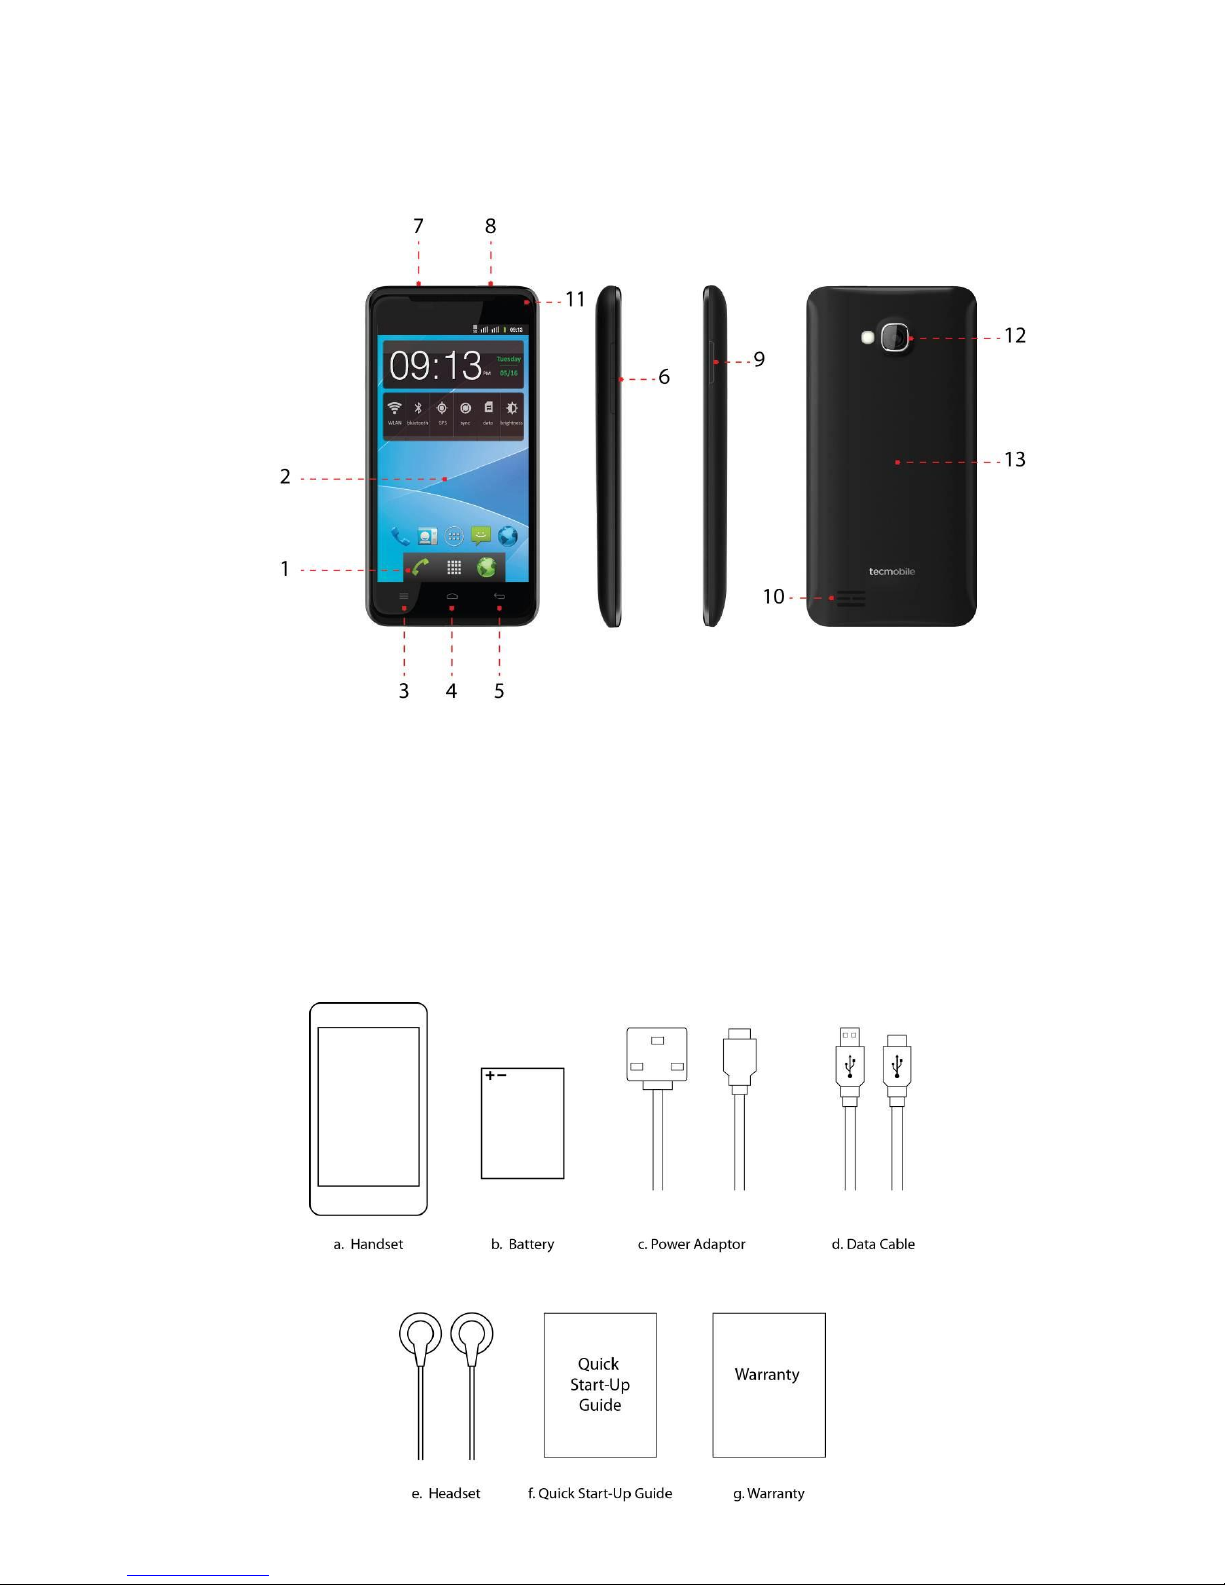
1.1. Overview
1.2. Box Contents
1. Receiver
2. Display Screen
3. Options Key
4. Home Key
5. Return Key
6. Volume Key
7. Headset Jack
8. USB Interface
9. Power ON/OFF Key
10. Speaker
11. Front Camera
12. Back Camera
13. Battery Cover

4
2. GET STARTED
2.1. Set up your phone
The first time you turn ON your phone you will see a welcome screen and you will be
prompted to set up the basic settings on your device.
Start by setting up your preferred language. Touch Start to jump to the following step,
where you will be asked to set Date & Time.
Make it Google
If you already have a Google account sign in with it, if not you can create a new account.
A Google account will give you full access to Google apps and other services that you
may want to use, such as Gmail, Google Maps, Navigation, Android Market, YouTube,
Google Talk and so on.
After creating your Google account you can use Google's location service, this will help
to determine your approximate location even when GPS isn't available.
A Google Account lets you organise and access your personal information from any
computer or mobile device:
Never lose your contacts again: When you sign in to your phone with a Google
account, all the contacts you associate with that account in the Contacts are
automatically backed up. As a result, they're always accessible
through your Gmail account from any computer.
Synchronise and back up everything: Whether you draft an email, add a
contact's phone number, add an event
to your calendar, or take a photo, your work gets backed up continuously by
Google and synchronised with any computer where you use the same Google
Account.
Access from anywhere: Check your latest calendar, email, text messages, or
social stream, wherever you are, no matter what computer or mobile device you're
using.
Keep your stuff secure and available: Google works round the clock to protect
your personal data from unauthorised access and to ensure that you have access
to it when you need it, wherever you need it
When Setup is complete touch Finish to start using your device or Back if you want to
make any change on the previous.

5
2.2. Navigate Your Phone
At the bottom of the screen, you'll find three Navigation buttons. They're always
available. No matter what you're doing with your phone, you can always get back to the
main Home screen or return to previous screens.
Options Touching this on the Home Screen enables you to change your
Wallpaper, Manage Apps or go to your System settings. When using it in any
other application a menu will pop up with different options for that specific
application.
Return - Opens the previous screen you were working on, even if it was in a
different app. Once you back up to the Home screen
further.
Home Touching this icon takes you to the Home Screen.
Just above the Navigation buttons, you have the Favourites tray. The applications icons
you keep in the tray remain visible on every Home screen. The All Apps icon in the centre
is permanent. Touch it to see all your apps and widgets.
At the top of the screen, you will see:
Status icons - (on the left) tells you which apps have sent you notifications; for
example, that a message has arrived, you have a missed call or it's time for a
meeting.
Note: To see your notifications, swipe your finger down from the top of the screen.
System icons - (on the right) displays the current wireless and network
connection strength, battery level, time, and more.
Google Search - (below the status and system icons) lets you search your phone
or the Internet. Touch Google to type your search terms, or to speak them.
The All Apps icon
6
2.3. Use the Touchscreen
You can use your finger to control your phone. The controls on your touch screen
change depending on the tasks you are performing.
Touch - Touch on buttons, icons or applications to select items or to open
applications.
Touch & Hold Touch and hold to access available options.
Slide Quickly move your finger across the surface of the screen, without pausing
when you first touch (so you don't drag something instead).
Drag Touch & hold an item for a moment and then, without lifting your finger,
move your finger on the screen until you reach the target position.
Double-tap - Tap quickly on a webpage, map or other screen to zoom. For
example, double-tap a section of a webpage in the Browser to zoom in and the
selected will fit the width of the screen. You can also control the zoom on Maps
and other apps.
Pinch - In some applications (such as Browser, Maps and Gallery) you can zoom in
and out by placing two fingers on the screen at once and spreading them apart
(to zoom in) or pinching them together (to zoom out).
Rotate Screen - On most screens, the orientation of the screen changes as you
rotate it. You can turn this feature on or off.
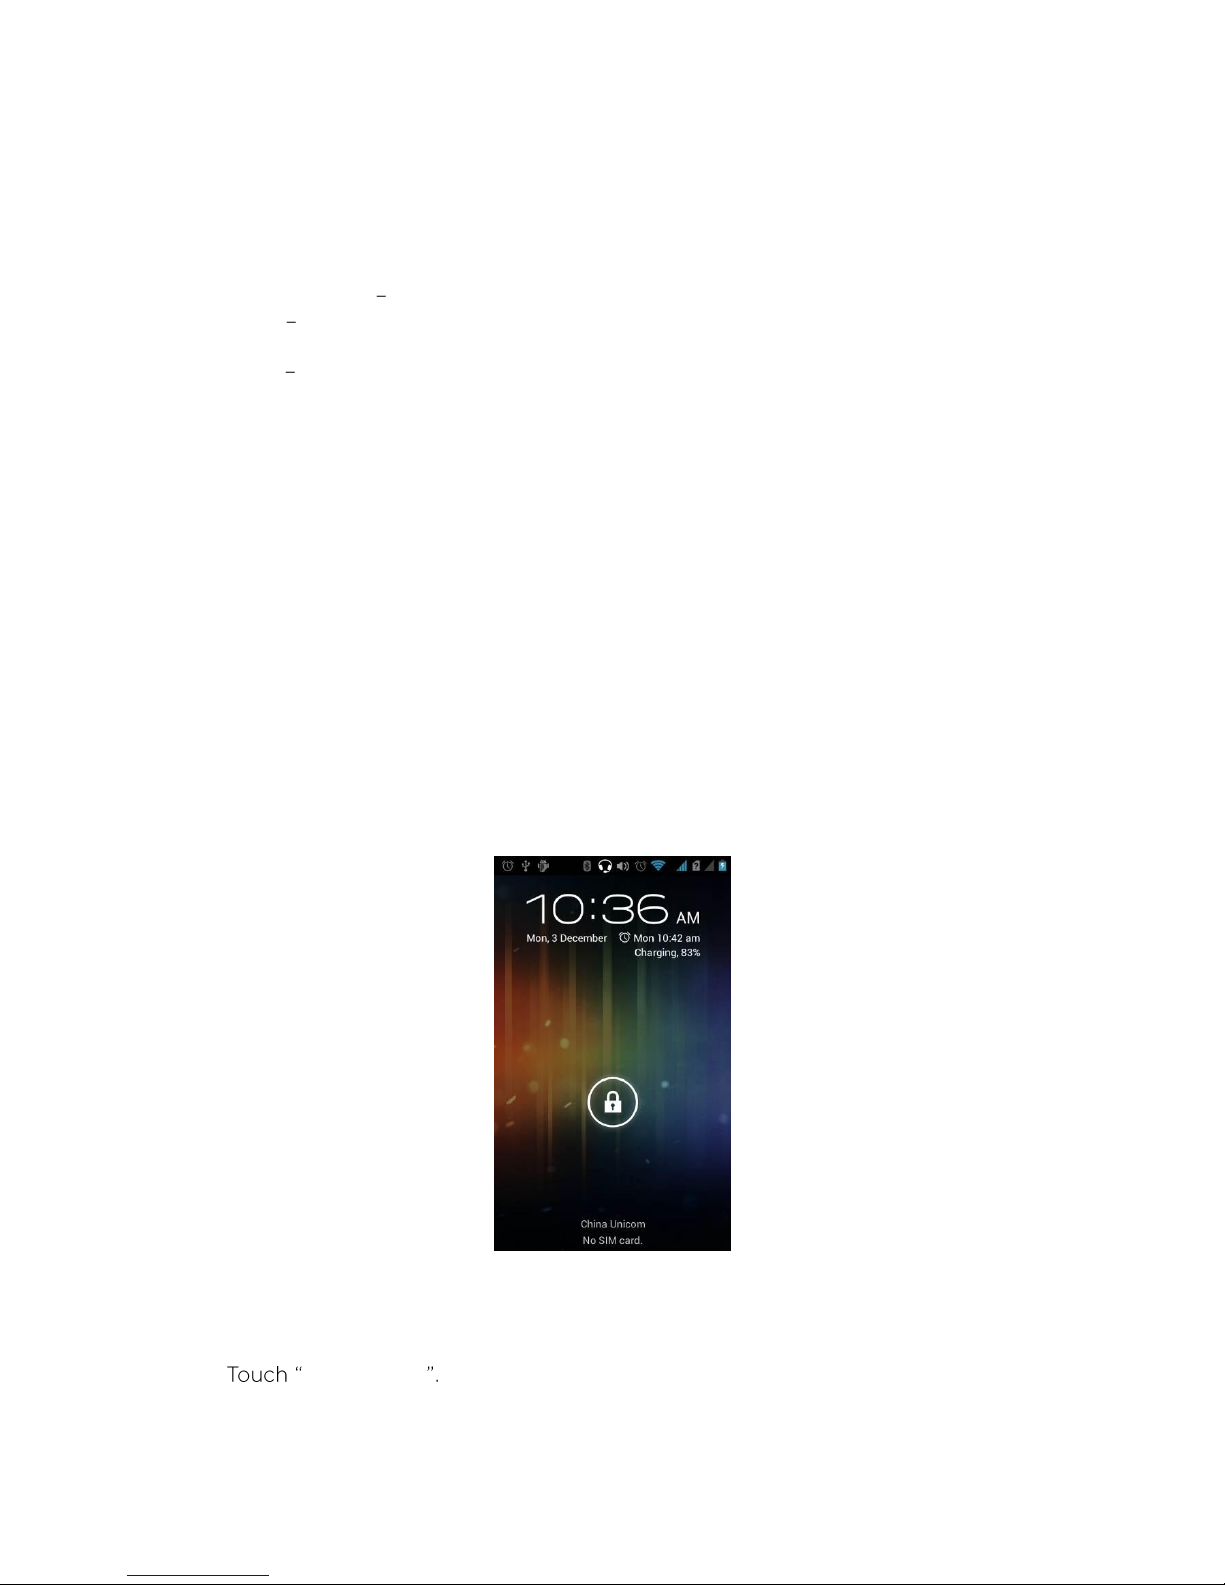
2.4. Unlock the Screen
You may need to provide a PIN, Password, or draw a pattern to unlock your device when
the screen is locked.
1. Press the Power ON/OFF button to wake up the phone.
2. Hold and drag the unlock icon to the right to unlock the screen.
You can change the unlocking method on your phone's settings:
1. On the main menu, touch Settings > Security.
2. Screen lock
3. Select from the following options: None / Slide / Pattern / PIN / Password.
4. If choosing to draw a pattern, please follow the instructions provided on the
device.

7
3. MAKE YOURSELF AT HOME
3.1. Change the Wallpaper
1. Touch & hold anywhere on the Home screen that's not occupied. A list of options
appears.
2. Choose from the following options:
Gallery - Pictures that you've taken with the Camera or downloaded to
your device.
Live Wallpapers - A scrolling list of animated wallpapers.
Wallpapers - Thumbnails of default images. You can download additional
wallpapers from Android Market.
3. Touch the desired image to use it as your Wallpaper.
3.2. Ringtones & Other Sounds
Your phone uses sounds and vibrations to communicate with you, including ringtones,
notifications, alarms, and navigation feedback. You can customise any of these sounds,
as well as controlling their volume and the volume for music, videos, games, and other
media.
Change default Ringtone
1. On the main menu, touch Settings > Profile Settings > General/Outdoor.
2. Touch SIM1/SIM2 Ringtone, depending on which ringtone you wish to change.
3. Select a ringtone from Android System or from ES File Explorer (where you
can access the files stored in your SD memory card).
Change other sound settings
To change other sounds and vibrations, go to Settings > Profile Setting.
Volumes (in General or Outdoor) - sets the master volume separately for
music, ringtones, notifications and alarms. You can still use the physical volume
control on the phone to raise or lower volume of whatever sound is currently
playing.
Vibrate Enables sound vibration for notifications.
Silent Turns off all sounds.
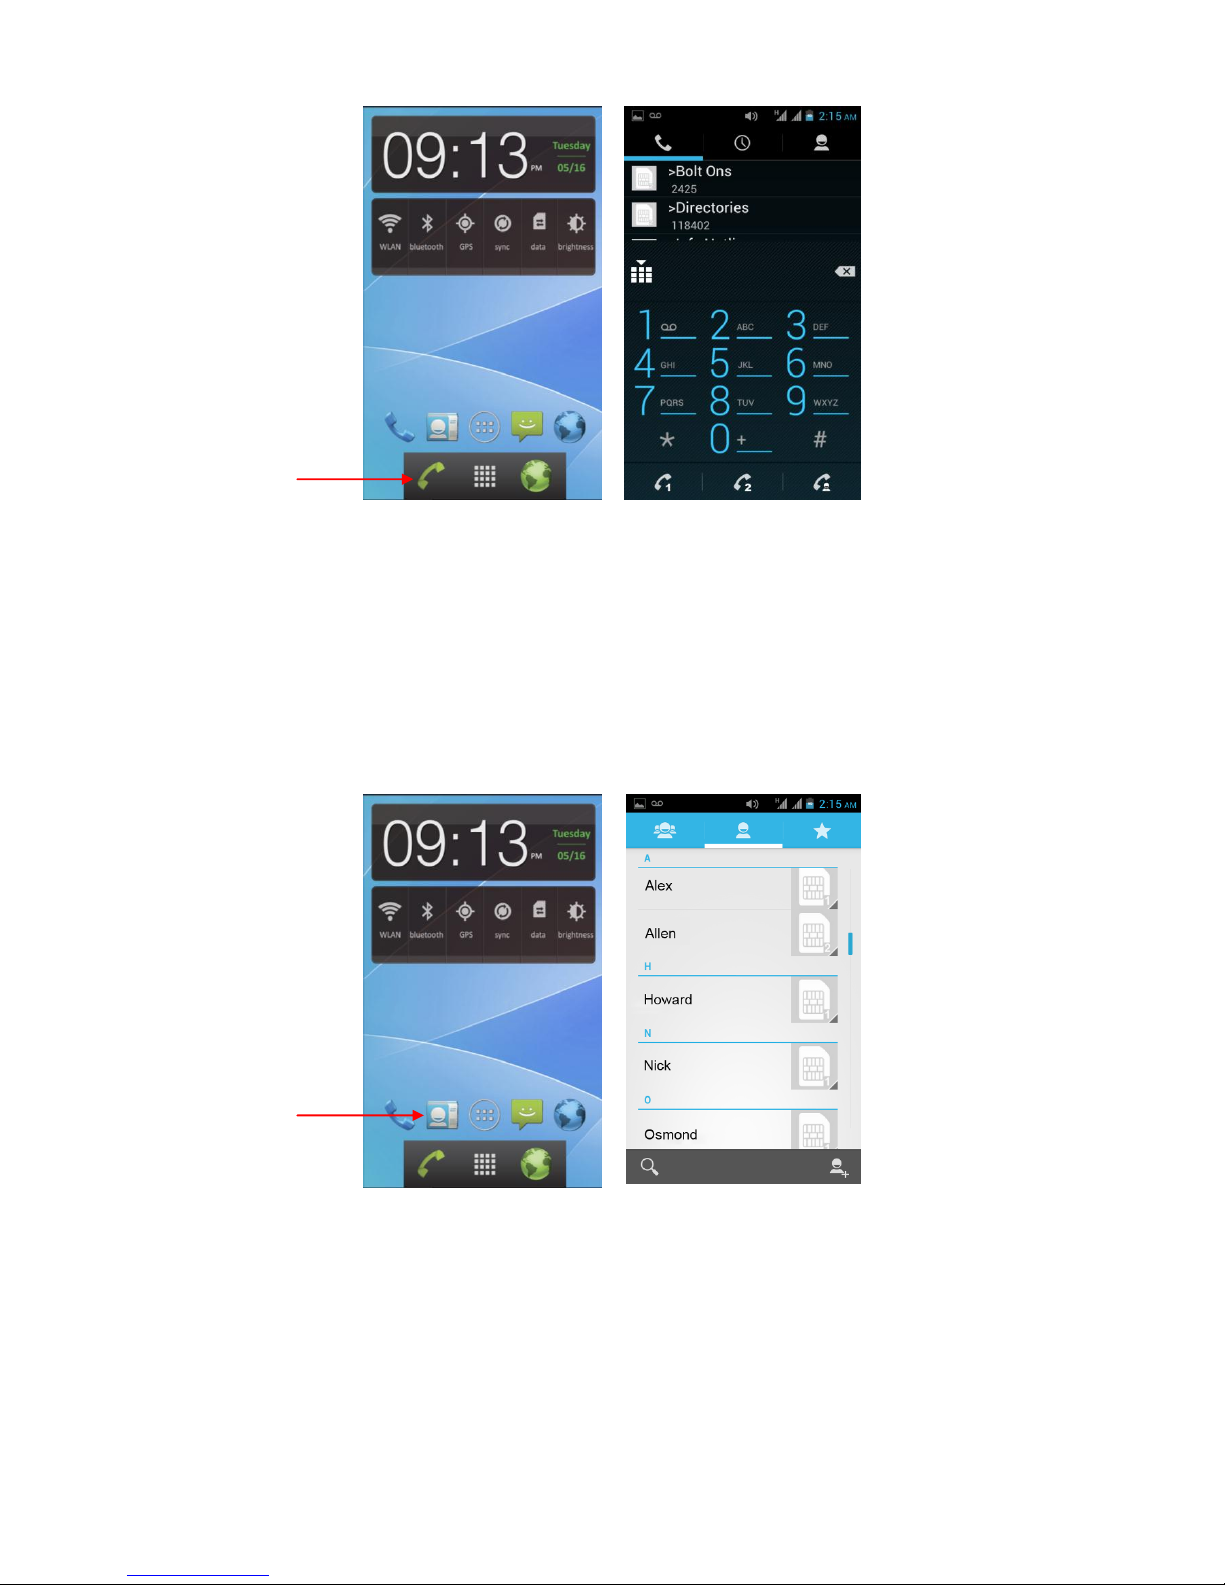
3.3 Make a phone call
Make a call from the Dialler
1. Touch the phone icon on the main menu or on the Home Screen.
2. Input the number you wish to make a call to.
3. On the bottom of the screen you have the option to choose which SIM card
you would like to use to place the call.
8
Make a call from Contacts
1. Touch the Contacts icon on the main menu or on the Home Screen.
2. You can either scroll through your contacts list or use the quick search by
touching the Search icon on the bottom left side of the screen and typing the
contact name.
3. Touch the contact you wish to call to see its number.
4. Touch on the phone number to place the call.
5. Select which SIM card you want to use to make the call.
Make a call from the Call Log
1. Touch the Phone icon on the main menu or on the Home Screen.
2. Slide the screen from the left to the right and you will find all your call logs.
3. Select the number you wish to make a call to or touch the Phone icon on the
right side of the contact name or number to place the call.
4. If touching on the contact name/number there will be a variety of options,
such as: Call via SIM1/SIM2, Video Call or Send Text Message.
Contacts icon
Phone icon

9
Place an Internet Call
To place an Internet call you must add an internet calling account and you will be able to
make calls over the internet when connected to a WiFi network instead of using your
mobile network.
Add an internet calling account and configure your incoming and outgoing preferences:
1. Touch the Phone icon on the Home screen.
2. Touch Options button > Call Settings.
3. Under Internet Call Settings choose Accounts to configure your account and
incoming settings, or Use Internet Calling to set outgoing call preferences.
When y
screen.
Options during a Call
Answer another incoming call You can answer another call during a call.
Adjust volume Use the volume button on the right side of your phone.
Switch to the dialler To enter a number you wish to save or if you want to make
another call.
Speaker Switch from receiver to speaker, or if you have a Bluetooth device
connected with your phone you can also switch to it.
Mute Mute your microphone.
Hold Put the other party on hold.
Switch Switch to another call in progress.
Make another call Make another call during the current call. The first call will be
put on hold.
Merge Merge separate calls as a single conference call.
3.4 Messaging
SMS and MMS
You can send text SMS and MMS messages to other people. The limit for SMS character
is 160 characters. If you continue to enter the message when the character limit is
reached, this will count as another text message and the message will be split and
received separately every time the character limit has been exceeded. This is known as
Concatenated SMS.
MMS is also known as Multimedia Messaging and can contain Text & Pictures, Audio
Recording or Audio Files.
Note: When you add a subject title or attachment, the phone will automatically convert
an SMS to an MMS message.
10
Composing an SMS
1. Select the Messaging icon and touch the New Message icon on the bottom left
side of the screen to compose.
2. Enter a contact number or select the desired recipient from the Contact List.
3. Enter the message in the Type message box.
4. Touch Send and chose weather to send the message via SIM1 or SIM2.
Composing an MMS
1. Select the Messaging icon and touch the New Message icon on the bottom left
side of the screen to compose.
2. Enter a contact number or select the desired recipient from the Contact List.
3. Touch Menu > Attach to display a list of options Pictures, Videos, Audio, etc.
4. Attach the desired file and enter the message in the Type message box.
5. Select Send and chose weather to send the message via SIM1 or SIM2.
Save the information as a Draft
When composing a message, the MMS or SMS message can be saved to the Draft box
by pressing the Return/Back button. To edit the message, touch the Messaging icon on
the Home Screen and select the draft message to edit the information and then select
Send.
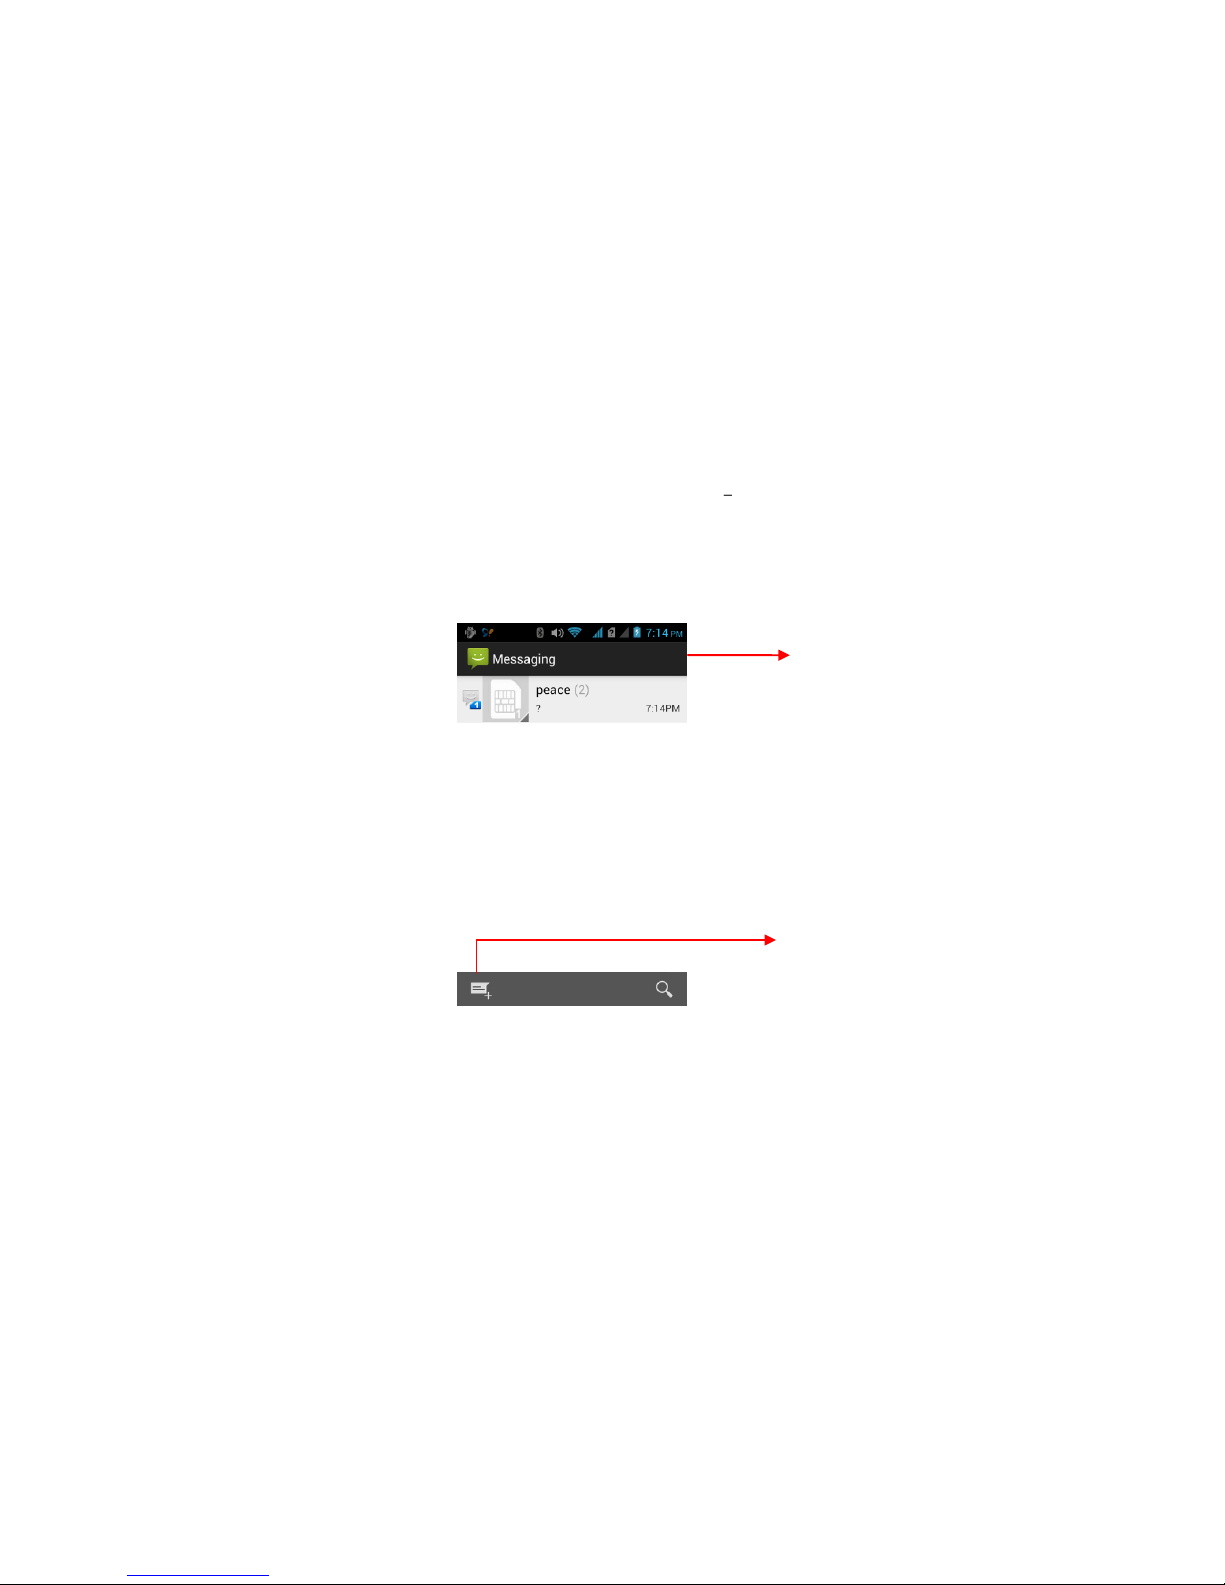
Reading and replying to a message
Depending on your notification settings, the phone will play a ringtone, vibrate, or
display the new message icon in the Notification Bar when you receive a new text or
multimedia message.
The text messaging and multimedia messaging with contact details will be concatenated
into a Message Conversation Cluster. Series of text or multimedia messaging allow you to
view the messages which are sent and received by you and your contacts on the screen.
SMS conversations will be listed in the order of time they are received: the latest
messages will be on the top of the conversation list.
Touch to open a messaging
conversation
Touch to compose a new text or
multimedia message.

11
Forwarding Messages
1. On the Home Screen touch the Messaging icon and scroll to the desired message.
2. Touch and hold the message and an options menu will pop up. Select Forward on
the options menu and then input or locate the contact details of the recipient to
be forwarded to.
Deleting Messages
1. On the Home Screen touch the Messaging icon and scroll to the desired message.
2. Touch and hold the message and an options menu will pop up. Select Delete
message on the options menu.
Text-message (SMS) settings
Delivery Report: Select this option to receive Delivery Reports to notify you when
your message has been received.
Copy SMS to SIM: Select this option to copy the received messages to your SIM
card.
Manage SIM1 Card messages: Manages the messages stored in the SIM1.
Manage SIM2 Card messages: Manages the messages stored in the SIM2.
Multimedia message (MMS) settings
Delivery Report: Select this option to receive Delivery Reports to notify you when
your message has been received.
Read Reports: Select this option to receive a Read Report for each read message
sent.
Auto-retrieve: Select this option to automatically Retrieve all Multimedia
Information. This may dramatically increase the costs of your on-line data.
Roaming auto-retrieve: Select this option to automatically Retrieve all Multimedia
Information whilst Roaming. Note that this may dramatically increase the roaming
costs of your on-line data.

12
SIM1 Notification setting
Notifications: Notifications will be displayed on the Notification Bar, when new
SMS are received.
Choose ringtone: Assigns a ringtone to be played when a new SMS and MMS is
received.
Note: The ringtone will be played for a short period of time after it is selected.
Vibrate: Allows you to enable or disable the vibration function when a new SMS
and MMS are received.
SIM2 Notification setting
Notifications: A notification will be displayed on the Notification Bar, when new
SMS are received.
Choose ringtone: Assigns a ringtone to be played when a new SMS and MMS is
received.
Note: The ringtone will be played for a short period of time after it is selected.
Vibrate: Allows you to enable or disable the vibration function when new SMS and
MMS are received.
Service Message setting
Enable WAP PUSH: Enables you to receive service messages.
3.5. Access Your Contacts
If you have a Google Account, any contacts associated with that account are
automatically backed up by Google. This means all your contacts are always available on
the web and can be synced to any Android phone that's set up with the same account.
As a result, even if you lose your phone, switch to a new phone, or use a desktop
computer, your contacts are always available.
To get your phone numbers and other contact information into your Google account,
you have several options:
Import your contacts directly into your phone from your SIM card. See the
instructions below.
Use a desktop computer to import both your email and your contacts from
another email account into your Gmail account.
Use a desktop computer to export your contacts from applications like Outlook as
a text file, and then import them into your Google Account through a desktop
browser.
Use a desktop computer to export your contacts as a text file, then import them
directly into your phone.
Regardless of the method, you only need to import your contacts once. After you start
using a Google Account, all your contacts stay in sync. To view your contacts:
On your phone: use the Contacts app.
From a browser on a desktop computer: Go to www.google.com/contacts

13
Import Contacts from your SIM card
You can import contacts from your SIM card to the Contact list on your phone:
1. On the Home Screen touch the Contacts icon to enter the contact list.
2. Touch the Options button > Import/Export.
3. You can choose to import contacts from SIM1 and SIM2 or from your storage (SD
card) to the phone.
4. Select the contacts you wish to import/export and touch OK to confirm.
3.6. Arrange & Work with Apps
To see all your apps touch the All apps icon on any Home Screen.
In this screen you are able to see all your apps including the ones downloaded from
Android Market. You can also move app icons to any of your home screens.
Move between screens: Swipe left or right.
Launch an App: Touch its icon.
Add app icon on a Home screen: Touch & hold the app icon, slide your finger,
and place the icon in the desired area.
Place an app icon in the Favourites tray: Touch, hold & slide to move one of the
favourites icons out of the tray. Then use the same technique to move another one
into the same position.
Explore your widgets: Touch the Widgets tab at the top of any All Apps screen.
Get more apps: Touch the Play Store icon for more app options.
Remove app icon from Home screen: Touch, hold & slide the app towards the
top of the screen, and drop it over the Remove icon.
Touch an application to open it.
Slide the Launcher left or right to bring more
icons into view.
The status bar shows the time, signal strength,
battery status and notification icons.

14
3.7. Use Folders
You can combine several apps in a folder. Drop one app icon over another on a Home
screen and the two icons will automatically be combined.
Open a folder: Touch it.
Rename a folder: Touch its name.
Move folders around Home screens: Touch, hold & slide.
3.8. Manage Notifications
From the Notification Bar, you can access information of calendar events, new emails,
new SMS and on-going activities, such as incoming calls or status of the current call.
You can also open the Notification Panel to view the network operator or to enable
Bluetooth, WiFi, Data connection, GPS, Silent Mode or Airplane Mode.
When a new notification icon is displayed, touch the Notification Bar on the top of the
screen and slide it downwards to open the Notice Board.
Touch and hold an empty spot to add a
shortcut to an application, a widget and so on.
The status bar shows the time, signal strength,
battery status, and notification icons.

15
More options:
Respond to a notification: Touch it to open it.
Dismiss a notification: Swipe it sideways.
Dismiss all notifications: Touch the X on the top right corner.
Note: When the notice board is open you can also go to your phone's settings by
touching the Quick Settings icon at the top of the list, near the date. This provides you a
quick way to access your settings from any of your home screens.
4. USE SOME APPS
4.1. Find Your Contacts
The Contacts app gives you quick and easy access to everyone you want to reach. When
you first turn on your phone and sign into a Google Account, any existing contacts from
that account will be automatically synced with your Contacts list. After that, all your
contacts stay in sync automatically, whether you make changes on your phone, from
another device, or from any Web browser.
All your Contacts information is available from Gmail, Google Talk, Phone, and other apps
where it's useful. As you add contacts from different sources, they are synced
automatically across all the places you need them.
View your contacts: Touch the Contacts icon on All Apps screen. You can view
them in three different ways from the tabs on the top of the screen: Groups /
All / Favourites.
Read details: Touch a name to see details for a contact or group.
Edit details: While viewing a contact, touch the options button and choose Edit
or Set Ringtone. You can also touch the Star beside the name to add a contact to
your favourites list.

16
Change your settings: While viewing the main list, touch the options button to
choose display options for the contacts, and add or edit accounts.
No matter where you are within Contacts, you can always get back to the main lists by
touching the icon in the top left corner of the screen.
4.2. Use Email
Creating an Email account
You need to set up an email box when you use the email function for the first time.
1. On the Home Screen Touch the All Apps icon > Email to enter into the Setup
Email screen.
2. Input your email account and password details and touch Next or Manual Setup
to setup the email server.
3. Select the POP3, IMAP or Exchange account after checking your Email
parameters.
4. Set up your Incoming server settings for the email account if required.
5. Touch Finish when you have completed the fields.
Composing an Email
1. On the Home Screen Touch the Menu >Email
2. Touch the Email Account you wish to use on the account interface.
3. Touch the Compose icon on the bottom left corner.
4. Enter the recipient's email address in the Recipient Field.
5. Input the title and content of the email.
6. Touch Options button > Attach file or Add Cc/Bcc if required.
7. Touch the Send icon on the top right corner of the screen to send the Email.
You also have Search, Folders (to check all folders in your email account, such as
Starred, Inbox, Drafts, Outbox, Sent and Trash) and Refresh icons on the bottom of
the screen.
4.3. Manage Your Calendar
The Calendar app lets you view and edit your schedule.
When you first set up your phone, you configured it to an existing Google Account. The
first time you open the Calendar app on your device, it will display any existing calendar
events from that Google account on the web. As you edit events from any mobile device
or web browser, they are synchronised automatically across all the places you need
them.
New Entries
Use your phones Calendar to create and manage your events, meetings, and
appointments.
1. Touch All apps > Calendar to open the calendar.
2. Select Options.
3. Touch New event, to open the Event Details interface.
4. Input the details and set different reminders for this events.
To change the calendar view, touch the date on the top and choose Day, Week, Month
or Agenda.

17
4.4. Camera
The Camera app is a combination of camera and camcorder and it actually consists of
two cameras front and back camera. The back camera includes a Panorama mode that
allows you to create a single image by panning across the screen.
You can view pictures and videos you take with the camera in the Gallery app
To take pictures or videos, first touch the Camera icon on a Home screen or All apps
screen.
When Camera opens, you can:
Switch between Camera (front or back), Camcorder or Panorama (function only
available for back camera).
Take a picture by touching the blue button.
View most recently taken picture by touching the thumbnail near the blue
button.
While in camera mode, open the photo settings - Touch the Settings icon on the main
Camera screen.
The settings icons appear. Touch the one you want to adjust:
Flash mode - Turn flash off or on.
White balance -Adjust for the type of ambient light: Incandescent, Daylight,
Fluorescent, or Cloudy. To let the camera adjust automatically, touch Auto.
Exposure - Adjust up or down from the automatic exposure reading. To let the
camera set the exposure without adjustment, touch 0.
Scene setting - Adjust lighting effects to simulate Night mode. To let the camera
adjust automatically, touch Auto.
Touch here to access
settings
Touch to change between
video/camera mode.
Touch to take picture/
video.
View albums and
photos

18
Camera settings - Determines the location in which your photos are stored with
each photo you take. It also determines the image size - the higher the number of
pixels, the higher the resolution and the more storage capacity each photo
requires. You can also restore all default settings from here.
4.5. Music
Opening the Music Player and Music Library
1. Touch the All apps icon> Music to access the Music Library Interface. Your list of
music is stored in the phone and is divided into the following categories: Artists,
Albums, Songs and Playlists in the Music Library Interface.
2. Select the desired category to display the list of music files.
Note: When music is played in the background, you can open the Notification Panel,
and then touch the music file to switch to the Music Player Interface.
Creating a Playlist
1. Touch the All apps icon>Music to access the Music Library Interface.
2. Select the Category to locate your desired music file.
3. Touch and hold on the song until an options window pops up. Select Add to
playlist. You can create a new playlist or add to Current playlist.
4. Follow the instructions on screen then select Save to confirm.
Managing your Playlist
1. Touch the All apps icon >Music> to access the Music Library Interface.
2. Select Playlist on the Music Library Interface.
3. Touch and hold the song in the Playlist allows you to Play, Edit, Delete or Rename
your playlist.
4.6. Manage Downloads
Files, apps, and other items you download from Gmail, Email, Android Market, or in other
ways are stored in your device's internal storage. You can use the Downloads app to
view, reopen, or delete what you've downloaded.
When you try to download an oversized-file when connected to such networks, you may
be required to delay downloading until your device is connected to a Wi-Fi network, the
download will resume automatically. You can view and manage these queued files in the
Downloads app as well.
Downloaded files are stored in the Download directory that's visible when your device is
connected to a
computer. You can view and copy files from this directory.
Touch the Downloads icon from a Home screen or All apps screen.
Touch an item to open it.

19
Share items - select the file, touch the Share icon and choose a sharing method
from the list given.
Select icons you want to delete and then touch the Trash icon.
At the bottom of the screen you switch between Sort by size or Sort by date.
5. TUNE PERFORMANCE
5.1. Optimise Battery Life
You can extend your battery's life between charges by turning off features that you don't
need. You can also monitor how apps and system resources consume battery power.
To adjust the settings described here, first touch the Settings icon on a Home or All
Apps screen.
Extend the life of your battery
If you aren't using Wi-Fi, Bluetooth, or GPS, use the Settings app to turn them off.
The GPS setting is located in Settings > Personal > Location services.
Don't leave the Maps or Navigation apps open on the screen when you're not
using them. They use GPS and therefore more power when they are running.
Turn down screen brightness and set a shorter Sleep timeout by choosing
Settings > Device > Display.
If you don't need it, turn off automatic syncing for all apps by selecting Settings >
Personal > Accounts & sync. Note that this means you need to sync manually to
collect messages, email, and other recent information, and won't receive
notifications when updates occur.
If you know you won't be near a mobile or Wi-Fi network for a while, switch to
Airplane mode by Pressing and holding the power ON/OFF option until the
Phone options appears. Then touch Airplane Mode.
Check battery level and usage details
Go to Settings > Device > Battery.
The list displayed on the screen shows you the breakdown of battery usage for
individual apps and services. Touch a graph for more details. The details screen for
some apps includes buttons that allow you to adjust settings affecting power
usage, or stop the app completely.
Battery status (charging, discharging) and level (as a percentage of fully charged)
are displayed at the top of the screen. The discharge graph shows battery level
over time since you last charged the device.

20
5.2. Optimise Data Usage
Data usage refers to the amount of data uploaded or downloaded by your device during
a given period. To monitor your data usage, adjust your data usage settings.
The usage displayed on the data usage settings screen is measured by your phone. The
feature described here can help you track your usage, but is not guaranteed to prevent
additional charges.
Data usage settings allow you to:
Set the data usage level at which you'll receive a warning.
Set a data usage limit.
View or restrict data usage by apps.
To adjust the settings described above:
1. Touch the Settings icon on your All Apps screen.
2. Go to Wireless & Networks and touch Data usage.
By default you will see the settings for mobile data, this means the data network or
networks provided by your carrier, although it is also possible to show Wi-Fi data usage
in a separate tab: Options button > Show Wi-Fi usage.
If you want to change your data usage cycle, touch the date to choose a different cycle.
This data range is the period of time for which the graph displays data usage.
Set warning for data usage Drag the orange line by its right side to the level
where you want to receive a warning. When your data usage reaches this level
you'll receive a notification.
Set data usage limit Select Set mobile data limit, read the message and if you
want to proceed touch Ok. At this point the red line on the top of the graph will
be activated so you can drag it up or down to set your limit. When the limit is
reached, mobile data will be turned off automatically. You'll receive a notification
when this occurs.
View or restrict data usage by app Scroll down to find the app data usage you
want to view (the blue bar indicates the total data usage during the cycle
defined). To see more details, touch the app. If you wish to stop background data
usage for this app, touch Restrict background data. Read the message and touch
Ok if you want to proceed.
Note: Restricting background data usage for individual apps can sometimes be a
useful way to reduce your overall data usage. However, this is a drastic measure
that may also affect the app's performance or cause it to malfunction.
Table of contents
Other Tecmobile Cell Phone manuals

Tecmobile
Tecmobile Titan 150 User manual

Tecmobile
Tecmobile R30 User manual

Tecmobile
Tecmobile Titan 150 User manual

Tecmobile
Tecmobile TITAN 600 User manual

Tecmobile
Tecmobile Q50 User manual

Tecmobile
Tecmobile R30 User manual

Tecmobile
Tecmobile R50 User manual

Tecmobile
Tecmobile MXC-545 User manual

Tecmobile
Tecmobile Titan 550 User manual

Tecmobile
Tecmobile Titan 550 User manual


