Tecnet HL-1500 User manual

TecNet International inc.
11535 West 83rd Terr.
Lenexa, KS 66214
Toll Free: 800-456-2071
Phone: 913-859-9515
Fax: 913-859-9550
www.tecnetusa.com
Printed in the Philippines
PART NO.950-00172-BB
LAND MOBILE RADIO
HL-1500 SERIES
1. Product Features
2. Main Products
3. Optional Accessories
6. Operation
4. Controls and Indicators
Basic Operation
(1) On/Off Power & Volume Knob
(2) Channel
(3) Receive
(4) Transmit
(5) Monitor
(6) Function
Channel Scan
Low/High Function of Squelch
Setting Beep Sound
Key Lock
DTMF
2TONE ANI
VOX Mode
Setting VOX Levels
7. HL-1500 Function Summary
8. Battery Use & Recharging
9. Using the Desktop Charger
10. Troubleshooting for Abnormal Operation
11. Caution/Warning
12. CTCSS/CDCSS TONE Frequency Table
3
4
13. Warranty Policy
5
6
10
10
10
10
10
11
11
11
12
13
13
14
15
15
19
20
21
23
24
25
27
14
5. LCD Display Panel
9
12
LAND MOBILE RADIO
HL-1500 SERIES LAND MOBILE RADIO
HL-1500 SERIES
Product Feature Main Products 4
3
22..
MMaaiinn
PPrroodduuccttss
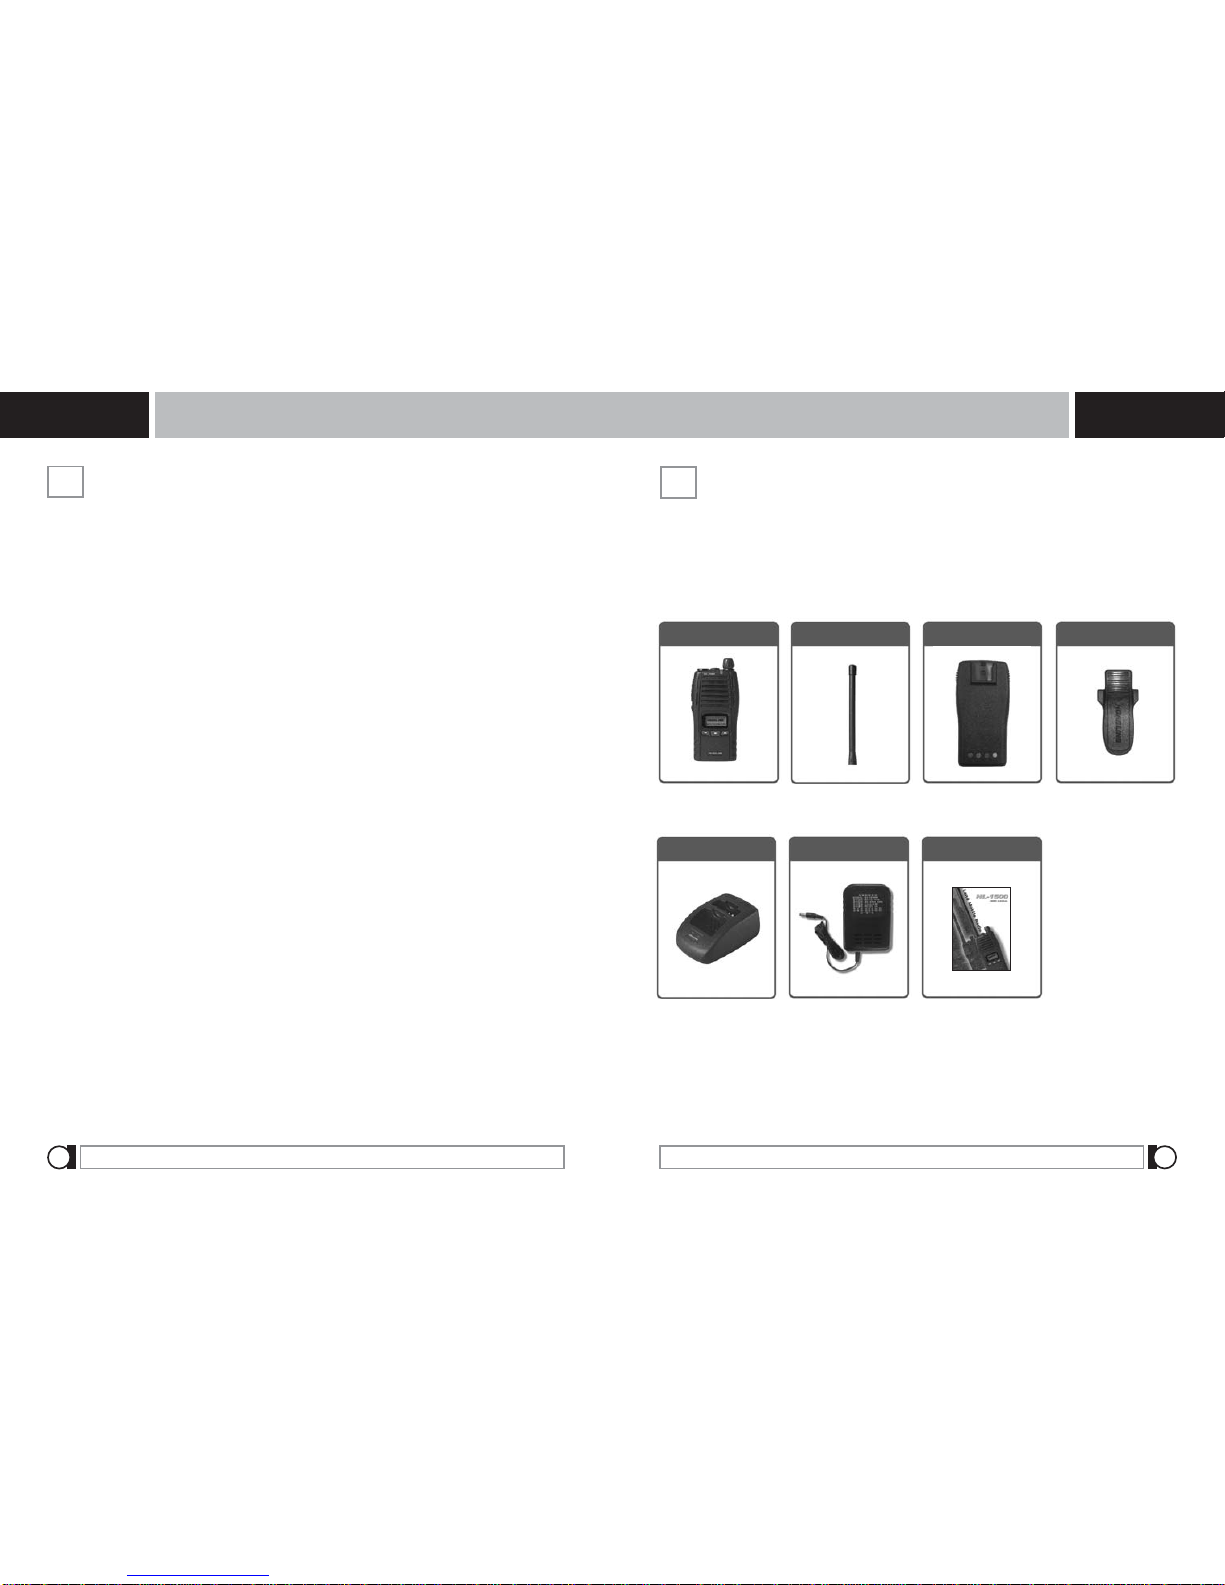
Thank you for purchasing the Headline Radio Communication product.
Below is a listing of the package contents. If any items are missing or
damaged, please contact the selling dealer for a replacement.
UNIT ANTENNA BATTERY PACK BELT CLIP
CHARGER ADAPTER MANUAL
11..
PPrroodduucctt
FFeeaattuurreess
1. Small & Lightweight
2. Operational 99 channels
3. 8-Character alphanumeric DOT matrix display
4. 1 or 4/5 Watts output power
5. Channel scan
6. Programmable 38 Standard CTSCC tones and 83 DCS Codes
7. Wide and Narrow channel spacing
8. 2.5 KHz channel stepping
9. Tri-color status LED
10. Two-tone and Quick call decode
11. Able to add an alias to a channel
12. Radio Lock with password protection
13. Adjustable receive sensitivity
14. Voice operated Transmission (VOX)
15. Clone mode

LAND MOBILE RADIO
HL-1500 SERIES LAND MOBILE RADIO
HL-1500 SERIES
Optional Accessies Controls and Indicators 6
5
44..
CCoonnttrroollss
aanndd
IInnddiiccaattoorrss
1)On/Off
&
Volume knob
2)External Ear/Microphone Jack
3)Battery pack
9)LED Indicator
10)Speaker
11)MIC
12)LCD
13)Down/Up
Button
14)Function Button
4)Antenna
5)PTT
(Push-To-Talk)
button
6)Battery
latch
7)Belt clip
8)Monitor
button
33..
OOppttiioonnaall
AAcccceessssoorriieess
The functionality of your Headline radio may be increased through the use
of the following accessories. For details and pricing, please contact your
selling dealer.
* Speaker microphone or other audio accessories
* Replacement and spare batteries
* Carrying accessories

LAND MOBILE RADIO
HL-1500 SERIES LAND MOBILE RADIO
HL-1500 SERIES
8
7
9. LED Indicator (Tri-color Lamp)
10. Speaker
Received audio and beep signals are heard through here.
Speaker level is adjusted by the volume control knob.
11. MIC
When transmitting a call, speak clearly towards this part of the radio.
12. LCD (Liquid Crystal Display)
The LCD indicates the state of operation and function selections.
13. Down / Up Buttons
Used to select channels and functions.
14. Function Button
Use this button to select various additional functions.
Green
Red On
Receiving a call
Call Transmission
1. On/Off & Volume Knob
Rotate this knob clockwise to power on the radio and adjust
the volume level.
2. External Ear / Microphone Jack
Through this accessory jack, an Earphone or Speaker Microphone may
be connected to the radio.
3. Battery Pack
Li-Ion or Ni-MH Battery - provides greater capacity and increased
battery life.
4. Antenna
Required for communication at the optimum distance.
5. PTT (Push-To-Talk) Button
Press and hold this button to transmit a call or tone signal.
Release the button to receive a call.
6. Battery Latch
When the battery is installed to the radio, the latch automatically locks
in place. To remove the battery, simultaneously press both latches
downward.
7. Belt clip
Allows for a secure grip on the user's belt.
8. Monitor Button
Press this button to remove noise or tone squelch when receiving
a weak signal. Checks channel activity before transmitting.
Controls and Indicators Controls and Indicators
On

LAND MOBILE RADIO
HL-1500 SERIES LAND MOBILE RADIO
HL-1500 SERIES
Operation 10
9
66..
OOppeerraattiioonn
1. Basic Operation
LCD Display Panel
Rotate the On/Off
& Volume Knob.
Select the channels using
the Up/Down button.
The signal will be received
after selecting a channel.
Battery
55..
LLCCDD
DDiissppllaayy
PPaanneell
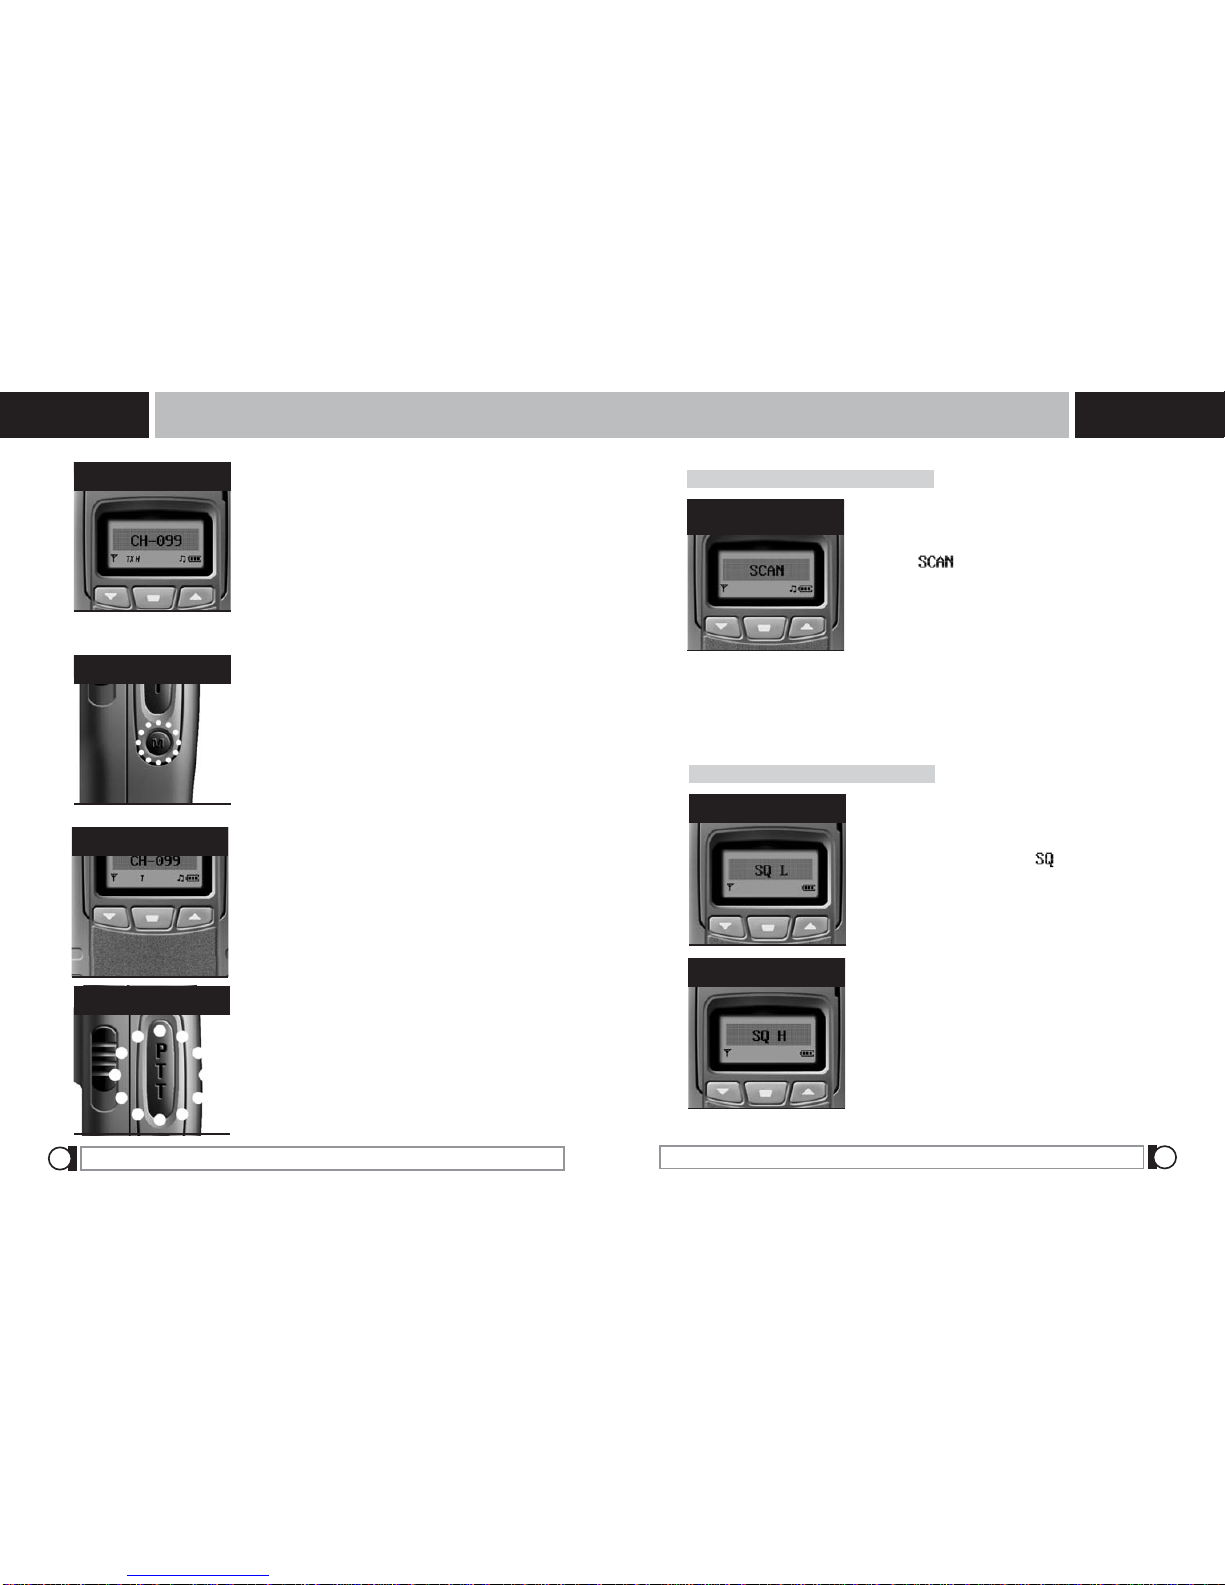
3) Receive
To receive a signal, a channel must first be
selected. When a communication is
received the display is activated and the 5
levels of the sensitivity will be indicated.
1) On/Off Power & Volume Knob
Rotate the On/Off Power & Volume knob
clockwise to turn power on and activate the
display.Confirmation Tone will sound to con
firm that the radio is on and the display will
show your home channel.
Volume can be adjusted by turning the volume
knob clockwise.
2) Channel
Channels are selected by pressing either of
the Up/Down buttons. Press and hold either of
the Up/Down buttons over 2 seconds for
rapid channel advance.
Shows Beep tone is On
Key Lock indicator
Shows 2 Tone is
active
Indicates 5 levels of
receiving Sensitivity /
two Levels of
transmitting
Transmit indicator
Shows Channel scan function is
active
Shows Sub-Tone is
active on the
current channel
Show VOX operation is active
Shows High power is active
LAND MOBILE RADIO
HL-1500 SERIES LAND MOBILE RADIO
HL-1500 SERIES
Operation Operation 12
11
2) Low/High Functions of Squelch
This is a sensitivity adjustment function that
allows for communication at a desired level.
Press the "Function" button twice to select
Squelch system. The icon " " will begin flash-
ing. Select Low/High by pressing the Up/Down
buttons. The selected function will be stored auto-
matically. If no buttons are pressed within 5 sec-
onds after selecting function, the screen will
revert to the main display. Press the PTT button
to finish and exit the function mode.
4) Transmit
Select a channel using the Up/Down buttons.
Press and hold the PTT (Push-To-Talk) button
and speak into the microphone. The LED
indicator is activated (RED Color) and the trans-
mission icon will appear on the display.
Pressing and holding the PTT button with the
Up/Down button at the same time will select
High/Low Transmit Power.
5) Monitor
Pressing the monitor button will open the squel-
ch button. Press the 'M' button to monitor.
Press the 'M' button for two seconds to lock
monitor continuously. To release monitor lock,
press the 'M' button again.
6) Function
Use this button for selecting or releasing
functions.
Use the Up/Down buttons to reset
options. Press the PTT button to finish after
resetting the options. Press the "Function"
button to switch to the next function. resetting
the options. Press the "Function" button to
switch to the next function.
If no buttons are pressed for the 5 seconds,
the selected function mode will be cancelled.
Reset the options using
the Up/Down buttons.
Press the 'Function' button
twice to select- select LOW
Select a channels using
the Up/Down buttons.
Press the 'M' button shortly
to monitor the channel.
Press the PTT button to finish
after resetting the options.
Press the 'Function' button
twice to select- select HIGH
1) CHANNEL SCAN
This function helps automatically find all channels
used by the radio. Select the Channel Scan by
pressing the "Function" button once.
The icon " " will be indicated on the dis-
play.
Select On/Off by pressing either the Up or Down
button.
The unit will now begin scanning and the appro-
priate channel numbers will scroll on the display.
Select the Channel Scan pres
-sing the 'Function' button
once

LAND MOBILE RADIO
HL-1500 SERIES LAND MOBILE RADIO
HL-1500 SERIES
Operation 14
13
6) 2TONE ANI
This function transmits a 2TONE signal when-
ever the PTT button is pressed.
Select the 2TONE ANI function by pressing the
"Function" button 6 times, the icon " " will
begin flashing. Select On/Off by pressing the
Up/Down buttons. The selected function will be
stored automatically. If no buttons are pressed
within 5 seconds after selecting functions, the
You should turn off the 2TONE ANI during
the general communication. Otherwise,
receiving transmission can be unavailable.
monitor will revert to the main display. Press the PTT button to finish
and exit the function mode. This function works only if the selling dealer
has programmed the radio for this. The radio will receive only when a
2TONE signal is sensed. Radios will communicate with each other only
if both are using 2TONE signals. For general communication with other
radios regardless of 2TONE, switch this function off.
4) KEY LOCK
This function locks the channel currently in use
and prevents other channels from being
accessed. Press the "Function" button 4 times
to set up 'Key Lock', the key icon " " will begin
flashing. Select On/Off by pressing the Up/Down
buttons. The selected function will be stored
automatically. If no buttons are pressed within 5
seconds after selecting functions, the screen
will revert to the main display. Press the PTT
button to finish and exit the function mode. To
release the Key Lock function, press and hold
the Function button for two seconds.
5) DTMF
This function serves to alert for incoming mes-
sages. Set up the DTMF Transmission by press-
ing the "Function" button 5 times. The icon " "
will begin flashing. Select On/Off by pressing the
Up/Down buttons. The selected function will be
stored automatically. If no buttons are pressed
within 5 seconds after selecting functions, the
screen will revert to the main display. Press the
PTT button to finish and exit the function mode.
If DTMF is on, the unique sound of DTMF will be
heard whenever the PTT button is pressed.
Operation
Press the 'Function' button
5 times.
Press the 'Function' button
6 times.
3) SETTING BEEP SOUND
This function confirms that the buttons are prop-
erly pressed with the beep sound.
Press the "Function" button 3 times to select the
beep sound. The icon " " will be flashing.
Select On/Off by pressing the Up/Down buttons.
The selected function will be stored automatically.
If no buttons are pressed within 5 seconds after
selecting functions, the screen will revert to the
main display. Press the PTT button to finish and
exit the function mode.
Press the 'Function' button
3 times to select the beep
sound.
Press the 'Function' button
4 times to set up 'Key Lock'.

LAND MOBILE RADIO
HL-1500 SERIES LAND MOBILE RADIO
HL-1500 SERIES
16
15
Additional Channel Scan Instructions
(1) Channel Scan Order
There are two kinds of channel scans: Priority Scan Channel and General
Scan Channel. General Scan Channel is a channel that is used to commu-
nicate on, but is not an essential communication channel. Priority Scan
Channel is a channel that is of more importance and is frequently used to
communicate on. If no Priority channel has been assigned, the radio will
scan all general channels programmed by starting with the first channel and
finishing with the last channel. Once a priority channel has been assigned,
the radio will scan two general channels followed by the priority channel.
(General Scan Channel 1 - General Scan Channel 2 - Priority Channel 1 -
followed by the next two general channels.) If two Priority Scan Channels
are assigned, the radio will scan two general channels then the priority
channel 1, followed by the next two general channels, then priority channel
2: (General Scan Channel 1 - General Scan Channel 2 - Priority Channel 1
- Channel 3 - General Scan Channel 4 - Priority Channel 2 - followed by the
next two general channels.)
Example
As previously mentioned, there are two kinds of channel scans: Priority
Scan Channel and General Scan Channel.
For example, the radio is programmed to receive and transmit on ten
channels. Of these channels, two Priority Scan Channels are assigned;
Priority Scan Channel 1 is assigned to Channel 5 and Priority Scan
Channel 2" is assigned to channel 6. Therefore, the channel scan will
occur as follows.
(For additional information, please refer to How to Register Channels for
Channel Scan on Page 18.)
priority
scan
channel 1
priority
scan
channel 2
priority
scan
channel 1
priority
scan
channel 2
general scan channel
7) VOX MODE
This function is for automatic voice operated
transmission system similar to "Hands Free".
Select the VOX Mode by pressing the
"Function" button 7 times. The icon " " will
begin flashing. Select On/Off by pressing the
Up/Down buttons. Select "ON" and press the
PTT button. The display will change to the VOX
Level settings. (See Function 8 below.) Once
the unit is set for VOX mode, a special
EAR/MIC accessory is required for the radio to
operate. (The MIC is not functional in VOX
Mode.) If no buttons are pressed within 5 sec-
onds after selecting functions, the screen will
revert to the main display. If general communi-
cation using the PTT button is desired, enter the
VOX mode function and select the OFF feature.
8) Setting VOX Levels
This function selects the desired sensitivity (9
Levels) to activate the VOX circuit.
Select the VOX Mode by pressing the "Function"
button 8 times. The icon " " will begin flashing.
Select the VOX level desired by pressing the
Up/Down buttons. Pressing the PTT button
saves the selected level and exits the function
mode.
Operation Additional Instruction of Scan Channel
Select the VOX mode press-
ing the 'Function' button 7
times.
Select the VOX mode press-
ing the 'Function' button 8
times.
125346565786910
18
Additional Instruction of Scan Channel
LAND MOBILE RADIO
HL-1500 SERIES
17 Additional Instruction of Scan Channel
LAND MOBILE RADIO
HL-1500 SERIES
(2) Receive and Transmit During Scanning Channel
If there is a signal reception and transmission during scanning chan-
nel, scanning will be stopped at the channel. At this time, you can
transmit according to the transmit type by pressing the PTT.
(3) How to Transmit During Scanning
To transmit during scan, simply press PTT.
1. Tranmit is only allowed on the Home Channel.
2. Transmit occurs on the last channel received.
3. Transmits occurs on the channel from which scan was initiated.
(4) Progress the Channel Scan
When the radio catches any signals, scanning will be stopped on
that channel for about 2 seconds, and resume scanning from the
next channel. If the scanning stops on the channel that you detect
and if you want to keep scanning after communication, press the
"Up" button to resume scanning to the next channel.
(5) Temporary Deletion Channel on Scanning
You can delete a scanned channel temporarily if there are many
channels you want to scan. Press the "Down" button when scan
stops on the unwanted channel. It will be then deleted temporarily.
Restarting scan will restore the deleted channel into the scan list.
You can register the channel which you want to scan
among the channels in the radio as using the exter-
nal PC program or through the registration mode of
the scan channel in the radio.
There are three dealer programmable transmit types.
(See the registration and cancellation of the scan
channel in a special mode.)
* How to Register the Scan Channel
Alpha-Numeric Display
1. You can set the display channel name using PC programmer.
Ex) CH-001 > SHOP
2. Usable character: A~Z(Capital/small letters),1 to 0,
Special letters on the Key board
3. This is changing the channel name from "CH-001"
to perhaps "SHOP".
4. This would probably use a lot of available memory of the radio.
5. The number of available channels could be reduced
to compensate.
Quick Call II
If the dealer has programmed the radio for Quick Call,
the function button acts to enable/disable the function.
Pressing and holding the function button for more than 3 sec
onds will toggle it either on or off.
This function only works if enabled by the dealer.
* Note :
LAND MOBILE RADIO
HL-1500 SERIES LAND MOBILE RADIO
HL-1500 SERIES
HL-1000 Function Summary 20
19
88..
BBaatttteerryy
UUssee
&&
RReecchhaarrggee
To reduce battery consumption, the "Battery Save" circuit will be activated
when the radio is idle. The user may also set & control the 'battery save
time' through the PC programming software. Default is set for Headline's
standard battery save time.
BATTERY SAVE FUNCTION
(1) The Li-ion / Ni-Mh batteries used for HL-1500 series are highly
efficient, stable and reliable.
(2) Charge the battery to its full capacity before using to achieve its
maximum capacity and to allow stable operation of the radio.
(3) Allow the battery to be completely drained before recharging.
A warning beep will sound to alert the user that the battery needs to
be recharged.
(4) Battery is designed for use only with the provided charger.
(5) The radio must be powered off when charging of the battery.
(6) Should the battery terminal short-circuit through carelessness or
misuse, the battery could burn itself or cause a fire.
(7) Do not allow the battery terminal to come into contact with metal or
any conducting material as it could cause damage and result in
injury.
1) CAUTION IN CHARGING THE BATTERIES
(1) When the radio's performances become unstable due to low voltage
of battery.
(2) When the Red LED indicator is blinking.
(3) When the battery indicator is blinking on the LCD screen.
(4) When the warning beep sounds every 10 seconds when the radio is
in use.
2) WHEN TO CHARGE
77..
HHLL
-
11550000
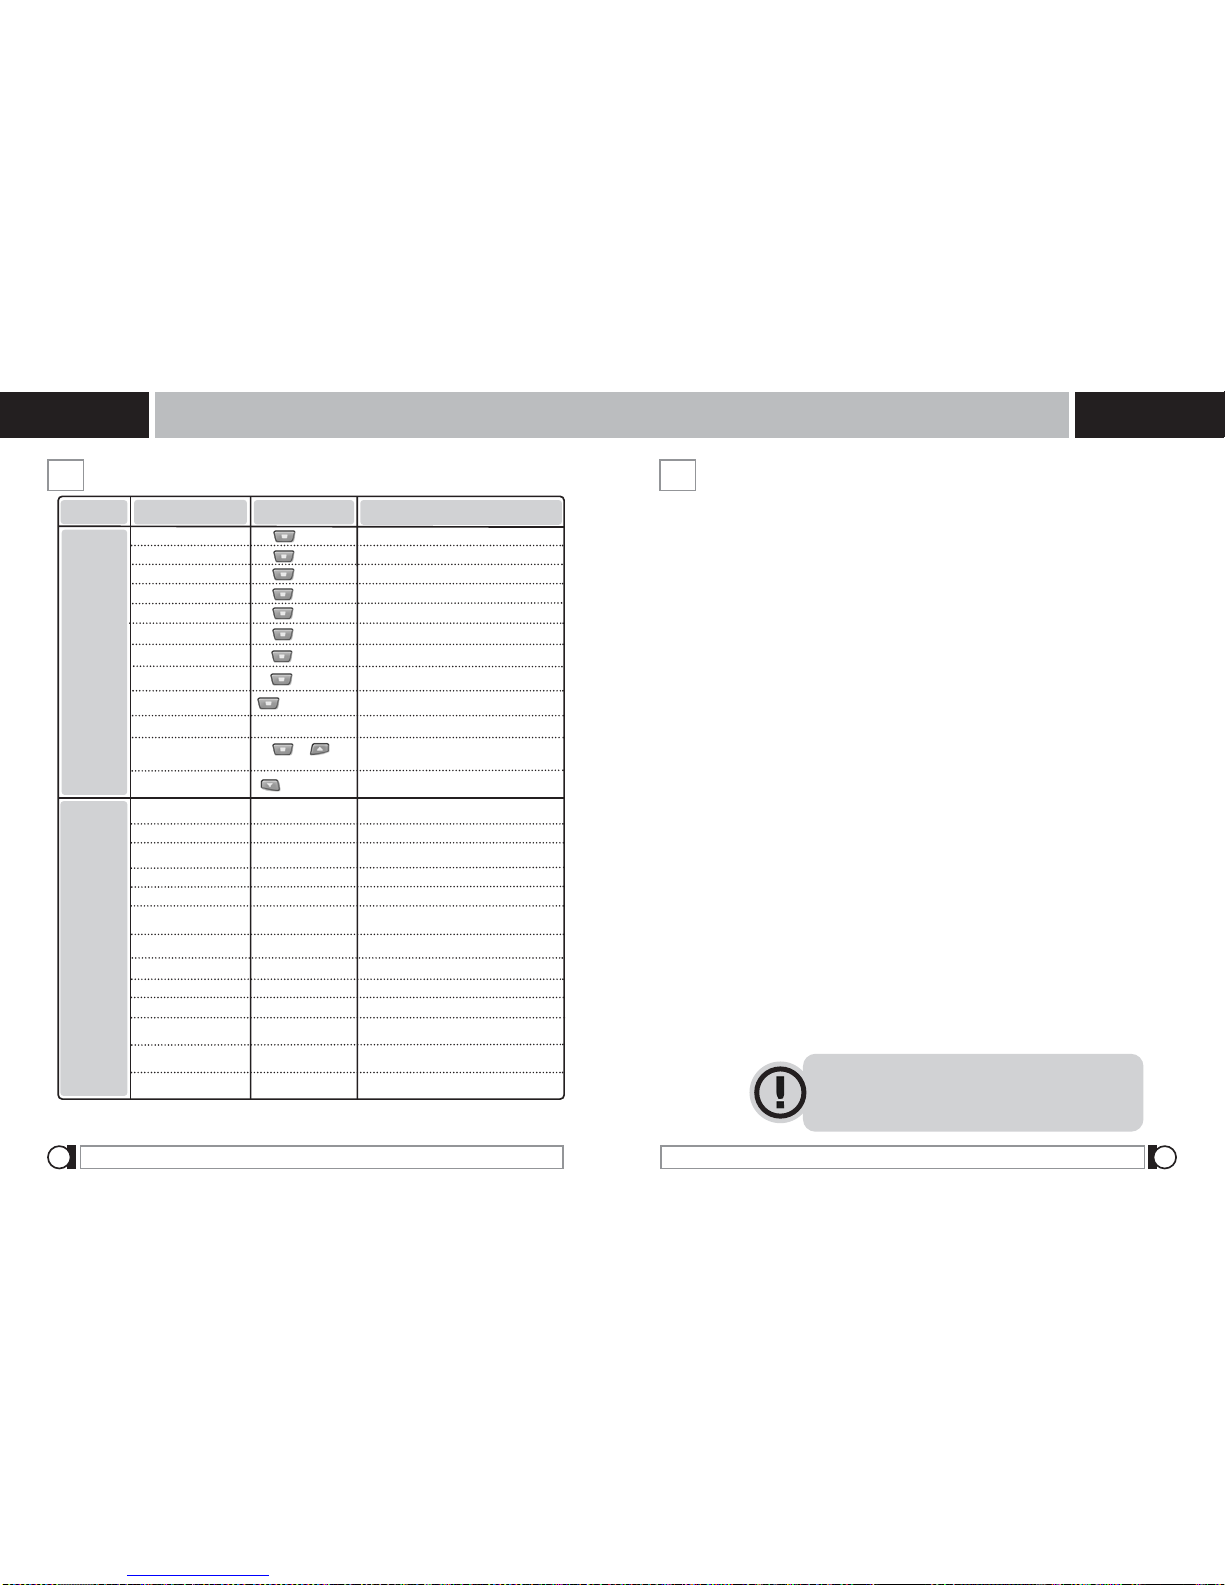
FFuunnccttiioonn
SSuummmmaarryy
INPUT FUNCTION CONTROL KEY FUNCTION DESCRIPTION
Key
Button
&
Exernal
PC
Program
Exernal
PC
Program
SQUELCH
BEEP ON / OFF
DTMF ON / OFF
2TONE ANI ON / OFF
CHANNEL SCAN
VOX MODE ON / OFF
VOX SENSITIVITY
QUICK CALL ON/OFF
KEY LOCK ON / OFF
CLON MODE
REGISTER / CANCEL OF
SCAN CHANNEL LIST
PASSWORD MODE
BATTERY WARNING BEEP
BCLO SELECTION
TOT SELECTION
TOT TIME SETTING
BATTERY SAVE
SETTING
SCAN TIME SETTING
SCAN TYPE SETTING
DTMF SETTING
BCLO TYPE SELECTION
VOX SETTING
2TONE TYPE SELECTION
2TONE OPTION SETTING
INPUT 2TONE ID /
ANI SELECTION
Controls Receiving Sensitivity
Turns Beep sound On / Off
Locks channel in use
Sets DTMF transmitting On / Off
Sets 2TONE ANI On / Off
Sets Channel On / Off
Sets VOX mode On / Off
Sets the VOX sensitivity level
Sets QUICK CALL Mode On / Off
Allows cloning of two units (using the Cloning cable)
Allows for Entry and Cancellation of scan
channels
Password input / delete
Sets low Battery indicator ON/OFF
Enables/Disables BCLO setting
Selects BCLO type
Enables/Disables Time-Out-Timer setting
Selects Time-Out-Timer setting
Sets Battery save time in wait mode
Sets Channel Scan time
Sets the SCAN type
Sets the DTMF ID / Time
Sets 2TONE type (11 types available
including EEA)
Sets 2TONE time
Sets the VOX delay time
Sets 2TONE ID input / ANI
1 TIME
2 TIMES
3 TIMES
4 TIMES
5 TIMES
6 TIMES
7 TIMES
8 TIMES
Press For 2 Seconds
+ POWER SWITCH
PTT + POWER SWITCH
ON / OFF
Enable / Disable
Carrier / Repeater
Enable / Disable
TOT Time / Penalty time
ON/OFF / ACTIVE TIME
DWELL TIME / TX TYPE
SA Combi / Carrier
ID & TIME INPUT
Delay Time INPUT
ID INPUT & ANI ON/OFF
2TONE TYPE SETTING
2TONE OPTION
SETTING
Battery Use & Recharge
The radio will turn off automatically if the battery
voltage is too low for radio operation.
* Note :
+
+ POWER SWITCH

LAND MOBILE RADIO
HL-1500 SERIES LAND MOBILE RADIO
HL-1500 SERIES
Using the Desktop Charger 22
21
3) How to use the charger
(1) Plug the adaptor cable into the adaptor jack of the charger.
(2)To charge the battery while attached to the radio, insert it into the
front slot of the charger. To charge the battery by itself, insert it into
the rear slot of the charger. To simultaneously charge a battery while
attached to the radio and a spare battery, insert the radio and
attached battery into the front slot of the charger. Then, insert the
spare battery into the rear slot of the charger. The front slot will begin
to charge first. (Estimated time to fully charge a battery is 3.5 hours.)
Green
Lamp Color
Yellow
Lamp Status Charging status
Lamp on
Lamp on
Lamp on
Blinking
Charging Completed
Charging is on going
Charging Stand-by
99..
UUssiinngg
tthhee
DDeesskkttoopp
CChhaarrggeerr
1) Identification of parts
5) Adaptor Jack
-+
2) Rear Slot
1) Front Slot
4) Rear charge
LED Light
3) Front charge
LED Light
2) Features of the charger
Battery type
Input Voltage
Output Voltage
Dimension
Operating temp.
Li-ion
AC 120V / 220V, 60Hz
DC 12V, 1000mA / DC 12V,400mA
140(W) x 57(H) x 90(D)
Using the Desktop Charger
0 C ~ +50 C
Ni-Mh
(3) LED indications
Ni-Mh / Li-ion battery charger
Red
Charging Error
LAND MOBILE RADIO
HL-1500 SERIES LAND MOBILE RADIO
HL-1500 SERIES
Trouble Shooting for Abnormal Operation Caution / Warning 24
23
1111..
CCaauuttiioonn
(1) Do not carry the radio grasping by the antenna only.
(2) Keep the radio away from water or oil.
(3) Do not disassemble the radio.
(4) Do not remove the radio casing. Doing so will void the warranty.
(5) If the radio is damaged or not working properly, please contact your
dealer or Authorized Service Center to repair the unit.
(6) RF Energy Exposure Awareness and Control Information and
Operational Instructions for Occupational Use.
1100..
Trouble
shooting
for
Abnormal
Operation
1) PLL UNLOCK
In case of fatal error within the internal circuits, a "U" icon will blink on the
LCD display, along with warning beeps. Intermittent transmitting and
receiving will result. To remedy this situation, power the radio off. Then,
power on and resume normal operation.
2) OTHERS
(1) Check that the operating procedure is correct.
(2) Change your location and try again.
(3) Confirm the radio is on the correct channel.
(4) Make sure the antenna is correctly and tightly connected.
This radio is intended for use in occupational/controlled conditions
where users have full knowledge of their exposure and can exercise
control over their exposure to meet the occupational limits in
FCC/ICNIRP and International standards. This radio device is NOT
authorized for general population consumer use. This radio complies
with the IEEE (FCC) and ICNIRP exposure limits for
occupational/controlled RF exposure environments at operating duty
factors of up to 50% talk-50% listen and is authorized by the
IEEE/ICNIRP for occupational use only.
LAND MOBILE RADIO
HL-1500 SERIES LAND MOBILE RADIO
HL-1500 SERIES
CTCSS / CDCSS Tone Frequency Table 26
25
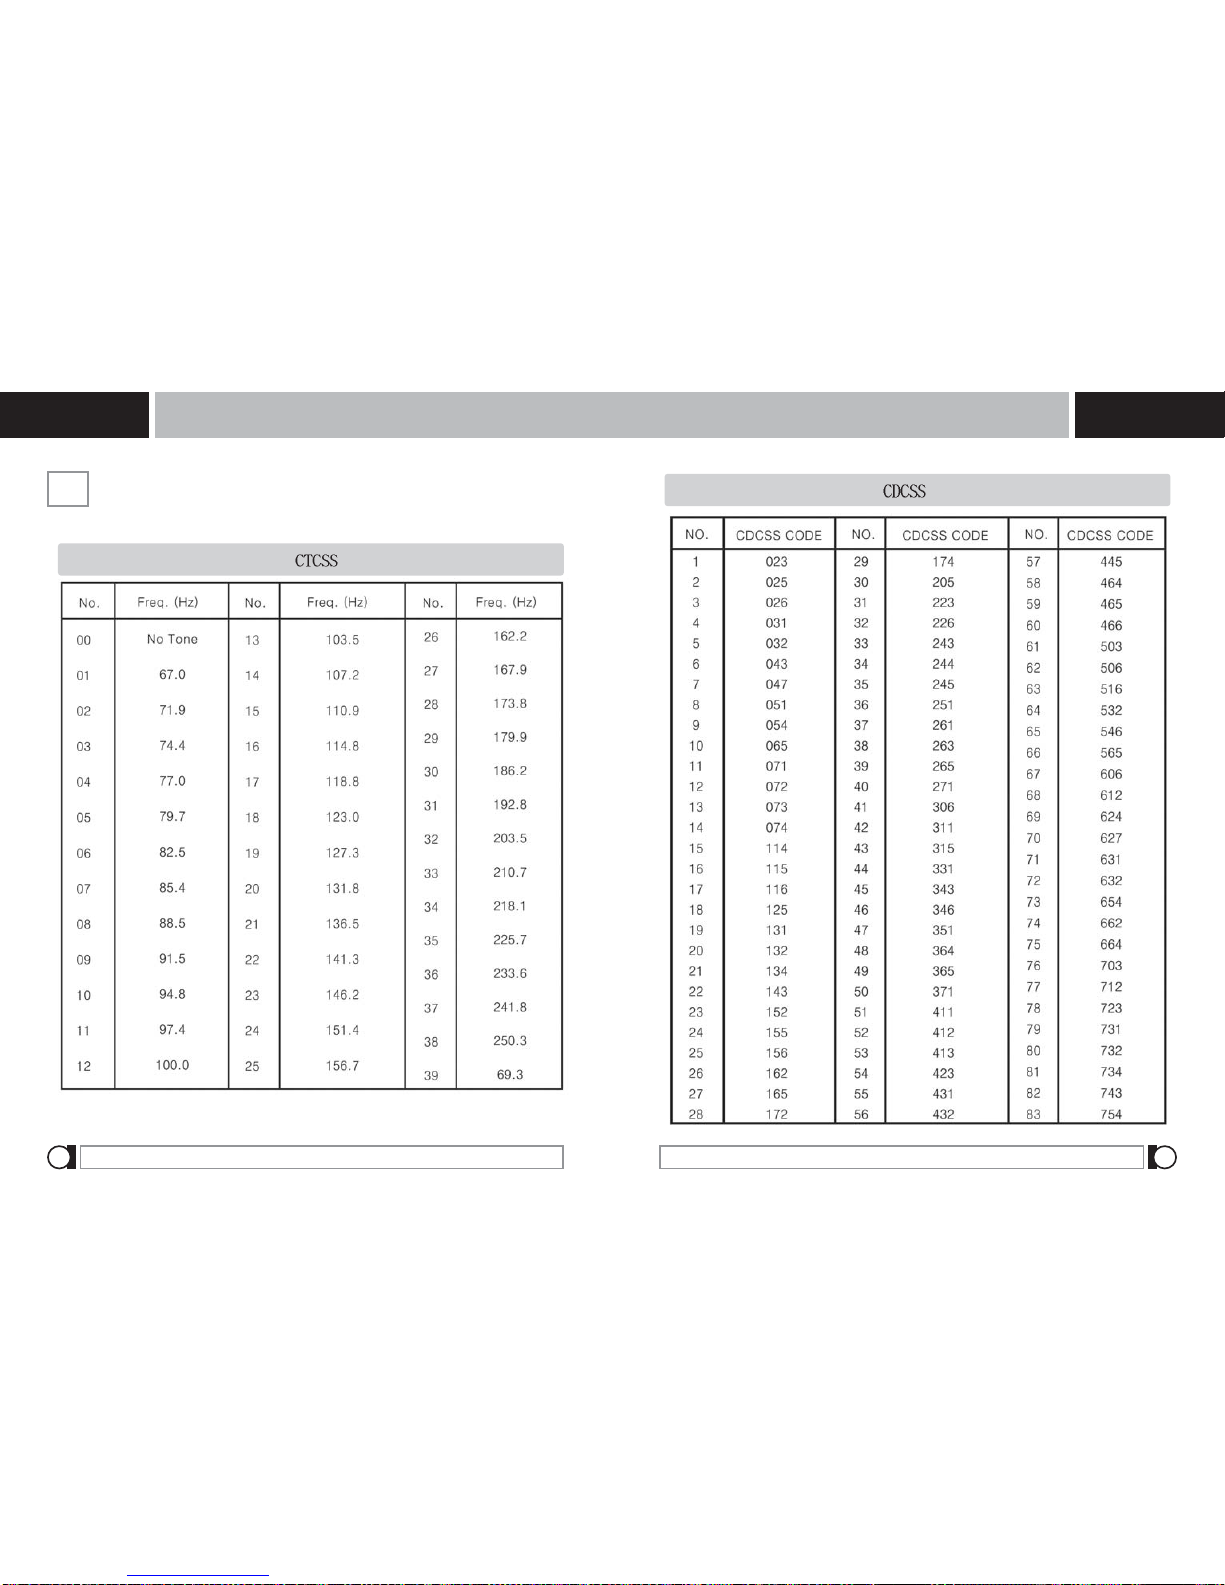
1122..
CTCSS
/
CDCSS
TONE
Frequency
Table
CTCSS / CDCSS Tone Frequency Table

LAND MOBILE RADIO
HL-1500 SERIES LAND MOBILE RADIO
HL-1500 SERIES
Warranty
27 28
TecNet warrants each new radio product manufactured or supplied by it to be
free from defects in material and workmanship under normal use and service
for the time period listed below, provided that the user has complied with the
requirements stated herein. The Warranty period begins on the date of
purchase from an Authorized TecNet Sales and Service Outlet.
This Warranty is offered to the original end user and is not assignable or
transferable. TecNet is not responsible for any ancillary equipment, which is
attached to or used in conjunction with its products.
TecNet offers to the original end user a Two (2) Year Limited Warranty on all
Headline Business and Industrial Radio Products. Accessories carry a One
(1) Year Limited Warranty.
During this period, if the product fails to function under normal use because of
manufacturing defect(s) or workmanship, it should be returned to the
Authorized TecNet Sales and Service Outlet from which it was purchased.
The Outlet will repair the product, or return the product for repair to TecNet or
its Authorized Repair Depot. The user is responsible for the payment of any
charges or expenses incurred for the removal of the defective product from
the vehicle or other site of its use; for the transportation of the product to the
Sales and Service Outlet; for the return of the repaired / replacement product
to the site of its use and for the reinstallation of the product.
TecNet shall have no obligation to make repairs or to cause replacement
required which results from normal wear and tear or is necessitated in whole
or in part by catastrophe, fault or negligence of the user, improper / unautho-
rized alterations or repairs to the Product, incorrect wiring, use of the Product
in a manner for which it was not designed, or by causes external to the
Product. This warranty is void if the product serial number is altered, defaced
or removed.
TecNet's sole obligation hereunder shall be to replace or repair the Product
covered in this Warranty. Replacement, at TecNet's option, may include a
1133..
Warranty
Policy
similar or higher-featured product. Repair may include the replacement of parts
or boards with functionally equivalent reconditioned or new parts or boards.
Replaced parts, accessories, batteries or boards are warranted for the balance
of the original time period. All replaced parts, accessories, batteries or boards
become the property of TecNet.
THE EXPRESS WARRANTIES CONTAINED HEREIN ARE IN LIEU OF ALL
OTHER WARRANTIES, EITHER EXPRESSED OR IMPLIED OR
STATUTORY, INCLUDING, WITHOUT LIMITATION, ANY WARRANTY OF
MERCHANTABILITY OR FITNESS FOR A PARTICULAR PURPOSE. FOR
ANY PRODUCT THAT DOES NOT COMPLY WITH THE WARRANTY
SPECIFIED, THE SOLE REMEDY WILL BE REPAIR OR REPLACEMENT.
IN NO EVENT WILL TECNET BE LIABLE TO THE BUYER OR ITS
CUSTOMERS FOR ANY DAMAGES, INCLUDING ANY SPECIAL,
INCIDENTAL, INDIRECT OR CONSEQUENTIAL DAMAGES, OR THE LOSS
OF PROFIT, REVENUE OR DATA ARISING OUT OF THE USE OF OR THE
INABILITY TO USE THE PRODUCT.
Warranty

MEMO MEMO
Table of contents
Other Tecnet Radio manuals


