Installazione / Installation / Installation
Fig. 4
Fig. 2 Fig. 3
Installazione / Installation / Installation
Fig. 4
Fig. 2 Fig. 3
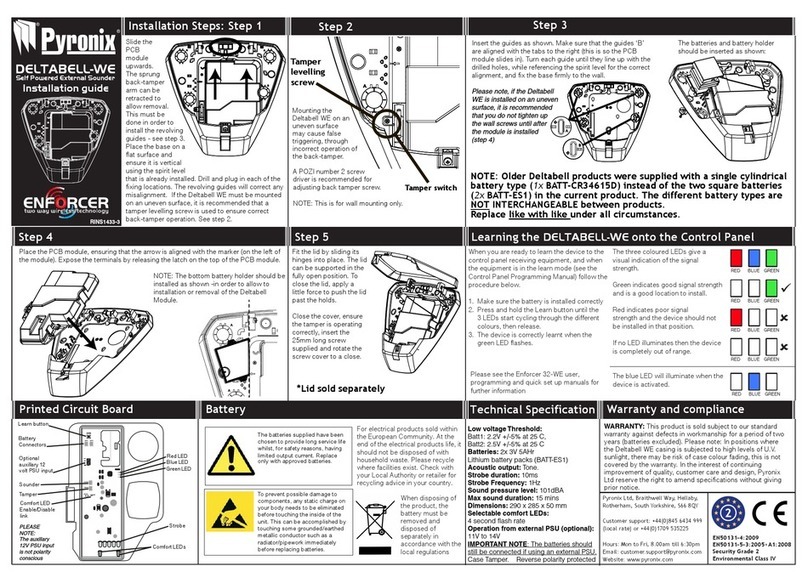
Montaggio del contatto tamper / Fixation du contact d'auto-surveillance /
Fixing of the tamper switch
Il contatto tamper funziona da tamper antistrappo e da tamper antiapertura.
Fissare il rettangolo di plastica (fig. 4) senza staccarlo dal fondo del contenitore.
VATTENZIONE W
Non rimuovere il rettangolo di plastica
dal fondo del contenitore.
Le contact d'auto-surveillance protège soit
contre l'arrachement soit contre l'ouverture.
Fixer le rectangle de plastique (fig. 4) sans
l'enlever du fond du boîtier au mur.
V
ATTENTION
W
Ne jamais enlever le rectangle de
plastique du fond du boîtier.
The tamper switch protects both against
detachment and opening.
Fix the plastic rectangle (fig. 4) without
removing it from the bottom of the
casing, to the wall.
V
ATTENTION
W
Never remove the plastic rectangle from
the bottom of the casing.
2
2

