Teeter Hang Ups POWER II Inversion Table User manual

Patent applies.
OWNER'SMANUAL
DO NODO NO
DO NODO NO
DO NOT REMOT REMO
T REMOT REMO
T REMOVE FROM TVE FROM T
VE FROM TVE FROM T
VE FROM TABLEABLE
ABLEABLE
ABLE
Height / Weight Capacity: Max 6'6" / 300 lbs. (198 cm, 136 kg)
POWER IITM
Important Safety Instructions:
It is your responsibility to familiarize yourself with the proper use of the equipment and the inherent risks of inversion, such as falling on
your head or neck, pinching, entrapment or equipment failure. Do not use the inversion table until you have thoroughly and carefully
read the Owner's Manual, reviewed all other accompanying documents, and inspected the equipment.
1. DO NOT use the equipment without a licensed physician's approval. Carefully review the following list of medical contraindi-
cations for inversion with your licensed physician: (This is not an exhaustive list, it is intended only for reference) Pregnancy;
Hiatal Hernia, Ventral Hernia; Glaucoma, retinal detachment or conjunctivitis; High blood pressure, hypertension, recent stroke or transient
ischemic attack; Heart or circulatory disorders; Spinal injury, Cerebral Sclerosis, and acutely swollen joints; Bone weakness (osteoporosis),
recent and/or unhealed fractures, medullary pins, and surgically implanted orthopedic supports; The use of anticoagulants, including high doses
ofAspirin; Middle ear infection; Extreme obesity.
2. DO NOT use if you are over 6'6" (198 cm) or 300 lbs. (136 kg).
3. DO NOT operate equipment while under the influence of drugs, alcohol, or medication that may cause drowsiness or disorientation.
4. NEVER allow children to use the equipment unsupervised.
5. DO NOT drop or insert objects into any opening. Keep hands and fingers away from moving parts to avoid injury.
6. ALWAYS inspect the equipment prior to use. Make sure that all fasteners are secure.
7. ALWAYS wear securely tied lace-up shoes with a flat sole, such as a normal tennis style shoe. DO NOT wear shoes with
thick soles, boots, high-tops or any shoe that extends above the anklebone. Verify that no part of the footwear or garments
can touch or interfere with the locking pin in any way during inversion.
8. DO NOT modify the equipment or use accessory attachments that are not recommended by the manufacturer, as this may
result in serious injury or death. Utilize the equipment for its intended purpose only.
9. DO NOT use weights, elastic bands or any other exercise or stretching device while on the inversion table.
10.This product is not intended for use in public facilities.
11.Refer to additional warning notices posted on the equipment.
WARNING
!
HELPFUL SUGGESTIONS FOR INVERTING
Begin Slowly:
• To start, invert to only 15-20 degrees (see Figure 1) for a week or more until you get used to it.
• Stay down as long as you are comfortable, even if only a few seconds at first.
• Pause at horizontal when returning upright - dizziness after a session is a sign that you should
take more time to let your body readjust.
Make Changes Gradually:
• Increase only a few degrees at a time. You can gain all the benefits of Inversion without ever
inverting beyond 60 degrees. Muscle stretching and relaxation can be realized at as little as 20 degrees of inversion.
• You may want to increase your inversion time from 1-2 minutes to 5 or more over time - just listen to your body.
Pay Attention to What Your Body Tells You:
• Remind yourself that your body is unique and it will tell you what is good for it. If other people invert longer or a greater
angle, it has nothing to do with your body.
• Wait for a while after you've eaten before you invert.
• IfInversionmakesyounauseous,don'tfightit.Comeupassoonasyoufeelqueasy,evenifafteronlyafewseconds.Give
it time--it may take weeks or months before your inner ear gets used to inverting.
Moving While Inverted is Helpful:
• Add gentle stretching and light exercises only after you are comfortable with inversion. Movement while inverted may
help make inversion a more comfortable experience and may help joints to realign and muscles to stretch and relax.
• Movement may be accomplished either by intermittent or rhythmic traction or by stretching and light exercise:
Intermittent traction consists of 1-2 minutes inverted and a half minute up. Rhythmic traction is a more evenly
spaced movement down and up. Stretching can be done from either partial or full inversion. Light exercise such as
crunches, full-range sit-ups and inverted squats should be done only from the fully inverted position to reduce the
chance of back injury. DO NOT use weights, elastic bands or any other exercise or stretching device while
on the inversion table.
See reverse side for complete use instructions.
Figure 1
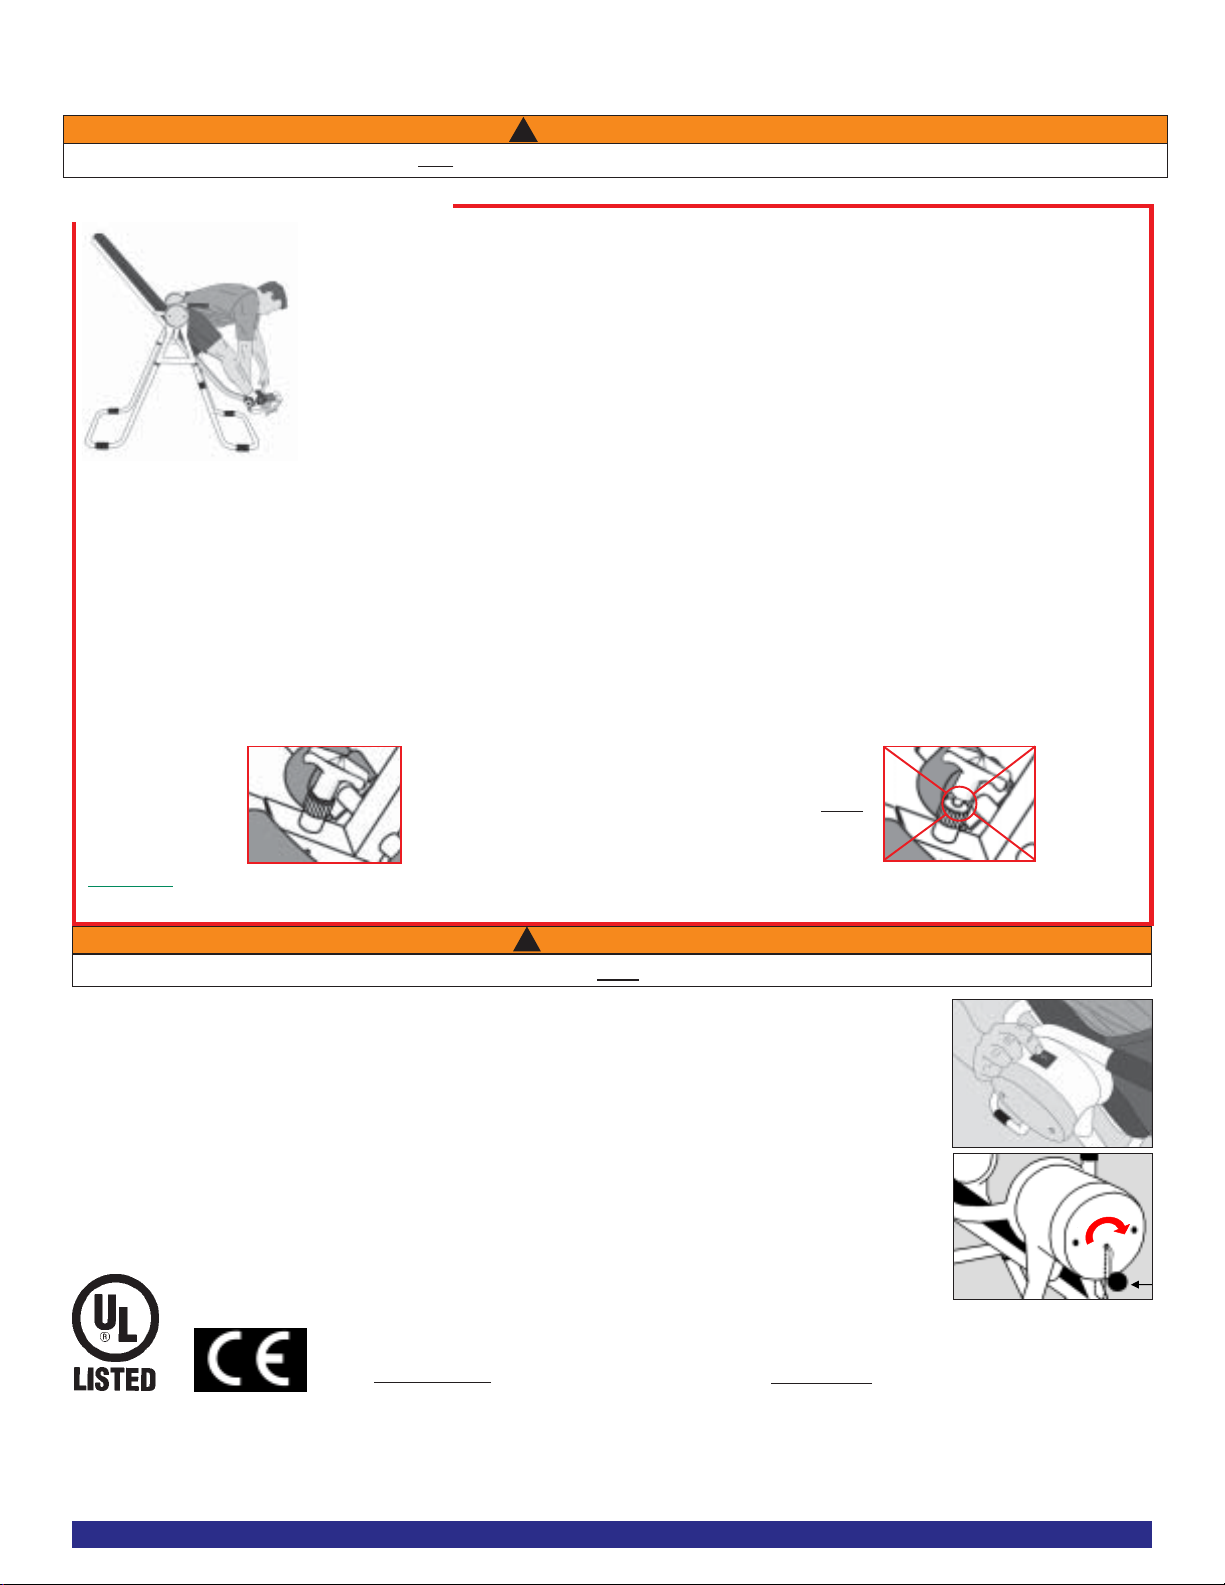
Use the concept of HEAR - FEEL - SEE every time you secure your ankles:
HEAR the locking pin click into place.
FEEL the locking pin to make sure it is fully engaged in a hole setting.
SEE that there is NO space between the locking pin and its base. (See illustrations below)
ALWAYS carefully check to be certain the ankle locking pin is fully engaged each time you use your inversion table and
make sure that both the front and rear ankle clamps are snug against your ankles, or you could fall when the table inverts.
Owner's Manual LP1024 Pg. 2
For information about the Teeter Hang Ups®2-year warranty, or if you have any problems assembling the
equipmentorquestions about itsuse, please contactCustomer Service attheappropriate locationbelow:
USA & Canada:
STL Inc.
9902 162nd St. Ct. E., Puyallup, WA 98375
Toll Free (Phone) 800-847-0143 (Fax) 800-847-0188
Local (Phone) 253-840-5252 (Fax) 253-840-5757
(email) Info26@TeeterHangUps.com
(web)www.TeeterHangUps.com
PRIOR TO USE
Press the rotation control button to make sure that the table rotates smoothly to the fully inverted position and back.
These steps must be performed carefully and precisely each time you use the inversion table!
Note: ALWAYS wear securely tied lace-up shoes with a flat sole, such as a normal tennis
style shoe. DO NOT wear shoes with thick soles, boots, high-tops or any shoe that extends
above the anklebone. Verify that no part of the footwear or garments can touch or interfere
with the locking pin in any way during inversion.
• Stand on the foot platform, sliding your ankles between the foam ankle clamps.
• Press your ankles back firmly against the rear ankle clamps.
• Rotate the top of the rear clamps slightly inward toward your ankles - this will increase
your comfort while inverting.
• Pull out the locking pin to allow the front ankle clamps to snap closed against your ankles. Make sure your pant legs
do not interfere with obtaining a secure closure.
• Adjust the front ankle clamps to make sure both the front and rear ankle clamps are snug against your ankles.
Release the locking pin so that it fully engages a hole setting. (See Figure 2)
• If the locking pin does not automatically engage in a hole, push the front ankle clamps inward until the pin engages
fully in the next tightest hole setting.
Figure 2
CORRECT:
LOCKING PIN
FULLYENGAGED
DANGER:
LOCKING PIN NOT
FULLYENGAGED
Patentapplies.
Teeter Hang Ups®is a registered trademark of STL
Inc. and Inversion International, Ltd.
Specifications subject to change without notice.
© COPYRIGHT 2004, STL Inc. and
InversionInternational, Ltd.
International Law Prohibits Any Copying, 01/04-1
International:
InversionInternational,Ltd.
PO Box:AP 59245, New Providence Island, Bahamas
(Phone) +1-242-362-1001
(Fax) +1-242-362-1002
(email) [email protected]
(web)www.InversionInternational.com
SECURING YOUR ANKLES
INVERTING
• Push the rotation control button in the direction of your head. (See Figure 3) When first
using the inversion table, do not go to full inversion. Refer to "Helpful Suggestions" on the
reverse side.
• To return upright, press the rotation control button in the direction of your feet. Rest at the
horizontal position for a minute prior to returning to start position.
• If a power failure occurs, please remain calm. Reach for the emergency crank attached with a
chain to the motor housing. (See Figure 4) Insert the emergency crank into the hole at the
motor end and turn the crank clockwise to rotate the table upright.
WARNING
Failure to engage the ankle locking pin fully could result in serious injury or death! DO NOT deviate from these instructions.
!
WARNING
!
Failure to engage the ankle locking pin fully could result in serious injury or death!
Figure 3
Figure 4
Table of contents


