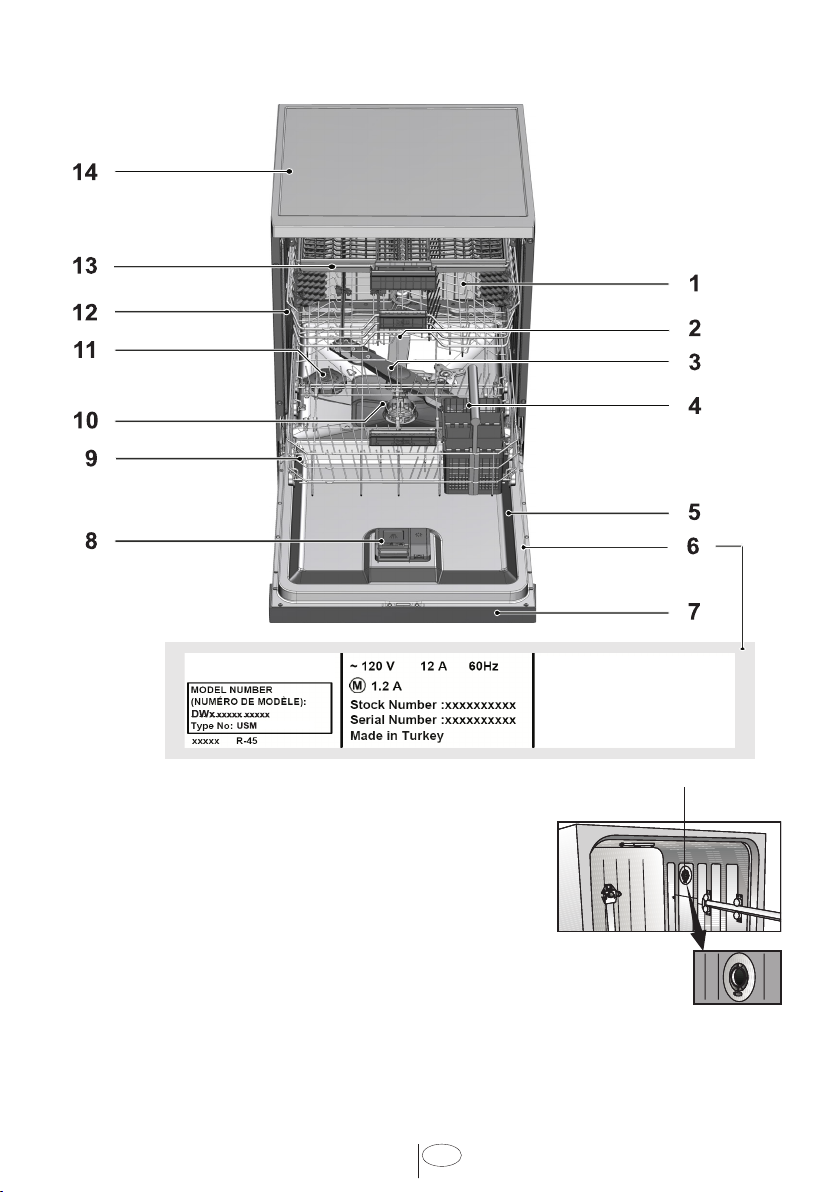
manuals.online logo
Brands
  1. Home
  2. •
  3. Brands
  4. •
  5. Teka
  6. •
  7. Dishwasher
  8. •
  9. Teka DFI 46950 120/60 User manual

Teka DFI 46950 120/60 User manual

Dishwasher
User manual
USA
15 8702 0100_AA_uE5_USA/ 18-03-22.(16:47)
DFI 46950 120/60
DFI 46950 STD 120/60
DFI 46900 STD 120/60
DFI 46900 120/60
,
CONTENTS
1. IMPORTANT SAFETY INSTRUCTIONS 1
2. RECYCLING 3
3. GETTING TO KNOW YOUR DISHWASHER 4
4. LOADING THE DISHWASHER 5
4.1 UPPER RACK 8
ADJUSTING THE HEIGHT OF THE UPPER BASKET 11
4.2 LOWER RACK 12
4.3 PROPER AND IMPROPER LOADING OF DISHWARE 18
5. WHAT SHOULD NOT BE WASHED IN YOUR DISHWASHER 19
6. OPERATING THE PRODUCT 20
6.1 KEYS 21
6.2 PREPARING THE MACHINE 21
6.3 PROGRAM SELECTION 21
ADDITIONAL FUNCTIONS 23
6.5 SCHEDULING THE WASHING TIME 25
6.6 STARTING THE PROGRAM 25
6.7 CANCELLING THE PROGRAM 26
6.8 SALT INDICATOR ( ) 26
6.9 RINSE AID INDICATOR ( ) 26
6.10 END OF PROGRAM 26
6.11 WATER CUT-OFF WARNING 27
6.12 OVERFLOWING WARNING 27
7. DETERGENT 28
7.1 ADDING DETERGENT 28
7.2 TABLET DETERGENTS 29
7.3 RINSE AID 29
8. ADJUSTING THE WATER SOFTENING SYSTEM 31
9. FILLING THE DISHWASHER SALT DISPENSER 32
10. CARE AND MAINTENANCE 33
10.1 CARING FOR YOUR DISHWASHER EXTERIOR 33
10.2 CARING FOR YOUR DISHWASHER INTERIOR 34
10.3 CLEANING THE FILTERS 35
10.4 CLEANING THE HOSE FILTER 36
10.5 CLEANING THE WASH ARMS 36
LOWER IMPELLER 36
UPPER IMPELLER 37
11. TROUBLESHOOTING 38
12. TECHNICAL FEATURES 43
1USA
INTRODUCTION
Please read this user manual and
particularly the safety instructions
completely and carefully. They will save
you time and effort and help to ensure
optimum dishwasher performance.
Be sure to observe all listed warnings
and cautions. Look particularly for the
icons with exclamation marks inside. The
information icon will also provide important
references.
WARNING:
Indicates a potentially
hazardous situation which, if not
avoided, could result in death or
serious injury.
CAUTION:
Indicates a potentially
hazardous situation which, if not
avoided, may result in injury. It may
also be used to alert against unsafe
practices.
NOTICE:
Indicates a potentially
hazardous situation which, if not
avoided, may result in damage to
the dishwasher, the table-ware, the
equipment or the environment.
1. IMPORTANT SAFETY
INSTRUCTIONS
WARNING:
When using the
dishwasher, follow basic precautions,
including the following: Read all
instructions before using the
dishwasher! Save these operating
instructions and pass them on to any
future user.
“This device complies with Part 15 of
the FCC Rules. Operation is subject
to the following two conditions: (1)
this device may not cause harmful
interference, and (2) this device must
accept any interference received,
including interference that may cause
undesired operation.” “No changes
shall be made to the equipment
without the manufacturer’s permission
as this may void the user’s authority to
operate the equipment”
•Use the dishwasher only for its
intended purpose as described in
this user manual. This appliance is
intended for normal household use
only.
•
The manufacturer disclaims
responsibility for damage or
injury caused by improper use
of this appliance.
•The information in this user manual
must be followed to minimize the risk
of fire or explosion and to prevent
property damage, personal injury or
loss of life.
•Do not operate your dishwasher
unless all the enclosure panels are
properly in place.
•Do not tamper with the controls.
•Do not abuse, sit on, stand in or on the
door or dish rack of the dishwasher.
•The cup racks are designed to support
cups, glasses and kitchen utensils.
When the cup racks are in the
dishwasher do not lean on or use the
cup racks to support your body weight.
•To reduce the risk of injury, do not
allow children to play in, on or near the
dishwasher.
•Use only detergents or rinse aids
recommended for use in a household
dishwasher and keep them in a dry
place out of the reach of children.
Check that the detergent dispenser
is empty after the completion of each
wash program.
•Dishwasher detergents contain
chemicals that can cause sickeness
and may be if they are inhaled or
swallowed. Also, be careful when
opening the door due to hot steam
that is producded during operation.
2USA
Consult a doctor immediately if
detergent has been swallowed or
inhaled.
•if the hot water has not been used
in several weeks, we recommend
running the hot water taps to remove
any built up hadrogen gases.
•Do not store or use flammable
liquids or vapors in the area of the
dishwasher.
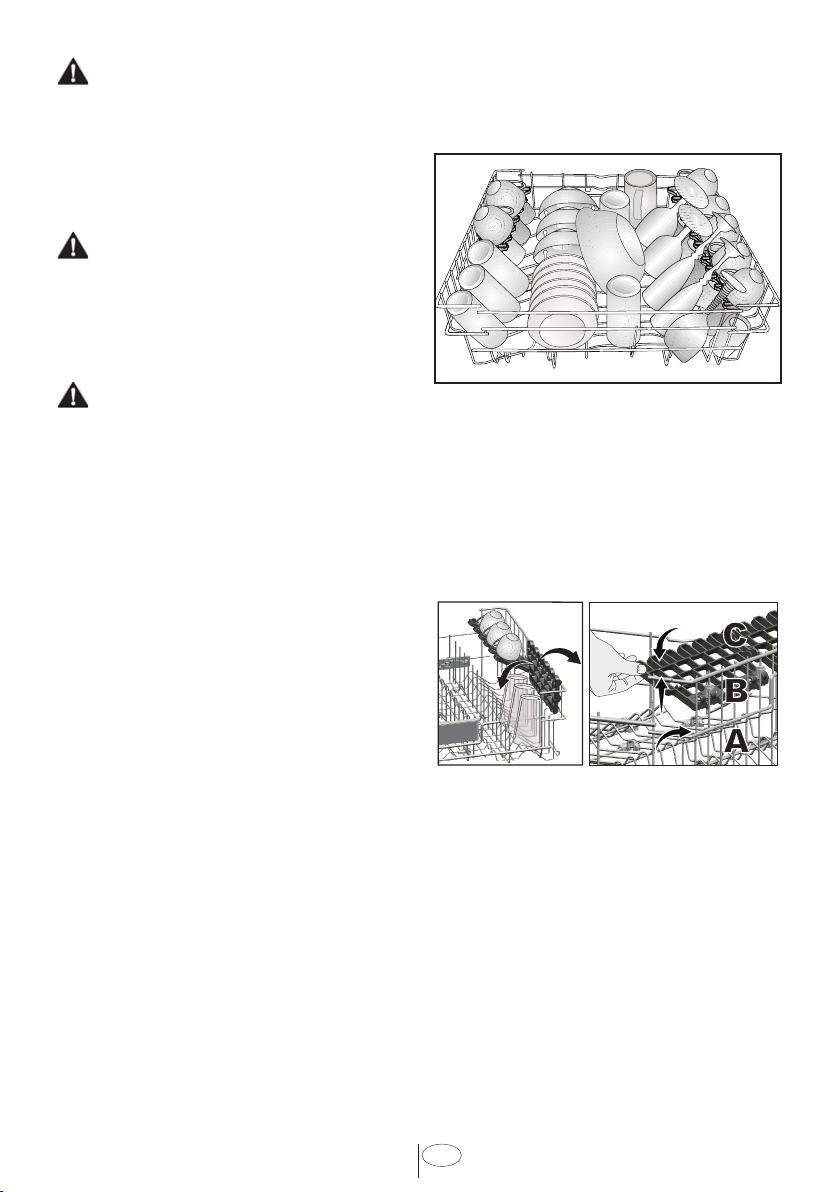
•When loading items to be washed,
position sharp items so that they are
not likely to damage the door seal and
load sharp knives with the handles up
to reduce the risk of cut-type injuries.
•Do not wash plastic items unless they
are marked “dishwasher safe” or the
equivalent. For plastic items not so
marked, check the manufacturer’s
recommendations.
•If a malfunction occurs, switch off
the appliance and turn off the water
supply to the dishwasher.
•Please do not attempt to carry the
dishwasher by yourself in order
to avoid potential injuries. Two or
more people are needed to move a
dishwasher.
•Before cleaning or carrying out
maintenance, switch off the
appliance, disconnect the power plug
and turn off the water supply.
•Repairs and technical modifications
must be carried out exclusively by a
Authorized technician.
•If the dishwasher is not in use for an
extended period of time (i.e. vacation
home), we recommend remove all
items from the dishwasher, leave
the door cracked open to allow air to
circulate and turn off both the power
and water supply to the dishwasher.
•This appliance comes with a three
prong NEMA 5-15P 15A power cord.
It must be connected to a Grounded
and Polarized wall receptacle that
has been installed and tested by an
licensed electrician and that it has
been installed based on all Local, State
and Federal Electrical codes.
WARNING:
Improper connection of
the equipment-grounding conductor
can result in a risk of electric shock.
Check with a qualified electrician
or service representative if you are
in doubt whether the appliance is
properly grounded. Do not modify
the plug provided with the appliance,
if it will not fit the outlet, have a
proper outlet installed by a qualified
electrician.
•This appliance produces ozone
within the washing compartment
during normal operation. Long-term
exposure to ozone or exposure
at elevated levels may result in
respiratory problems, especially for
the infirmed, elderly and children.
•Chidren should not operate this
machine without adult supervision.
•Be Careful to not leave the door
fully open when not being loaded or
unloaded to prevent someone from
tripping on the unit.
WARNING:
If your dishwasher is
equipped with internal illumination,
lamp should only be replaced by the
Authorized Service Agent in case of
failures that may occur on the lamp.
WARNING:
This product can expose
you to chemicals including Nickel
(Metallic) which is known to the State
of California to cause cancer.
For more information go to www.
P65Warnings.ca.gov
3USA
Note: Nickel is a component in all stainless
steel and some other metal components.
SAVE THESE INSTRUCTIONS
•Service should be performed by a
qualified installer. Work by unqualified
persons could be dangerous and may
void the warranty.
•Do not operate the appliance if
damaged, malfunctioning, partially
disassembled or if it has missing or
broken parts.
•Before installation or service,
disconnect the power supply to
the work area by unplugging the
unit, “tripping” the circuit breaker or
removing the fuse.
•For safety reasons, dishwasher must
be secured to adjacent cabinetry using
the brackets provided. Failure to do
this may cause damage to property or
bodily injury.
•Do not use any extension cord or
portable outlet device to connect the
dishwasher to a power supply.
2. RECYCLING
•Remove the door to the washing
compartment when removing an old
dishwasher from service or discarding
it. Ensure that the appliance presents
no danger to children while being
stored for disposal.
•Remove the door lock or door of
the washing compartment before
disposing dishwasher so that children
or small animals can not trapped
inside.
•Old appliances may contain materials
that can be recycled. Please contact
your local recycling authority about
the possibility of recycling these
materials.
•Please check the water supply line
periodically. It is susceptible to
breakage. It becomes less flexible as
time goes by.Replace it immediately
when it is torn, cut, swollen or there is
water leakage.
•Please keep the dishwasher package
out of the reach of children after
unpacking it.
WARNING:
Danger of suffocation!
Ensure that any plastic wrappings,
bags, small pieces etc. are disposed
of safely and kept out of the reach of
children.
4USA
15
1. Upper basket
2. Upper impeller
3. Lower impeller
4. Cutlery basket
5. Door
6. Model and Serial Tag
7. Control panel
8. Detergent and rinse aid dispenser
9. Lower basket
10. Filters
11. Salt container (Select Models)
12. Upper basket rail
13. Upper cutlery basket (Select Models)
14. Tabletop (Select Models)
15. Turbo fan heat drying system (Select Models)
3. GETTING TO KNOW YOUR DISHWASHER
5USA
4. LOADING THE
DISHWASHER
1. Pull the handle to open the door. If the
door is opened during operation, the
dishwasher will stop running. Once
the door is closed the program will
continue.
2. Remove coarse food leftovers from
tableware.
3. Now you can load the dishwasher.
12 place settng loadng pattern
for daly, regular or typcal use
Upper rack
Lower rack
Upper cutlery basket (Select
Models)
Cutlery basket
6
5
5
4
44444
33
3
33
3
222
2
2
2
2
2
2 2
2
2
2
2
2
2
2
2
2
2
22
1
1
1
1
1
111
1
1
1
1
44 44 4
32 432
3333
1: Salad Fork
2: Teaspoon
3: Dinner fork
4: Knife
5: Serving spoon
6: Serving fork
6USA
6
5
5
324
23
3
4
34
4
22
2
2
2
2
4
2
2
2
2
2
22
1
2
1
1
1
2
1
1
2 42 3
3 44
3443
3
2
2
3
4
3
11
11
11
22
2
4
3
Addtonal loadng pattern for 10
place settng
Upper rack
Lower rack
Upper cutlery basket (Select
Models)
Upper rack wthout upper cutlery
basket (Select Models)
7USA
Lower rack wthout upper cutlery
basket (Select Models)
Cutlery basket
6
5
5
4
44444
33
3
33
3
222
2
2
2
2
2
2 2
2
2
2
2
2
2
2
2
2
2
22
1
1
1
1
1
111
1
1
1
1
44 44 4
32 432
3333
1: Salad Fork
2: Teaspoon
3: Dinner fork
4: Knife
5: Serving spoon
6: Serving fork
1
4
4
114
31
3
3
13
3
25
5
5
5
5
4
5
5
5
5
4
52
2
2
2
2
2
2
2
2
3 11 4
1 33
4334
1
4
4
1
8USA
CAUTION:
Large knives and other
utensils with sharp tips and edges
must be placed horizontally into the
upper rack due to risk of injury. Other
smaller knives and sharp utensils
should be placed with sharp side down
in the cutlery basket.
CAUTION:
Use extreme caution
when removing knives and other sharp
utensils from the dishwasher. These
items may have shifted position during
the wash program, and may be wet or
slippery.
CAUTION:
Hot steam can escape!
Danger of serious burns or other injury.
•Place all containers such as cups,
glasses and pots into the dishwasher
with the opening facing downwards
(so that no water can collect).
•Small and light items can go into the
upper rack.
•Long and narrow items are placed in
the middle of the racks.
•Place all large and very dirty items in
the lower rack.
•Load dishes accordingly and be careful
when loading glasses so they do not
hit each other during the wash cycle.
Also, make sure that both wash arms
are not in contact with any dishware.
•Do not overload your dishwasher
and pay attention to manufacturer
instructions regarding dishes which
are appropriate for use in for a
dishwasher. Only with suitable dishes
(mentioned in section 5) will you
obtain optimal washing results with a
sensible use of energy.
4.1 UPPER RACK
Load the upper rack with dessert plates,
cups, glasses etc.
ADJUSTABLE SHELVES
(Select Models)
Depending on the size of the glasses and
cups, the shelf height setting may be
adjusted.
1. Fold the shelf upwards
A
.
2. Positioning at the desired height
B
.
3. Fold the shelf again downwards
C
.
9USA
COLLAPSIBLE UPPER BASKET
WIRES
(Select Models)
You can use collapsible wires when you
need a larger space for your dishes in the
upper basket of your machine.
To bring the collapsible wires into
horizontal position, grab the wire from
the middle position and push them in the
direction of arrow in the figure. Place your
larger dishes into the area created. To bring
the wires back to vertical position, just lift
them up.
Bringing the wires to the horizontal
position by holding them from the tips
may cause them to bend. Therefore,
hold the wires from their stems while
bringing them to the horizontal or
vertical positions.
UPPER BASKET MULTIPURPOSE
SERVICE RACK
(Select Models)
This accessory located at the upper basket
of your machine allows you to easily wash
pieces such as extra long ladles and bread
knives.
You can lift up the upper basket
multipurpose service rack to remove it if
you do not want to use it.
If you want to use the upper basket
multipurpose service rack again, you can
easily attach it to the side section of your
upper basket.
10 USA
To lower the basket, while it is in the
uppermost position;
1. Hold the upper basket wires with both
hands, slightly lift up the basket and
simultaneously push and release the
latches shown in the figure (B).
2. Lower the basket from its current
position to the lower one.
3. Release the basket after it has reached
one level down.
Repeat the process if the height is not
sufficient.
1
2
3
The movement mechanism may not
function properly if the upper basket is
overloaded or if the weight distribution
is not balanced. In heavier conditions,
there is the risk of falling one level
down.
Make sure that the adjustment
mechanism has the same positions on
the right and left sides of the upper
basket.
ADJUSTING THE HEIGHT OF THE
UPPER BASKET
(Select Models)
The upper basket height adjustment
mechanism has been designed for you to
create large spaces in the lower or upper
sections of your machine depending on
your needs by adjusting the height in the
upper or lower direction while your basket
is empty or loaded.
Thanks to this mechanism, you can use
your basket in three different positions,
namely lower, middle and upper positions
(1, 2, 3).
1. To raise your basket, hold the upper
basket wires with both hands while the
basket is in the lowermost position and
pull them up (A).
2. You will hear a "Click" from the right
and left mechanisms, indicating that
the basket has reached the next level.
Release the basket.
Repeat the process if the height is not
sufficient.
1
2
3
11 USA
ADJUSTING THE HEIGHT OF
THE UPPER BASKET
(Select Models)
Upper basket height adjustment
mechanism is designed so that you can
create wide spaces on the upper or lower
compartment of the machine by adjusting
the basket upwards or downwards either
while it is empty or full.
Thanks to this mechanism, you may use
your basket in three different positions,
namely lower, center or upper positions.
To lower the basket, perform the following
while the basket is at uppermost position;
1. Hold the wires of the upper basket and
raise the handle of the mechanism
upwards as shown in the figure (A).
2. Lower the basket to the next lower
position.
3. Release the basket when it catches on
to the next lower position.
Repeat the same operation if the height is
not adequate.
1
2
3
1. To raise the basket, hold the wires of
the basket and pull the basket upwards
with both hands while the basket is at
the lowermost position (B)
2. Release the basket when it catches on
to the next upper position with a “Click”
that may be heard from the right and
left mechanisms.
Repeat the same operation if the height is
not adequate.
1
2
3
The movement mechanism may not
work properly when the upper basket
is overloaded or when the load is
unbalanced. And it may fall to the next
lower position in heavier conditions.
Ensure that the adjustment
mechanisms on the right and left of
the upper basket are aligned.
12 USA
HEIGHT SETTING
(Select Models)
In certain models, the height setting of
the upper rack may be changed using the
wheels which are present at two height
levels.
CAUTION:
Make sure that the rack
is empty. Changing the height setting
while the rack contains tableware
could cause the contents to dislodge,
causing personal injury or damage to
the tableware.
1. Release the latches on both the right
and left tracks of the upper rack by
turning them to the outside
A.
2. Pull out the rack completely
B
.
3. Place the rack into the tracks again at
the desired height
C
.
4. Push the latches back into the correct
position.
4.2 LOWER RACK
Use the lower rack for plates, bowls, pots
etc.
13 USA
COLLAPSIBLE LOWER BASKET
TINES
(Select Models)
There are foldable tines (A) located at
the lower basket of the machine are
designed for an easier placement of large
pieces such as pans, bowls, etc. You can
create larger spaces by folding each tines
individually or all of them at once.
To bring the collapsible tines into horizontal
position, grab the tines from mid position
and push them in the directions of arrows
(B). To bring the tines back to vertical
position, just lift them up. Collapsible tines
will click into the latch again (C).
Bringing the tines to the horizontal
position by holding them from the tips
may cause them to bend. Therefore, it
will be appropriate to bring the tines
in the middle to horizontal or vertical
position by holding them from their
stems and pushing in the direction of
arrow.
14 USA
SILVERWARE BASKET
(Select Models)
Silverware basket is designed to wash your
dishes such as knife, fork, spoon, etc. in a
cleaner manner.
Since the cutlery basket can be moved
(A, B), you can create a wider space while
placing your dishes to the lower basket and
free up space for your dishes in different
sizes.
NOTICE:
When finished, test to
ensure that the spray arm can still
move freely.
SILVERWARE BASKET
(Select Models)
Silverware basket is designed to wash your
dishes such as knife, fork, spoon, etc. in an
efficient manner.
Since the silverware basket can be moved
(A, B), you can create more space while
placing your dishes in the lower basket and
free up space for your dishes of different
sizes.
15 USA
TRAY WASH SUPPORTS
(Select Models)
Use the supports to wash trays in the
bottom basket.
See the Auxiliary functions section
for appropriate program and function
selection.
SOFTTOUCH ACCESSORY
(Select Models)
The SoftTouch Accessory found in the
lower basket of your machine enables a
safe washing for your fragile glasses.
LOWER BASKET GLASS HOLDER
(Select Models)
Lower Basket Glass Holder found in the
lower basket of your machine enables a
safe washing for your oversized and tall
glasses.
LOWER BASKET BOTTLE WIRE
(Select Models)
The bottle wire is designed for easier
washing of long pieces with wide mouths.
You may take out the bottle wire from the
basket when not in use by pulling it out
from both sides (H).
16 USA
LOWER BASKET MULTIPURPOSE
/ HEIGHT ADJUSTABLE SERVICE
RACK
(Select Models)
This accessory located at the lower basket
of your machine allows you to easily wash
pieces such as extra glasses, long ladles
and bread knives.
You may use the racks as required
by moving them to lower or upper
position, or close them to create a
wider space in your lower basket.
Make sure that the impeller does not
touch the dishes you placed on the
racks.
17 USA
CEILING CUTLERY BASKET
(Select Models)
Ceiling cutlery basket is designed to wash
your cutlery items such as forks, spoons
and etc. by placing them between the bars
on the basket.
1
In models with partial movement feature,
pushing the bar (1) on the handle enables
the central tray of the basket to get to
the lower position and the system gets
unlocked. Thus right and left side trays can
be used as moving parts.
The free space enabled by the side trays
allows long parts to be loaded in the upper
basket.
When the central tray is in the lower
position, you can load long/high items
such as coffee cups, ladles, etc. on the
tray. When the side trays lean on two side
walls, the handle can be pulled to allow the
central tray to rise and the system to be
locked.
CEILING CUTLERY BASKET
(Select Models)
Ceiling cutlery basket is designed to wash
your cutlery items such as forks, spoons
and etc. by placing them between the bars
on the basket..
18 USA
4.3 PROPER AND IMPROPER LOADING OF DISHWARE
•Place all containers such as cups, glasses and pots into the dishwasher with the opening
facing downwards (so that no water can collect).
•The movement of the spray arms must not be hindered.
•Do not overload your dishwasher.
•Only with suitable dishes (mentioned in section 5) will you obtain optimal washing
results with a sensible use of energy.
incorrect incorrect
incorrect incorrect

This manual suits for next models

3

Other Teka Dishwasher manuals

Teka DW 605 S User manual

Teka

Teka DW 605 S User manual

Teka Dishwasher User manual

Teka

Teka Dishwasher User manual

Teka DW8 41 FI VR01 User manual

Teka

Teka DW8 41 FI VR01 User manual

Teka DW8 45 S User manual

Teka

Teka DW8 45 S User manual

Teka DW7 41 FI User manual

Teka

Teka DW7 41 FI User manual

Teka LCZ 837 User manual

Teka

Teka LCZ 837 User manual

Teka LP8 818 BLANCO VR01 User manual

Teka

Teka LP8 818 BLANCO VR01 User manual

Teka LP2 400 User manual

Teka

Teka LP2 400 User manual

Teka DW6 42 FI User manual

Teka

Teka DW6 42 FI User manual

Teka LP8 700 VR02 User manual

Teka

Teka LP8 700 VR02 User manual

Teka LP8 400 VR01 User manual

Teka

Teka LP8 400 VR01 User manual

Teka DW7 56 FI User manual

Teka

Teka DW7 56 FI User manual

Teka LP8835W User manual

Teka

Teka LP8835W User manual

Teka LP 400 User manual

Teka

Teka LP 400 User manual

Teka LP2 140 User manual

Teka

Teka LP2 140 User manual

Teka LP7 830 User manual

Teka

Teka LP7 830 User manual

Teka DW7 41 FI User manual

Teka

Teka DW7 41 FI User manual

Teka LP8 440 VR02 User manual

Teka

Teka LP8 440 VR02 User manual

Teka LP2 700 User manual

Teka

Teka LP2 700 User manual

Teka DW8 57 FI VR02 User manual

Teka

Teka DW8 57 FI VR02 User manual

Teka DW8 41 FI User manual

Teka

Teka DW8 41 FI User manual

Teka LP7 830 User manual

Teka

Teka LP7 830 User manual

Teka DW6 User manual

Teka

Teka DW6 User manual

Teka LP9 440 WHITE VR02 User manual

Teka

Teka LP9 440 WHITE VR02 User manual

Popular Dishwasher manuals by other brands

Magic Chef MCSCD3W user manual

Magic Chef

Magic Chef MCSCD3W user manual

Wesco D12 manual

Wesco

Wesco D12 manual

KitchenAid KUDU03FTPA2 parts list

KitchenAid

KitchenAid KUDU03FTPA2 parts list

Moyerdiebel DF-M6 Technical manual

Moyerdiebel

Moyerdiebel DF-M6 Technical manual

V-ZUG Adora 55 SL operating instructions

V-ZUG

V-ZUG Adora 55 SL operating instructions

Concept2 MNV3560 manual

Concept2

Concept2 MNV3560 manual

Whirlpool ADP 971 quick start guide

Whirlpool

Whirlpool ADP 971 quick start guide

IKEA IUD3100BW2 installation instructions

IKEA

IKEA IUD3100BW2 installation instructions

Smeg LVS262EB user manual

Smeg

Smeg LVS262EB user manual

Bosch SMS8ZDI80T user manual

Bosch

Bosch SMS8ZDI80T user manual

Atag VA8215SLR/A02 user manual

Atag

Atag VA8215SLR/A02 user manual

GEAppliances PDW1860 owner's manual

GEAppliances

GEAppliances PDW1860 owner's manual

Miele Diamond G 5915 SCi Product dimensions

Miele

Miele Diamond G 5915 SCi Product dimensions

John Lewis JLDWW 1203 instruction manual

John Lewis

John Lewis JLDWW 1203 instruction manual

Frigidaire FDBL955BS0 use and care manual

Frigidaire

Frigidaire FDBL955BS0 use and care manual

ZANKER ZKS 5630 Instruction book

ZANKER

ZANKER ZKS 5630 Instruction book

Whirlpool ADG 522 operating instructions

Whirlpool

Whirlpool ADG 522 operating instructions

Maytag MDC4809PAW Energy guide

Maytag

Maytag MDC4809PAW Energy guide

manuals.online logo
manuals.online logoBrands
  • About & Mission
  • Contact us
  • Privacy Policy
  • Terms and Conditions

Copyright 2025 Manuals.Online. All Rights Reserved.