Teka HEB 723 BK User manual

EN
ES
UserU IWKFG
www.teka.com


1
2
3
4
5
6
7
8
9
10
11
12
13
14
15
9
10
11
12
13
14
15
2
3
4
5
6
7
8
HE 715 BK / HE 715 SS
1
1Control Panel
2Oven Seal
3Grill Element
4Chrome Support
5Grid
6Tray
7Hinge
8Door
9Air Outlet
10 Fixing to Unit
11 Grill Screen
12 Smoke Outlet
13 Light
14 Back Wall Panel
15 Fan
1Control Panel
2Oven Seal
3Grill Element
4Chrome Support
5Grid
6Tray
7Hinge
8Door
9Air Outlet
10 Fixing to Unit
11 Grill Screen
12 Smoke Outlet
13 Light
14 Back Wall Panel
15 Fan
HEB 723 BK / HEB 723 SS

Control Panel
1'VODUJPOTFMFDUPS
2 TiPHU
37HPSHUDWXUHVHOHFWRU
4+HDWLQJLQGLFDWRUOLJKW*OEJDBUFTUIBUUIF
IFBUJTHPJOHUPUIFGPPEBOEJUHPFTPVU
XIFOUIFTFUUFNQFSBUVSFJTSFBDIFE
1 2 4 3
12 3 4
HEB-723 SS
HEB-723 BK
HE-715 SS
HE-715 BK

Oven Functions
Switch off oven
Conventional with fan
Appropriate for roasts and cakes. The fan
spreads the heat uniformly inside the oven.
Conventional
It is used for sponges and cakes where the
heat received must be uniform to achieve a
spongy texture.
Grill
For preparing dishes with superficial roasting.
It allows the outer layer to be browned without
affecting the inside of the food. Ideal for flat
food, such as steaks, ribs, fish, toast.
Caution
While using the Grill, MaxiGrill or MaxiGrill with
fan, the door must be kept closed.
Grill and Lower element
Special for roasts. It can be used for any
piece, whatever its size.
Lower element
Heats only from beneath. Suitable for heating
dishes and raising pastry and similar.
Defrosting
This cooking mode is suitable for gently
defrosting of food. In special food to be
consumed unwarmed, e.g.: cream, custard,
pastry, tarts, cakes, fruit,...
Note
The pilot light remains on in any cooking
function.
(&2&RRNLQJ
)RUFRRNLQJLQWKHRYHQZLWKWKHPLQLPXP
HQHUJ\FRQVXPSWLRQSRVVLEOH
7KHRYHQXVHVFRQYHQWLRQKHDWLQJDQG
GHSHQGLQJRQWKHPRGHOVZLWFKHVRIIDIHZ
PLQXWHVEHIRUHWKHHQGRIFRRNLQJXVLQJWKH
UHVLGX¤DOKHDWLQVLGHWKHRYHQDQGFRPSOHWLQJ
WKHGLVKSHUIHFWO\
5HFRPPHQGHGIRUILVKDQGDOOW\SHVRIPHDW
URDVWV

Use of the Oven
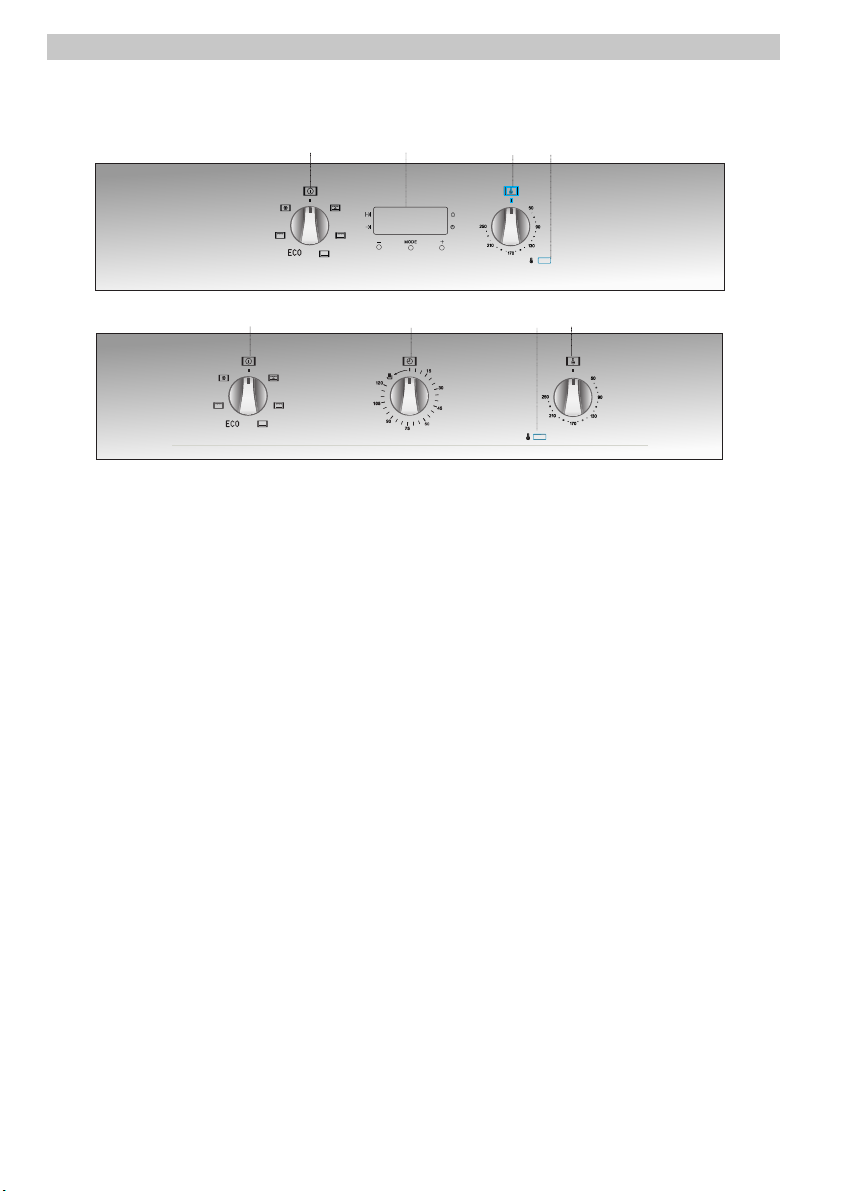
Setting the time on the clock
On connecting the oven, you will notice that
12:00 appears on the clock and that a light
begins to flash above the symbol. Pressing
the “+” and “–“ buttons the correct time can
be set on the clock, which is subsequently
stored and the flashing light goes out.
Manual use
After setting the correct time, the oven is
ready for use. Select a temperature and a
cooking function.
To switch off the oven, set the controls to the
position .
Functions of the Electronic Clock Programmer
Warning function: This function generates a
warning tone at a specified time.
Cooking time: This function allows to pro-
gramme the oven to cook for a specified time,
after which it will switch itself off.
End of cooking time: This function allows to
establish the exact hour, after which the oven
will switch itself off.
Duration and automatic stop: This function is
used to control the duration and the time at
which the oven will turn itself off. This function
allows the oven to start and stop automatical-
ly.
Warning function
1Press the MODE button until the signal
above the symbol begins to flash.
2Choose the time when you want the alarm
to sound, pressing the “+” or “–“ buttons.
3Subsequently, the light will remain on indi-
cating that the alarm is programmed.
4At the end of the programmed time, an
alarm will sound and the light will begin to
flash.
5Press any button to turn off the alarm and
the screen shows the current time again.
Programming the cooking time
1Press the MODE button until the indicator
above the symbol begins to flash.
2Select the length of time, pressing the “+”
or “–“ buttons.
3Subsequently, the indicator that was flash-
ing will light, indicating that the oven will
switch itself off automatically.
4The clock will then show the current time.
5Select a temperature and cooking function.
6When the set time has elapsed, the oven
will disconnect, an alarm will sound and the
indicator will begin to flash.
7Press any button to switch off the alarm,
reconnecting the oven.
8Set the controls in the position to switch
off the oven.
Programming the end of cooking time for the
oven
1Press the MODE button until the indicator
above the symbol begins to flash.
2Select the time that cooking is to finish,
pressing the “+” or “–“ buttons.
3Subsequently, the indicator that was flash-
ing is lit, indicating that the oven will switch
itself off automatically.
4The clock will then show the current time.
5Select a temperature and a cooking func-
tion.
6When the programmed time is reached, the
oven will disconnect, an alarm will sound
and the indicator will begin to flash.
7Press any button to switch off the alarm
and the oven will reconnect.
8Set the controls to the position to switch
off the oven.
This function may be used even though you
are already cooking in your oven. To do so, fol-
low the instructions given except Nº 5.
HEB 723

Programming the duration and automatic
stop
1Press the MODE button until the indicator
above the symbol begins to flash.
2Select the length of cooking time pressing
the “+” or “–“ buttons.
3Subsequently, the indicator that was flash-
ing will remain lit.
4Press the mode button until the indicator
above the symbol begins to flash.
5Select the time that cooking should finish
pressing the “+” or “–“ buttons.
6Subsequently, the indicator that was flash-
ing will remain lit.
7Select a function and cooking temperature.
8The oven will remain disconnected with the
indicators above the and symbols lit.
Your oven is programmed.
9When the time to begin cooking is reached,
the oven will switch itself on and will con-
tinue cooking during the programmed time.
10
When the programmed finishing time is
reached, the oven will disconnect, an alarm
will sound and the light above the sym-
bol will begin to flash.
11
Press any button to switch off the alarm
and the oven will reconnect.
12
Set the controls to the position to switch
of the oven.
Caution
Pressing the MODE button the display on the
screen shows any function programmed. It
can be changed by pressing the “+” or “–“ but-
tons. On selecting the desired function, the
indicator above the corresponding signal will
light.
In the event of a power cut, all the program-
ming of the electronic clock will be erased.
The correct time has to be reset and the
watch reprogrammed.
MODE

15
30
45
60
75
90
105
120
Use of Oven
HE 715
Manual use of the oven
1Turn the timing switch to the left to the posi-
tion .
2Select a temperature and a cooking func-
tion.
3Set the controls in position to switch off
the oven.
Using the timer switch
Allows cooking during a pre-established time.
To do this,
1Select the function and the cooking temper-
ature.
2Turn the timer control clockwise as far as the
position “120 minutes” and then turn it
backwards to the required cooking period.
3When the time has finished, there will be an
acoustic signal and the oven will stop heat-
ing.
4Set the controls to the position to switch
off the oven.

1
2
3
4
5
6
7
8
9
10
11
12
13
14
15
9
10
11
12
13
14
15
2
3
4
5
6
7
8
HE 715 BK / HE 715 SS
1
HEB 723 BK / HEB 723 SS
1Frente de Mandos
2Junta de Horno
3Resistencia de Grill
4Soporte Cromado
5Parrilla
6Bandeja
7Bisagra
8Puerta
9Salida de Aire
de Refrigeración
10 Fijación al Mueble
11 Pantalla de Grill
12 Salida de Humos
13 Lámpara
14 Panel Trasero
15 Turbina
1Frente de Mandos
2Junta de Horno
3Resistencia de Grill
4Soporte Cromado
5Parrilla
6Bandeja
7Bisagra
8Puerta
9Salida de Aire
de Refrigeración
10 Fijación al Mueble
11 Pantalla de Grill
12 Salida de Humos
13 Lámpara
14 Panel Trasero
15 Turbina

Frontal de Mandos
1 2 4 3
12 3 4
HEB-723 SS
HEB-723 BK
HE-715 SS
HE-715 BK
1 Selector de funciones.
2 Reloj electrónico programador.
3 Selector de temperaturas.
4Piloto de calentamiento. Indica la transmi-
sión de calor al alimento y se apaga al
alcanzar la temperatura seleccionada.

Oven Functions
Switch off oven
Conventional with fan
Appropriate for roasts and cakes. The
fan spreads the heat uniformly inside the
oven.
Grill
Gratinado y asado superficial. Permite el dora-
do de la capa exterior sin afectar al interior del
alimento. Indicado para piezas planas como
bistec, costillas, pescado, tostadas.
Atención
Durante el uso de la función Grill, la puerta
debe mante-nerse cerrada.
Grill y Solera
Especial para asados. Puede usarse para cual-
quier pieza, independiente de su tamaño.
Solera
Calor sólo desde la parte inferior. Apropiado
para calentar platos o levantar masas de
repostería y afines.
Descongelación
Esta función es apropiada para
descongela-ciones suaves de alimentos. En
especial aque-llos que son consumidos sin
calentar, por ejemplo cremas, pastas, tartas,
pasteles, etc.
Nota
La lámpara permanece encendida en
cualquier función de cocinado.
(&2&RRNLQJ
Permite el cocinado de alimentos en su horno con
un mínimo consumo energético. El horno utiliza
un calentamiento por con-vección forzada y
dependiendo del modelo desconecta su
funcionamiento unos minu-tos antes de finalizar
el cocinado permitien-do aprovechar el calor
residual que existe dentro de la cavidad y
obteniendo un aca-bado perfecto del alimento.
Indicado para pescados y asados de todo tipo de
carnes.

Puesta en Hora del Reloj Electrónico
Al conectar su horno, observará que en el reloj
aparece la indicación 12.00 y que una señal
luminosa encima del símbolo comienza a
parpadear. Pulsando los botones + y – podrá
poner el reloj en hora, posteriormente ésta se
almacenará, apagándose la señal luminosa.
Funcionamiento Manual
Tras poner el reloj en hora, su horno está listo
para cocinar. Seleccione una temperatura y
una función de cocinado.
Para apagar el horno, ponga los mandos en
posición .
Funciones del Reloj Electrónico
Avisador: Genera una señal acústica al cabo
del tiempo, para ello no es necesario que el
horno esté cocinando.
Duración del Cocinado: Permite cocinar
durante un tiempo seleccionado, a continua-
ción el horno se apagará de forma automáti-
ca.
Hora de Finalización del Cocinado: Permite
cocinar hasta una hora establecida, a conti-
nuación el horno se apagará de forma auto-
mática.
Duración y Fin del Cocinado: Permite progra-
mar la duración y la hora de finalización del
cocinado. Con esta función el horno se pon-
drá en marcha de forma automática a la hora
necesaria para cocinar durante el tiempo
seleccionado (Duración) y finalizando de
forma automática a la hora que le hayamos
indicado (Fin del Cocinado).
Programación del Avisador
1Pulse el botón MODE hasta que el indicador
encima del símbolo empieze a parpadear.
2Seleccione el tiempo tras el cual desea que
el reloj avise, pulsando los botones + o – .
3Posteriormente el indicador se quedará ilu-
minado indicando que el avisador ya está
programado.
4Transcurrido el tiempo programado, sonará
una señal acústica y el indicador empezará
a parpadear.
5Pulse cualquier botón para detener la señal
acústica, volviendo la pantalla a mostrar la
hora actual.
Programación de la Duración del Cocinado
1Pulse el botón MODE hasta que el indicador
encima del símbolo empieze a parpadear.
2Seleccione la duración, pulsando los boto-
nes + o –.
3Posteriormente el indicador que estaba par-
padeando, se iluminará indicando que su
horno se apagará de forma automática.
4El reloj mostrará entonces la hora actual.
5Seleccione una temperatura y una función
de cocinado.
6Transcurrida la duración del cocinado, el
horno se desconectará, sonará una señal
acústica y el indicador comenzará a parpade-
ar.
7Pulse cualquier botón para detener la señal
acústica, encendiéndose el horno de
nuevo.
8Ponga los mandos en posición para apa-
gar el horno.
Programación de la Hora de Finalización del
Cocinado
1Pulse el botón MODE hasta que el indicador
encima del símbolo empieze a parpadear.
2Seleccione la hora de finalización del coci-
nado, pulsando los botones + y –.
3Posteriormente el indicador que estaba par-
padeando se iluminará indicando que su
horno se apagará de forma automática.
4El reloj mostrará entonces la hora actual.
Manejo del Horno
HEB 723

5Seleccione una temperatura y una función
de cocinado.
6Alcanzada la hora de finalización del coci-
nado, el horno se desconectará, sonará
una señal acústica y el indicador comenza-
rá a parpadear.
7Pulse cualquier botón para detener la señal
acústica, encendiéndose su horno de nuevo.
8Ponga los mandos en posición para apa-
gar el horno.
Puede emplear esta función aunque usted ya
esté cocinando con su horno. Para ello siga las
instrucciones indicadas salvo la número 5.
Programación de la Duración y Fin del
Cocinado
1Pulse el botón MODE hasta que el indicador
encima del símbolo empieze a parpa-
dear.
2Seleccione la duración del cocinado pul-
sando los botones + y – .
3Posteriormente el indicador que estaba par-
padeando se iluminará de forma permanen-
te.
4Pulse el botón MODE hasta que el indicador
encima del símbolo empieze a parpa-
dear.
5Seleccione la hora de finalización del coci-
nado pulsando los botones + y – .
6Posteriormente el indicador que estaba par-
padeando se iluminará de forma permanen-
te.
7Seleccione una función y una temperatura
de cocinado.
8El horno permanecerá desconectado, que-
dándose iluminados los indicadores enci-
ma de los símbolos y . Su horno
está programado.
9Cuando se alcance la hora de comienzo
del cocinado, el horno se pondrá en mar-
cha y se realizará el cocinado durante el
tiempo seleccionado.
10
Alcanzada la hora de finalización que se
había programado, el horno se desconec-
tará, sonará una señal acústica y el indi-
cador luminoso encima del símbolo
comenzará a parpadear.
11
Pulse cualquier botón para detener la
señal acústica, encendiéndose su horno
de nuevo.
12
Ponga los mandos en posición para apa-
gar el horno.
Atención
Pulsando el botón MODE puede visualizar en
el reloj cualquier función que esté programada
y modificarla si usted lo necesita pulsando los
botones + y –. Al seleccionar la función dese-
ada se iluminará el indicador encima del sím-
bolo correspondiente.
En caso de un corte de suministro eléctrico,
se borrará toda la programación de su reloj
electrónico. Deberá ponerlo en hora y progra-
marlo de nuevo.
MODE

4
12
Funcionamiento Manual del Horno
1Gire el mando del temporizador hacia la
izquierda hasta la posición .
2Seleccione una temperatura y una función
de cocinado.
3Ponga los mandos en posición para apa-
gar el horno.
Funcionamiento Temporizado del Horno
Permite cocinar durante un tiempo previamen-
te seleccionado. Para ello:
1Elija la función y la temperatura de cocinado.
2Gire el mando del temporizador, en el senti-
do de las agujas del reloj, hasta la posición
“120” minutos y después gírelo en sentido
inverso para seleccionar el tiempo de coc-
ción deseado.
3Transcurrido el tiempo programado, sonará
una señal acústica y el horno dejará de
calentar.
4Ponga los mandos en posición para apa-
gar el horno.
Manejo del Horno
HE 715
15
30
45
60
75
90
105
120

Product informaon concerning the "COMMISSION DELEGATED REGULATION
(EU) No 66/2014"
Información sobre el producto en referencia al «REGLAMENTO DELEGADO DE
LA COMISIÓN (UE) N.º 66/2014»
Type of Oven: Tipo de horno: Built-in oven / Horno integrado
Symbol / Símbolo Value / Valor Unit /
Unidad
Model
Idencaon
Idencación del
modelo
HEB 723 SS
HEB-723 BK
HE 715 BK
HE 715 SS
Mass of Appliance Masa del aparato M 32,5 32,52 kg
Number of cavies Número de cavidades 1
Heat source per
cavity
Fuente de calor por
cavidad Electricity / Electricidad
Volume per Cavity Volumen por cavidad V 57 L
Energy consumpon
(electricity)
required to heat a
standardised load
in a cavity of an
electric heated oven
during a cycle in
convenonal mode
per cavity (electric
nal energy)
Consumo de energía
(electricidad)
necesario para
calentar una carga
normalizada en una
cavidad de un horno
eléctrico durante
un ciclo en modo
convencional, por
cavidad (energía
eléctrica nal)
EC(Electric Cavity) 0.84 kWh/
cycle
Energy consumpon
required to heat a
standardised load
in a cavity of an
electric heated oven
during a cycle in
fan-forced mode per
cavity (electric nal
energy)
Consumo de energía
necesario para
calentar una carga
normalizada en una
cavidad de un horno
eléctrico durante un
ciclo en modo de
circulación forzada,
por cavidad (energía
eléctrica nal)
EC(Electric Cavity) 0.75 kWh/
cycle
Energy Efficiency
Index per cavity
Índice de eciencia
energéca por
cavidad
EEI(Cavity) 95.7 Wh/kg
Energy Efficiency
Class
Clase de Eciencia
Energéca A
Measured to EN
60350-1
Medido según la
norma EN 60350-1:
Electric/Gas cavity Cavidad eléctrica/
de gas
kWh/cycle kWh/ciclo
According to Commision Regulation ( EU) 2019/2020, This light source which used inside of the oven is only for use by
related oven. Use of this light source will lead to increased energy cost compared to an equivalent more energy efficient
product.
De acuerdo con el Reglamento de la Comisión (UE) 2019/2020, esta fuente de luz que se usa dentro del horno es solo para
uso en el horno relacionado. El uso de esta fuente de luz conducirá a un mayor costo de energía en comparación con un
producto equivalente más eficiente en energía.
Basics: Information on the energy label of electrical ovens is given in accordance with the EN 60350-1 / IEC 60350-1
standard. Those values are determined under standard load with bottom-top heater or fan assisted low grill functions.
Energy efficiency class is determined with ECO funct.
Conceptos básicos: La información en la etiqueta energética de los hornos eléctricos se proporciona de acuerdo con la
norma EN 60350-1 / IEC 60350-1. Esos valores se determinan bajo carga estándar con funciones de calentador inferior
superior o parrilla baja asistida por ventilador.
La clase de eficiencia energética se determina con la función ECO.

Energy Saving Tips: Consejos para ahorrar energía:
Take out accessories such as trays, inner grid, cake
n that will not be used during cooking
Saque los accesorios como bandejas, rejilla interior,
molde para pasteles que no se vayan a usar durante
la cocción.
Allow frozen food to be defrosted outside before
being cooked in the oven.
Permita que la comida congelada se descongele
antes de cocinarse en el horno.
Take care to use dark painted or enamelled ns
that absorb heat in the oven.
Tengan cuidado de usar latas pintadas oscuras o esmal-
tadas que absorban el calor en el horno.
Frequent opening of the oven door while cooking
food causes the hot air inside to go out, thus
causing energy loss. For this reason, the oven door
should not be opened more than necessary.
La apertura frecuente de la puerta del horno mient-
ras se cocina la comida hace que el aire caliente del
interior salga, provocando así una pérdida de energía.
Por este movo, la puerta del horno no debe abrirse
más de lo necesario.
The residual heat remaining aer the meal cooked
in the oven should also be used for the next food.
El calor residual que queda después de cocinar la
comida en el horno también debe usarse para la
siguiente cocción.
Turn o the oven a few minutes before cooking
me. The oven will connue cooking at the current
temperature with less energy.
Apague el horno unos minutos antes de la cocción. El
horno connuará cocinando a la temperatura actual
con menos energía.

Austria
Belgium
Bulgaria
Chile
China
Czech Republic
Ecuador
Greece
Hungary
Indonesia
Malaysia
Mexico
Morocco
Peru
Poland
Portugal
Romania
Russia/Россия
Singapore
Spain
Thailand
Turkey
Ukraine
United Arab Emirates
Venezuela
Vietnam
Küppersbusch Austria
Küppersbusch Belgium S.P.R.L.
Teka Bulgaria EOOD
Teka Chile S.A.
Teka International Trading (Shanghai) Co. Ltd.
Teka CZ S.R.O.
Teka Ecuador S.A.
Teka Hellas A.E.
Teka Magyarország Zrt.
PT Teka Buana
Teka Küchentechnik (Malaysia) Sdn Bhd
Teka Mexicana S.A. de C.V.
Teka Maroc S.A.
Teka Küchentechnik Perú S.A.
Teka Polska Sp. ZO.O.
Teka Portugal S.A.
S.C. Teka Küchentechnik Romania S.R.L.
Teka Rus LLC/ООО "Тека Рус"
Teka Singapore PTE Ltd
Teka Industrial, S.A.
Teka (Thailand) Co. Ltd.
Teka Teknik Mutfak Aletleri Sanayi Ve Tic A.S.
Teka Ukranie LLC
Teka Middle East Fze
Teka Küchentechnik U.A.E LLC
Teka Andina S.A.
TEKA Vietnam Co., Ltd.
Eitnergasse, 13
Doomveld Industrie, Asse 3, No. 11 - Boite 7
Blvd. “Tsarigradsko Shosse” 135
Avd El Retiro Parque los Maitenes, 1237. Parque Enea
No.1506, Shengyuan Henghua Bldg. No.200 Wending Rd.
V Holesovickách, 593
Parque Ind. California 2, Via a Daule Km 12
Thesi Roupaki - Aspropyrgos
Terv u. 92
Jalan Menteng Raya, Kantor Taman A9 Unit A3
10 Jalan Kartunis U1/47, Temasya Park, Off Glenmarie
Blvd Manuel A. Camacho 126, Piso 3 Col. Chapultepec
73, Bd. Slimane, Depôt 33, Route de Ain Sebaa
Av. El Polo 670 local A 201, CC El polo, Surco
ul. 3-go Maja 8 / A2
Estrada da Mota - Apdo 533
Sevastopol str., no 24, 5th floor, of. 15
Neverovskogo 9, Office 417, 121170, Moscow, Russia
Clemenceau Avenue, 83, 01-33/34 UE Square
C/ Cajo,17
364/8 Sri-Ayuttaya Road, Phayathai, Ratchatavee
Levent Mah. Comert Sk. Yapı Kredi Blokları Sit. C Blok
Apt. No.1 C/32
86-e, Bozhenko Str .2nd floor,4th entrance
Building LOB 16, Office 417
Bin Khedia Centre
Ctra. Petare-Santa Lucia, km 3 (El Limoncito)
803, Fl 8th, Daiminh Convention Center, 77, Hoang Van
1231 Wien
1731 Zellik
1784 Sofia
Pudahuel, Santiago de Chile
Xuhui, Dist. 200030 Shanghai
182 00 Praha 8 - Liben
Guayaquil
193 00 Athens
9200 Mosonmagyaróvár
12950 Jakarta
40150 Shah Alam, Selangor Darul Ehsan
11000 Mexico D.F.
Casablanca
Lima
05-800 Pruszkow
3834-909 Ilhavo, Aveiro
010992 Bucharest Sector 1
121087 Россия, Москва
239920 Singapore
39011 Santander
10400 Bangkok
34330 Besiktas, Istanbul
03150 Kyiv
P.O. Box 18251 Dubai
P.O. Box 35142 Dubai
1070 Caracas
Thai, Tan Phu Ward, District 7, Ho Chi Minh
+43 18 668 022
+32 24 668 740
+359 29 768 330
+ 56 24 386 000
+86 2 153 076 996
+420 284 691 940
+593 42 100 311
+30 2 109 760 283
+36 96 574 500
+62 215 762 272
+60 376 201 600
+52 5 551 330 493
+212 22 674 462
+51 14 363 078
+48 227 383 270
+35 1 234 329 500
+40 212 334 450
+7 4 956 450 064
+65 67 342 415
+34 942 355 050
+66 -26 424 888
+90 2 122 883 134
+380 444 960 680
+971 48 872 912
+971 42 833 047
+58 2 122 912 821
+84 854 160 646
Teka Subsidiaries
Country Subsidiary Address City Phone
“for further information and updated contact adresses,
please refer to the corporate website”

www.teka.com
P22198R00
This manual suits for next models
1
Table of contents
Languages:
Other Teka Hob manuals

Teka
Teka VT-TC-2P User manual

Teka
Teka IB 6415 Operating instructions

Teka
Teka IQ 644 User manual

Teka
Teka ED 30 1G AI AL TR User manual

Teka
Teka Maestro EFX Series User manual

Teka
Teka 225146 N21 User manual

Teka
Teka VR-TC-95 User manual

Teka
Teka VTN DC User manual

Teka
Teka ED 30 1G AI AL TR User manual

Teka
Teka E/60.2 User guide

Teka
Teka FGKST 58 Series User manual

Teka
Teka TBC 64000 XFL BK User manual

Teka
Teka CGC 4G AI AL Manual

Teka
Teka GKST 30 12 User manual

Teka
Teka IR 321.1 User manual

Teka
Teka IR-321 User manual

Teka
Teka IRS 645 User manual

Teka
Teka IR 831 Operating instructions

Teka
Teka EM60 4G AI AL TR User manual

Teka
Teka VT TC 2P.1 Manual