Tekram Technology P6BXA User manual

MAINBOARD
Installation Guide
Rev: 1.00H
Date: April - 99
∗All other product names are trademarks or copyrights of their respective
owners.
∗Specifications and information contained in this manual are subject to change
without notice.

Installation Guide
2
Table of Contents
INTRODUCTION.............................................................................. 3
Product Description ........................................................................................3
Features & Specifications................................................................................4
Package Checklist...........................................................................................5
Board Level Feature........................................................................................6
Comprehensive Mainboard View....................................................................8
INSTALLATION................................................................................ 9
Installing the CPU ..........................................................................................9
Setting the Jumpers.......................................................................................11
Connections..................................................................................................14
Installing the Memory Modules (DIMM)......................................................25
Installing an AGP Card ................................................................................26
Installing the Support Drivers and Utilities...................................................27
SOFTWARE SUPPORT................................................................. 28
Mainboard BIOS...........................................................................................28
Flash BIOS Programming Utility..................................................................29
Symbios SCSI Configuration Utility..............................................................30
DMI Utility...................................................................................................30

Installation Guide 3
INTRODUCTION
Product Description
This mainboard represents the highest level of technology available in PC
Mainboards today. Designed as a flexible, high-performance and cost-effective
solution for System Integrators and End Users alike, this mainboard provides the
power and expandability to meet the requirements of the most advanced operating
systems and software applications.
This mainboard features “SLOT 1” architecture, a modular design that supports
the latest Intel® Pentium®III processors (running at 450MHz ∼700MHz with a
100MHz system bus and for board REV2.0 or later 533MHz ∼733MHz on a
133MHz system bus), Pentium®II processors (running at 233MHz ∼333MHz
with a 66MHz system bus and 350MHz ∼450MHz on a 100MHz system bus) as
well as Celeron®processors. Leading edge AGP 2X graphic capability is provided
for the full range of graphic intensive games and programs. The ATX form factor
design allows for more efficient system assembly with built-in mouse, serial and
parallel port connectors. This eliminates the need for separate ribbon
cable/connector brackets and speeds the manufacturing process.
Advanced hardware designs include ACPI’s Suspend to RAM for the
implementation of Instantly Available PCs. Also, by incorporating Super I/O, Bus
Mastering IDE and Universal Serial Bus (USB) onto the mainboard, optimum
system performance is assured and system design and implementation is
simplified.
Fully “Plug & Play” compatible via an Award BIOS, this mainboard facilitates
easy system configuration and peripheral setup. Advanced BIOS features include
Intelligent Hardware Monitoring and Alert functions. The Award BIOS also
supports ACPI readiness and is compatible with PC98 specification. This
mainboard is the ideal foundation for high-end computer systems.

INTRODUCTION
Installation Guide
4
Features & Specifications
Processor SLOT 1 support Intel Pentium®III, 450~700 MHz (FSB 100 MHz),
533~733 MHz (FSB 133MHz for board REV2.0 or later),
PentiumII processor, 233~333 MHz (FSB 66MHz), 350~450 MHz
(FSB 100MHz) and
Celeronprocessor, 333~500 MHz
Chipset Intel440BX AGPset
BIOS AwardPCI BIOS, support ACPI, DMI, Plug-and-Play, Boot from
CD-ROM, SCSI, LS-120, and ZIP devices
SymbiosSCSI BIOS, Anti-virus BIOS to prevent boot virus
System
Memory 3×168-pin DIMM Sockets support up to 768MB SDRAM memory
capacity
Support 8/16/32/64/128/256 MB Memory Module
ECC supported
On-board I/O
Features 1×Floppy Port (Up to 2.88MB) 2×USB Ports
1×Parallel Port (EPP, ECP Port) 1×IrDA TX/RX Header
2×Serial Ports (16550 Fast UART Compatible)
1×Power State Header 1×MIDI/game port
1×Audio jacks: Line-out, Line-in and Mic.-In
Advanced
Features Modem Ring-in Remote Power on
“Suspend to RAM” ready
Wake up on LAN
Keyboard Power On
Hardware Monitoring function
SB-link to support Sound Blaster cards for early DOS games
Support X-store Bus Master IDE driver *
ESS Solo1 PCI sound chip supporting software wavetable
Anti-Virus PC-Cillin software *
PCI Bus
Master IDE 2×UltraDMA/33 IDE Ports support
UltraDMA/33: 33MB/Sec.
Expansion
Slots 1×32-bit AGP slot. 5×32-bit PCI Bus Master slots,
2×16-bit ISA slots
ATX Power
Connector 3V, 5V and 12V 20-Pin ATX Power connector
Switching VR Switching Voltage Regulator to support 1.3V to 3.5V
Form Factor ATX Form factor 12″by 7.5″( 305mm by 190mm )

INTRODUCTION
Installation Guide 5
Remark:
Suspend to RAM is a sleep state specified by the ACPI specification. It’s the ideal sleep
state for the Instantly Available PC. In this state over 95% of the PC’s power is shut off
enabling a breakthrough in power savings, and the resume time is only a few seconds.
The XStore Pro IDE Driver enhances memory management by working with the
Windows 95/98 operating system, resulting in higher system performance by
implementing "read-ahead caching after seeking". This is especially effective with
the large block sizes of modern hard disks.
PC-cillin anti-virus software provides a powerful defense against viruses to
protect data integration.
Package Checklist
Your mainboard package should include the items listed below. Damaged or
missing items should be reported to your vendor.
þThe mainboard
with CPU Retention
Mechanism attached
þFloppy disk ribbon cable
þIDE ribbon cable
þThis Installation Guide
þBIOS, Driver & Utility
Guide
þCD-ROM containing the following
support software:
(The latest drivers can always be found
at their respective web sites.)
§Intel IDE Bus Master driver,
http://support.intel.com/support/chipsets
§Support software for updating the
FLASH BIOS
§HighPoint® XStore Pro IDE Bus
Master
http://www.highpoint-tech.com
§Trend ® PC-cillin Anti-Virus software
http://www.antivirus.com
§ESS Solo-1 drivers
http://www.esstech.com

INTRODUCTION
Installation Guide
6
Board Level Feature
1. ISA slots 11. PS/2 mouse connector (top)
2. PCI slots 12. PS/2 keyboard connector (bottom)
3. Mainboard BIOS 13. SLOT 1 (CPU)
4. Sound chip 14. Intel 440BX AGPset
5. MIDI/Game port 15. Power connector
6. Audio port 16. DIMM sockets
7. COM2 connector 17. Floppy connector
8. Printer port connector 18. Primary IDE connector
9. COM1 connector 19. Secondary IDE connector
10. USB connectors 20. AGP slot
* Board Size: ATX 305 mm x 190 mm (12” x 7.5”)

INTRODUCTION
Installation Guide 7
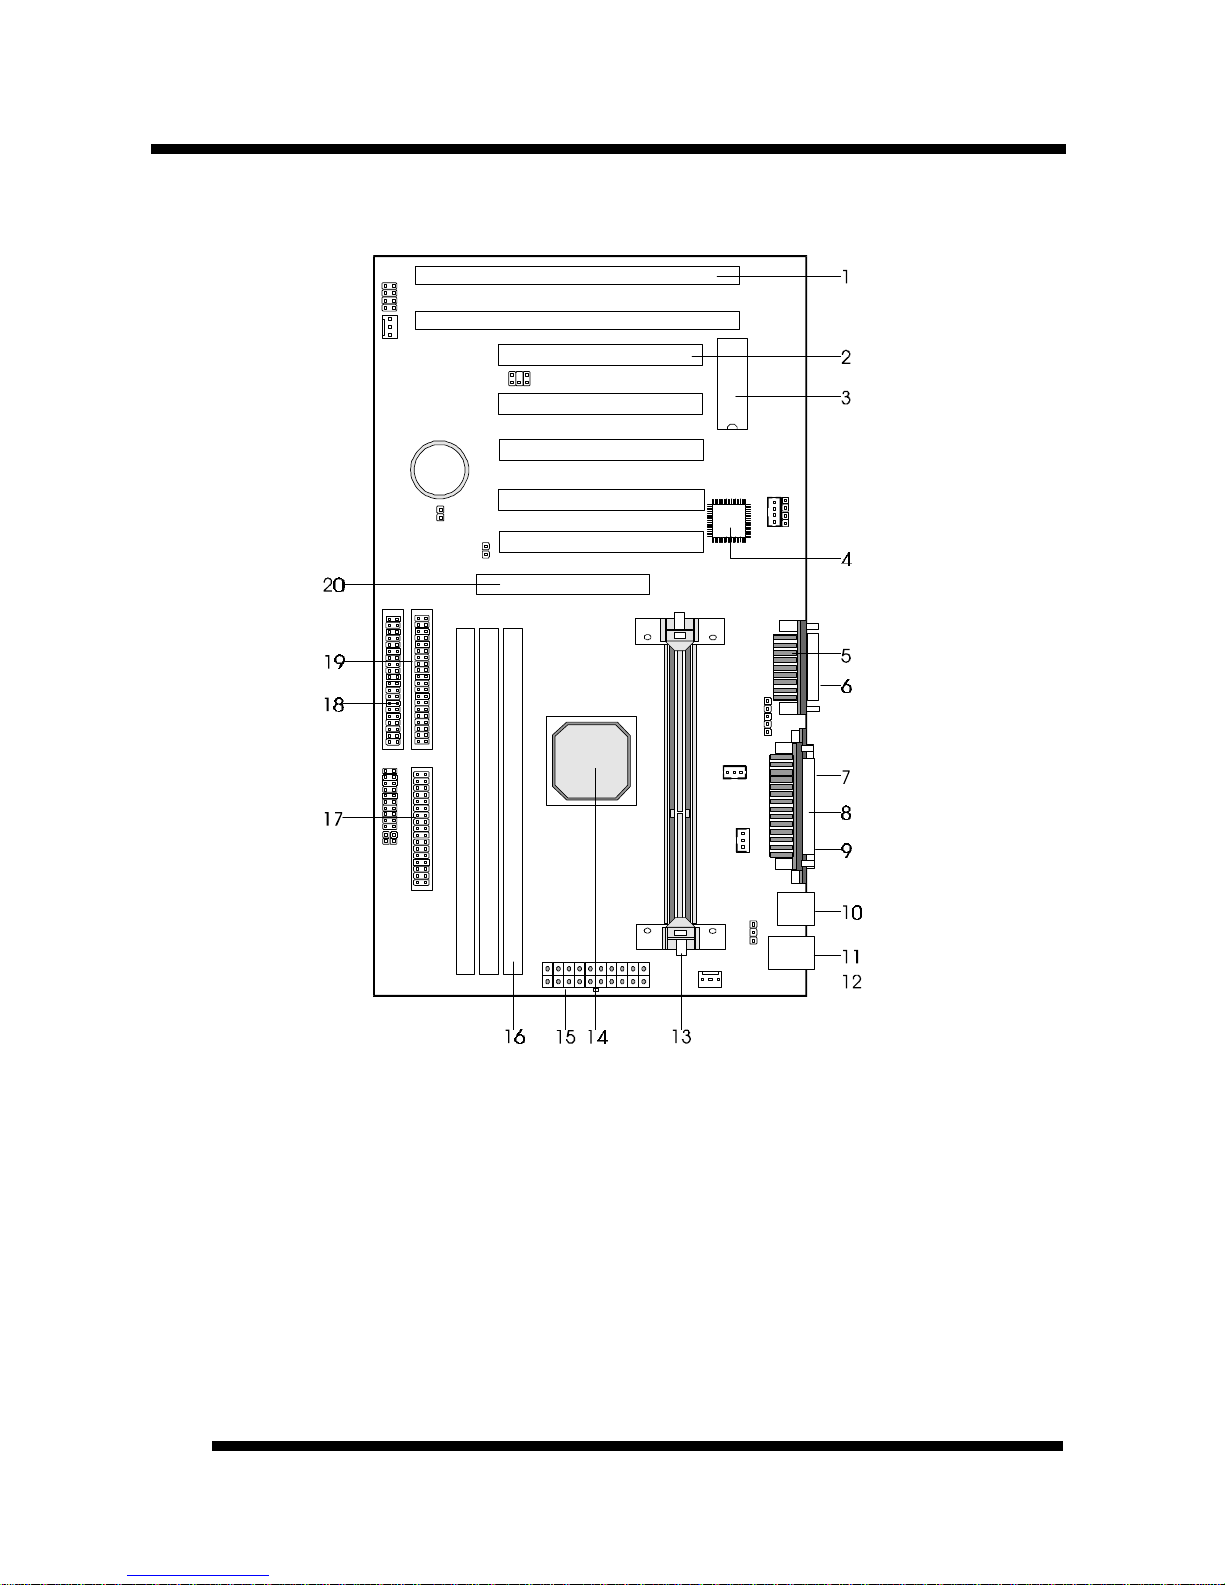
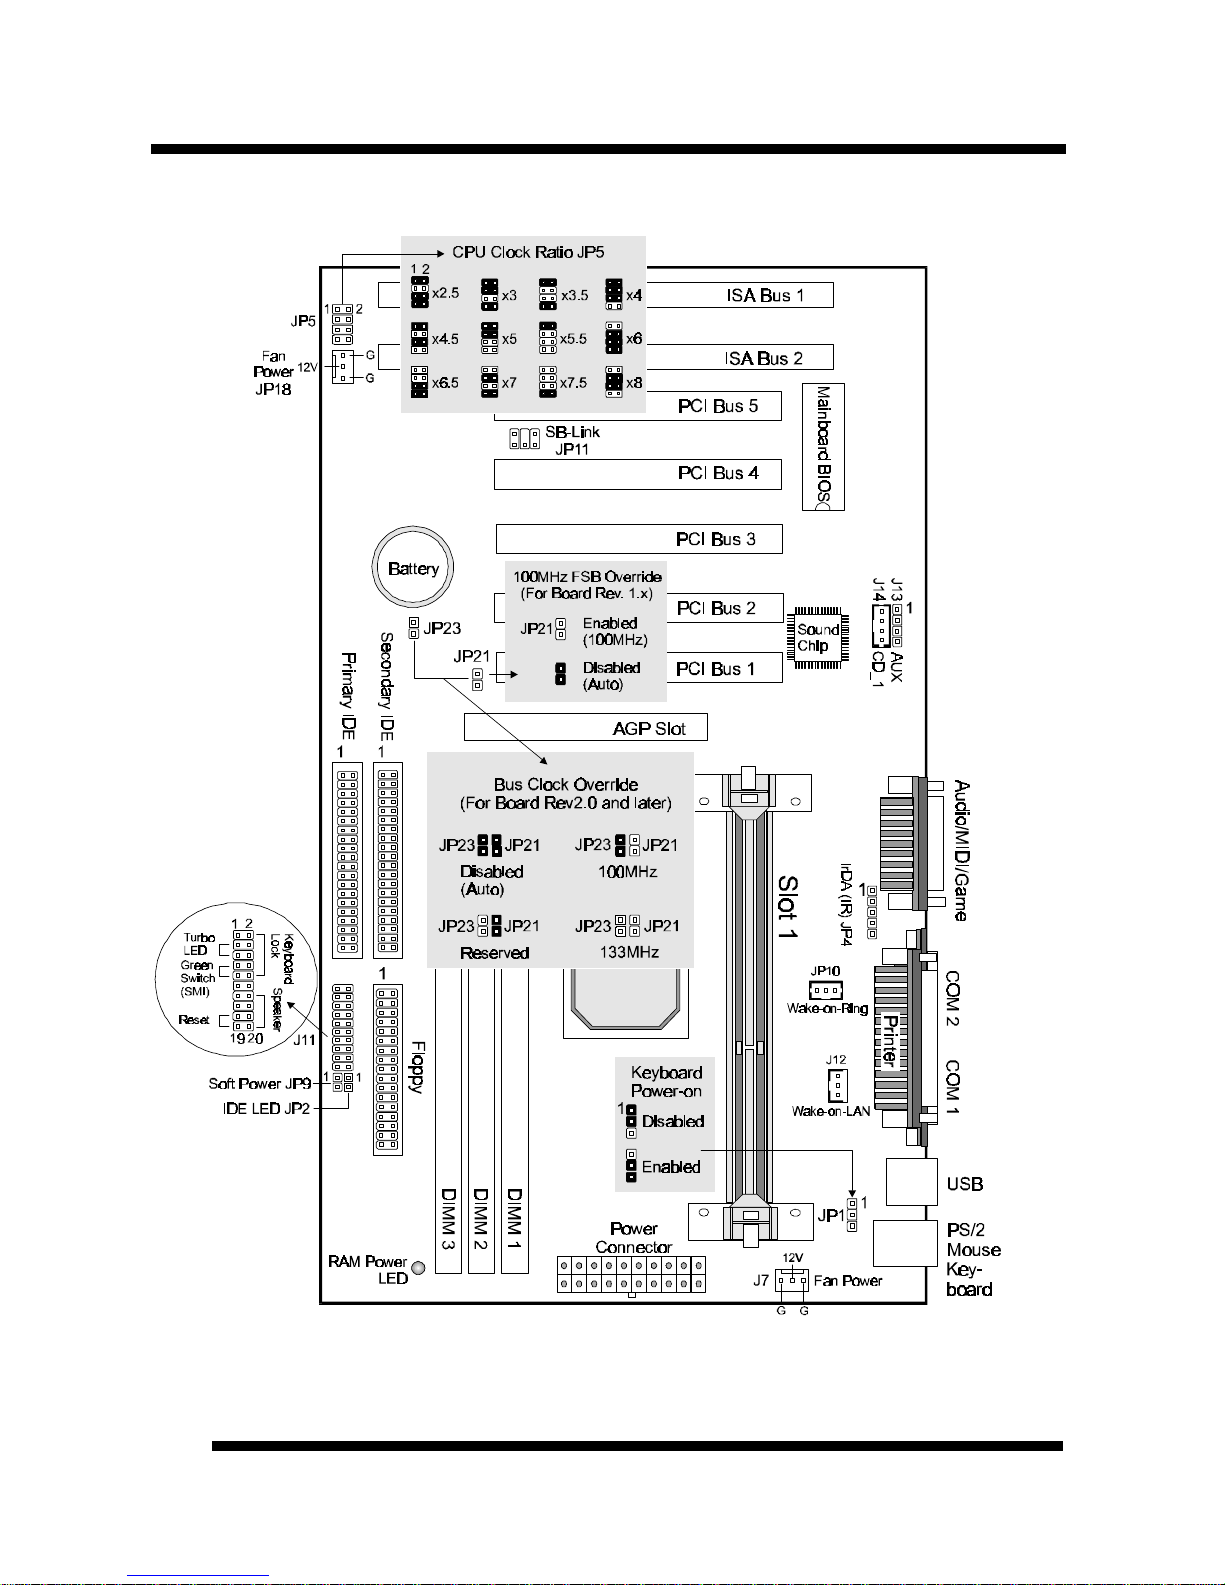
1. ISA Slots: (2) 16-bit ISA slots.
2. PCI Slots: (5) 32-bit PCI slots are provided.
3. Mainboard BIOS: Award BIOS supporting “Plug and Play”, DMI, Green
PC specification, on screen setup for Enhanced IDE and Multi-I/O. The BIOS
is FLASH Upgradeable via the AWDFLASH Utility.
4. Sound Chip: ESS PCI Sound Chip supporting software wavetable.
5. MIDI/Game Port: 15-pin female MIDI/Joystick connector.
6. Audio Port: Three 1/8” female jacks for Line Out, Line In and MIC.
7. COM2 Connector: High-speed UART compatible serial port. COM2 can be
directed to the Infrared Module for wireless connection capability.
8. Printer Port Connector: EPP and ECP compatible 25-pin D-Sub parallel
port.
9. COM1 Connector: High-speed UART compatible serial port.
10. USB Connectors: These connectors permit the connection of two USB
peripheral devices directly to the port without an external hub. USB is a new
technology supporting printers, fax modems and other telephony device.
11. PS/2 Mouse Connector: Supports PS/2 style mice.
12. PS/2 Keyboard Connector: Supports PS/2 style keyboards.
13. SLOT 1: Slot 1 CPU socket for Pentium®III, Pentium®II and Celeron®
CPUs.
14. Intel®440BX AGPset: Features PC100 SDRAM, UDMA and AGP 2x
support.
15. Power Connector: 20-Pin ATX Power Connector.
16. DIMM Sockets: (3) 168-pin DIMM sockets are provided to support a
maximum RAM memory capacity of 768 MB. DIMM types of 3.3 Volt true
SDRAM is supported and automatically detected by the BIOS.
17. Floppy Connector: Built-in floppy controller supports (2) 5.25" or 3.5"
(1.44MB or 2.88MB) floppy drives.
18. Primary IDE Connector: Connector for first IDE channel. The on-board
PCI Bus Mastering IDE controller features support for DMA Mode 2 and PIO
Modes 3 and 4 for faster data transfer rates. (2) Connectors are provided for
support of up to (4) IDE devices on two channels. ATAPI Tape Drives and
CD-ROMs are also supported.
19. Secondary IDE Connector: Connector for second IDE channel.
20. AGP Slot: AGP (Accelerated Graphics Port) is a new bus interface for high
performance graphics capabilities, especially 3D.

INTRODUCTION
Installation Guide
8
Comprehensive Mainboard View
* JP23 available only for board REV2.0 or later

Installation Guide 9
INSTALLATION
Static Precautions
Static electricity can be a serious danger to the electronic components on this mainboard. To
avoid damage caused by electrostatic discharge, observe the following precautions:
üDon’t remove the mainboard from its anti-static packaging until you are ready to install
it into a computer case. Also, handle add-in cards and modules by the edges or mounting
bracket.
üBefore you handle the mainboard in any way, touch a grounded, anti-static surface, such
as an unpainted portion of the system chassis, for a few seconds to discharge any built-
up static electricity.
Installing the CPU
Your mainboard features “SLOT 1” architecture, a modular design that can
accommodate the latest Intel® Pentium®III, Pentium®II and Celeron®
processors.
The Central Processing Unit: CPU
Pentium®II Processor Processor
Lock
Pentium II
Processor
Heat Sink
with Fan
Retention
Mechanism
Fan Power
Lead
Processor
Lock

INSTALLATION
Installation Guide
10
Installing the CPU
üü Warning: It is required to use a CPU Cooling Fan to prevent the CPU from
overheating. Install the fan first before inserting the CPU into the socket.
1. The CPU retention mechanism is already attached onboard. Before installing
the CPU, simply unfold the retention mechanism to the upright position as
shown below.
2. Slide the CPU down into the retention mechanism. Make sure the CPU is
correctly oriented.
3. Seat the CPU firmly into the slot until the two tabs on the CPU click outwards
to lock the CPU in place.

INSTALLATION
Installation Guide 11
Setting the Jumpers
Jumpers are used on this mainboard to select various settings and features. A 2-pin
jumper has two settings: Open and Short (or Closed). The jumper is closed by
placing the Jumper Cap across the two pins, thereby connecting them. 3-pin
jumpers can be set to pins 1-2 or 2-3 connected. Pin-1 is labeled on the circuit
board.
3-pin Jumper 2-pin Jumper
Pin 1-2
Open
Pin 2-3
Short
CPU Clock Selection Jumper (JP5)
After installing the CPU, you must set the clock selection jumper to match the
frequency of the CPU. Find the Jumper Blocks labeled JP5 on the mainboard. Set
the jumper according to the table below and the figure next page for the CPU
frequency you are using.
CPU Clock Ratio Bus Clock
233MHz x3.5 66MHz
266MHz x4.0 66MHz
300MHz x4.5 66MHz
333MHz x5.0 66MHz
366MHz x5.5 66MHz
350MHz x3.5 100MHz
400MHz x4.0 100MHz
450MHz x4.5 100MHz
500MHz x5.0 100MHz
550MHz x5.5 100MHz
600MHz x6.0 100MHz
650MHz x6.5 100MHz
700MHz x7.0 100MHz
533MHz x4.0 133MHz
600MHz x4.5 133MHz
667MHz x5.0 133MHz
733MHz x5.5 133MHz
§The CPU Clock corresponds to the
number marked on the CPU. The
Bus Clock when multiplied with
the Ratio gives the CPU Clock.
§If you are uncertain about the speed
requirements of your particular
CPU, you should obtain Technical
Documentation from the CPU
manufacturer.
§New settings may be available for
new CPU products.
§Such information is available via
the Intel WWW site.

INSTALLATION
Installation Guide
12
•The bus clock can be extended through the “CPU Host Clock (CPU/PCI)”
option of BIOS Chipset Features Setup for internal test. Over-clocking may
cause serious system damage.
CPU Bus Clock Override Jumper (JP21 & JP23)
* JP23 is available only for board REV2.0 or later.
These jumpers allow you to override the CPU’s bus clock to 100MHz or 133Mhz.
* Over-clocking may cause serious system damage.

INSTALLATION
Installation Guide 13
Keyboard Power-on Jumper (JP1)
This feature will power on the system from the keyboard. In addition to the jumper
setting, the “Power On Function” in the Integrated Peripherals Setup of the
BIOS must be set properly also.
Note: If you choose to use a password to power on the system, it is recommended
to keep a written record of your password. If you forget the password, the CMOS
must be cleared by removing the mainboard’s battery AND disconnecting the
mainboard’s power supply for a couple of seconds then re-installing them back.
This is the only way you can power on your system again.

INSTALLATION
Installation Guide
14
G
N
D
1
2
V
G
N
D
Connections
Cooling Fan (J7 and JP18)
J7 and JP18 are small 3-pin Header
Connectors that provide 12-Volt
power for CPU and chassis cooling
fans. Plug in the fan cable to the
connector. Pin-2 corresponds to the
RED power lead as shown:
Power Supply Connector
This mainboard features an ATX-style Power Supply Connector. This connector is
keyed to prevent connection in the wrong direction. Line up the locking
mechanism on the connector from the Power Supply with the tab on the mainboard
connector. Press down until the two connectors are locked.

INSTALLATION
Installation Guide 15
System Function Connector Block (J11)
Pins [3 & 5] Turbo LED switch - The Turbo function is not supported by this
mainboard. Therefore, the Turbo LED will always remain lit as long as the system
power is on.
Pins [7 & 9] SMI suspend switch lead - If your system’s case has a suspend
switch, hook the lead from the switch to pins 7 & 9. A suspend switch is used to
save electricity by putting the system into a suspend mode when the computer is
not being used. This switch could also be used by the Turbo switch on the front of
the system, since this mainboard does not support that function. For this switch to
be functional, it must first be enabled in the Power Management Setup in the BIOS
Setup utility.
Pins [17 & 19] Reset switch lead - Connects to the Reset Switch lead from the
system’s case. The reset switch is used to “cold-boot” the system without actually
turning off the power, reducing wear and tear on the power supply.
Pins [2, 6, 8 & 10] Keyboard lock switch lead – Pins 2 & 6 connect to the power
LED from the system’s case. Pins 8 & 10 connect to the case-mounted keylock
switch.
Pins [14 & 20] Speaker connector - Connects to the Speaker lead from the
system’s case.

INSTALLATION
Installation Guide
16
IDE Activity LED (JP2)
Hook the IDE LED lead to this connector, with the RED lead corresponding to
Pin-1.
Soft Power Switch (JP9)
Connects to the Power Switch featured on ATX case designs. This switch must be
hooked up before the system can be powered on, unlike traditional “Baby-AT”
designs where the power switch is located on the Power Supply itself.
Note: Under the following two conditions, you have to press and hold the switch
for longer than 4 seconds to power off your system, regardless of the “Soft-Off by
PWRBTN” setting in the BIOS.
•Shortly after the system is powered on, when the BIOS message is not yet
appear.
•When CPU hangs.

INSTALLATION
Installation Guide 17
IrDA-Compliant Infrared Module Connector (JP4)
The IrDA connector bracket hooks directly to this connector on the mainboard.
This connector provides support for the optional wireless transmitting and
receiving infrared module. You must first configure through the BIOS setup where
UART2 is directed, COM2 or IrDA.
* Pin 6 is reserved for consumer IR.

INSTALLATION
Installation Guide
18
Wake-up On LAN Connector (J12)
The Wake-up On LAN function will
allow the network to wake up a Soft
Power Down (Soft-Off) PC. However, if
your system is in the Suspend mode, you
can wake-up the system only through an
IRQ or DMA interrupt. To use the
Wake-up On LAN function, you must
enable the “Power On By Ring/LAN”
field in the Power Management Setup of
the Award BIOS. Connect the cable that
comes with your LAN card to this
connector on the system board. Refer to
the add-in card’s manual for details.
Note: Your LAN card must support
Magic Packet in order to use the Wake-
up On LAN function.
SB-Link (JP11)
Connect SB-Link cable on the
Creative Sound Blaster Card to this
connector. This PC to PCI bridge
provides backward compatibility
between PCI and ISA audio chips
for earlier DOS games.
1
2
5
6

INSTALLATION
Installation Guide 19
ParallelPort
COM1COM2
Serial and Parallel Ports
A 25-pin D-Sub header is provided on the back panel for a multi-mode bi-
directional parallel port.
Two 9-pin D-Sub headers are also provided on the back panel for Serial ports.
Wake-on-Ring Function
The Wake-on-Ring function allows the
modem to remotely power on the system.
Install an external modem (normally to
COM2) and enable Power On by
Ring/LAN function from BIOS “Power
Management Setup”.
For the function to work for an internal
modem card, you must also connect the
Wake-on-Ring cable on the modem card
to the Wake-on-Ring function connector
(JP10) on the mainboard.

INSTALLATION
Installation Guide
20
USB Connectors
These two connectors permit connection of two USB peripheral devices directly to
the system without an external hub.
PS/2 Keyboard and Mouse Connectors
These two connectors are located on the back panel of the mainboard.
USB
PS/2
Keyboard
PS/2
Mouse
Table of contents
Other Tekram Technology Motherboard manuals

Tekram Technology
Tekram Technology S381M User manual

Tekram Technology
Tekram Technology P5m4m User manual

Tekram Technology
Tekram Technology P6L40-A4E User manual

Tekram Technology
Tekram Technology P5V30-B4 User manual

Tekram Technology
Tekram Technology P6E40-A4 User manual

Tekram Technology
Tekram Technology P6B40D-A5 User manual

Tekram Technology
Tekram Technology P6F40-B5 User manual

Tekram Technology
Tekram Technology P5T30-B4 User manual

Tekram Technology
Tekram Technology P5T30-A4 User manual