Teleste E3 User manual

User Manual E3
59300623 Rev.001
5.4.2018 1(20)
E Series
User Manual
Teleste Corporation
E3 Compact amplifier

User Manual E3
59300623 Rev.001
5.4.2018 2(20)
Contents
Introduction........................................................................................................ 2
Installation.......................................................................................................... 3
Mounting.............................................................................................................. 3
Interfaces............................................................................................................. 4
Coaxial connections............................................................................................. 5
Powering............................................................................................................. 6
Front panel ......................................................................................................... 7
Features.............................................................................................................. 8
Diplex and output modules.................................................................................. 8
Forward path........................................................................................................ 9
Return path........................................................................................................ 10
Alarms............................................................................................................... 11
Local user interface......................................................................................... 12
E61 RIS receiver with USB.............................................................................. 14
Installation.......................................................................................................... 14
Establishing connection..................................................................................... 15
Software update................................................................................................. 16
Viewer pages..................................................................................................... 17
Legal declarations........................................................................................... 20
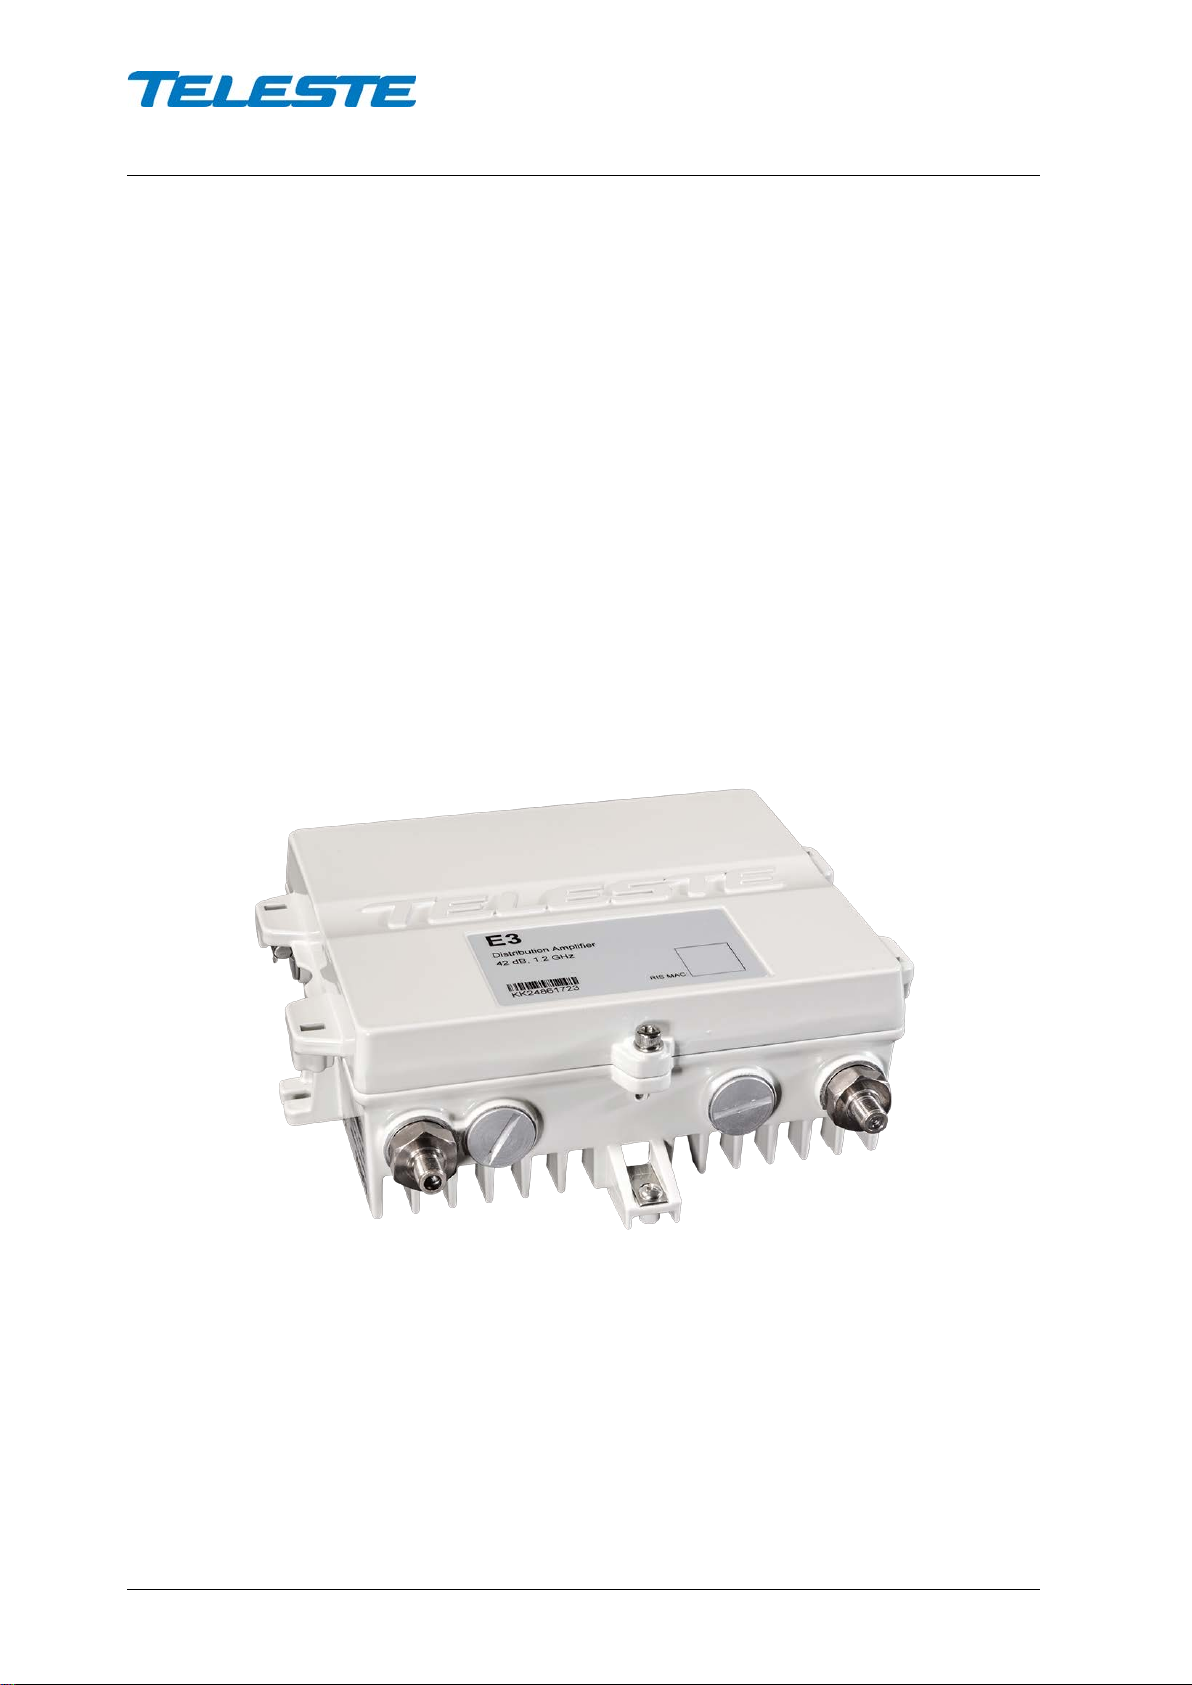
Introduction
E3 is a compact dual output amplifier with wide 16…42 dB gain adjustment
range making it suitable for both distribution purposes and line extender use.
The E3 amplifier supports 1.2 GHz frequency range which ensures fulfilment of
all future bandwidth needs. The upstream signal path is flexible and it can be
updated to 204 MHz.
Adjustments use electrical controls thus eliminating the need of the usual plug-
in attenuators in the system set-up. Other standard features include reliable
power supply, built-in return path amplifier as well as an efficient surge and ESD
protection.
Ingress switches can be remotely controlled via FSK communication of an
optional E61 RIS receiver. This one way communication channel also enables
remote update of software.
Local configuration of E3 is done via its built-in display and pushbutton user
interface. E61 module can be used to add USB interface for configuration using
a Windows PC or tablet equipped with CATVisor Commander software or
Android mobile device equipped with Teleste Commander software. Wireless
Bluetooth connection can be established with AC6901 USB to Bluetooth
adapter.
E3 hardware generations
E3 has 2 generations with some differences in hardware and functionality:
1st generation E3 was manufactured until Q3/2018. It has 0 / 13 dB selectable
interstage slope. 2nd generation E3 manufacturing started Q2/2018. It has 0…15
dB 1 dB step adjustable interstage slope.

User Manual E3
59300623 Rev.001
5.4.2018 3(20)
Installation
Mounting
The E3 can be installed either into a street cabinet or to a sheltered outdoor
environment. The amplifier should be installed vertically so that the external
cable connectors and ventilation hole are facing downward. Figure 1 depicts for
the positions of mounting brackets as well as other installation dimensions.
Mount the E3 securely onto a wall using appropriate length 5 mm mounting
bolts/screws (not supplied) and tighten the mounting bolts/screws. The amount
of torque required depends on the mounting surface.
When installing the amplifier in its final location, make certain that it has
adequate ventilation on all sides. In particular, it is necessary to provide at least
150 mm of room above and below the node for air circulation. The lid of the
amplifier may be opened from either the left or right hand side or removed
altogether. This flexibility improves accessibility and permits greater freedom to
install the amplifier in confined spaces. Hint! Easiest way to remove the lid is to
pull it from retaining bolt after it has been detached from the base.
The lid retaining bolts are fastened with a 4 mm hex key. Use no more than 3
Nm torque. The E3 enclosure classification is IP67. However in standard
delivery condition the lowest side wall is equipped with a 1 mm ventilation hole.
Thus the practical class of enclosure is IP54 when amplifier is correctly installed
and tightened.
Note: IP54 type enclosure - This enclosure provides protection from airborne
dust and light sprays or splashing water from all directions.
Before closing the lid is should be checked that:
•nothing is trapped between the lid and the case
•all case gaskets are intact and in their correct positions
•lid seats evenly on the rubber gasket
E3 housing should be grounded using a copper conductor of least 4 mm2cross
section area from a proper earth to the housing ground lug.

User Manual E3
59300623 Rev.001
5.4.2018 4(20)
9817032
Figure 1. E3 housing dimensions – top and side view
Interfaces
9817024
Figure 2. Port locations
The E3 has three dedicated cable connection points: Input and two outputs.
Input port
Output port 1
Ground lug
Output port 2

User Manual E3
59300623 Rev.001
5.4.2018 5(20)
Coaxial connections
The E3 amplifier requires pin-type connectors for all RF connections. The E3
amplifier has spring loaded seizure assemblies on coaxial ports that provide a
tight connection with precise alignment between contact points. All coaxial
output ports have a standard PG11 thread. Note that Teleste KDC327 (PG11–
F) and KDC328 (PG11-3.5/12) connectors fulfils the centre pin equipment
requirement for E series.
Suitable length for the centre conductor pin is approximately 21 mm (Figure 3).
Pin-type connectors, with pins extending from 19 mm to 23 mm from the
connector shoulder, require no trimming. Any longer pins must be trimmed
before inserting them into the housing. After cutting the pin, trim the sharp
edges. Using connectors with centre conductors pins exceeding 1.8 mm in
diameter will permanently damage spring loaded seizure assemblies. Ensure
that the centre conductor pin is not deformed, causing destruction of the spring
loaded seizure assembly. Note! When using KDC314 (PG11-5/8) adapter, the
length of connector’s centre connector pin must be 33 mm ±2 mm.
9817016
Figure 3. Centre conductor length

User Manual E3
59300623 Rev.001
5.4.2018 6(20)
Powering
NOTE! Do not remove the shielding cover. There are no user
serviceable parts inside. Unauthorized repairs or modifications
result in permanent damage to the equipment, and will void the
warranty.
Common precautions:
•The E3 amplifier is intended for installation in restricted access locations
(dedicated equipment rooms, equipment closet, or the like)
•Operate the device only on the specified supply voltage.
•The E3 must never be operated without its power supply unit shielding
cover.
•The E3 has no separate power switch thus the power plug must be easily
accessible.
•Disconnect the power cord by the connector only. Never pull on the cable
portion of the power cord.
•Do not place or drop heavy or sharp-edged objects on the power cord.
•The power must be disconnected when installing or removing the E3.
Additional safety requirements for Norway and Sweden:
Equipment connected to the protective earthing of the building installation
through the mains connection or through other equipment with a connection to
protective earthing and to a cable distribution system using coaxial cable, may
in some circumstances create a fire hazard. Connection to a cable distribution
system must be provided through a device providing electrical isolation below a
certain frequency range (galvanic isolator, see EN 60728-11).
The E3 is available either with a remote or local powering option. The E3 has an
integrated power supply that cannot be replaced. The following subsections
describe the differences.
E3 with remote powering (27...65 V AC)
The supply voltage of the remote powered E3 model (27...65 V AC) is supplied
via input/output RF ports only. Feed through capacity is max. 7 A / port. On
delivery, RF ports are provided with fuses. Local connection for remote feed is
not possible thus the power cord entry port must be plugged.
E3 with local powering (205…255 V AC)
The locally powered E3 model is connected to the mains voltage of 205…255 V
AC with its own power cord and has no fuses nor AC feed-through in its RF
ports. The power supply unit is double shielded and does not require separate
grounding. However, ensure that the housing of the E3 is properly connected to
the earth in order to meet safety requirements. Proper grounding will also
improve protection from the effects of interference and thus increase the overall
reliability of the system.

User Manual E3
59300623 Rev.001
5.4.2018 7(20)
Front panel
Figure 4. E3 front panel (remotely powered model)
1) Input port
2) Input test point, F female
(-20 dB resistive coupler)
3) Input diplex filter module
4) Slot for RIS module
5) Output diplex filter module
6) Output test / injection point, F female
(-20 dB directional coupler)
7) Output module (see Table 2)
8) Output 1 port
9) Output 2 port
10) Local user interface
11) Fuses (only in remote powered model)
1
2
3
4
5
6
7
8
9
10 11
11

User Manual E3
59300623 Rev.001
5.4.2018 8(20)
Features
Diplex and output modules
The E3 amplifier is delivered according to the ordering code.
The installed diplex filters (Figure 4 positions 3 and 5) must be new 1.2 GHz
types which are automatically detected by the software. The supported diplex
filter types listed in Table 1. It is also possible to order the amplifier without
diplex filters.
Diplex filters are automatically recognised by the software. "Unknown module"
alarm is activated if diplex filter type cannot be detected or if input diplex filter
frequency is different than output diplex filter frequency.
Diplex filter
Functionality
CXF065 65/85 MHz frequency split
CXF065 10
65/85 MHz split with ingress blocker, passband f>10 MHz
CXF065 19
65/85 MHz split with ingress blocker, passband f>18MHz
CXF085
85/105 MHz frequency split
CXF204
204/258 MHz frequency split
Table 1. Supported diplex filter types
Output modules are passive plug-ins used to control the outputs – see Table 2.
Module
Functionality as output module
Output 1
Output 2
AC6120
0 dB output module, 1 output in use
0 dB
not used
AC6113
2/8 dB tap, 2 outputs in use
-2 dB
-8 dB
AC6114 2/12 dB tap, 2 outputs in use
-2 dB
-12 dB
AC6115
1/16 dB tap, 2 outputs in use
-1 dB
-16 dB
AC6124
Two-way splitter, 2 outputs in use
-4 dB
-4 dB
Table 2. Output modules with corresponding nominal attenuation values

User Manual E3
59300623 Rev.001
5.4.2018 9(20)
Forward path
The input and output amplifier stages are both based on high performance
solutions which allow the user to set E3 outputs for high and low output levels.
The output stage uses a GaN hybrid to improve RF performance over the entire
85 to 1218 MHz passband. Note that E3 must have a proper matching at output
port(s) to ensure optimal and reliable operation.
Forward path gain control
E3 has two gain control elements in its forward path signal route: input gain and
interstage gain. The software automatically adjusts these elements based on
the desired total gain. The total gain is adjustable between -26 and 0 dB in 0.5
dB steps.
When the built-in cable simulator is enabled (input slope < 0 dB) by the user,
the available forward path gain decreases by 13 dB. The software automatically
compensates for this as far as possible by changing the total gain value by + 13
dB. The opposite happens when cable simulator is disabled.
Forward path slope control
Forward path slope is the frequency response level difference between 85 and
1218 MHz. It is controlled by two elements:
1) Input slope, coupled with built-in cable simulator: Adjustable between -13
and 20 dB in 0.5 dB steps. Negative values enable the built-in 13 dB cable
simulator and reduce the maximum gain by 13 dB. Forward path gain is
automatically adjusted to 13 dB higher value, if possible, to compensate for
the gain loss caused by the cable simulator.
2) Interstage slope: Adjustable between 0 and 15 dB in 1 dB steps. Note that
1st generation E3 amplifiers have only two choices: sloped (13 dB) and flat
(0 dB).
Interstage slope should be set according to desired output slope. After selecting
the correct interstage slope the low frequency output signal levels should be
adjusted with a measurement instrument using input slope control.
Increasing slope value decreases low frequency signal levels.
Power save
The RF performance and power consumption of E3 can be adjusted by
controlling the output hybrid’s current. Power save is disabled as factory default.
This ensures full performance and should be used if output levels are close to
maximum.
If output levels are more than 2 dB below the specified maximum levels the
power save can usually be enabled to achieve a ~3 W reduction in power
consumption without any effect on RF performance.

User Manual E3
59300623 Rev.001
5.4.2018 10(20)
Return path
E3 amplifier supports 65 MHz, 85 MHz and 204 MHz return path. The return
path bandwidth is automatically set according to the installed diplex filters. If
diplex filter type cannot be detected, or the installed diplex filters are not the
same type, the “Unknown module” alarm is set and 65 MHz bandwidth is used.
Return path gain and slope control
Return path gain can be adjusted between -20 and 0 dB in 0.5 dB steps.
Return path slope can be adjusted between 0 and 15 dB in 0.5 dB steps.
The return path slope control pivot frequency is 204 MHz (slope measured
between 5 and 204 MHz) when 204 MHz diplex filters are installed, otherwise
85 MHz (slope measured between 5 and 85 MHz). Note that in 65 MHz
operation the signal level at 65 MHz is thus also affected by slope control which
has 85 MHz pivot frequency.
If diplex filters are changed so that the slope pivot point frequency changes, the
E3 software automatically readjusts return path gain and slope controls to
obtain similar frequency response.
RFF (Return Follows Forward) functionality
When forward path gain and slope are adjusted by the user, E3 software
automatically adjusts return path gain and slope accordingly. This RFF
calculation assumes that all needed forward path gain & slope is due to splitting
(flat) and cable losses between this and previous amplifier. If the forward path
output levels are the same for this and previous amplifier, RFF typically adjusts
return path so well that fine-tuning may not be needed at all.
RFF is enabled as factory default. It is automatically disabled if return path gain
or slope is adjusted manually. RFF can be re-enabled or disabled by the user.
RFF adjusts only gain and slope. It does not change return path input gain and
ingress switch settings and does not take these into account in calculation.
Return path input gain
The return path input gain can be used to add a fixed 10 dB flat attenuation to
the first return path gain control element. This can be useful in certain
situations, e.g. to force cable modems to transmit at higher levels resulting in
better SNR.
The use of return path input offset is similar to adding a return path input
attenuator plug to a traditional amplifier equipped with plug-in slot.
Ingress switch
Ingress switch can be used to attenuate return path by 6 dB or to cut it off
completely. The ingress switch can also be controlled remotely using Teleste
RIS system when E61 module is installed. Remote control overrides local
ingress switch control.
Teleste CATVisor Argus element management system supports SmartRIS
which can automatically control ingress switches and isolate ingress problems
based on ingress measurements in intelligent Teleste amplifiers and nodes.

User Manual E3
59300623 Rev.001
5.4.2018 11(20)
Alarms
The E3 alarms displayed in local user interface and PC / Android viewer are
described in the table below.
The alarm texts are displayed in separate rows in the local user interface. When
the display is sleeping, slowly blinking dot “.” means no alarms and rapidly
blinking “E” means at least one alarm. See also “Local user interface” chapter.
Local UI text
Alarm in viewer
Description & suggested corrective action
E.INT
Internal error
E3 has an internal error. If resetting the unit doesn't help,
contact Teleste support.
E.PLu Unknown module
E3 is not able to recognise RIS module or diplex filter type,
or diplex filter frequencies do not match. If software is up to
date and removing and reinstalling the plug-in modules
doesn't help, contact Teleste support.
E.PSu Power supply
failure
Internal voltages are not OK. If the AC supply voltage is
within specification and resetting the unit doesn't help,
contact Teleste support.
E.ACV
AC voltage high
Remote AC voltage is above 65 VRMS.
AC voltage low
Remote AC voltage is below 27 VRMS.
E.TMP
Temperature high
Internal temperature is above 85 °C.
Temperature low
Internal temperature is below -20 °C.
Table 3. E3 alarms

User Manual E3
59300623 Rev.001
5.4.2018 12(20)
Local user interface
E3 has a local user interface consisting of a 4*7-segment display and 3 buttons.
This local UI can be used for E3 configuration in cases where E61 RIS module
is not installed or the use of a PC, tablet or smartphone equipped with CATVisor
Commander is not desired.
Using the local user interface
During power-up "Teleste E3R/L X.Y" text (where X.Y indicates the installed
software version, R indicates remote powering and L local powering) scrolls
through the display. Pressing the “Enter” button (right button with ■symbol)
wakes up the display and activates the first menu item. If there is no button
activity during ~3 minutes, the display will go to sleep mode. When in sleep
mode, a slowly blinking dot “.” in the display indicates no alarms and rapidly
blinking “E” indicates alarms.
The menu structure is described in Figure 5. The “Up” (left button with ▲
symbol) and “Down” (middle button with ▼ symbol) buttons browse through the
menu items, The “Enter” button selects the item for modification / reading, “Up” /
“Down” changes the value of the selected item and “Enter” returns to the menu.
Possible alarms are displayed in separate rows in the beginning of the menu.
For additional information about alarms, see the “Alarms” chapter.
PIN code
A PIN code can be used to prevent unauthorised local access. The PIN code is
disabled (0000) as factory default. It can be changed via the local user interface
or via PC / Android viewer when using E61 module.
If the PIN is enabled, i.e. set to value other than 0000, it needs to be entered
with “Up” / “Down” / “Enter” buttons each time the display wakes up from sleep.
If the PIN is enabled and forgotten it can only be reset via PC / Android viewer
and E61 module.

User Manual E3
59300623 Rev.001
5.4.2018 13(20)
Forward path gain
[-26...0 dB, step 0.5 dB]
Input slope
[-13...20 dB, step 0.5 dB]
Interstage slope
[0...15 dB, step 1 dB]
Return path input gain
[0/ -10 dB]
Return path gain
[-20...0 dB, step 0.5 dB]
Enter button
Up / Down buttons
Ingress switch control
[0 dB / -6 dB / -50 dB]
Measured AC
RMS
voltage [V]
(Remote power model only)
Return path slope
[0...15 dB, step 0.5 dB]
PIN=0
ALARM CODES:
E.INT = Internal error
E.PLU = Unknown plugin
E.PSU = Power supply failure
E.ACV = Remote AC voltage
E.TMP = Temperature
Display sleep: blinking
”E” = alarms, ”.” = no alarms After ~3 min
inactivity
Power save
[Off / On]
Local UI PIN setting
[0000 = disabled]
Possible alarms
Each on separate row
Login screen
(displayed if PIN <> 0)
PIN OK
PIN<>0
Return Follows Forward
[On / Off]
PIN
NOK
Measured internal
temperature [°C]
Software version
Software version 3.6 and
below displays ”RET.A”
instead of ”RFF”:
Figure 5. E3 local user interface menu structure. Factory default values are in bold.

User Manual E3
59300623 Rev.001
5.4.2018 14(20)
E61 RIS receiver with USB
Installation
E61 can be installed without turning off the power by simply pushing the unit
firmly to its location marked with “RIS module” until it snaps into place.
The MAC address visible in E61 front panel should be recorded during
installation together with unit location and other information. This makes it
possible to later add the unit into HDM155 RIS controller device table and EMS
system. This data can also be stored and transferred easily using Teleste
Commander software for Android devices.
Note that E61 automatically updates E3 software if it detects different version
that is included inside E61. Thus it is recommended to make sure the E61
software version is up to date before installing it into E3. See the “Software
update” chapter for details.
Figure 6. E61 installed into E3
E61 automatically scans for RIS carrier generated by HDM155 RIS controller
within its tuning range. When a carrier is found, E61 locks to the carrier and
reacts to commands sent to its MAC address. If E61 doesn’t receive any
packets during 1 minute it starts scanning again.
E61 front panel has a “RIS” led which indicates communication status:
•Dark: Searching for RIS carrier.
•Blinking green: Locked to RIS carrier, but no commands received in last 2
minutes. This usually means that this E61’s MAC address has not been
entered in RIS controller’s device list.
•Green: Locked to RIS carrier and receiving commands.
•Yellow: Locked to RIS carrier and received “Ingress attenuate” command.
•Red: Locked to RIS carrier and received “Ingress off” command.

User Manual E3
59300623 Rev.001
5.4.2018 15(20)
Establishing connection
In addition to the local user interface, the E3 amplifier can also be configured
with a PC, tablet or smartphone when E61 module is installed.
Connection to E3 is possible using the following methods:
Local configuration with a PC through E61 RIS receiver USB port
CATVisor Commander 2.10 or later and up-to-date DUS100 user interface
collection is needed for USB and Bluetooth support. These both are available
for download in Teleste extranet (MyTeleste).
Connection to E61 USB port can be done with a standard USB A plug to USB
mini B plug cable, or via AC6901 USB to Bluetooth adapter. The cable or
adapter should be disconnected when not in use to avoid possible EMC
problems caused by the cable acting as an antenna.
E61 will draw power from the USB connector for E61 and E3 microcontroller
and memory if no external power supply is available. This makes it possible to
configure E3 settings and update the software without any power supply.
Note that as only the CPU part of the unit is powered via USB, many
parameters visible via the user interface may display incorrect values. Installing
and removing plug-in modules while the unit is USB powered is not
recommended and may lead to unexpected behaviour.
Local configuration with an Android device
Teleste Commander software for Android devices can be downloaded from
Google Play. Connection to E61 USB port can be done via AC6901 USB to
Bluetooth adapter. The adapter should be disconnected when not in use to
avoid possible EMC problems caused by the adapter acting as an antenna.
Remote ingress switch control via RIS link
RIS controller module HDM155 can be used for controlling E3 ingress switch
remotely when E61 is locked to HDM155’s carrier. Remote ingress switch
control overrides local control. See HDM155 documentation for more details.

User Manual E3
59300623 Rev.001
5.4.2018 16(20)
Software update
New software versions for E3 and E61 are published at Teleste extranet
(MyTeleste). These may contain bug fixes, enhancements and completely new
features. For details see the software release history documents also available
in MyTeleste.
E3 software
E3 software can be only updated using E61 module. The E61 software includes
the E3 software image. Every time E61 software starts it checks the E3
software version. If it does not match with the version of the E3 software image
included in E61 software, the E61 automatically updates E3 software.
Ongoing E3 software update is indicated with multicolour blinking of E61’s “RIS”
led and typically takes half a minute to complete. E3 new software starts
automatically when the software update completes. If the software update is
interrupted by e.g. a power failure, E61 resumes update immediately when
power returns. Note that E3 does not have functioning software during the
software update, so short RF breaks will appear. If E61 is removed during the
software update the E3 will not have any software and does not function at all
until E61 is installed again and it completes the software update.
E61 software
E61 software can be updated locally via USB or AC6901 Bluetooth adapter
using CATVisor Commander or Teleste Android Commander. It is also possible
to update E61 software (and thus also E3 software) remotely via the RIS link.
Contact Teleste support for more details on remote software update.
The new E61 software is taken into use after it has been completely transferred
and the device is reset. This reset takes ~10 seconds after which the E61 is
fully functional and running the new software and, if needed, starts to update
the E3 software. If the E61 software update fails, E61 continues to use its
original software.

User Manual E3
59300623 Rev.001
5.4.2018 17(20)
Viewer pages
This chapter presents E3 graphical user interface (=”viewer”) pages when
connecting to E3 with CATVisor Commander PC software via E61 module USB
port using USB cable or AC6901 Bluetooth adapter.
The same settings but in slightly different layout are also available when using
an Android tablet or smartphone with Teleste Commander software.
Status viewer page
Figure 7. The Status page
The Status page displays unit's alarms and controls together with measurement
data and a graphical view of the current configuration.
Forward and return path controls
Forward path interstage gain and slope and return path input gain can be
selected from the drop-down menu according to installation requirements.
Gain and slope can be adjusted by clicking the up and down buttons or typing a
value into the fields. The slider indicates relative position of the control to its
limits.
When “Return follows forward” is checked, return path gain and slope are
automatically adjusted based on forward path settings and frequency range.
Adjusting return path manually disables this RFF feature.
The radio buttons control the ingress switch. The “-50 dB” selection cuts off the
return path RF signal and thus disconnects all cable modems behind this unit. If
ingress switch commands are received via RIS link they override local control.
Detected diplex filter types are shown in respective positions in green when the
types are detected OK and match each other, otherwise in red.

User Manual E3
59300623 Rev.001
5.4.2018 18(20)
RIS module
When E61 module is installed, the communication frequency and status is
shown with:
•Scanning: Searching for RIS carrier.
•Locked: Locked to RIS carrier, but no commands received in last 2
minutes. This usually means that this E61’s MAC address has not been
entered in RIS controller’s device list.
•Connected: Locked to RIS carrier and receiving commands.
The Controller IP and Controller ID fields display the RIS controller (HDM155)
identification data received via RIS link. These are needed in networks
equipped with multiple RIS controllers for assigning the RIS receivers to correct
RIS controllers.
Alarms
Active alarms are listed in the bottom left corner and colour coded according to
severity. For additional information about alarms, see table of module alarm
descriptions in the "Alarms" chapter.
Measurements
The “TEMP” field displays E3’s internal temperature. It is typically 10…25
degrees above ambient temperature depending on installation.
The “AC” field is visible only with remote powered E3 model and shows the
measured RMS value of the remote supply voltage. This value is calculated
using sliding average and thus reacts quite slowly to changes.
The background colour of each field shows the parameter's alarm status.
Notes
The “Notes” field allows storing up to 200 character message into unit non-
volatile memory.

User Manual E3
59300623 Rev.001
5.4.2018 19(20)
Properties viewer page
Figure 8. The Properties page
The “Properties” page displays unit identification and statistics data.
Identification
A descriptive alias name for the station can be entered into the “Name” field,
site location into “Location” field and contact information into “Contact” field. All
these fields can contain up to 63 characters.
The geographical coordinates can be entered into respective latitude and
longitude fields. The preferred format for the coordinates can be selected from
the "Format" drop-down field. When entering coordinates, special characters
(º/'/") can be simply omitted.
The "Save RIS info" button opens a dialog for saving RIS identification data to a
file. This file can then be used for adding the amplifier to management system.
Properties
The type, hardware version, serial number and software version are shown for
both station and RIS module. RIS module MAC address used for remote
communication is displayed here and on RIS module front panel.
Statistics
The “Uptime” field shows the time since the last reset or power up. The format
is days, hours, minutes and seconds, with ±5 s/day accuracy.
The "Total uptime" field shows the total number of full operating days.
The "Reset count" field shows the total number of resets.
Security
The PIN code can be enabled to protect the E3 local user interface from
unauthorised access. When a value other than 0000 is entered, the correct PIN
needs to be entered every time the local user interface is used. Note that the
PIN is not needed for PC/smartphone/tablet configuration via E61.

User Manual E3
59300623 Rev.001
5.4.2018 20(20)
Legal declarations
Copyright © 2018 Teleste Corporation. All rights reserved.
TELESTE is a registered trademark of Teleste Corporation. Other product and
service marks are property of their respective owners.
This document is protected by copyright laws. Unauthorized distribution or
reproduction of this document is strictly prohibited.
Teleste reserves the right to make changes to any of the products described in
this document without notice and all specifications are subject to change without
notice. Current product specifications are stated in the latest versions of
detailed product specifications.
To the maximum extent permitted by applicable law, under no circumstances
shall Teleste be responsible for any loss of data or income or any special,
incidental, consequential or indirect damages howsoever caused.
The contents of this document are provided "as is". Except as required by
applicable law, no warranties of any kind, either express or implied, including,
but not limited to, the implied warranties of merchantability and fitness for a
particular purpose, are made in relation to the accuracy, reliability or contents of
this document.
Teleste reserves the right to revise this document or withdraw it at any time
without notice.
Teleste Corporation
P.O. Box 323
FI-20101 Turku
Street address: Telestenkatu 1, 20660 Littoinen
FINLAND
www.teleste.com
Free and open source software components (FOSS LIST)
“rsnewlib”, RedSuite (FULL) newlib: http://www.code-red-tech.com/RedSuite5/red-suite-5.php
“f4usb”, STM32F4xx USB xxx Library: MCD-ST Liberty SW License
Agreement V2:
http://www.st.com/software_license_agreement_liberty_v2
“freertos”, FreeRTOS: modified GPL, http://www.freertos.org/a00114.html
“dspic”: MPLAB X (free edition): http://www.microchip.com/pagehandler/en-us/family/mplabx/#documentation
“redlib”, RedSuite (FULL) redlib: http://www.code-red-tech.com/RedSuite5/red-suite-5.php
"dspic": MPLAB X (free edition): http://www.microchip.com/pagehandler/en-us/family/mplabx/#documentation
“steeprom”: http://www.st.com/web/catalog/tools/FM147/CL1794/SC961/SS1743/PF257846
“cdc”: UART to CDC Modem Sample Application: http://www.ftdichip.com/Firmware/Precompiled.htm
Table of contents
Other Teleste Amplifier manuals