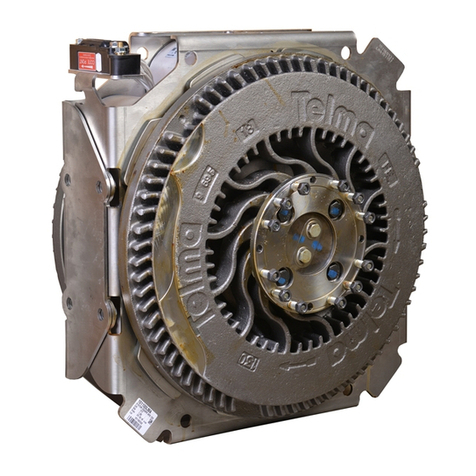
Telma TL113046 User manual

15sep21jh
TL113046
INSTALLATION MANUAL
FOR TELMA AF50-90
ON FORD F650
WITH SPL100 U-JOINTS
FROM MODEL YEAR 2017

TL113046
Installation Manual Ford F650 TELMA AF50-90 SPL100 relay box 124 UIM
Page 2 of 18_____________________________________________________________________________15sep21jh
TABLE OF CONTENTS
Preface - Scope of this manual
1 Preparation of the Chassis
1.1 Driveline
1.2 Exhaust
2TelmaInstallation
2.1 Installation Kit TIK10611
2.2 Installation of the Chassis Brackets
2.3 Retarder Bracket Installation
2.4 Installation of the Telma in the Chassis
2.5 End and Top View
2.6 Drive Shaft Modification and Installation
2.7 Exhaust Modification
3ControlComponents
3.1 Relay Box Installation
3.2 Light Bar Installation
3.3 TRCM Installation
4 Wiring Harness Installation
4.1 Harness Assembly Layout
4.2 Power Harness Installation
4.3 Control Harness Preparation and Installation
4.4 TRCM2 Configuration
4.5 Wiring Diagram
5 Recommended Tools
6 Post Install Checklist
7 Installation Drawings

TL113046
Installation Manual Ford F650 TELMA AF50-90 SPL100 relay box 124 UIM
Page 3 of 18_____________________________________________________________________________15sep21jh
SCOPE OF THIS MANUAL
This manual covers the installation of Telma into the Ford F650 chassis equipped with
Spicer SPL100 driveline. This manual and the kit listed is not compatible with driveline
u-joint sizes larger than SPL100. Contact Telma engineering support at
on a chassis equipped with larger u-joint sizes.
Due to the variations of the Ford F650 chassis which can have many different options
which affect the driveline such as engine choice, air or hydraulic brakes, and air or
spring suspension, it is necessary to submit an installation drawing request using our
Online Installation Drawing Request Form. TIL03019 Chassis Measurement Templates
and TIL03020 Driveline Retarder Pre-Installation Measurement Guide can be used as
worksheets to gather the necessary information. Contact Telma engineering support at
SECTION 1 PREPARATION OF THE CHASSIS
1.1 DRIVELINE
Remove the complete drive-shaft assembly after measurements have been taken.
1.2 EXHAUST
Remove the exhaust just past the DPF sensors.

TL113046
Installation Manual Ford F650 TELMA AF50-90 SPL100 relay box 124 UIM
Page 4 of 18_____________________________________________________________________________15sep21jh
SECTION 2 RETARDER INSTALLATION
2.1 INSTALLATION KIT TIK10611
PART NUMBER DESCRIPTION QTY
LBA101158
A
F50-90 12V 1480/1550/1610 1
JZ1007XX-45 Rubber mount kit 1
TIB01017 CONTROL/RELAY BOX BRACKET 2
TIB03100 Control Module Bracke
t
1
TIB03104 UNIVERSAL CHASSIS BRACKET 2
TIB03107 TOP WASHER FOR AXIAL RETARDER BRACKET 4
TIB07010
A
F5 retarder bracket - Zero De
g
rees 2
TID15005 HARNESS ASSEMBLY 8G_2G TRCM2 with rela
y
box 124 1
TID31020 UIM C
A
N harness 1
TID31015 CAN extension harness 1
TIF01064 hex head bolt 1/4 - 28 x 1.25
g
rade 8
y
ellow zinc for TRCM mountin
g
2
TIF01066 n
y
lon insert locknut 1/4-28UNF for TRCM mountin
g
2
TIF03001 all metal lock nut 3/8-24UNF 16
TIF05010 LOCKWASHER 5/16 SPLIT 4
TIF05011 NUT 5/16 4
TIF05012 BOLT 5/16-18UNC x 1-3/4 HEX HEAD G5 4
TIF05013 BOLT 1/2-13UNC x 1-1/2 HEX HEAD G5 2
TIF05014 LOCKWASHER 1/2 MED SPLIT 2
TIF05025 5/8-18 x 2 GRADE 8 HEX FLANGE CAP SCREW 2
TIF05026 5/8-18 GRIP FLANGE LOCKNUT 2
TIF05031 1/2 - 20 X 1.75 flan
g
ed head bolt 8
TIF05032 1/2 - 20 flan
g
ed nu
t
8
TIF07001 M12 x 1.75 x 35 Grade 10.9 DIN 933 Black Phosphate 200+ Salt 6
TIG11010 TELMA LIGHT BAR DISPLAY 1
TIG31075 TRCM2a control module 1
VF201382 Trep Washer 6
Note1: SPL90 flange yokes 2 x Spicer part number 90-2-19 must be ordered separately.

TL113046
Installation Manual Ford F650 TELMA AF50-90 SPL100 relay box 124 UIM
Page 5 of 18_____________________________________________________________________________15sep21jh
2.2 INSTALLATION OF THE CHASSIS BRACKETS
Remove any bolts such as battery box and/or exhaust hanger mounts that will interfere with the
chassis bracket mounting
Mark the reference hole at dimension T1 from the outside top of the frame down to the reference
hole and at dimension CC from the center of the transmission u-joint.
Drill a 5/8” hole in the frame and bolt the chassis bracket (TIB03104) against the outside of the
frame rail using the reference hole in the bracket.
Rotate the bracket to the angle specified on the installation drawing and tighten the reference bolt
and nut to 150 lb-ft (±10%) to hold the bracket in place at the correct angle.
Note: Use an electronic angle meter with 0.1° accuracy (e.g. Mitutoyo Pro 360 950-
317 digital protractor). Use “alt zero” to get a frame reference of zero degrees so
that all angles are measured with the frame at 0°. In order to maintain the frame
reference, do not rotate the angle meter in the horizontal plane after setting alternate
zero.
Drill four 1/2” holes in each chassis bracket and frame rail evenly distributed across the chassis
bracket using existing holes when possible. Keep away from fuel and brake lines and secure with
the 1/2”-20UNF x 1.75” flanged bolts (TIF05031) and 1/2”-20UNF flanged lock nuts (TIF05032)
included in the kit. Tighten to 100 lb-ft (±10%).
Drill through the chassis bracket any holes needed for battery box and/or exhaust hanger mounts
and reinstall the original bolts that were previously removed.
OUTSIDE VIEW DRIVER SIDE FRAME RAIL

TL113046
Installation Manual Ford F650 TELMA AF50-90 SPL100 relay box 124 UIM
Page 6 of 18_____________________________________________________________________________15sep21jh
2.3 RETARDER BRACKET INSTALLATION
Attach the retarder brackets TIB07010 to the retarder as shown below according to the
position indicated on the installation drawing.
Use three of the M12x1.75x35mm bolts with nylon patch lock (TIF07001), and Trep washers
(VF201382) provided with the kit to fasten each Telma bracket onto the side of the unit. Tighten
bolts to 35 lb.-ft. (±5 lb-ft).
POSITION 1
--------------------------------------------------------------------------
POSITION 2

TL113046
Installation Manual Ford F650 TELMA AF50-90 SPL100 relay box 124 UIM
Page 7 of 18_____________________________________________________________________________15sep21jh
2.4 INSTALLATION OF THE TELMA IN THE CHASSIS
Assemble the mounts to the Telma brackets as shown below with the male portion of the mounts
on the bottom side of the brackets.
Use fasteners included in the rubber mount kit JZ1007XX-45 to attach the Telma and bracket
assembly to the chassis brackets which were installed previously.
Install the Telma, equipped with the brackets and rubber mounts to the chassis brackets in the
hanging position.
As shown below, secure the Telma to the chassis bracket using the M16x2.0x110mm long bolts
through the holes in the chassis brackets, mounts and retarder brackets. At each mount, install
two M16x71mm (2.80”) diameter flat washers (one on each end of the rubber mount, one M16
spring washer under the head of the bolt and another between the large diameter flat washer
and the M16 all metal lock nut. Tighten to 150 lb.-ft. (±10%).
Place ¼” square washer TIB03107 on top of chassis bracket at each mount and tack weld in
place after retarder is in final position.

TL113046
Installation Manual Ford F650 TELMA AF50-90 SPL100 relay box 124 UIM
Page 8 of 18_____________________________________________________________________________15sep21jh
2.5 END and TOP VIEW - TELMA INSTALLED IN CHASSIS

TL113046
Installation Manual Ford F650 TELMA AF50-90 SPL100 relay box 124 UIM
Page 9 of 18_____________________________________________________________________________15sep21jh
2.6 DRIVE SHAFT MODIFICATION AND INSTALLATION
A slip assembly is required on each side of the Telma. The slip position should be at center of slip travel when the shaft
is installed.
Refer to chassis manufacturers guidelines for proper drive shaft manufacture, balance, straightness, and critical speed
limits.
Refer to the installation drawings for approximate shaft lengths.
Always verify proper shaft lengths before modification.
Connect the flange yoke to the Telma coupling flange using 3/8-24UNF all metal locknuts TIF03001.

TL113046
Installation Manual Ford F650 TELMA AF50-90 SPL100 relay box 124 UIM
Page 10 of 18_____________________________________________________________________________15sep21jh
2.7 EXHAUST MODIFICATION
If necessary, modify the exhaust to go around the Telma (for example four 45° bends).

TL113046
Installation Manual Ford F650 TELMA AF50-90 SPL100 relay box 124 UIM
Page 11 of 18_____________________________________________________________________________15sep21jh
SECTION 3 CONTROL SYSTEM COMPONENTS INSTALLATION
3.1 RELAY BOX MOUNTING
Mount the relay box brackets 2 x TIB01017 to the relay box using the 5/16” bolts, nuts, and lock
washers supplied in the kit.
Mark and drill two ½” holes in the frame using the relay box and bracket assembly as a guide. Install
the relay box and bracket assembly to the inside of the left frame rail using the ½” bolts and lock
washers supplied in the kit.
Tighten the four 5/16” bolts to 17 lb-ft (±10%) and the two ½” bolts to 75 lb-ft (±10%).
NOTE: Brackets TIB01017 are not needed if the relay box is to be mounted to the outside of the frame
rail.
3.2 LIGHT BAR INSTALLATION
The Light Bar should be mounted so that it is easily visible to the driver.
Make a rectangular hole 7/8” wide x 1 ¾” tall in the lower dash to the right of the steering column or install the Light Bar
in an existing console receptacle.
Plug the Light Bar harness TID31014 on to the Light Bar TIG11010.
Feed the harness with the Light Bar connected through the hole.
Plug the Light Bar into the hole
PANEL OPENING

TL113046
Installation Manual Ford F650 TELMA AF50-90 SPL100 relay box 124 UIM
Page 12 of 18_____________________________________________________________________________15sep21jh
3.3 TRCM INSTALLATION
Mount the TRCM under the driver side dash using bracket TIB03100 high enough and with wiring
oriented to be away from driver interference.
SECTION 4 WIRING HARNESS INSTALLATION
4.1 HARNESS ASSEMBLY LAYOUT

TL113046
Installation Manual Ford F650 TELMA AF50-90 SPL100 relay box 124 UIM
Page 13 of 18_____________________________________________________________________________15sep21jh
4.2 POWER HARNESS INSTALLATION
From the relay box, route the Telma power connection and ground harness along the inside of the
frame rail and up over the top along the middle of the Telma.
Connect the 8G orange, blue, yellow, and brown wires to the connecting block at the top right
corner.
Connect the 8G relay box ground cable and the 2G Telma main ground cable to the insulated
ground terminal at the Telma top left corner. Coat the terminals with anti-corrosion paint or body
undercoat after the connections are made.
Secure the harness to the center of the Telma brackets with rubber coated cable clamps. The
harness should be secured along the centerline of the Telma and as far away as possible from
either rotor to avoid heat damage to the harness. No cables should cross the heat outlets in the
periphery of the rotors.
Connect the black 2G ground cable and to negative terminal of the battery pack or frame mounted
battery pack ground point. Secure the cable with rubber coated cable clamps.
Connect the red 2G power positive cable to the positive terminal of the battery pack or battery
disconnect switch. Secure the cable with rubber coated cable clamps.
GROUND CONNECTION AT
TOP LEFT CORNER
SECURE HARNESS TO
RETARDER USING RUBBER
COATED CABLE CLAMPS
POWER CONNECTIONS AT
TOP RIGHT CORNER

TL113046
Installation Manual Ford F650 TELMA AF50-90 SPL100 relay box 124 UIM
Page 14 of 18_____________________________________________________________________________15sep21jh
4.3 TRCM HARNESS INSTALLATION
Follow the OEM harness and route the control harness equipped with two plugs labeled “relay box’ and “light bar”
along the inside of the left frame through the firewall and into the cab on the left side. Connect the main harness to the
cab harness at the connector labeled “TO RELAY BOX”.
Find the TRCM2a harness TID31024 and insert the gray and black 12way plugs into the module.
Open the lower dash panel on the passenger side and find the Universal Interface Module (UIM) plug. Contact Telma
technical department if the optional UIM is installed.
Plug the Telma UIM harness TID31020 into the UIM plug. Route the harness across to the left side and connect to the
TRCM2 harness plug labeled “vehicle CAN”. If necessary, use the CAN extension harness TID31015 to reach the
TRCM2.
Plug the connector of the control harness labeled “relay box” into the connector of the TRCM2 harness labeled “relay
box”.
Plug the connector of the control harness labeled “light bar” into the light bar harness previously installed.
Connect the red/white wire labeled “ign+” to 5 amp fused ignition source.
Connect the black wire labeled “ground” to a good chassis ground source.
NOTE1: If the hand control option has been specified by the customer the hand control switch TIG31073 can be
installed using the hand control harness TID31021.
NOTE2: The transducer connector in the TRCM2 harness is not used for this application.

TL113046
Installation Manual Ford F650 TELMA AF50-90 SPL100 relay box 124 UIM
Page 15 of 18_____________________________________________________________________________15sep21jh
4.4 TRCM2 CONFIGURATION
After installation is complete, connect the PC to the TRCM2 using a usb-a to usb-c cable to configure and test the
system as follows.
Do not turn on the vehicle ignition or start the vehicle at this time.
Plug the usb cable into the computer
Open the TRCM2 Telma software. The TRCM2 Software is a free download from
https://telmausa.com/Downloads/TRCM2.exe
Plug the usb cable into the TRCM2 usb-c board connector through the hole in the TRCM2 housing. In the
configuration section of the TRCM2 software just above the green start button you should see “TRCM2 connected
to COM”.
Left click on the green start button. Data Status should change to a green check mark.
Under “Edit Programmed Values” choose the CAN drop down “Ford all from MY2020” and the “Low Speed Cutoff”
drop down to 0mph.
Under “Input Selection” choose “vehicle CAN”.
Under “Output Selection” choose “Relay Box”.
Under “CAN Brake Pedal Setpoints” type the following settings stage 1=1, stage 2=3, stage 3=5, and stage 4=7.
Do not enable “Bluetooth” or “Dual Config”.
Left click on the blue “Program Module” button and check on the right side that “Current Module Values” change
to the settings you have chosen.
Start the vehicle and verify that “CAN Status” shows a green check mark.
Left click on the “diagnostics” tab.
Push on the brake pedal and observe that
1) “Brake Position” in lower right corner changes from 0% to some higher number.
2) “Relay Control Outputs” stages 1-4 turn on progressively as brake pedal is pushed further (speed set to
zero). All four stages should be on when “Brake Position” box reaches 4%.
Release the brake pedal and left click on the Configuration tab.
Choose the “Low Speed Cutoff” of 2.0.
Left click on the “Program Module” button and verify that under “Current Module Values” that Low Speed Cutoff
has changed to 2.0 mph and that all other settings are still at the settings mentioned above.
Close the TRCM2 software
Disconnect USB cable from module
Turn off vehicle ignition.
Congratulations, you are finished configuring TRCM2.

TL113046
Installation Manual Ford F650 TELMA AF50-90 SPL100 relay box 124 UIM
Page 16 of 18_____________________________________________________________________________15sep21jh
4.5 WIRING DIAGRAM
SECTION 5 RECOMMENDED TOOLS
Transmission Jack
Heavy duty drill motor
Standard assortment of mechanics hand tools
Vehicle hoist, pit, or floor jack with stands
Electrical terminal crimping pliers for use with non-insulated terminals
Electronic angle meter with 0.1° accuracy (e.g. SPI Pro 360 digital protractor)

TL113046
Installation Manual Ford F650 TELMA AF50-90 SPL100 relay box 124 UIM
Page 17 of 18_____________________________________________________________________________15sep21jh
SECTION 6 INSTALLATION FOLLOWUP CHECKLIST
TL133010
Revised
21
j
un16 INSTALLATION FOLLOWUP CHECKLIST CHASSIS #:
CHASSIS MAKE/MODEL:
Telma part number:
Telma Serial number:
End Customer:
Retain a copy of this checklist in the chassis VIN record
INSTALLER:
Record Telma serial number in electronic VIN record INSPECTION DATE:
INSPECTED BY:
√
X COMMENTS
ELECTRICAL
harness properly routed along center of Telma away from rotors
and secured with cable clamps to retarder bracket
minimum 1/4" clearance between chassis bracket and retarder
bracket
harnesses routed on inside of frame rail away from heat sources,
sharp edges, etc. and secured with rubber coated metal cable
clamps
correct cable eyelet size at battery / disconnect switch
relay box mounted vertical with wiring exiting from the bottom and
can be easily accessed
Telma battery power cable connected to battery switch or to battery
"+" terminal and is protected with corrosion inhibitor
Telma battery ground cable connected to frame rail bare metal
surface where battery pack is grounded or directly to battery
ground post and protected with corrosion inhibitor
relay box ground connected to retarder ground post
electrical connections (weatherproof connectors, no quick splice,
avoid butt connectors)
Light Bar Display installed correctly, visible to driver, and operates
properly
Telma Control Module accessible and secured with screws
Telma foot control shuts off automatically at 1mph
Telma activates when moving and brakes are applied
Connect PC to TRCM to check proper configuration and function
MECHANICAL
All fasteners are paint marked after tightening to proper torque
cables, hoses and air lines are at least 4" from rotors or heat shield
installed
drive shaft weld quality, slip installed on each side of Telma at
center of travel, balance, u-joints same quality as OEM
Transmission angle measurement
Telma angle measurement
First shaft angle and installed length measurement
Second shaft angle and installed length measurement
Third shaft angle and installed length measurement
Fourth shaft angle and installed length measurement
Axle angle measurement
drive shaft lengths/angles, transmission, Telma, and axle angle
conform to drawing
Flange yokes are in same plane

TL113046
Installation Manual Ford F650 TELMA AF50-90 SPL100 relay box 124 UIM
Page 18 of 18_____________________________________________________________________________15sep21jh
SECTION 7
INSTALLATION
DRAWINGS
(SUBMIT AN INSTALLATION DRAWING REQUEST ON OUR
WEBSITE AT https://telmausa.com/drawing-request)
Table of contents
Other Telma Industrial Equipment manuals


