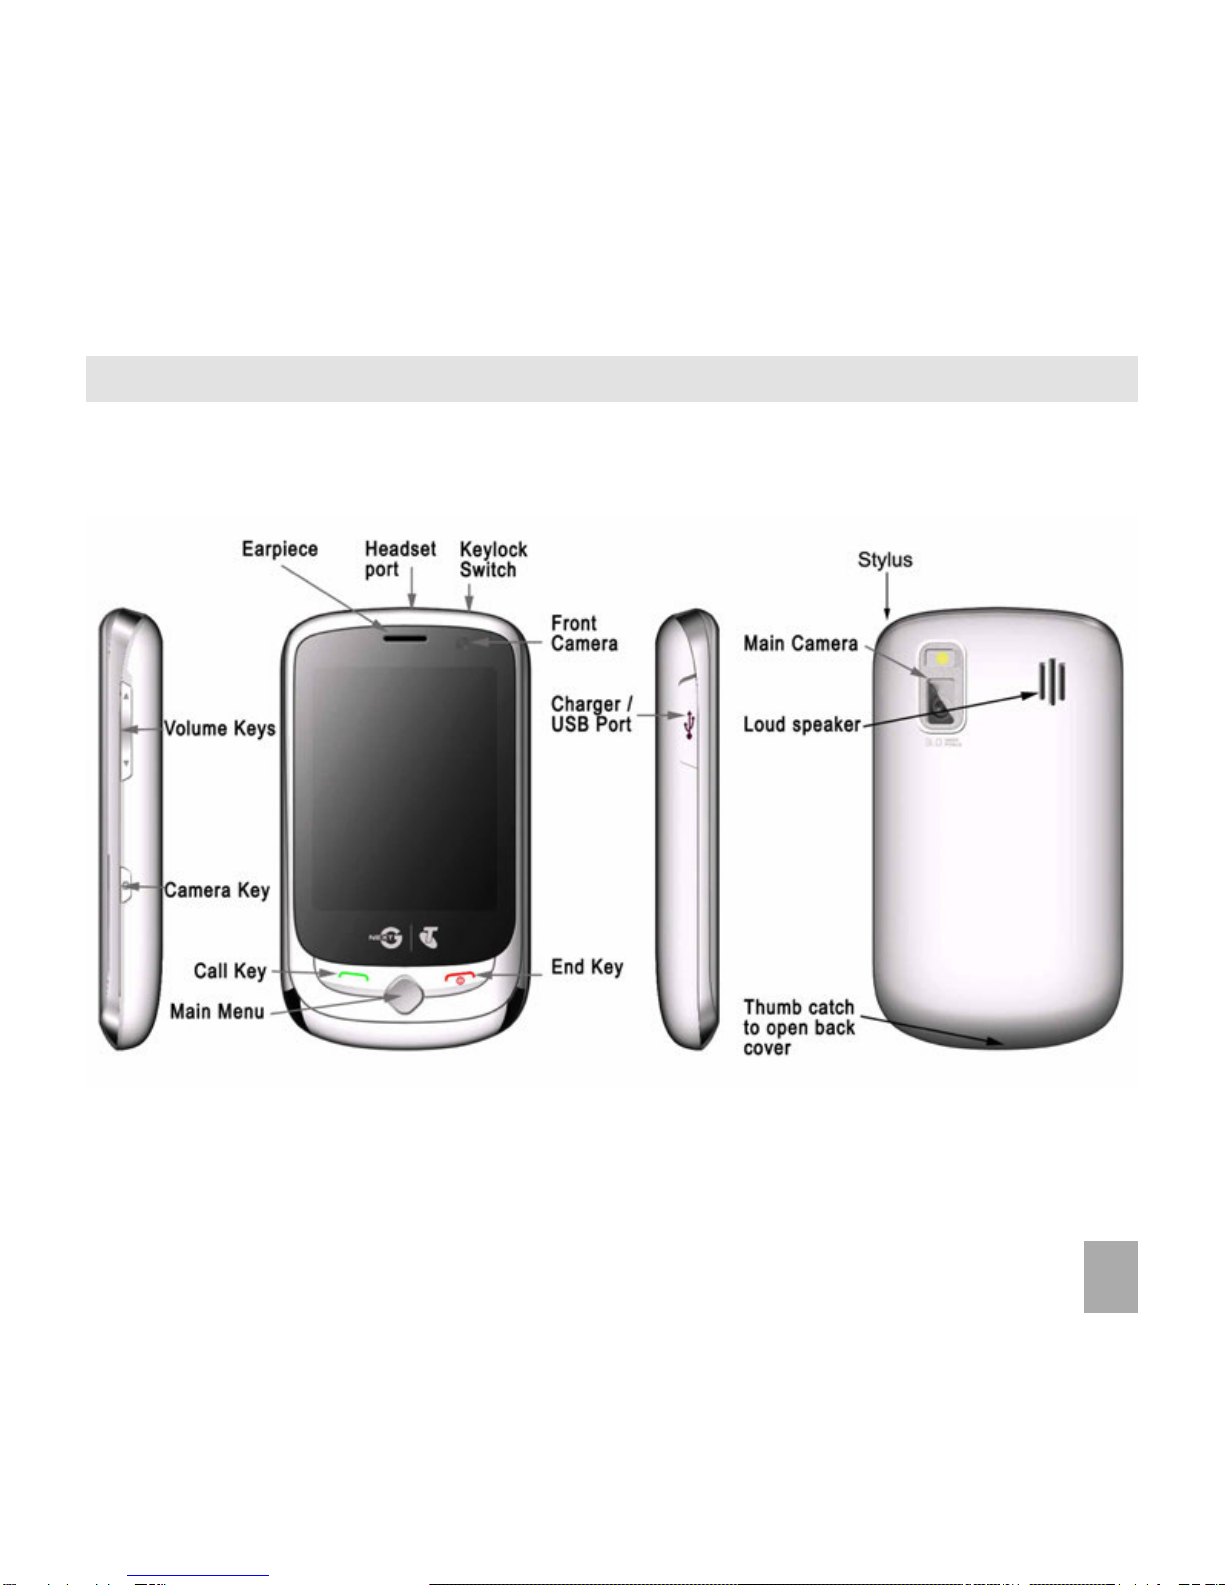
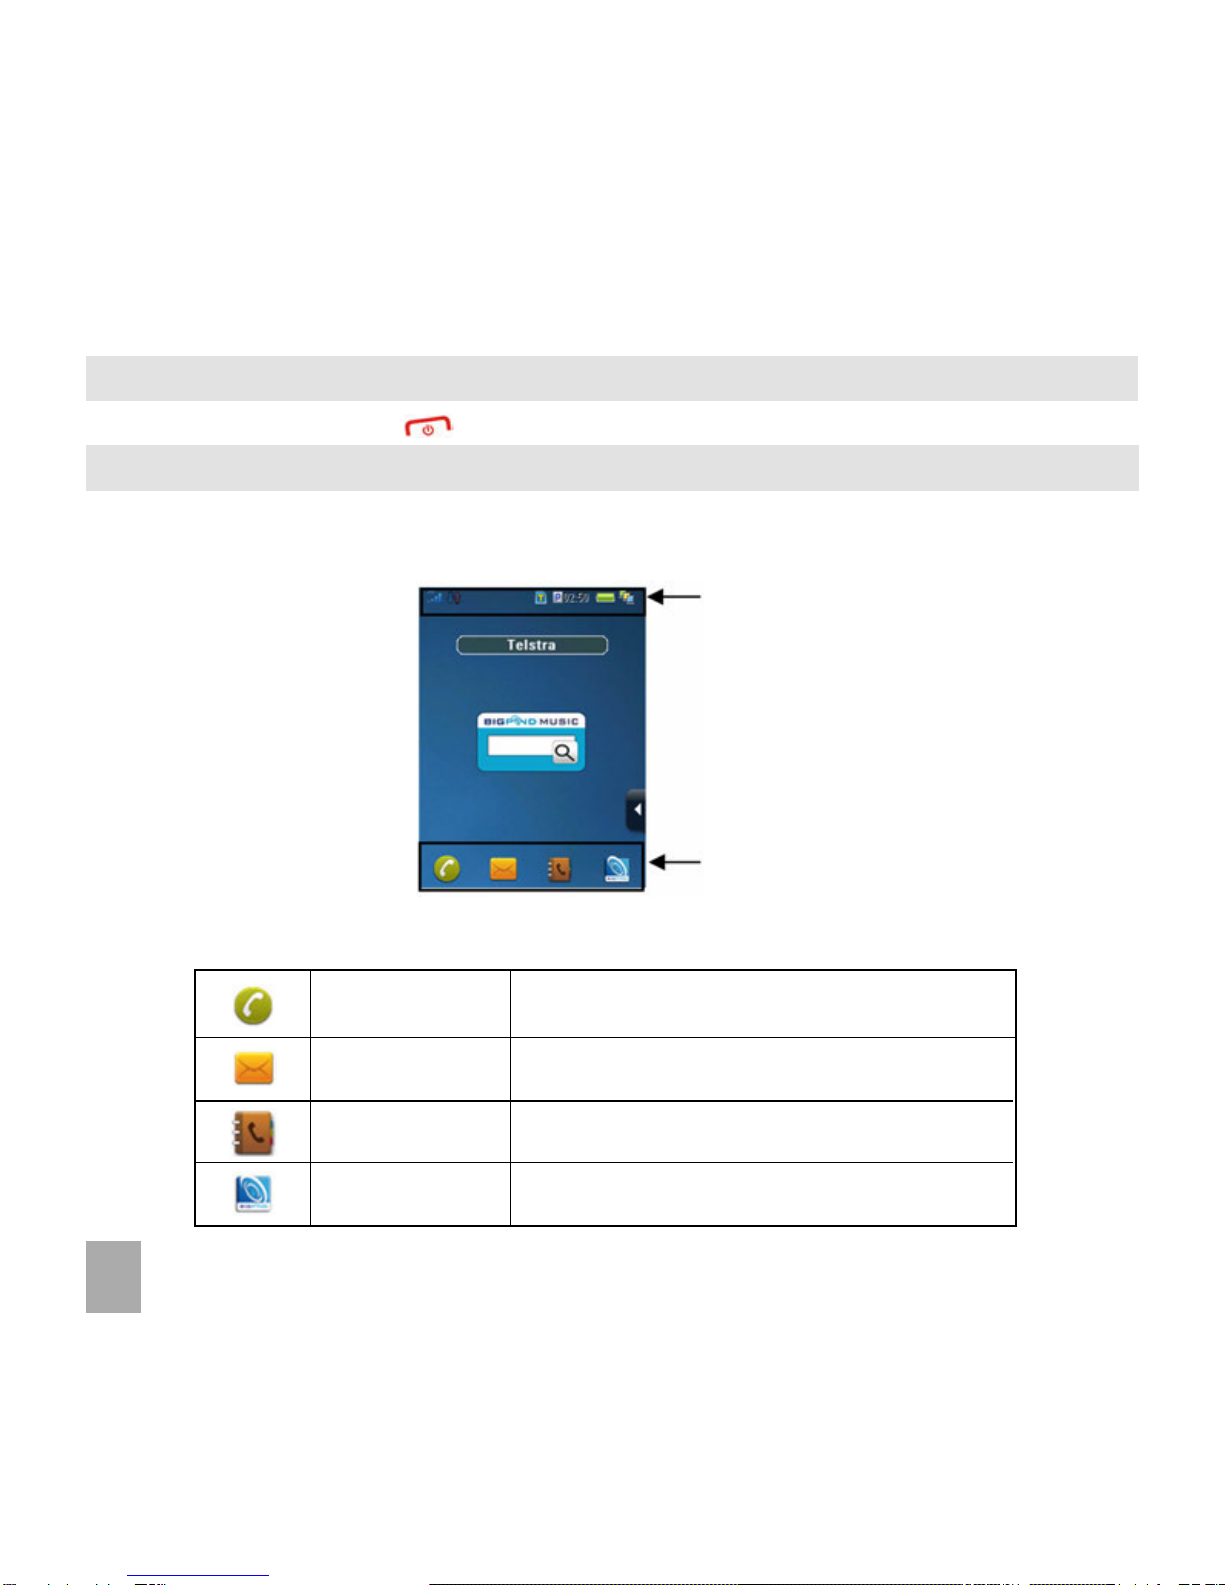
Telstra BubbleTouch T930 User manual

1
T
Te selstr
e s
elstra Ba Bubb
Ba
a Bubb TleT
T
leTouc
ouch
hT
TM
H DHSDP
H D
HSDP M t b d 3 b l onA Multi band 3G Mobile Phone
M b d 3 b l ont
A Multi band 3G Mobile Phone
UserManual
0 E o Al e e do 2 r g
Copyright © 2010 ZTE Corporation All rights reserved
1st Edition June 2010
No part of this publication may be excerpted, reproduced, translated or utilized in any form or by any
means, electronic or mechanical, including photocopying and microfilm, without the prior written
permission of ZTE Corporation.
ZTE Corporation operates a policy of continuous development. ZTE Corporation reserves the right to
make changes and improvements to any of the products described in this document without prior
notice.

2
I dn
1 Index
1
1e
eIndex
Index 3
3
2
m op I
Important Information 7
3Welcome 8
1
3 1 HandsetOverview 9
2
3 2 Turn your phone on and off 10
3
33 3
3 3 Idlescreen 10
4
3 4 TouchScreenControls 11
5
3 5 Desktopwidgets 12
6
3 6 Statusicons 13
7
3 7 Menuscreen 14
8
83 8
3 8 CustomisetheMainMenu 14
9
3 9 MenuMap 15
4
t et t
Getting Started 8
18
1
4 1 HowtoinserttheUSIMCard 18
2
4 2 Howtoinsertthebattery 19
3
34 3
4 3 HowtoswitchthephoneOnorOff 20
4
4 4 Howtoconnectthecharger 20
5
4 5 Tipsaboutchargingandbatterylife 21
6
4 6 Howtosetthetimeanddate 21
7
4 7 Howtolock/unlockthe phone 22
5
5
Basic Operation
Basic Operation 3
323
23
1
5 1 Howtomakeavoicecall 23
2
5 2 Howtoansweranincomingcall 23
3
5 3 HowtosendaTextMessage(SMS) 24
6n
Contacts 5
25
1
16 1
6 1 HowtoentermyContacts 25
2
6 2 HowtocopyallContactsfromaUSIMcard 25
3
6 3 HowtosearchmyContacts 25
4
6 4 HowtoaddaContactfromareceivedcallnumber 26

3
5
6 5 HowtoaddaContactfromareceivedSMS(TextMessage) 26
6
66 6
6 6 HowtosetadedicatedringtoneorimagetoaContact 26
7
6 7 HowtosetSpeedDialnumbers 27
8
6 8 HowtomakeacallusingSpeedDial 27
9
6 9 HowtoupdateanexistingContact 27
6 10 AdvancedContactOptions 28
7
7s
sCalls
Calls 9
929
29
1
7 1 HowtomakeaVoiceCall 29
2
7 2 HowtomakeaVoiceCallfrommyContacts 29
3
7 3 HowtoviewandmakeaVoiceCallfrommyCallHistory 29
4
7 4 CalloptionsduringanactiveVoiceCall 30
5
57 5
7 5 HowtoactivateSpeakerphone 30
6
7 6 HowtoansweraCall 30
7
7 7 Howtousetheheadphones(PersonalHandsfree) 31
8
7 8 HowtomakeaVideoCall 31
9
7 9 CalloptionsduringanactiveVideoCall 32
7 10
7 10 HowtoansweraVideoCall 33
7 11 HowtomakeEmergencyCalls 33
7 12 AdvancedCallSettings 34
7 13 CallOptionswhenConnectedtoaBluetoothdevice 36
8
s il
Messages and Emails 7
37
1
18 1
8 1 HowtosendaTextMessage(SMS) 37
2
8 2 HowtoviewareceivedTextMessage(SMS) 38
3
8 3 HowtousePredictiveText 38
4
8 4 SpecialCharactersandSMSMessageLength 39
5
8 5 HowdoIsendaMultimediaMessage(MMS)? 40
6
68 6
8 6 HowtoreceiveaMultimediaMessage(MMS)andsaveanattachment 41
7
8 7 MMSandSMSAdvancedSettings 41
8
8 8 WAPPushMessages 41
9
8 9 HowtosendanEmail 42
8 10 HowtoreceiveanEmail 43

4
8 11
8 11 HowtosetupautomaticEmailRetrieval 43
8 12 HowtocreateanewMailbox 44
9
s e
How to Personalise the Phone 5
45
1
9 1 ChangetheProfiles 45
2
9 2 ChangetheBackgroundScreen(Wallpaper) 46
3
39 3
9 3 ChangethedefaultRingtoneorMessageTone 46
4
9 4 EnableVibrateMode 47
5
9 5 SwitchtheKeytones off 47
6
9 6 ChangetheBacklightDuration 47
7
9 7 ChangetheDisplayBrightness 48
8
89 8
9 8 SettheKeyboardLight 48
9
9 9 SetKeylockTimeout 49
9 10 CalibratetheTouchScreen 49
9 11 AddIdleGreeting 49
9 12 AddaGreeting 50
9 13
9 13 WhatisthePINCode? 50
9 14 WhatistheHandsetSecurityCode? 51
9 15 AdditionalnotesonPINCodes 51
9 16 Touchscreen Vibrate mode 51
10
a E orM n r d r al
File Manager and External Memory 2
52
10 1
10 1 FileManager 52
10 2 AccesstheMemoryCard(iffitted)usingFileManager 53
10 3 InstallingAdditionalMemory-MicroSDcard 54
11
l ppms o
Alarms and Appointments 5
55
11 1 SetAlarms 55
11 2
11 2 SetAppointmentsusingtheCalendar 55
12
gin eu d V
Imaging - Pictures and Videos 7
57
12 1 HowtousetheCamera 57
12 2 HowtousetheVideoCamera 58
12 3 Viewingpicturesandvideos 59
13
13 Music
Music 0
060
60

5
13 1
13 1 FMRadio 60
13 2 BrowseandplaymusicfilesfromMyFiles 61
13 3 UsetheMusicPlayertoPlaymusicfiles 61
14 ec v
Connectivity 62
14 1 UsethephoneasaMassStorageDevicewithaMicroSDCard 62
14 2
14 2 Connectyour phoneto acomputer 62
14 3 InstallingJoinMe 63
14 4 UseJoin Me tocopy photosto your computer 64
14 5 UseJoinMetotransfermusicfromacomputer 66
14 6 EnterContactsusingJoinMe 68
14 7
14 7 CopyContactsfromthephonetothecomputer(createabackup) 69
14 8 ImportContactsfromMicrosoft Outlook 70
14 9 ExportContactstoOutlook 70
14 10 UseJoinMetosendanSMS 71
14 11 ImportCalendareventsfromMicrosoftOutlook 71
14 12
14 12 UseJoinMe to connect tothe Internet 72
14 13 ConnecttoaBluetooth Device 73
14 14 UseBluetoothto send files toanother device 74
14 15 ConnecttoaBluetoothCarKitorPersonalHeadset 74
14 16 DialUpNetworkingusingUSBorBluetooth 75
14 17
14 17 PCConnection 77
14 18 ConnectionsSummaryTable 77
15
c th
Other Facilities 78
15 1 Browser 78
15 2 Bluetooth 79
15 3
15 3 WorldTime 81
15 4 Calculator 81
15 5 Notes 82
15 6 Converter 82
15 7 Timer 82
15 8
15 8 Voice Recorder 82

6
15 9
15 9 GamesandApplications 83
15 10 Connections 83
15 11 AccessPointSettings 84
15 12 Restoredefaultsettings 84
15 13 DefaultMemory 84
15 14
15 14 NetworkSettings 85
15 15 YourHandsetisNetworkLocked 85
15 16 CTM 86
16
b n nl o T c l d I
Troubleshooting, Technical and Warranty Information 7
87
16 1 TroubleshootingandFAQ’s 87
16 2
16 2 ErrorMessages 90
16 3 TechnicalParameters 91
16 4 SupportInformation 92
16 5 WarrantyInformation 92
17
e a
Environmental Statement 3
93
18
18 l cn r d
n r l d cGeneral Safety and Maintenance Information
General Safety and Maintenance Information 4
494
94
t e e irPC Software Requirements
t ie e r
PC Software Requirements
JoinMePCSoftwareincludedsupportsMicrosoftWindows7,VistaandXP
Alimited versionofJoin Meissupplied thatsupportsMACOS10 5 11&above
gs t NoticWarnings and Safety Notices
gs t No ict
Warnings and Safety Notices
Pleasereadallthesafetynoticesbeforeusingthisdevice
Donotusethephoneatarefuellingpoint Donotusenearfuelorchemicals
Donottransportorstoreflammablegas,liquidorexplosivesinthesamecompartmentofyourvehicleasyourmobilephone
andaccessories

7
t r tp t
2 Important Information
fe n
RF Safety Information
The handset has an internal antenna located at the bottom of the phone. For optimum performance
with minimum power consumption do not cover the antenna area with your hand. Hold the handset
between thumb and finger in the middle of the device. Covering the antenna affects call quality, may
cause the handset to operate at higher power level than needed, and may shorten talk and idle times.
i F q nc g
Radio Frequency Energy
Thehandsetisalow-powerradiotransmitterandreceiver.Whenswitchedonitintermittentlytransmits
radio frequency (RF) energy (radio waves). The transmit power level is optimized for best performance
and automatically reduces when there is good quality reception. Maximum power is only used at the
edgeofnetworkcoveragesoundermostcircumstancesthepoweroutputisvery low.Underpoornetwork
conditions the phone transmits at a higher power, may get hot and have a significantly shorter battery
life.
e n n AR fi r )f t S
Declaration of Conformity - SAR (Specific Absorption Rate)
We declare under our sole responsibility that the product(s) detailed in this manual, and in combination
with our accessories, conform with the essential requirements of The Radio Communications Standard
(Electro-magnetic Radiation Human Exposure) 2003 and the Australian Communications and Media
Authority Section 376 of the Telecommunications Act 1997.
N14945

8
W3 W
W
3 Weelc
e
elcome
ome
Congratulations on choosing the Telstra BubbleTouchTM handset.Please take a few minutes to read the
user guide to help you get the most from your new mobile phone.
e tp a on
Operation
ec f e
Quick Reference
Handset overview, keypad and information bar Section 3 – Welcome
How to insert your SIM card and Battery Section 4 – Getting Started
Quick introduction to key features, Calls and SMS Section 5 – Basic Operation
Store a list of contact names and phone numbers Section 6 – Contacts
View calls received, dialled and missed Section 7 – Calls
Text messages – sending and receiving Section 8 – Messages and Emails
Personalise your phone, e.g. ringtone, screen saver Section 9 – Personalise…
Managing handset files and content Section 10 – File Manager
Setting alarms and reminders Section 11 – Alarms & Appointments
Using the camera – take photos, record a video Section 12 – Imaging
FM Radio, play and access your music files Section 13 – Music
Connecting to a PC to copy pictures and music Section 14 – Connectivity
Calculator, Stopwatch and more… Section 15 – Other Facilities
Troubleshooting, Technical and Warranty info Section 16 – Technical

9
3.1
O
Handset Overview

10
3.2
our d off
Turn your phone on and off
s
Press and hold the
End Key for
ec
two seconds to switch the phone ON or OFF.
3.3
ed e
Idle screen
Theidle screenisyour startingpointfor usingallthe applications onyour phone. Theidle screen displays
important information, such as shortcuts icons and status indicators.
Statusbar
Shortcut icons bar
Phone Make and receive calls.
Messaging Send and receive MMS, and text messages.
Contacts Save and manage your Contacts.
BigPond Link to BigPond.
Shortcuticons:

11
Tap the Status
Bar and
d p
slide up
to open the s
task
r
manager
3.4 Tc
ouc
h Scre
en C t
ontr l
ols
Touc
o
h or ta
ap
Tap or touch items on the screen to run the application or make a selection.Use the stylus to select with
greater precision and see Section 9.10 to calibrate the touch screen controls.
Swipe
Swipe your finger vertically to scroll through contacts, messages, music, photos, and more.
d
Slide
Pressandholdyourfingeronthe screentodrag.Whiledragging,donot releaseyourfinger untilyouhave
reached the target position.
Flick
Flickingthe screenis similar toswiping, exceptthatyou needtoswipe yourfinger inlight,quicker strokes.
This is always in a vertical direction, such as flicking through your contacts list.
T
e
ask Manager
The handset supports multi tasking - You can
run multiple applications simultaneously.
Tap the status bar and slide your finger up to
view the T
ka
ask Manager.
From within an application press the
nE
End key
to end the application.
Press the n
Menukey to select and start another
application.

12
3.5
sk o wie s
Desktop widgets
You can customize your idle screen to display applications,shortcuts,and widgets.
Follow the steps to customise your desktop widgets:

13
3.6
st n
Status icons
The status bar icons keep you informed of the phone settings and current status:
3G Signal Strength
EDGESignalStrength
Flight Mode
New SMS
NewMMS
New Email
NewWapPushMessage
ServiceProviderSMS
AM/PM
High speed data connected
Message Box Full
Email Box Full
Multi Tasking
Missed Voice Call
Missed Video Call
Bluetooth
Data available (not in use)
Data connected
Call Forward Active
CTM Mode
Battery
Alarm
Silent
Meeting & Vibrate Mode
Vibrate Mode
Headset Mode
microSD Card
USB Disk Mode
Roaming
Car kit attached

14
3.7
Menu screen
Press the
e ye
Menu Key to open main menu screen.
Slide left and right to switch between screens or select using the row of dots along the bottom:
3.8
eu t M n
Customise the Main Menu
Ta
ap the Set ni
ting button to customise the
Min
Main Menu screens to add or remove icons.
•Select from the available categories and tap the check box to select or unselect each item.
•Press Back to Save your choices.
(o e:
Note: If you exit by pressing the
E ye
End Key your choices will not be saved)
•
n ea ds t n
Handset Functions •tn
Entertainment •n
Business
•
o i eN
Social Networking •
p &
News, Sports & Weather •
E
Real Estate
•
l aa
Mail & Messaging •
c w
Technology News •ow lo
Downloads
•i
Banking •av
Travel •Po
BigPond
•
r sr o
Directory & Guides

15
3.9
M
Menu Map

16
Menu Map Continued…

17
Menu Map Continued…

18
t t4 G g d
4 Getting Started
4.1
r M
How to insert the USIM Card
The USIM card (UMTS Subscriber Interface Module) is the small plastic smart-card with gold contacts. It
holds personal information such as names and phone numbers. It can be moved between different
phonesifrequired.
e
Note:
Without the USIM card inserted you can still use applications such as FM radio, Camera etc.
•Remove the back cover using the thumb catch at the bottom of the handset.
•Insert the USIM card with the gold contacts facing down and the bevelled edge on the left hand side
as shown. Carefully slide it under the metal bar observing the correct orientation.


20
4.4
c e h r
How to connect the charger
Charge before initial use. The charger lead is keyed and
onlyfitsoneway.Alwaysinsertthechargerleadcarefully
with the B symbol facing the top of the phone.
f ee m
Do NOT use excessive force which may
ma B .
damage the USB socket.
m t U ra a t o s
Physical damage to the USB port is NOT
a yr
covered by warranty.
The phone can be charged by connecting the U
USB
lead to a computer or to the AC charger supplied.
If the phone is off after charging
g pr
long press the n
End
ey
Key to switch it on.
4.3
t onw t h e
How to switch the phone On or Off
Press and hold the red
k
End key for
o d
two seconds to switch the phone ON or O FF
OFF.
Enter (U)SIM PIN code – supplied with your USIM card.
Table of contents
Other Telstra Cell Phone manuals

Telstra
Telstra T95 User manual

Telstra
Telstra Cell Phone User manual

Telstra
Telstra EasyCall 2 User manual

Telstra
Telstra T108 User manual

Telstra
Telstra BUZZ User manual

Telstra
Telstra RUSH - T792 User manual

Telstra
Telstra TEMPO T815 User manual

Telstra
Telstra Frontier User manual

Telstra
Telstra T95 User manual

Telstra
Telstra T84 User manual

Telstra
Telstra Explorer T165 User manual

Telstra
Telstra T165i User manual

Telstra
Telstra Flip 2 T21 User manual

Telstra
Telstra T126 User manual

Telstra
Telstra Blade L5 User manual

Telstra
Telstra T106 User manual

Telstra
Telstra T86 User manual

Telstra
Telstra TOUGH T90 User manual

Telstra
Telstra Evolution T80 User manual

Telstra
Telstra T96 User manual