TEP REPLAY+ User manual

User Guide

2
Index
Welcome to TEP-REPLAY+.......................................................................................................................3
Getting started........................................................................................................................................3
Program Guide........................................................................................................................................4
Replay –watching past programs...........................................................................................................6
Using the Pause function ........................................................................................................................7
Rewind/Forward functions .....................................................................................................................8
Super fine Rewind and Fast Forward..................................................................................................8
Adjusting REW/FF steps in Settings ..................................................................................................10
Recording functions..............................................................................................................................11
Playing back recordings ........................................................................................................................12
Managing recordings ............................................................................................................................13
Using the Search Function ....................................................................................................................13
Using the search box.........................................................................................................................14
Automatic word completion.............................................................................................................15
Saved searches / search history........................................................................................................15
Search result list................................................................................................................................16
Managing my favorite channels lists ....................................................................................................17
Web-based Radio & Podcasts...............................................................................................................19
The Search section............................................................................................................................19
Movies and Series on Demand (VOD)...................................................................................................20
YouTube App.........................................................................................................................................21
Other Apps............................................................................................................................................21
Settings..................................................................................................................................................22
Display configuration ........................................................................................................................22
Changing the language......................................................................................................................22
Network configuration: activate Wi-Fi..............................................................................................22
Other settings ...................................................................................................................................22
Online documentation..........................................................................................................................22
3
Welcome to TEP-REPLAY+
Many thanks for having chosen TEP REPLAY+! We assume that by now you have connected and
started your REPLAY+ Box using the Quick Start Guide included in your package.
With the REPLAY+ Box you can navigate the standard TV features in a very intuitive, “standard TV
way”, so you might want to just go ahead and play. If, on the other hand, you prefer to begin with a
guided tour –read on!
Getting started
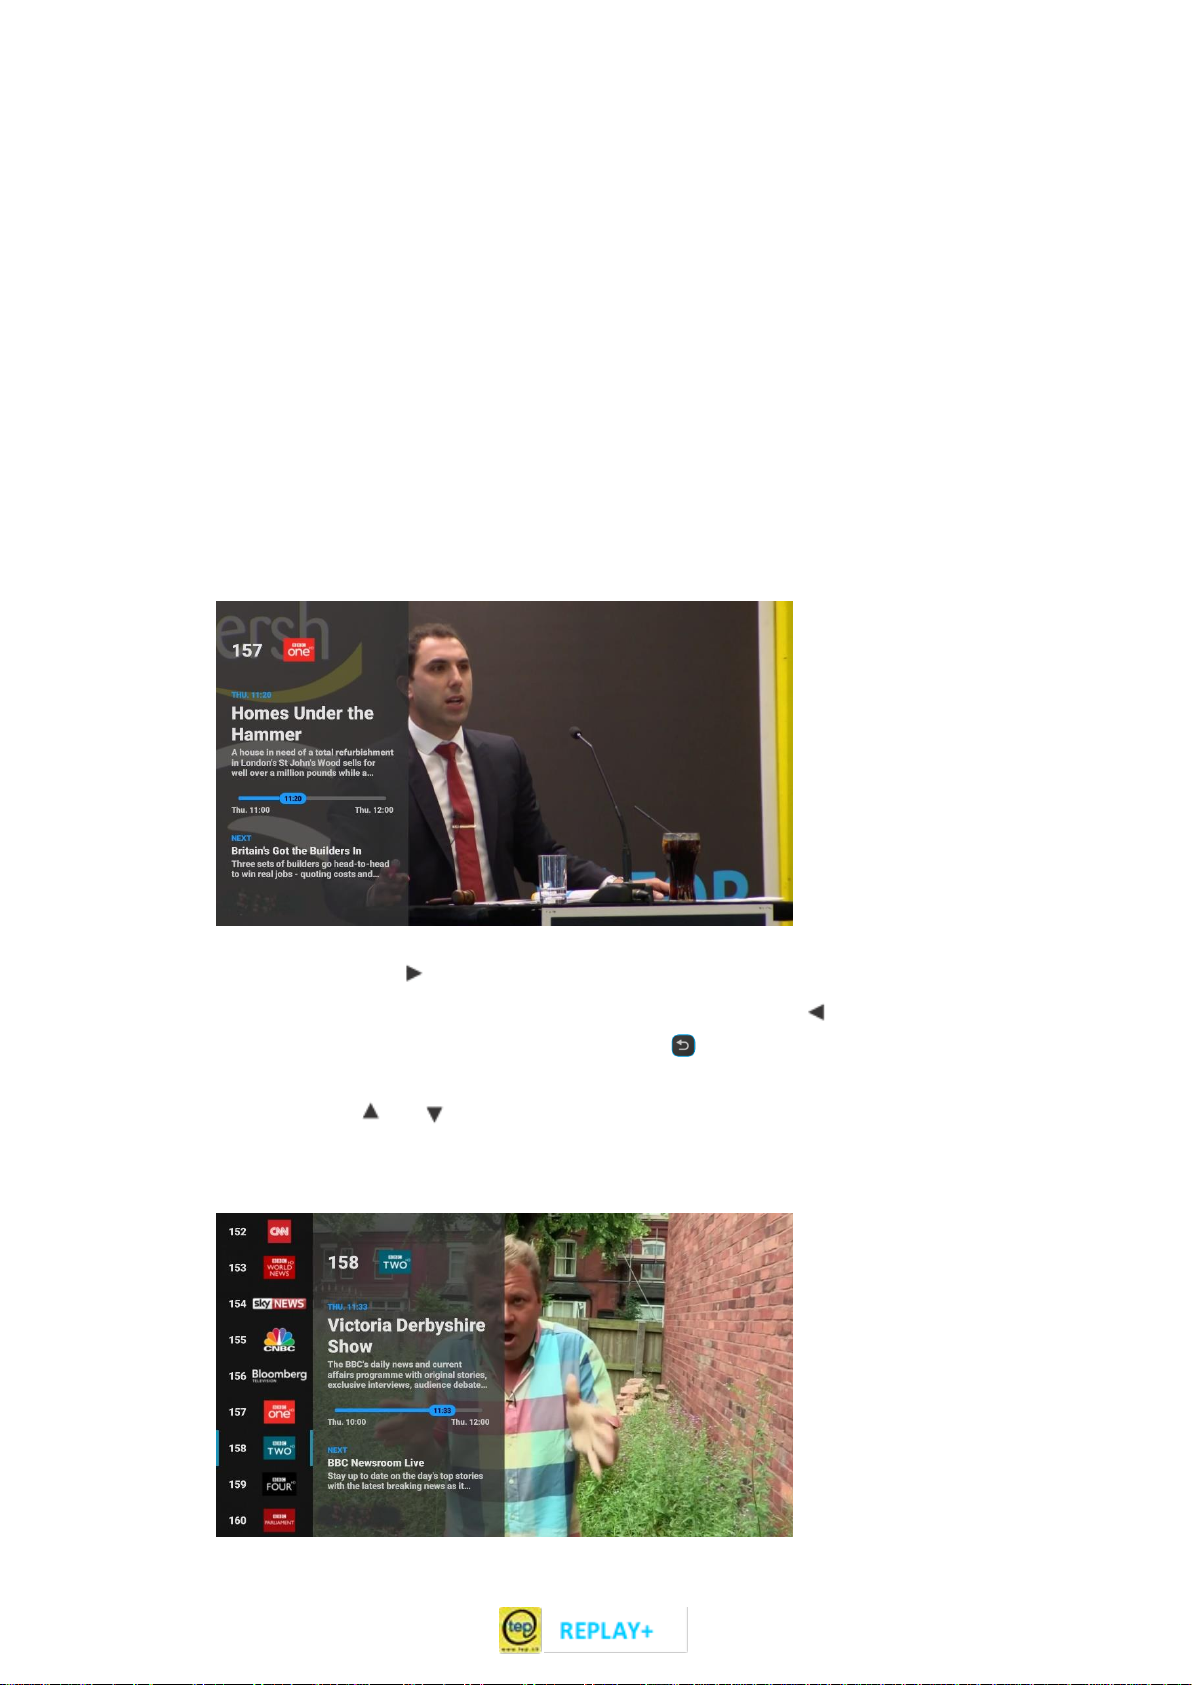
Your REPLAY+ Box will wake up in live TV mode and you will be able to watch the TV program right
away. While live TV is running, you can:
Use the OK button to see information about the show you are watching and the next show on
the same channel. This is called On Screen Display or OSD. It will automatically disappear after
a few seconds.
You can also use the arrow on your remote control to open the On Screen Display, and
again to open the detailed view and navigate inside it and use the arrow repeatedly to
close the various OSD screens one by one. Use the button to close all OSD screens at
once.
You can use the and arrows on your remote control. This will open the same OSD and
will also show the channel list. Select another channel and press OK to change channels
quickly.
4
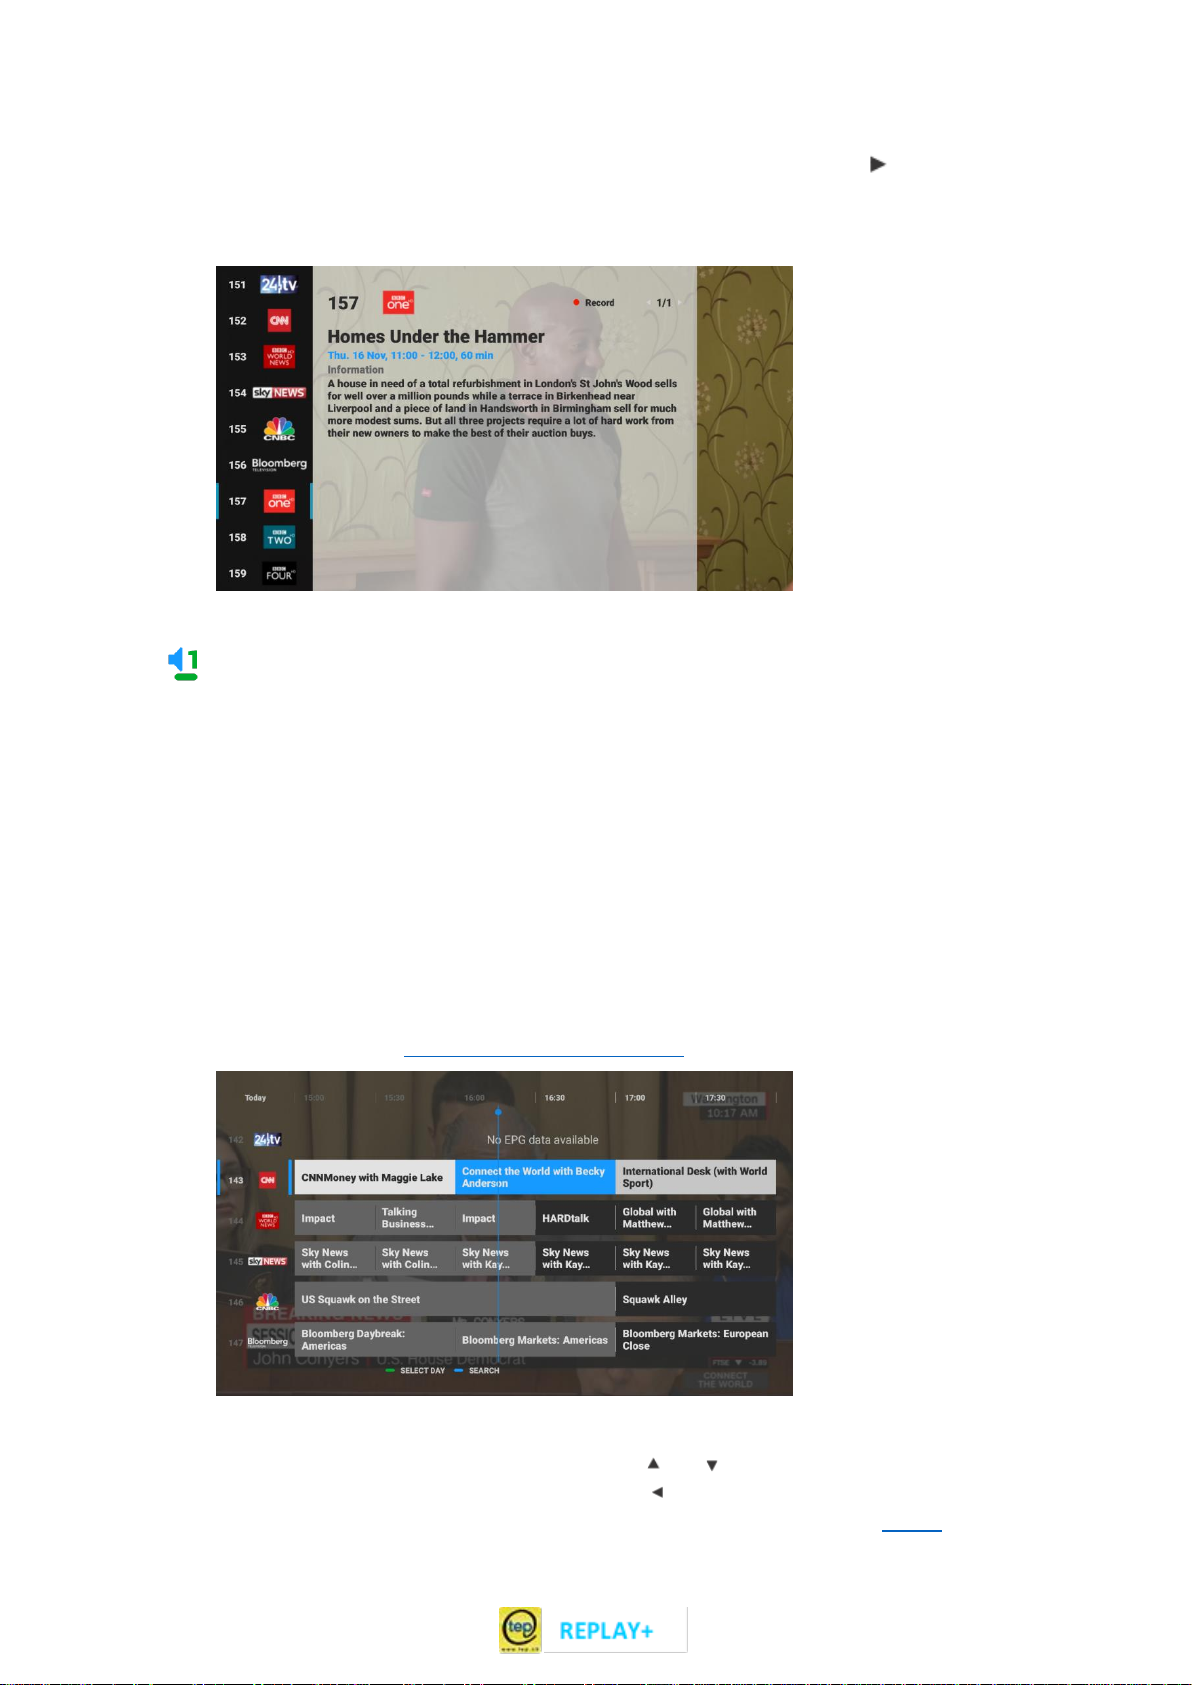
If you want to see more information about the current program, use the arrow to open a
more detailed view. The detailed view may have multiple pages and additional information
like genre, actors or director information, etc.
If you see this language icon, this means the current show may have multiple audio
languages. Use the green button to switch languages.
All functional areas of the REPLAY+ box are always accessible via the main menu by pressing the
MENU button.
Program Guide
Press the GUIDE button to see the on-screen Program Guide, also known as Electronic Program
Guide or EPG. The Program Guide always covers a two-week period –one week in the past and one
in the future. The shows are organized by channels and by showing times. To customize the channel
list to your preferences - see Managing my favorite channels
While in this Program Guide view, you can:
Navigate up and down the TV channels by using and buttons
Browse through past programs - move left using button. You can select past shows
provided by the Replay service, currently for up to 7 days in the past –see Replay

5
Browse through future programs - move right using the button. You can record future
shows –see Recording.
Use the green button to select a day on the calendar. The Program Guide will now show the
program for the selected day.
To exit the Program Guide and go back to watching Live TV, press or GUIDE or the TV
button.
Press OK to select the highlighted show
Pressing OK on the highlighted show will display details about this show like genre, title, episode
name, storyline, cast and other details (depending on availability).
You can:
read all info pages by using the or buttons –number of available pages is shown in the
top right corner
use the OK button to watch the selected show
-If this show has already ended, it will automatically start playing from the beginning
-If the show is currently running, a pop-up menu will show up where you will be able to
decide if you want to watch the show from the beginning or watch live

6
-If the show is in the future, you can switch to that TV channel (live TV)
use the REC button to record the selected show
use the button to leave the detailed view
Press or TV button to leave the Program Guide view and go back to Live TV.
Replay –watching past programs
The Replay function allows you to watch programs that are up to 7 days in the past. All programs
listed in the Program Guide are available for Replay.
Note: This is different from recorded programs, which you have to specifically select for recording.
Replay allows you to watch any program that was broadcast over the past 7 days. Your recorded
programs are stored in your Recording Library and remain available until you delete them.
Replay is activated simply by selecting and starting a past program from the Program Guide. The
program will start from the beginning and for a few seconds, you will see the On-Screen Display
which provides program information and navigation features.

7
Tips:
you can rewind, fast-forward and pause the playing show at any time.
while watching a show in Replay, use the TV button to continue watching Live TV on the
current channel at any time
while watching a show in Replay, use the STOP button to skip the currently watched show
and watch the next show. You can use the STOP button as many times as you want to skip
shows one by one until you reach Live TV.
Controls for Play, Pause, Rewind and Fast Forward.
Using the Pause function
You can pause any program at any time. This includes Live TV, Replay and Playback of recorded
programs. The On-screen Display provides information and navigation features in Pause mode.
Pause can be max 24h.
You can rewind, fast-forward and pause/play at any time. As soon as you pause a show, the current
playback position will be displayed in the OSD for easy reference. Press the TV button or the STOP
button to continue watching Live TV on the current channel at any time.

8
Rewind/Forward functions
Super fine Rewind and Fast Forward
You can now fast forward and rewind any running show in much finer steps than before. Also you
will experience a much faster resume of playback after you use FF/REW buttons. Since some people
prefer faster seeking whereas others prefer a more comfortable operation, we added several new
FF/REW settings in the Settings menu, so that everyone can adjust the TV Box to their liking.
Live indicator
Press the OK button and
you will see if you are
watching live or not. If you
do not see the red LIVE
bubble, you can press the
STOP button as many
times as needed until you
reach live playback.
You now also see the
current time in seconds.
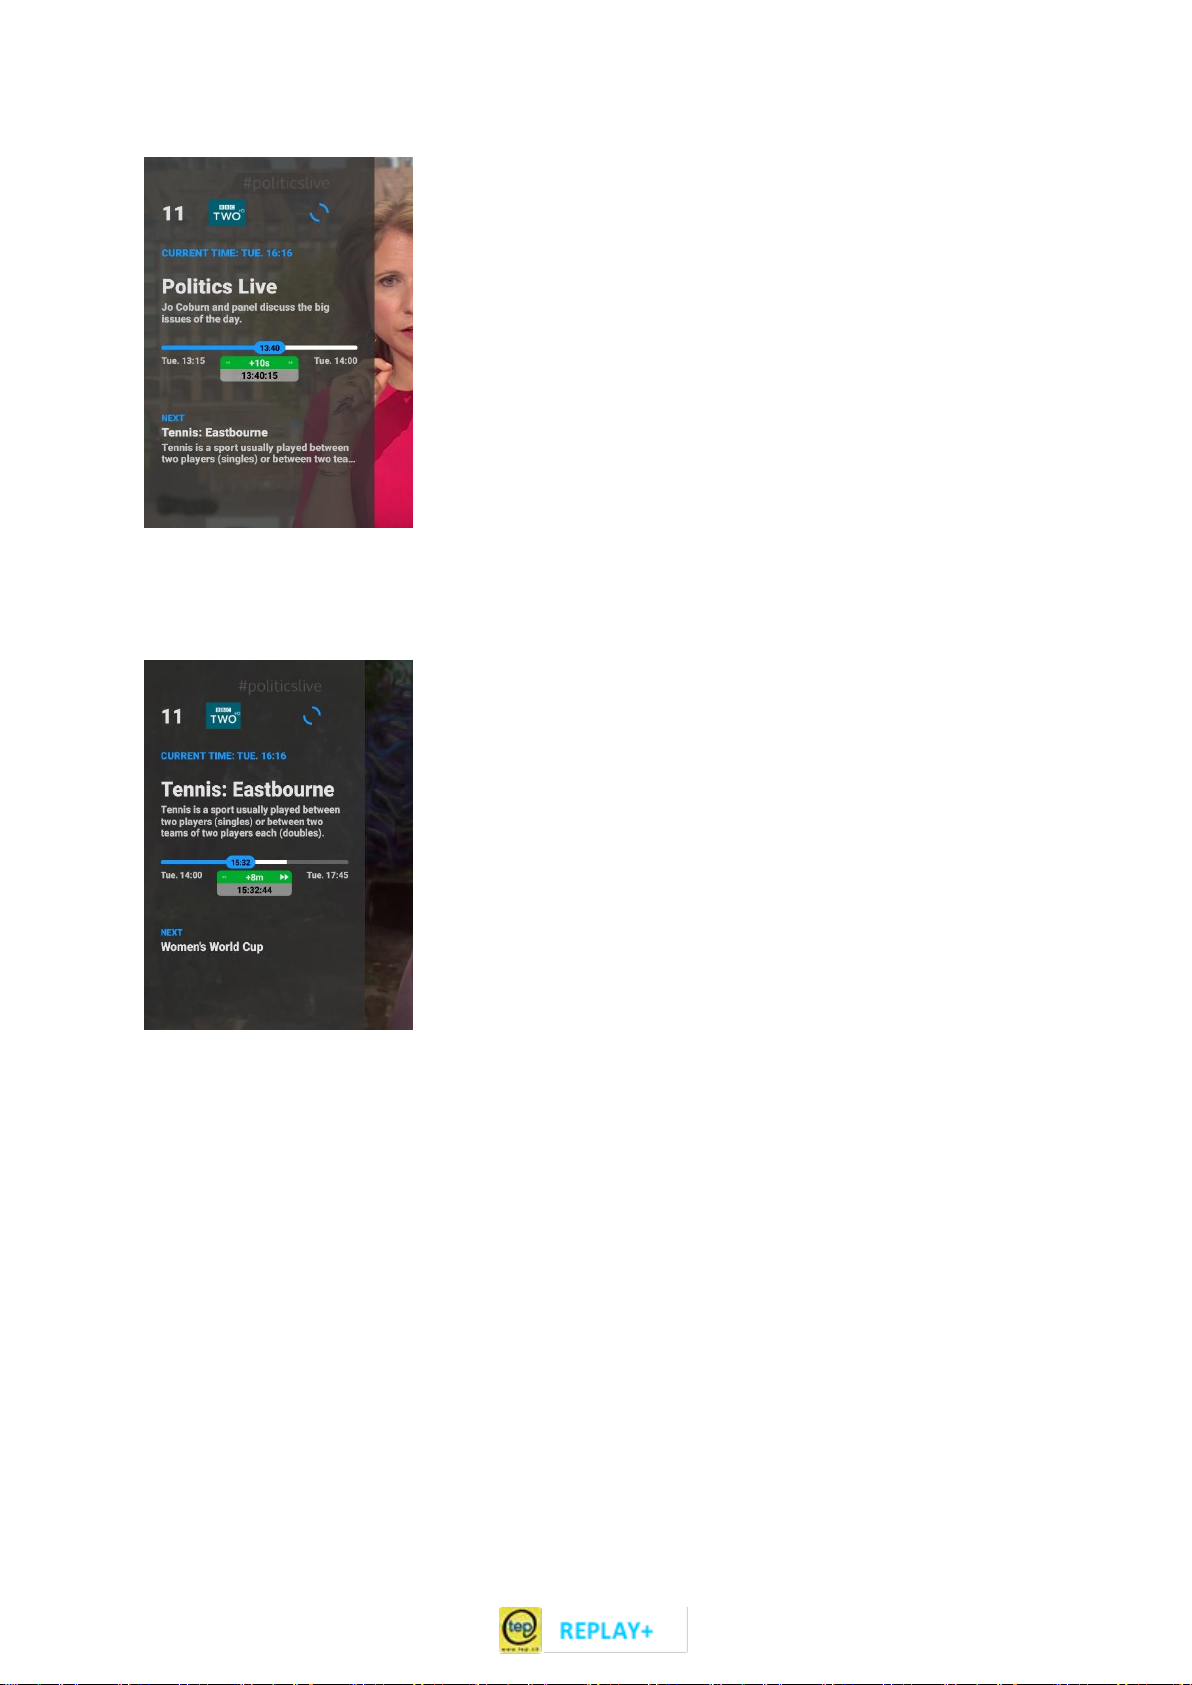
Step Fast Forward / Rewind
Press and immediately release the REW button once. The playback
will move backward by e.g. 5 seconds and start playing from there.
“-5s” indicates that you have now jumped back in time by 5 seconds.
Observe the green bubble, it shows you the size of the last REW step
and also the new playing position in HH:MM:SS format.
9
Press and release the FF button twice in quick succession. The
playback will move forward by e.g. 10 seconds and start playing from
there.
“+10s” indicates that you have now jumped forward in time by 10
seconds. Note that FF only works if you are not watching live
already.
Observe the green bubble, it shows you the size of the last FF step
and also the new playing position in HH:MM:SS format.
Try pressing the FF or REW buttons 3 times quickly. The steps will be
even larger.
The size of FF and REW steps is adjusted in the Settings, as explained
a bit further down in this document.
Continuous Fast Forward / Rewind
Press and keep the FF or REW button continually down. The
playback will move forward or backward in steps that increase every
1-2 seconds until reaching the highest seek speed.
As an example, “+8m” indicates that you are now moving forward in
time by 8 minutes roughly every second. Note that FF only works if
you are not watching live already.
Observe the green bubble, it shows you the size of the last step and
also the new playing position in HH:MM:SS format.
There are 6 seek step sizes in total. The steps 4,5, and 6 can only be
reached by continually keeping the FF or REW button pressed.
Tip: if you are watching a Replay show e.g. from this morning, you can also use the STOP button.
This will jump forward in time to the beginning of the next show each time you press STOP. You can
quickly fast forward through time and check out the beginning of each show in sequence.

10
Adjusting REW/FF steps in Settings
Press the MENU button and select Settings.
You will see a new menu indicated by a Film
icon and “<< / >>”. Select it and press OK.
You will see two settings:
Step Size
Mode
Step Size
Moderate: sets smaller seek steps
Fast: sets larger seek steps, roughly double
the size of the smaller steps
Mode
Identical FF/REW Steps: FF and REW steps
are the same size
FF Steps larger than REW steps: FF Steps are
roughly double the size of the REW steps
Both settings can be used in any combination. Best is to try for yourself!
For the curious
The step sizes in all 4 combinations are as follows:
Moderate + identical steps (-4m, -2m, -1m) -30s,-15s,-5s / 5s, 15s, 30s (1m, 2m, 4m)
Moderate + larger FF steps (-4m, -2m, -1m) -30s,-15s,-5s / 10s, 30s, 60s (2m, 4m, 8m)
Fast + identical steps (-10m, -5m, -2m) -60s,-30s,-10s / 10s, 30s, 60s (2m, 5m, 10m)
Fast + larger FF steps (-10m, -5m, -2m) -60s,-30s,-10s / 20s, 60s, 120s (4m, 10m, 15m)
11
Recording functions
REPLAY+ allows you to store up to 250 recordings in your Recordings Library. Your recorded shows
are kept for you automatically and indefinitely, regardless of the 7-day replay period.
The recordings are stored online in a cloud-based storage system.
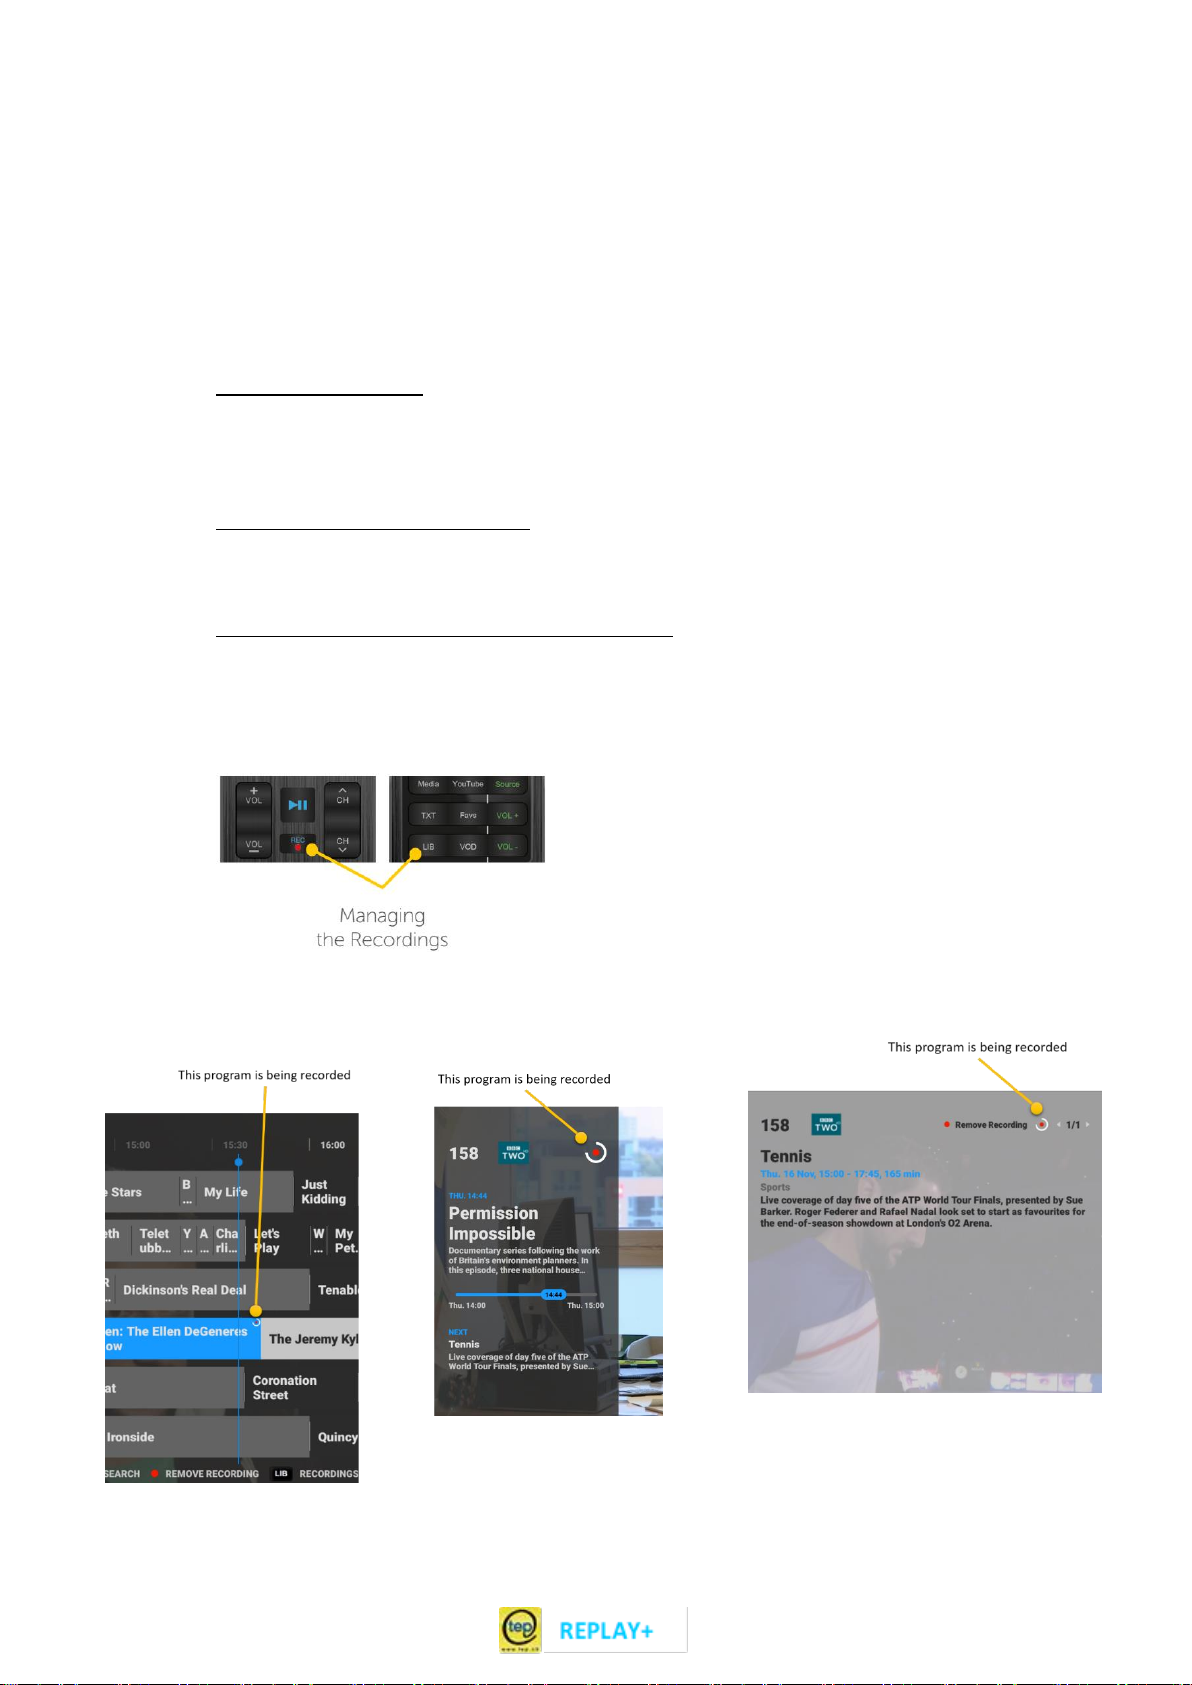
There are 3 ways to record a show:
1. While watching a show, use the REC button to add the current show to the recordings
Library. After pressing the REC button while watching TV, the current show is recorded from
its start and a “red dot” icon is shown on the On-Screen Display while the show is being
recorded.
2. While browsing the Program Guide, highlight any show, then press the REC button. This will
add the selected show to the recordings Library. You can record any show found in the
Program Guide: past, current and future.
3. While the detailed view for a show is on the screen, press the REC button. This will add the
selected show to the Recordings Library.
You can un-record a show by pressing the REC button again.
You can easily check which programs are being recorded - in the Program Guide, in the On-Screen
Display and in the Detail View as shown in the pictures below:

12
Playing back recordings
To play back a recording, use the LIB button to open your Recordings Library and select a recording
to play back. The available recordings are sorted by date, with the newest recordings on top. Just
select any recording and press OK to play it back.
Tip: Any show can also be played back from the Program Guide view until the Replay period expires.
When playing back a recording, an icon is shown on the On-Screen Display to indicate that you are
watching a recording.
You can rewind, fast-forward and pause/play the recording
at any time. Press the TV button or the STOP button to stop
playing back the recording and continue watching Live TV on
the current channel at any time.
Navigation in the player

13
Managing recordings
Use the LIB button to open the recordings Library.
Recordings can be sorted by title or by date & time. Use the green button to switch between those
views. Using the red button, you can group recordings by month.
To delete a recording, select it and then press the yellow button.
Using the Search Function
You can search for desired shows by genre, time, channel or search words. There are 3 ways to start
searching for shows:
1. While watching TV, press the blue search button. This will open the search box (see Using the
Search Box shown below). The last used search settings will be shown in the box. This is the
quickest way to initiate a search.
2. While the On-Screen-Display (OSD) is shown on the screen, press the blue search button.
REPLAY+ will search for shows with the same name across all times and TV channels and will
display the list of results. This feature allows you to instantly find more episodes - past and
future - of the show you are currently watching.
3. While in the Program Guide view (use the GUIDE button to get there), press the blue search
button. Let’s say the program highlighted in the Program Guide is called “GMT”. Pressing the
blue search button will bring up a pop-up box where you can choose between: “Search for
shows containing GMT”or “Use existing search settings”.

14
The first selection directly opens the list of search results, containing all shows with “GMT”.
The second selection opens the search box with the last used search setting to be completed.
Pressing the OK button will produce a list of search results.
Using the search box
In the search box, you can enter a text to find shows where this text appears in the title or anywhere
else in the show details. It can be an actor’s name or part of the show description. You can also use
one or more filters / checkboxes to narrow down the search, e.g. you can select Series, Today and
Tomorrow to search for any series showing today or tomorrow that contain a certain text (“eco” in
the example below) either in the title or anywhere else in the show details.
The above screenshot shows all checkboxes selected. Each check box can be selected on its own or
be combined.
Tips:
Use the CLEAR TEXT button to delete all text.
Selecting “All Genres”, “All Times” or “All Channels” will alternate between all checkboxes
ON or OFF. This speeds up deselecting all boxes, so you don’t have to deselect each box one
by one.

15
Automatic word completion
Once you typed 2 or more characters in the search box, a drop-down list with up to 6 autocomplete
proposals appears. Adding more characters refreshes the proposals automatically.
Use / buttons to navigate the drop-down list and select by pressing OK.
Saved searches / search history
To speed up searching, REPLAY+ saves the search history. The search text and filter settings of the
last 6 searches are automatically saved.
Pressing the blue button SAVED SEARCH will show the last 6 performed searches, the newest at the
top of the list.
16
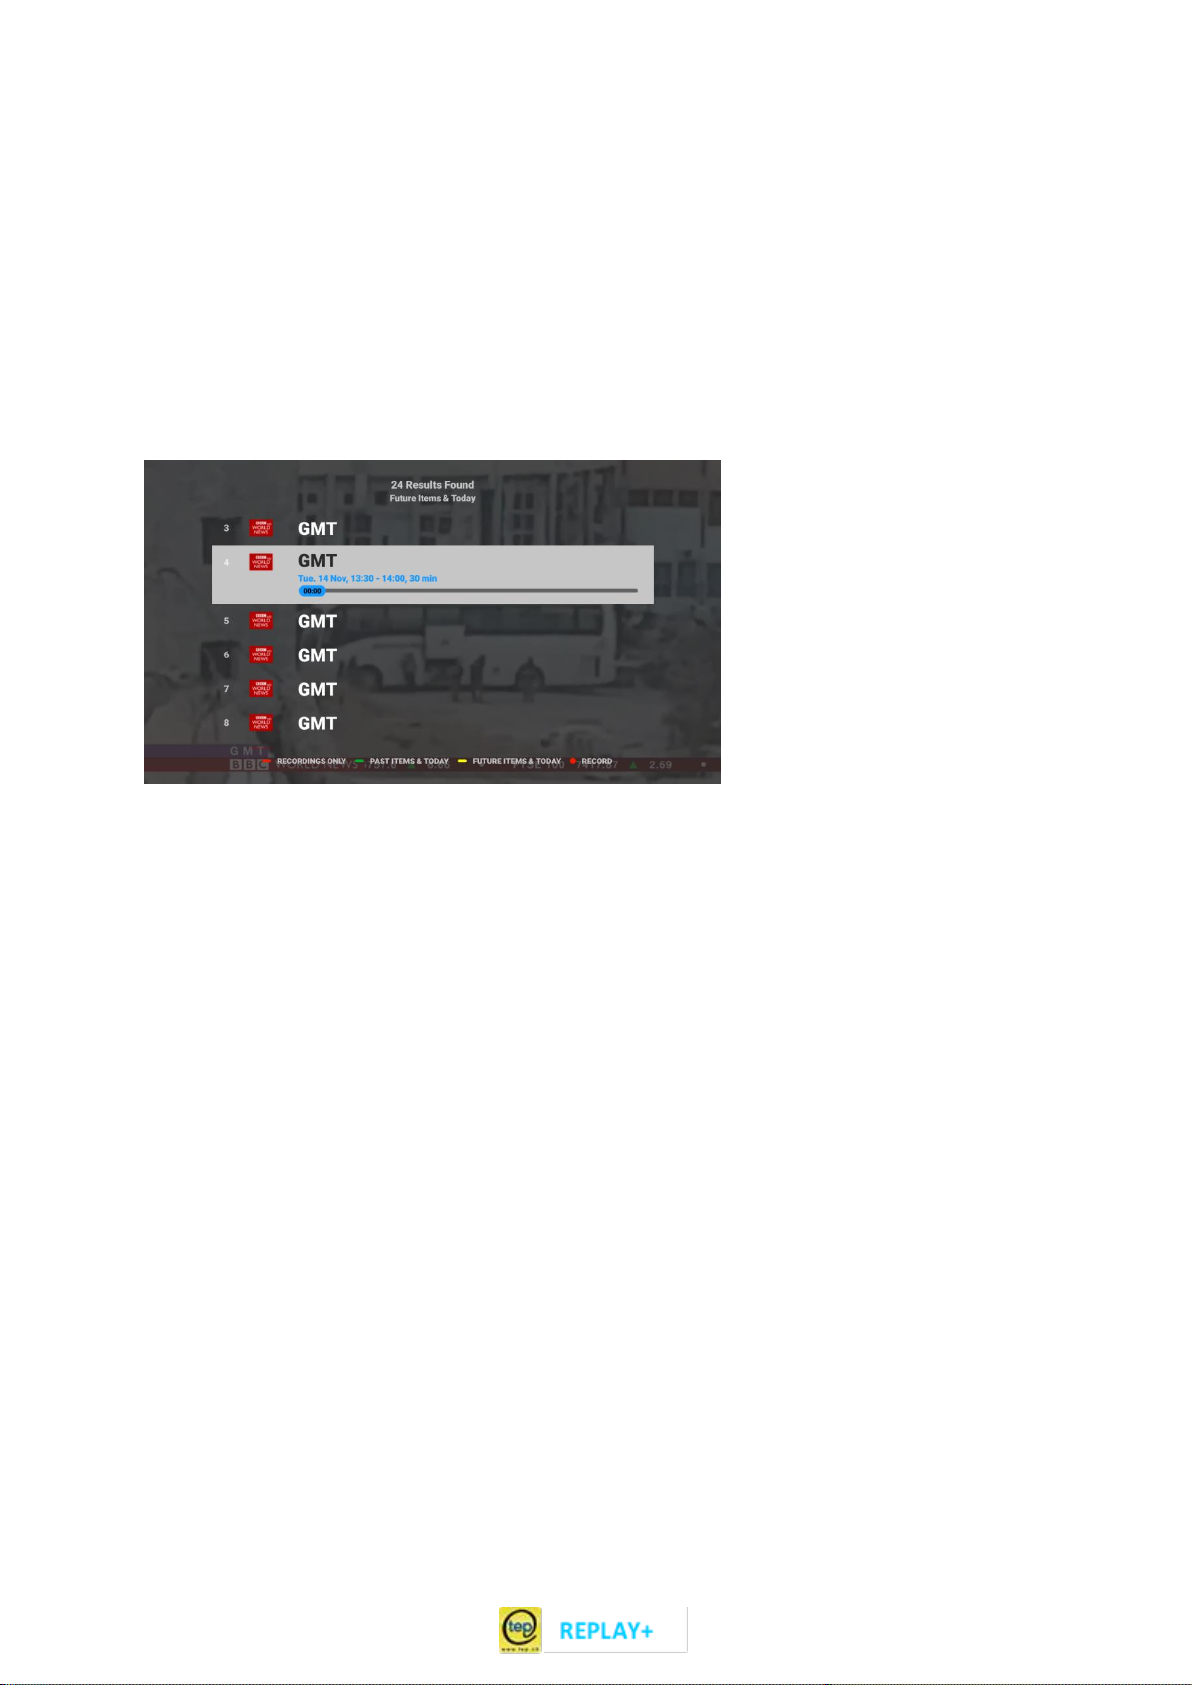
Search result list
Search results are always sorted by time of the show. The show nearest to the current time is
highlighted. Any past or currently running show on the list of search results can be watched instantly
by pressing OK on the highlighted show. Any show on the list can be recorded by pressing the REC
button on the highlighted show.
Search covers all shows listed in the Program Guide and your Recordings Library. The result list is
limited to 200 results.
You can use the red, green or yellow button to filter the results as follows:
“Recordings only” displays only results found in the list of your recordings.
“Past items & Today” starts from “now” and lists all results from past shows, descending by
time.
“Future items & Today” is default and starts from “now” and lists all results from future
shows, ascending by time.
Multiple search results beginning at the same time but on different channels will be sorted by
Favorite Channels first.
If the pop-up “No results were found. Please try: …” appears, it means that there are results, but
not for the default settings “Future items & Today”. You get the suggestion to try to find results in
“Past items & Today” or even in your “Recordings” (red button).
If you see the pop-up “No results found”, nothing meets your search criteria.

17
Managing my favorite channels lists
Press the Favs button to manage your favorites.
You will see the following:
Default List, the list of all channels included in your package; cannot be edited
3 additional Favorites Lists to edit and store your preferred TV channel lists
By default, each of your favorite lists contains all the channels included in your subscribed package.
The currently active list is indicated by a green and any highlighted list can be activated by
pressing the green button. Any of the 3 user-editable lists can be reset to default by pressing the red
button on the highlighted list. You can then change the favorites lists as you please by using the
context color buttons.
Pressing OK on a selected favorites list will open the list for editing. All changes you make will be
automatically saved upon exiting and the title of the list will be changed to e.g. Favorites 1. You can
also manually rename the list by using the button until the cursor shows up in the title.
There are two basic editing possibilities after opening a favorite list: you can hide TV channels from
your channel list and you can reorder the channels to your liking. Use the contextual red, green,
yellow or blue buttons to edit as follows:
Remove a few channels: first use the OK button to select or deselect multiple channels for hiding,
then press the red HIDE button. This will make all selected TV channels invisible. Save the list by
pressing . All hidden channels will automatically move to the end of the list.

18
If you want to create a short channel list as a favorite, the best approach is to first hide all channels
by using the red HIDE ALL button. This will make all TV channels invisible. Then select the few
channels that you want on the list and press the green SHOW button to make them visible. Save the
list by pressing . All visible channels will automatically move to the top of the list.
Reorder the list by first using the OK button to select or deselect multiple channels for reordering.
With one or more channels selected, use the arrow keys to move the highlight to the location where
you want to move the selected channels, then press the yellow MOVE SELECTED button. The
selected channels will be moved to the highlighted location and all other channels will be
automatically shifted.
Move channels to the top by first using the OK button to select or deselect multiple channels for
reordering. With one or more channels selected, press the blue MOVE TO TOP button. The selected
channels will be moved to the top of the list and all other channels will be automatically shifted
behind them.
Tips:
Use the green SHOW ALL button to show all available channels in their current position
Use the OK button to alternatively select or deselect a channel for editing
On the top right, you can see how many channels will be visible out of the total available
channels
Channels that are visible are shown as dark grey tiles, the invisible channels are shown
greyed out and transparent
Pressing the button saves all your changes automatically and exits the edit mode

19
Web-based Radio & Podcasts
In the main Menu there is now a Radio icon. Click on it to access the new Radio and Podcasts App.
When you first start it, you will see the Discover section in which you can search for Radios and
Podcasts by Country, by Genre, By Mood and using the text-based Search section.
Once you find a radio or a podcast you like and click on it, it will begin to play. Pressing the button
to stop playing and return to the previous screen. When you reach the Radio & Podcast home
screen, you will see the 8 last played Radios and the 8 last played Podcasts for easy and quick access
to your favorite stations.
If a selected station is not playable at the moment, it will not be added to the Recently Played
section. You can try the same station again later as some stations are not always broadcasting.
The Search section
Use the alphanumeric keys on your remote control to type in a few characters of a desired station’s
name. Results will be shown when you press OK, starting with full matches and continuing with
partial text matches. Afterwards you can filter the results only for Radio (yellow button), only for
podcasts (blue button) or both (green button), which is also the initial view after searching.

20
Movies and Series on Demand (VOD)
Press the VOD button on the REPLAY+ remote control to access the interface (VOD stands for Video
on Demand)
Navigate within the menu on the left with the and arrows on your remote control and press
OK. The and arrows on your remote control allow you to choose a film within a category.
Use the OK button to access the options for the selected film.
Go to Rent/Buy and press OK.
If the film is available in several languages, you can now choose the language in which you want to
watch it. You will also have access to the film’s price and length of availability.
To select or change the subtitles or to change the audio language if the film is available in several
languages, press the OK button on the remote after starting the movie.
Other manuals for REPLAY+
1
Table of contents
Other TEP Set-top Box manuals


