terrysfabrics Cassette Roman Blind Kit Operating instructions
FABRIC REQUIREMENTS FOR YOUR BLIND
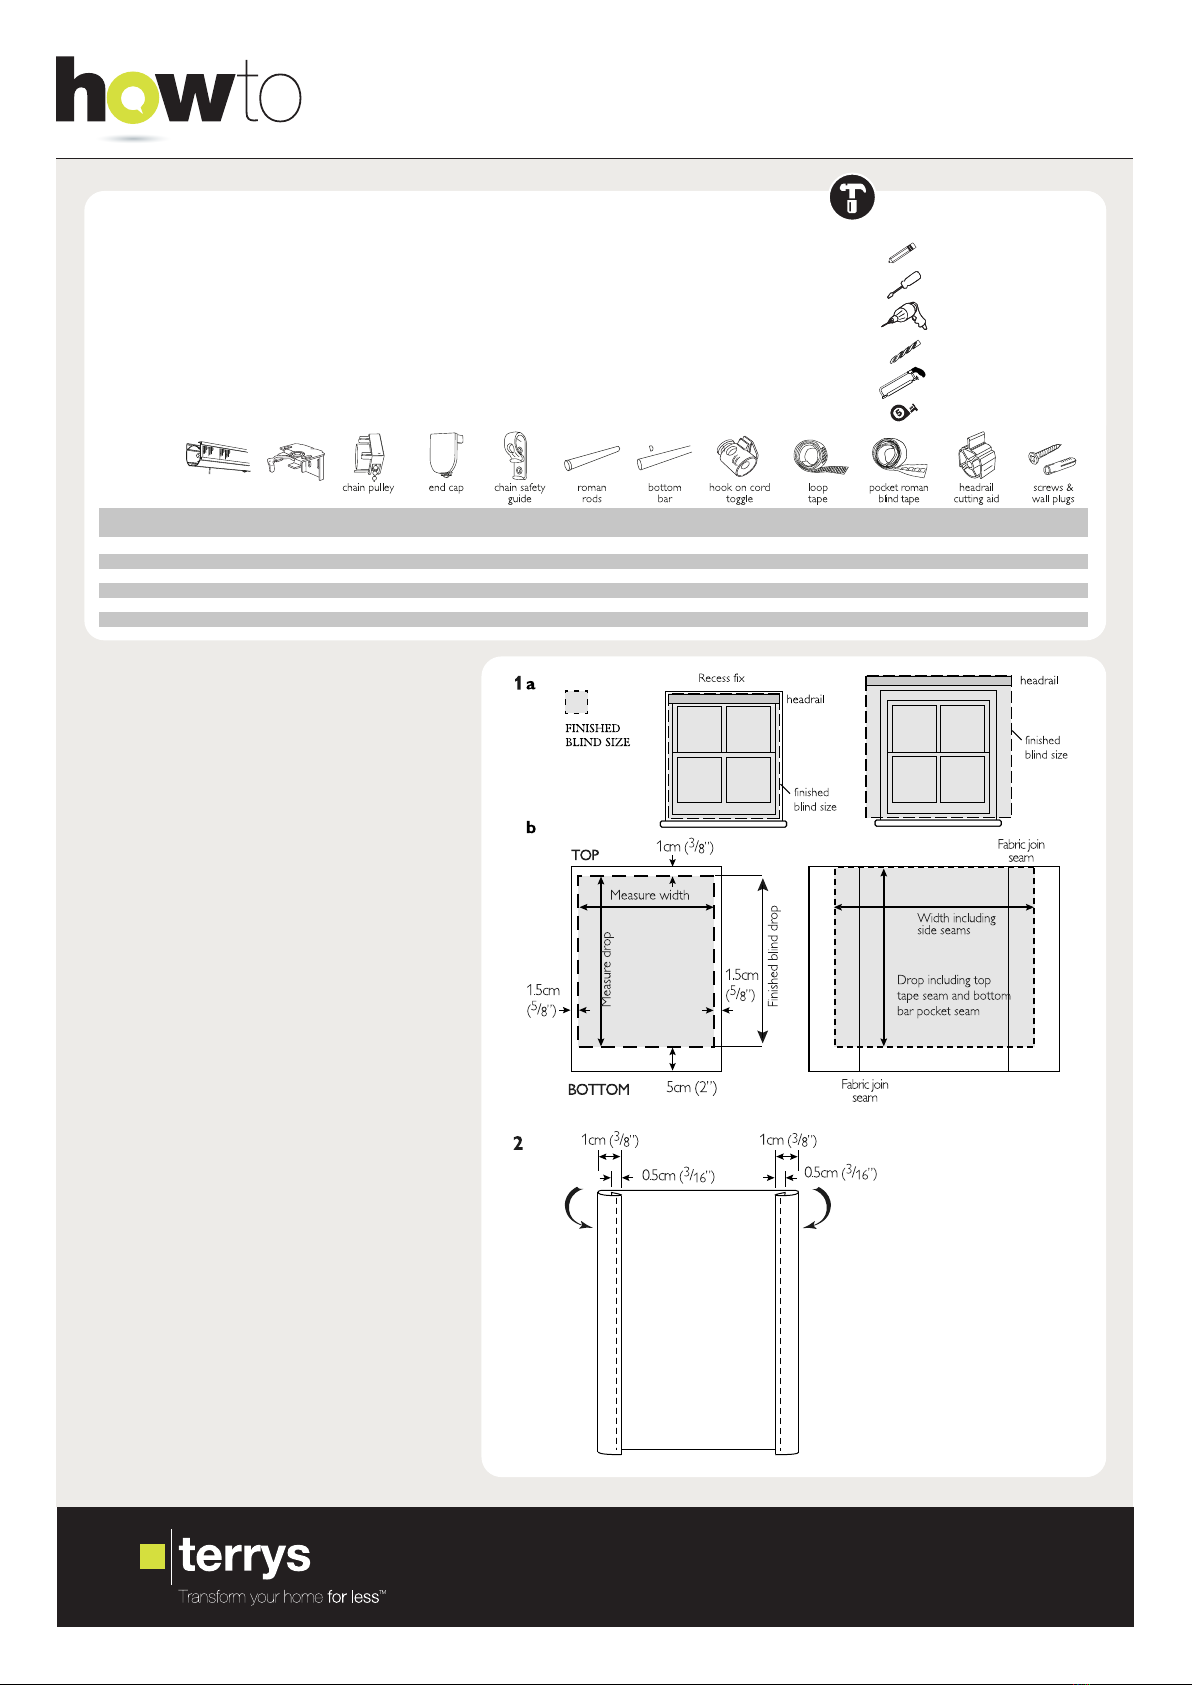
A Measure the width and drop of our window for recess
fixed headrail or if you have mounted your blind headrail
outside the recess, measure the width of the blind
headrail by the drop required.
BAdd to the finished blind the measurements shown
in diagram B,
On wider blinds more than a fabric width wide, join the
fabric so the blind will have seams an equal distance
from the centre. Mark the blind size plus seams with
tailors chalk. Trim out the size.
STEP 1
Use Cassette Roman Blind Kit
Need some more help?
Talk to our customer service experts
on 01782 566 666
fabrics
TOOLS REQUIRED
Pencil
Screw Driver
Drill
6mm Drill Bit
Hack Saw
Tape Measure
WE RECOMMEND A PROFESSIONAL OR A PERSON COMPETENT IN DIY
UNDERTAKE THIS INSTALLATION
PLEASE NOTE Additional fastners other than those sent with your blind may be required depending on the
mounting surface. Wallboard and plaster require the use of anchors such as expansion or toggle bolts.
Brick, tile or stone need special plugs and drill bits.
Remember to always pre-drill holes in wood to avoid splitting.
6
8
8
10
12
14
60cm
90cm
120cm
150cm
180cm
210cm
Screws &
Wall Plugs
3
4
5
5
6
6
Hook on
Cord Toggle
0.62 Mtr
0.92 Mtr
1.22 Mtr
1.52 Mtr
1.82 Mtr
2.11 Mtr
Loop
Tape
1
1
1
1
1
1
Bottom
Bar
Headrail
Length
5
5
5
5
5
5
Roman
Rods
1
1
1
1
1
1
Headrail
Cutting Aid
3.2 Mtr
4.7 Mtr
6.2 Mtr
7.7 Mtr
9.2 Mtr
10.7 Mtr
Pocket Roman
Blind Tape
YOU SHOULD HAVE
PLEASE READ CAREFULLY BEFORE COMMENCING
SEWING THE SIDE SEAMS
Working on the back of the fabric, fold the side fabric
under 0.5cm (3/16”) and then over 1cm (3/8”) to form a
seam and sew down the inner edge.
Repeat for the opposite side.
STEP 2
3
3
4
5
6
6
Cam
Support
1 (ratio 1:1)
1 (ratio 1:1)
1 (ratio 1:1)
1 (ratio 1:3)
1 (ratio 1:3)
1 (ratio 1:3)
Chain
Pully
1
1
1
1
1
1
Chain Safety
Guide
1
1
1
1
1
1
End
Cap
1
1
1
1
1
1
Headrail
(ready corded)
cam
support
headrail
(ready corded)
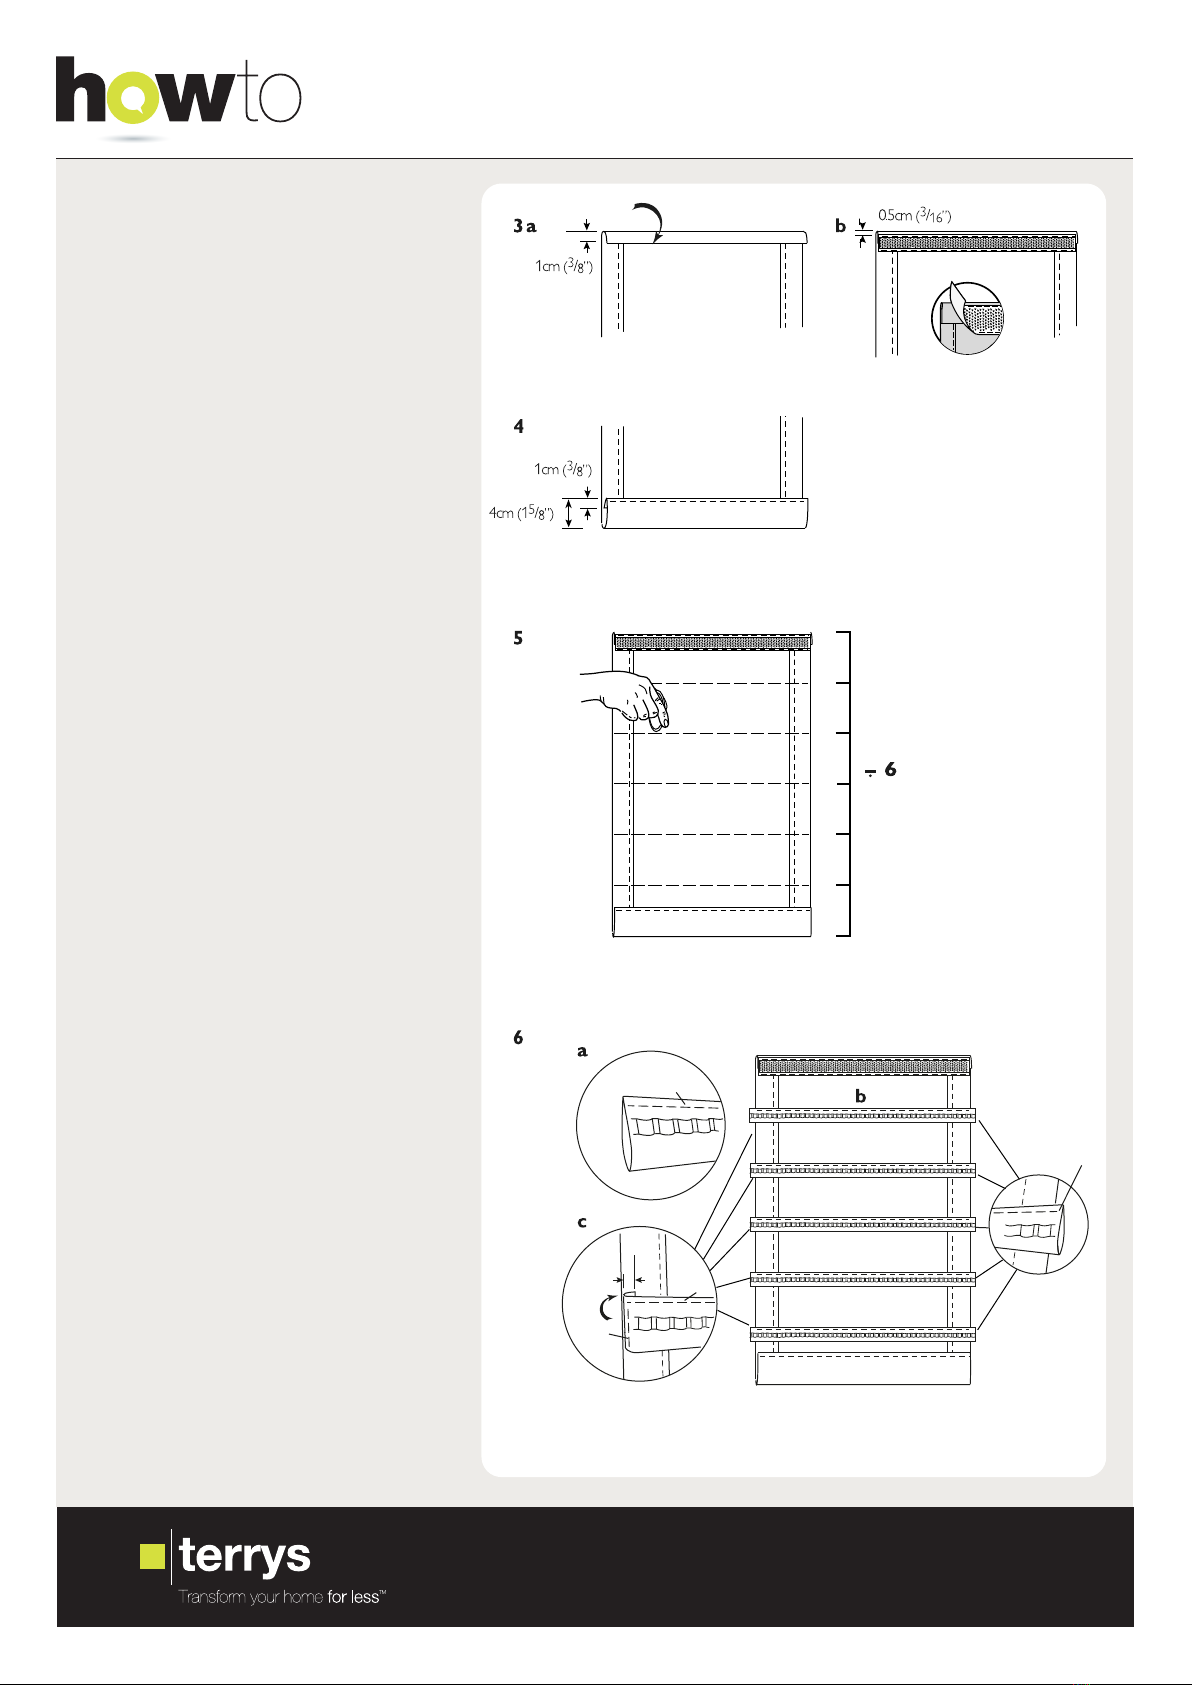
STITCHING THE LOOP TAPE TO THE TOP OF THE BLIND
Remove loop tape from headrail.
AFold over the top of the fabric 1cm (3/8”).
BPlace the loop tape over the fold leaving 0.5cm (3/16”)
gap between the tape and the top of the fold.
Sew the tape into place with two rows of stitches - a row
on top and a row on the bottom of the tape.
STEP 3
SEWING THE BOTTOM BAR POCKET
Fold over and create a 4cm (15/8”) pocket with a
turn over of 1cm (3/8”) as shown in the diagram.
Stitch along the top edge hem/pocket.
STEP 4
Use Cassette Roman Blind Kit
Need some more help?
Talk to our customer service experts
on 01782 566 666
fabrics
MARKING THE TAPE POSITIONS
Divide the distance between the top and bottom of the
blind by 6 and mark at both sides the position.
With tailors chalk draw a faint line across the blind.
NOTE: Ensure the lines are parallel before sewing
blind in step 6.
STEP 5
SEWING THE TAPE TO THE BLIND
ARotate the tape so that it is in the upright position
with the rear pocket at the bottom of the tape as
shown opposite.
TRIM RODS AND TAPES ONLY IF REQUIRED
BMeasure and trim the 5 lengths of tape to the blind
width plus 1cm (3/8”) at either end for seams.
CPlace the lengths onto the chalk marks made
previously and turn one side of each length in
1cm (3/8”) to form a hem on the tape.
DSew to the blind with a row of stitching above the
pocket area leaving one pocket end open on each
to be hemed later.
STEP 6
Stitch
1cm
(3/8”) Stitch
Pocket
Back
of tape
Stitch
Front of tape
Leave open
Stitch
INSERTING THE ROMAN RODS
ARemove cap and trim the roman rods 2cm (3/4”)
shorter than the blind width. Replace the cap.
BInsert into the open ends of pockets on the blind
tape.
CFold the end of the pocket under 1cm (3/8”) and
stitch down the side.
STEP 7
POSITIONING THE HEADRAIL
PLEASE NOTE: Additional fasteners other than those
sent with your blind may be required depending on the
mounting surface. Wallboard and plaster require the use
of anchors such as expansion or toggle bolts. Brick, tile
or stone need special plugs and drill bits. Remember to
always pre-drill holes in wood to avoid splitting.
A Inside a Recess
Decide the position of the headrail so that it will be clear
of any latches and window fixtures. If you need to reduce
the width of the headrail to fit the recess, this should be
done BEFORE assembling. See ‘Trimming the headrail’
instruction on the following page.
B Outside Recess
Decide the position of the headrail so that the overlaps on
both sides of the recess are equal. It is advisable to allow
a minimum of 5cm (2”) overlap on each end.
STEP 9
INSERTING THE BOTTOM BAR
Trim the bottom bar to the same width as the roman
rods cut previously (2cm (3/4”) shorter than the blind
width). Insert into the bottom pocket of the blind.
Place a tacking stitch at each end to hold in place.
STEP 8
Use Cassette Roman Blind Kit
Need some more help?
Talk to our customer service experts
on 01782 566 666
fabrics
TRIMMING THE HEADRAIL
Tools required are a hacksaw & Phillips screw driver.
ALoosen the end cover an Phillips screw, slide and
revove end cover from rail.
B Loosen the cord guide retaining screw and the small
grub screw, located underneath the rail
C Slide cord guide and housing further up the headrail
to desired position. Re-lock the cord guide retaining screw.
D Insert the trimming aid into the headrail over the bar
to your required trimming position.
E Using the edge of the insert as a guide, carefully trim
the headrail with a fine toothed hacksaw, cutting through
the inner bar as you do so.
F Remove the trimming aid. Unscrew and reposition the
centre cord guide if needed. Re-secure the guides.
Should you wish the blind to draw from the left hand
side - see points 16 and 17 overleaf before re-securing
the guides.
STEP 10 b
c
a
f
cord guide
retaining screw
cord guide
and housing
ed
8
7
width minus 2cm (3/4”)
Stitch
1cm (3/8”)
ab
c
Cap Rod

CORDING THE BLIND
For ease of assembling the rail is pre-corded.
AWorking vertically from where each cord will drop
from the cord guides, thread the cord through the
pocket tape. After the last row of pocket tape thread
a hook on cord toggle onto each cord.
BUsing an upward motion as shown, thread the hook
on cord toggle into the last row of pocket tape.
DO NOT ALLOW THE CORDS TO BECOME TWISTED.
With the blind held in a level, vertical position, adjust
the hook on cord toggles so that equal tension is held
on each and they are level. Trim any excess cord at a
distance of 4cm from the hook on cord toggles.
DO NOT KNOT THE CORDS.
Should the cords ever become detached please ensure
when replacing that they are aligned vertically and that
the hook oncord toggles have equal tension on each
and they are level.
STEP 13
ATTACHING BLIND TO THE HEADRAIL
Line up the blind/loop tape with the hook tape on the
headrail and press firmly to secure the blind in place.
STEP 12
FIXING THE SUPPORTS
AThe brackets are designed for face or top fixing to
frame, wall or ceiling.
BMark through the screw holes the position for the
cam supports making sure they are level and in line,
check with a spirit level.
With the brackets removed, drill each bracket screw
position. Fix brackets into place using screws provided,
check alignment and level as you go. Use the wall
plugs provided for plaster and masonary walls.
We recommend for plaster walls a wooden batten
be secured first.
STEP 11
Use Cassette Roman Blind Kit
Need some more help?
Talk to our customer service experts
on 01782 566 666
fabrics
HANGING THE HEADRAIL / REMOVING
AWith the cam supports in the unlocked position,
mount the headrail onto the supports by resting the
front lip of the headrail onto the front of the supports.
BSecure by sliding the lever on the cam supports into
the locked position.
STEP 14
a
11 ba
b
4cm
14 lock
unlock
side view
lever rear
located under headrail
a
b

MOUNTING THE CHAIN SAFETY GUIDE
Read these instructions carefully before installing and
using the chain safety guide.
Children can be strangled if this safety device is not
installed correctly. Use of safety device helps reduce
the risk of strangulation but cannot be considered
entirely fool proof.
AWith the chain safety guide on the chain, mark a
suitable mounting position for the chain safety guide
at a point where it keeps the chain taut. NOTE: The
safety device shall not be installed less than 1.5m
from the floor. It is essential that the chain safety guide
shall be installed at the maximum distance possible from
the control mechanism to prevent the looped chain
becoming slack.
BUse appropriate fixings to mount the chain safety
guide, depending on the surface to which the device
is being fitted.
Children can strangle if this safety device is not
installed correctly. Always use this device to keep
cords or chains out of reach of children.
STEP 15
CONVERTING TO LEFT HAND DRAW
UNTRIMMED TRACK
AUnscrew, slide and remove the end cover and chain
pulley.
BSlide the end cover and chain pulley into the opposite
ends of the rail from previous. Tighten screws to secure.
STEP 16
CONVERTING TO LEFT HAND DRAW
TRIMMED TRACK
AUnscrew, slide and remove the end cover and chain
pulley.
BSlide the inner bar at the end where the chain pulley
will be placed into the rail so it is at least 2cm from the
rail end for 120 - 150cm, and 3cm for 150 - 210cm
rails.
CRotate the bar so that the grub screws at the side of
the cord guides are accessible. Loosen both the cord
guide screws and grub screws. Reposition so that they
align with the corded positions on the blind.
Secure the cord guide screws and grub screws.
DSlide the end cover and chain pulley into the opposit
ends of the rail from previous. Tighten screws to secure.
STEP 17
Use Cassette Roman Blind Kit
Need some more help?
Talk to our customer service experts
on 01782 566 666
fabrics
To avoid strangulation and entanglement, keep cords out of the reach of young children. Cords may become wrapped around
a child’s neck. Move beds, cots and furniture away from window covering cords.
Do not tie cords together. Make sure cords do not twist and create a loop. Cut the cord to suitable length to ensure it can be
wound around the cleat several times when your roman blind is both open and closed.
Children can strangle if the cleat device is not installed. Always use this device to keep cords out of reach of children.
WARNING Young children can be strangled by loops in pull cords, chains, tapes and inner cords
that operate the product.
Popular Window Blind manuals by other brands


HunterDouglas
HunterDouglas Reveal Installation operation care

Silent Gliss
Silent Gliss SG 1014 Installation and user manual

HunterDouglas
HunterDouglas Pirouette Installation operation care

Kirsch
Kirsch Banded Shade Automation III installation instructions

Cosiflor
Cosiflor FD Slope 4 quick guide

MHZ
MHZ BASIC 04-1620 Installation and operating instructions

MHZ
MHZ s-enn SN 72/1 installation instructions

Rollo Rieper
Rollo Rieper DFS Assembly instruction

Renaissance
Renaissance Roman Blind Safe-Release installation instructions

Draper
Draper FlexShade DHMO instructions

Creation Baumann
Creation Baumann TECHNOLOGY PLITRIC VS 2 KL Assembly instruction

Draper
Draper FlexShade INSTRUCTIONS INSTALLATION & OPERATION