manuals.online logo
Brands
  1. Home
  2. •
  3. Brands
  4. •
  5. Renaissance
  6. •
  7. Window Blind
  8. •
  9. Renaissance Roman Blind Safe-Release User manual

Renaissance Roman Blind Safe-Release User manual

To shorten the Headrail size
Step 1 Remove
the End Cap from
the Headrail
(at the opposite end
from the control end
with the chain).
Step 2 Unlock and
slide back the Fast-
Fit Cord Roller unit
using the cord to pull
it away from the end
you will be cutting
(to unlock simply twist
the clear tab 90°).
Step 3 Mark the
distance you want to
remove – make sure
you allow 2mm for the
End Cap going back
on! Then using a saw,
cut through the
Headrail and Axle Bar.
Step 4 Once cut, put
the End Cap back in
place and reposition
and secure the
Fast-Fit Cord Roller
(to lock simply twist
the clear tab back 90º).
Please read all safety warning instructions before installation
and keep them in a safe place for future reference.
Roman Blind Safe-Release™Kit
Closed Cassette System with Safe-Release™Device
and Clip-In Adjustable Cord Stoppers with Hole
CHILD SAFE
APPROVED
REN073--02-NEW-20-05
TOOLS REQUIRED
HOW TO INSTALL
To Adjust
Width
To Install
Installation Instructions
rca-uk.com
TIP: Move the Roller to just before cut point,
this supports the Axle Bar for easier cutting!
Assembly instructions and
use of child safety devices
Headrail installation
1. Mark bracket hole positions on the wall or
ceiling (g
1
).
2. Drill holes and x bracket in place using screws
provided.
3. Take the assembled blind & headrail and detach
the top of the blind from the headrail (g ).
4. Place the headrail prole up to brackets. Tilt
the headrail forwards and insert into bracket,
then tilt back to the straight position to ensure
the bracket has ‘clicked’ rmly in place (g
2
).
5. Secure the headrail by moving the locking arms
into place (g ).
6. Aix the top of the blind back to the headrail
(g ).
Ceiling Fix Wall Fix
NOTE: Safety devices must be used
to ‘Make It Safe’ for compliance
1. Place the blind face down and place the rail onto
the so loop tape heading on your blind (see g
below). Line-up the cord rollers – to adjust
positions twist the lock mechanism to unlock and
twist back to re-lock in the desired place. Ensure
all cords are fully unwound and equal length.
2. Clip the Clip-In Adjustable Cord Stoppers with
Hole into the tape on bottom fold (g
1
).
Alternatively you can sew-in to the bottom fold
through the small hole in the Cord Stopper close
to the clip (g
2
)– See the back page of these
instructions for full positioning details.
3. Thread cords through the guides in the tape which
has been sewn on to each of the folds in the rear
of the Blind and then through the main hole in the
Clip-In Adjustable Cord Stopper with Hole.
4. Do NOT tie a knot in the liing cords as this will
compromise the safety feature of the device.
5. Conrm chain is the correct drop for the tting
requirements and safety compliance – change if
required. Ensure the Safety Cord Guide is tted.
Clip-In Adjustable Cord
Stoppers with Hole
Strong compression
spring to clamp cord
Clip the
Stopper to
blind here
Blind cord threads
through this main hole
Fig 2b
1
2
1
2
1
2
rca-uk.com
1
2
1
2
How to install and use the Safe-Release™Device
It is the responsibility of both the blind maker and installer to check and conrm the blind is
safe according to the standards. We advise you keep these instructions for future reference.
2
3
1
6
5
4
4
7
Side View
Side View
Below View
2
3
1
6
5
4
4
7
Side View
Side View
Below View
rca-uk.com
To avoid strangulation and entanglement, keep
cords out of the reach of young children. Cords
may become wrapped around a child’s neck.
Move beds, cots and furniture away from window
covering cords. Do not tie cords together, make
sure cords do not twist and create a loop.
Installing this device reduces the hazards of
strangulation or entanglement as the Wheel and
Chain will release from the Gear Housing to meet
the 6kg testing requirement. Using this device
removes the need for wall xed chain tension
devices and allows chains to be tted 60cm from
the ground. The use of this and other child safe
devices help reduce the risk of strangulation, but
vigilance is always required.
Go to www.makeitsafe.org.uk for further details.
WARNING
Young Children can be strangled by loops in pull cords,
chains, tapes and inner cords that operate the product.
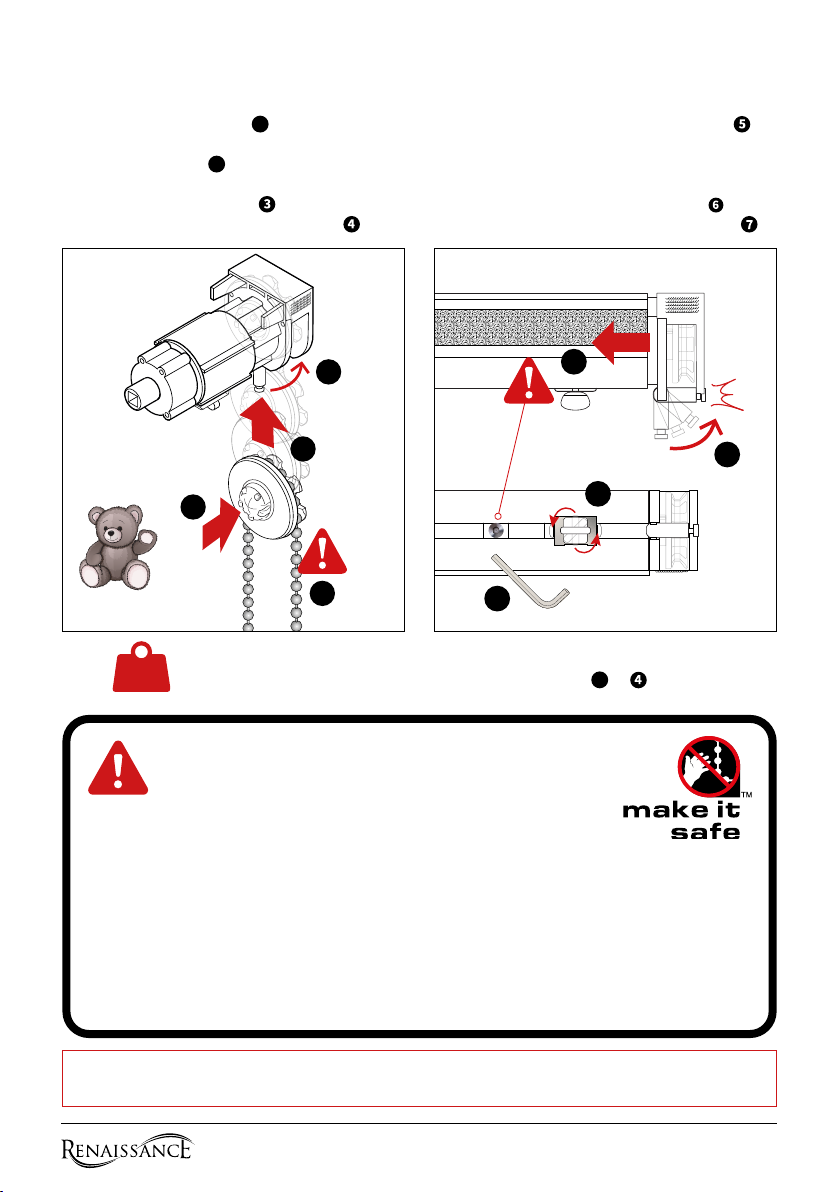
Make sure you wrap the operating chain round
the Safe-Release wheel (g
1
) before you insert
into the chain housing. Then squeeze the spring
side of the wheel (g
2
) and push the wheel &
chain into the slot – with the spring wheel facing
towards the mechanism (g ). When fully
inserted the pivot lock can be closed (g ).
If not inserted already, the housing simply
slides into the headrail as shown above (g )
NOTE: Make sure that the Axle Bar connection
screw is positioned correctly and the tab lock
is open. When fully inserted and ush with the
headrail twist the tab lock to secure (g ) and
x the Axle Bar via the screw from below (g ).
CHILD SAFE
APPROVED
The Wheel and Chain will release from the Gear Housing to meet the 6kg testing
requirement. It’s simple to reconnect – just follow steps
1
to as shown above.
6kg
CHILD
SAFE
BREAK
POINT
Positioning of Child Safety Devices
Clip-In Adjustable
Cord Stopper
Do NOT tie a knot
in the Blind Cord!
Do NOT tie a knot
in the Blind Cord!
Cord
Roller
Cord
Roller
1
2
1
2
1
2
Clip-In Adjustable
Cord Stopper
with Hole
Clip into the Roman
Blind Tape on the
bottom fold
(g
1
) or sew-in to
the blind through
the Cord Stopper
hole (g
2
).
Safe-Release
Device
NOTE: When using the
Wheel & Chain Release
your Chain MUST NOT
be secured to the wall.
REN073--02-NEW-20-05
rca-uk.com
1
2

Other Renaissance Window Blind manuals

Renaissance Venetian Blinds User manual

Renaissance

Renaissance Venetian Blinds User manual

Renaissance Glide-Aside User manual

Renaissance

Renaissance Glide-Aside User manual

Renaissance AutoMoto Operating instructions

Renaissance

Renaissance AutoMoto Operating instructions

Renaissance CHILD SAFE User manual

Renaissance

Renaissance CHILD SAFE User manual

Popular Window Blind manuals by other brands

MHZ MOTION 04-2445 Installation and operating instructions

MHZ

MHZ MOTION 04-2445 Installation and operating instructions

Draper Clutch-Operated FlexShade instructions

Draper

Draper Clutch-Operated FlexShade instructions

HunterDouglas Alustra Woven Textures ST30 Installation operation care

HunterDouglas

HunterDouglas Alustra Woven Textures ST30 Installation operation care

HunterDouglas Vignette Modern Roman Shades Installation operation care

HunterDouglas

HunterDouglas Vignette Modern Roman Shades Installation operation care

MOTION BLINDS Honeycomb user manual

MOTION BLINDS

MOTION BLINDS Honeycomb user manual

HunterDouglas Paramount Installation operation and care

HunterDouglas

HunterDouglas Paramount Installation operation and care

dB RT Series manual

dB

dB RT Series manual

SOMFY Altus quick start guide

SOMFY

SOMFY Altus quick start guide

WAREMA C 80 A8 Instructions for use and maintenance

WAREMA

WAREMA C 80 A8 Instructions for use and maintenance

Rollos Medium Plus Basis Assembly and operating instructions

Rollos

Rollos Medium Plus Basis Assembly and operating instructions

Plissees VS4 Slope Assembly and operating instructions

Plissees

Plissees VS4 Slope Assembly and operating instructions

Maanta REEF ROLL Instructions and warnings

Maanta

Maanta REEF ROLL Instructions and warnings

CURRENT Luxury SilenTrac Programming guide

CURRENT Luxury

CURRENT Luxury SilenTrac Programming guide

ROOFLIGHT COMPANY neo Steel installation manual

ROOFLIGHT COMPANY

ROOFLIGHT COMPANY neo Steel installation manual

VENETA Smartfit Honeycomb Blind manual

VENETA

VENETA Smartfit Honeycomb Blind manual

gaviota 35 Series Assembly instructions

gaviota

gaviota 35 Series Assembly instructions

BFT LOOP 50/10 Installation and user manual

BFT

BFT LOOP 50/10 Installation and user manual

MHZ R 03 Operation manual

MHZ

MHZ R 03 Operation manual

manuals.online logo
manuals.online logoBrands
  • About & Mission
  • Contact us
  • Privacy Policy
  • Terms and Conditions

Copyright 2025 Manuals.Online. All Rights Reserved.