Three Types of Keys
Model Y supports three types of keys:
• Phone key - You can set up your personal phone as a
"phone key" that communicates with Model Y using
Bluetooth. A phone key supports automatic locking
and unlocking.
• Key card - Tesla provides a key card that
communicates with Model Y using short range radio-
frequency identification (RFID) signals. The key card
is used to "authenticate" phone keys to work with
Model Y and to add or remove other key cards,
phone keys, or key fobs. Unlike the phone key and
key fob, the key card does not support automatic
locking and unlocking. In situations where your phone
key has a dead battery, or is lost or stolen, use your
key card to unlock, drive, and lock Model Y.
• Key fob - The key fob allows you to press buttons to
open the front and rear trunks, and unlock, lock, and
drive Model Y. The key fob also supports automatic
locking and unlocking, if available in your region (see
Passive Locking and Unlocking on page 9) and
can be used as a backup to your phone key. The key
fob is an accessory sold separately.
Model Y supports a total of 19 keys, which can include
phone keys, key cards, and up to four key fobs.
CAUTION: Remember to bring a key with you
when you drive. Although you can drive Model Y
away from its key, you will be unable to power it
back on after it powers o.
Phone Key
Using your phone as a key is a convenient way to access
your Model Y. As you approach, your phone's Bluetooth
signal is detected and doors unlock when you press a
door handle. Likewise, when you exit and walk away with
the phone key, doors automatically lock (provided the
Walk-Away Door Lock feature is turned on; see Walk-
Away Door Lock on page 12).
Before you can use a phone to access Model Y, follow
these steps to authenticate it:
1. Download the Tesla mobile app to your phone.
2. Log into the Tesla mobile app using your Tesla
account username and password.
NOTE: You must remain logged in to your Tesla
account to use your phone to access Model Y.
NOTE: If multiple vehicles are linked to your Tesla
account, you must ensure that the vehicle you want
the mobile app to access is currently selected on the
mobile app.
3. Ensure:
◦ Your phone's general Bluetooth settings are
enabled.
◦ Bluetooth is enabled within your phone's settings
for the Tesla mobile app. For example, on your
phone, navigate to Settings, choose the Tesla
mobile app, and ensure the Bluetooth setting is
turned on.
◦ Access to your location is enabled. Open the Tesla
mobile app in your phone's settings and select
Location > Always. For the best experience, keep
the mobile app running in the background.
◦ Allow Mobile Access is enabled on the vehicle
touchscreen (Controls > Safety > Allow Mobile
Access).
NOTE: Model Y communicates with your phone using
Bluetooth. Keep in mind that your phone must have
enough battery power to run Bluetooth and that
many phones disable Bluetooth when the battery is
low.
4. While sitting inside the vehicle with a key card handy,
open the Tesla mobile app and touch Set Up Phone
Key on the main screen, or navigate to Security > Set
Up Phone Key. Follow the prompts on the mobile app
and vehicle touchscreen to set up your phone key.
To view a list of keys that can currently access Model Y,
or to remove a phone key, touch Controls > Locks (see
Managing Keys on page 10).
Model Y can connect to three phone keys
simultaneously. Therefore, if more than three phone keys
are detected and you want to authenticate or pair a
dierent phone, move the other connected phone key(s)
out of range or turn o its Bluetooth setting.
Once a phone has been authenticated, it no longer
requires an internet connection to be used as a phone
key for Model Y. However, to use the phone hands-free,
access your phone's contacts, play media from it, etc.,
you must also pair it and connect it as a Bluetooth
device (see Pairing a Bluetooth Phone on page 146).
Key Card
Tesla provides you with two Model Y key cards, designed
to fit in your wallet.
To use a key card to unlock or lock Model Y, position the
card as shown and tap it against the card reader located
just below the Autopilot camera on the driver's side
door pillar. When Model Y detects the key card, the
exterior lights flash, the mirrors unfold or fold (if Fold
Mirrors is on), the horn sounds (if Lock Confirmation
Sound is on), and the doors unlock or lock.
NOTE: You may need to physically touch the center
console or driver's side door pillar with the key card, and
you may need to hold it against the transmitter for one
or two seconds.
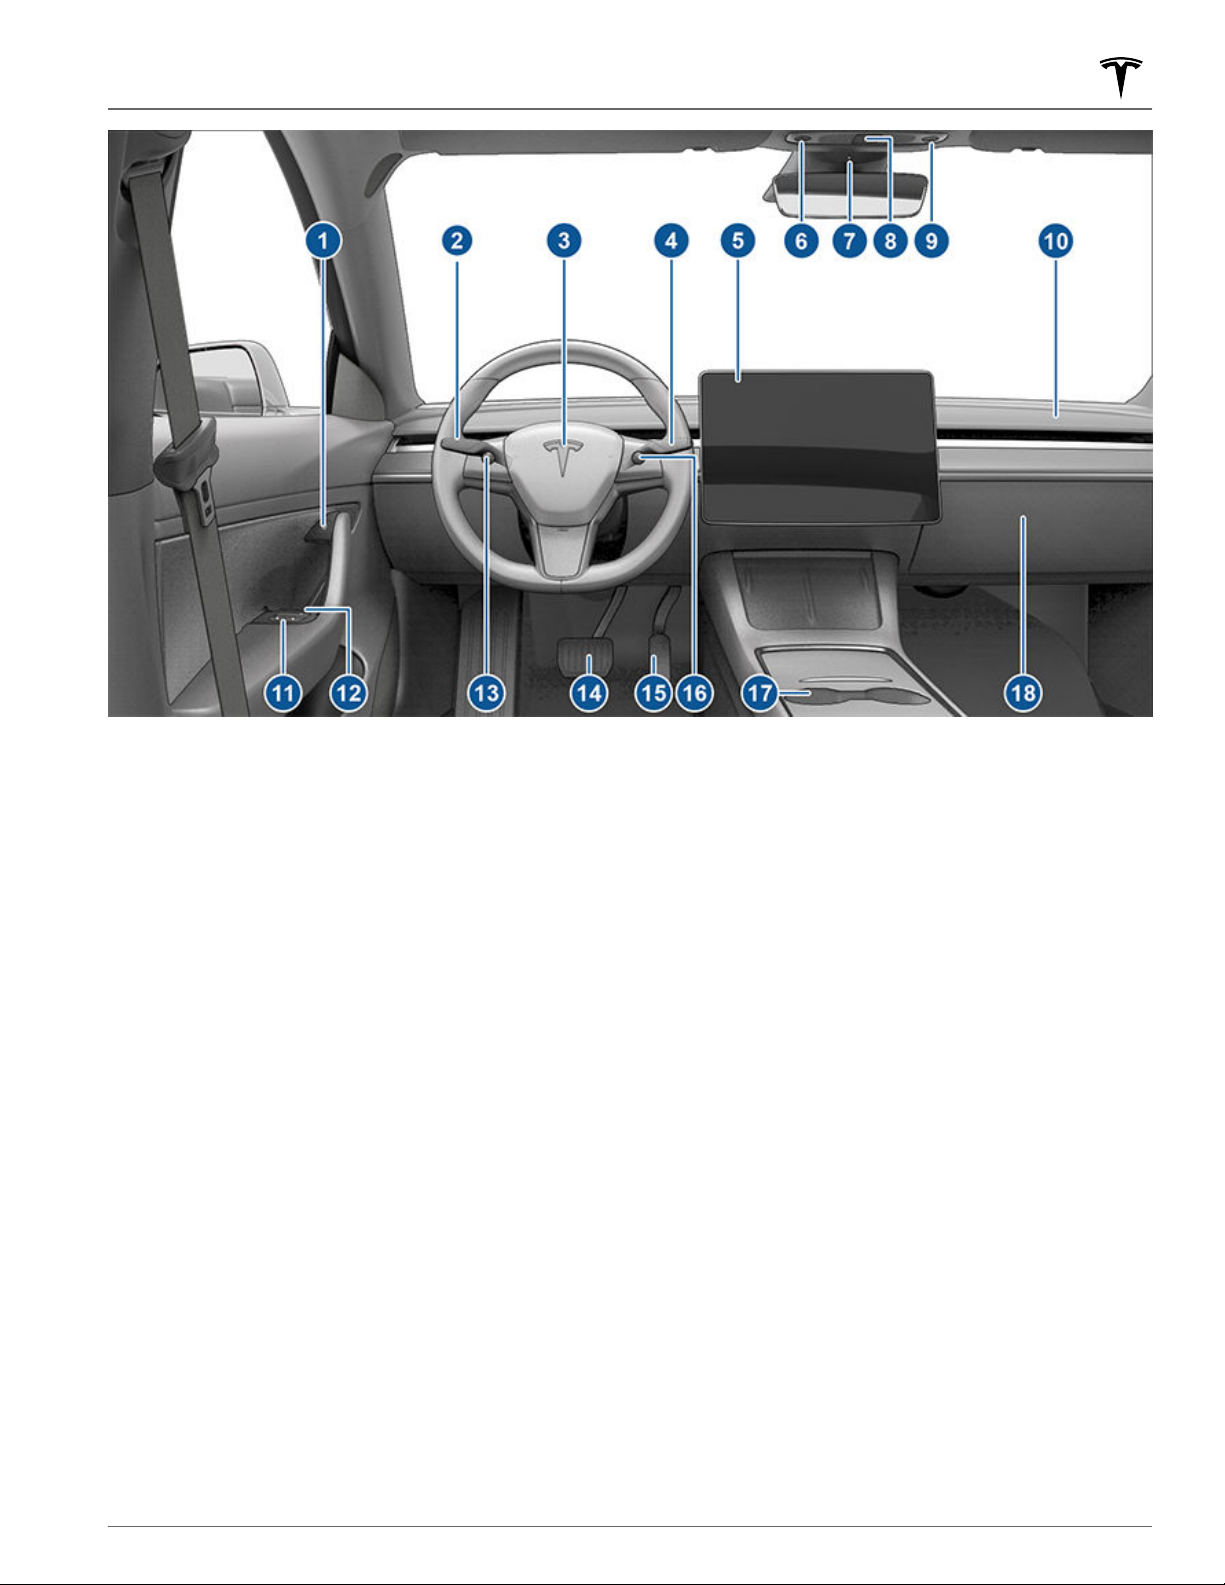
Keys
7Opening and Closing