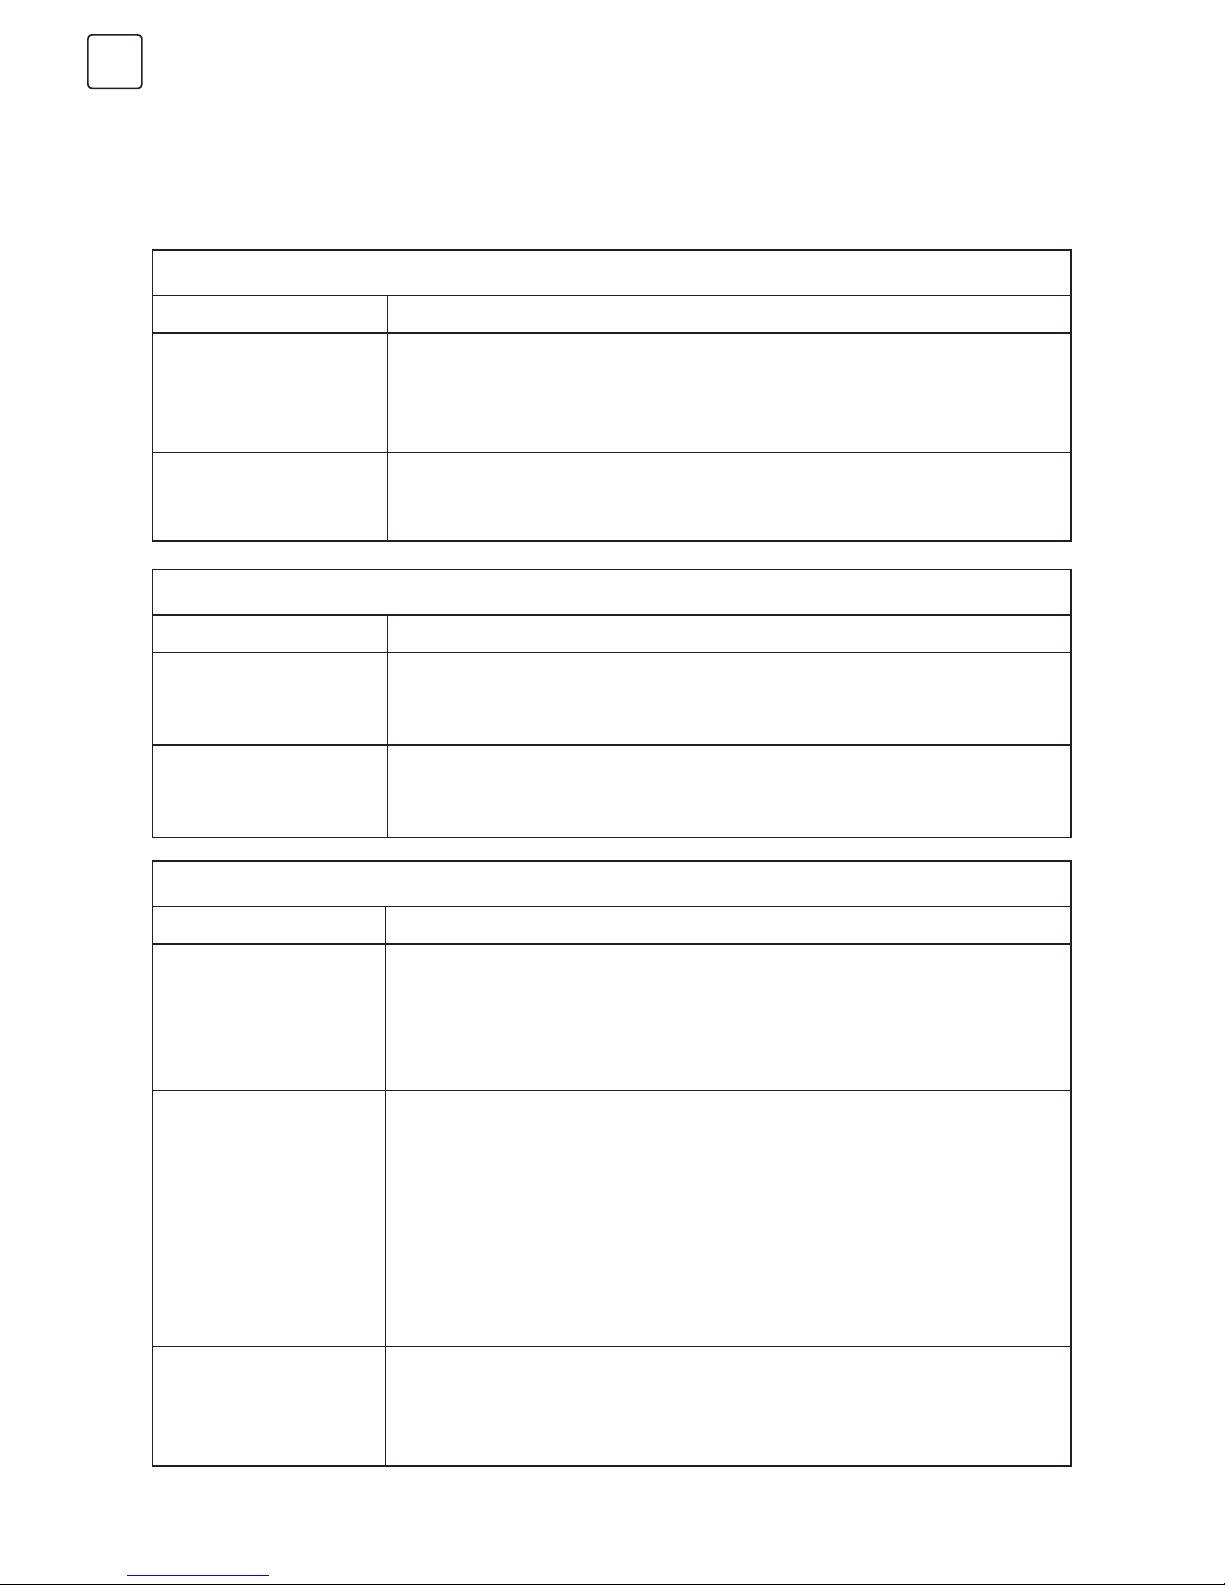
Tesla Series 3 User manual

HUN ITA MKD MNE RO SI SRB
ENG ALB BiH BG DEU FRA HRV
SERIES 3
32S317BH
40S317BF
43S317BF
49S317BF
50S317BF
55S317BF
QUICK
START
GUIDE


3
ENG
ACCESSORIES
SPECIFICATIONS
• Remote control
• Battery AAA size, 2pcs
• Quick Start Guide
• Warranty Card
• Base stands (2pcs)
• Screws (2pcs) 32"
• Screws (4pcs) 40"-55"
• AC Line Cord x 1
Note: for some models, AC cable may be already connected with the TV set and can't be
removed.
Note
1. The graphics in this file are only for reference.
2. Your TV may be slightly different from that shown herein.
3. The information in this document is subject to change without notice. The manufacturer
accepts no liability for damage resulting directly or indirectly from faults, incompletness or
discrepancies between the user manual and the product described.
4. In dry environment due to static electricity. the product may restart and return to the main
OSD Interface, USB player interface or the previous source mode. Please continue to
operate the TV as you will.
32”
49”
40”
50”
Working voltage 100-240V~ 50/60Hz
Dimensions without stand
(WxHxD mm) 733.4x438.5x85.1 906.5x525.9x84.9 974.5x575.6x85.8
Net weight without stand (kg) 3.9 6.6 8.8
Working voltage 100-240V~ 50/60Hz
Dimensions without stand
(WxHxD mm) 1240x145x762 1129.5x663.6x92.2 1242.9x727.9x90.1
Net weight without stand (kg) 11.5 12.2 14.4
43”
55”

4
ENG
POSITIONING THE TV SET
• Install Display on solid horizontal surface such as a table or desk. For ventilation, leave a
space of at least 10 cm free all around the set. To prevent any faul and unsafe situations,
please do not place any objects on top of the set. This apparatuscan beused in tropical and/
or moderate climates.
• Fixing the rear of enclosure to wall. (only for AU market)
Never place a television set in an unstable location. A television set may fall, causing serious
personal injury or death. Many injuries, particularly to children, can be avoided by taking
simple precautions such as:
• Using cabinets or stands recommended by the manufacture of the television.
• Only using furniture that can safely support the television.
• Ensuring the television is not overhanging the edge of the supporting furniture.
• Not placing the television on tall furniture (for example, cupboards or bookcases) without
anchoring both the furniture and the television set to a suitable support.
• Not placing the television set on cloth or other materials that may be located between the
television set and supporting furniture.
• Educating children about the dangers of climbing on furniture to reach the television or its
controls.
If your existing television set is being retained and relocated, the same considerations as
above should be applied (Only for the TV with mass exceed 7 kg).
• Environment
(only for Tropical climates zone):
Working temperature: 5'C-45'C
Working humidity: 20%-80%
Storage temperature: -15'C-50'C
Storage humidity: 1 0%-90%
• Environment
(only for Moderate climates zone):
Working temperature: 5'C-35'C
Working humidity: 20%-80%
Storage temperature: -15'C-45'C
Storage humidity: 10%-90%

5
ENG
• An optional wall mount can be used with your television. Consult with your local dealer for a
wall mount that supports the VESA standard used by your TV model.
Carefully attach the wall mount bracket at the rear of the TV. Install the wall mount bracket on
a solid wall perpendicular to the floor. If you are attaching the TV to other building materials,
please contact qualified personnel to install the wall mount.
Detailed instructions will be included with the wall mount. Please use a wall mount bracket
where the device is adequately secured to the wall with enough space to allow connectivity
to external devices.
Model Size: 32" Top Down
Screw
Diameter (mm) "E" M4 M4
Depth (mm)
“D”
Max 9 9
Min 6 6
Quantity 2 2
VESA (AxBxC) 100x100x100
Note:
1) The pictures are for reference only.
2) For the TV sets with terminals towards the wall, in order to leave enough space to use the
terminals, a rubber cushion is needed together with the screw to fix the wall mount. It is a
small hollow pillar whose internal diameter is 8mm, external diameter is 18mm and height
is 30mm.
• Disconnect the power before moving or installing the TV. Otherwise electric shock may
occur.
• Remove the stand before installing the TV on a wall mount by performing the stand
attachment in reverse.
• If you install the TV on a ceiling or slanted wall, it may fall and result in severe injury. Use an
authorized wall mount and contact the local dealer or qualified personnel. Otherwise it is
not covered by the warranty.
• Do not over tighten the screws as this may cause damage to the TV and void your warranty
• To prevent injury, this apparatus must be securely attached to the floor/wall in accordance
with the installation instructions.
• Use the screws and wall mounts that meet the following specifications. Any damages or
injuries by misuse or using an improper accessory are not covered by the warranty.
CAUTION

6
ENG
BUTTON
Note: The graphics are for representation only.
TERMINALS
Note: The terminals may differ by model or region, and please select the terminals according
to the actual TV you have.
1Cl CI card port.
2AV IN Connect audio and/or video signal from signal
source such as DVD.
3HDMI1/2 Connect HDMI input signal from signal source
such as DVD.
4DIGITAL AUDIO OUT Use a SPDIF cable to connect your TV to a
compatible audio receiver.
5EARPHONE Audio output, speakers will be muted when
earphone is plugged.
6USB USB port
7ANTENNA IN (ANT.) Connect a coaxial cable to receive signal from the
antenna, AIR/CABLE/LNB cable or satellite.
8SERVICE Debugging interface only for professional
technician
Bottom view
Press middle button:
1. In standby mode, press it to turn on the TV;
2. Without OSD, short press it to access source menu; long press to turn the TV to standby;
3. With OSD, short press it to confirm a selection; long press it to return or exit.
Push left: decrease volume or go to left.
Push right: increase volume or go to right.
Push forward: channel up or go to above.
Push backward: channel down or go to below.
Rocker Button
Forward
Left Right
Backward

7
ENG
REMOTE CONTROL
Note: Some button may be invalid, when you press this kind of button, the TV screen will not
respond or pop out a message to show that this function does not exist.
1. POWER ( ) Press to tum the TV on or standby.
2. MUTE ( ) Press to mute or restore the
volume.
3. Number buttons Choose channel directly.
4. CHN LIST Press to access the channel list.
5. RETURN (BACK) Press to return to previous
viewed channel.
6. MENU Open the menu options.
7. SOURCE Select the input source mod
8. Up/Down/Left/Right (///)
Navigate the menu.
9. OK Confirm the selection.
10. TV/RADIO Press to switch between TV and
radio.
11. EXIT Exit the current menu.
12. QUICK Access the quick menu.
13. INFO Display information about current source.
14. Volume Up/Down (VOL+/VOL-)
Adjust the volume up or down.
15. Program Up/Down (PR+/PR-)
Change the programs up or down.
16. EPG Press to display the current EPG
information in DTVmode.
17. REC (Record) Press to record the current
program (Only worked in DTV mode).
18. NICAM (1/11) Press to select desired sound
output depending on the broadcasting
channel.
19. AD Press to tum on audio description, a
narrator will describe what is happening on the
screen for blind or visually impaired viewers.
Press again will turn it off (Only available in DTV
mode).
20. FAV Press to view your assigned favorite
channels. Press Up/Down buttons to cycle
through your assigned favorite channels, press
OK to confirm.

8
ENG
21. FREEZE Freeze or unfreeze the image on the
screen (Not available in USB mode).
22. Colored buttons Press to execute the prompt
function in TV or DTVmode.
23. USB Play Control Buttons
Play & Pause ( )
Press to pause playback, press again to
continue playback.
Stop ( )
Press to stop playback.
Fast Backward Button ( )
Press to fast reverse.
Fast Forward ( )
Press to fast forward.
24. TELETEXT BUTTONS
TEXT
Press to enter or exit the teletext menu.
SIZE
Enlarge the teletext display: Press this button
once to enlarge upper half of the screen. Press
this button again to enlarge lower half of the
screen. Press this button again to resume to
normal screen size.
HOLD
Press to hold the teletext page on screen
without update and changes. Press again to
release the hold state.
SUB.PAGE
Press this button to enter or exit subpage mode
(if subpage is available). Press Red I Green
buttons to select the desired subpage.
INDEX
Display index page.
REVEAL
Display concealed information such as solutions
to riddles or puzzles or remove the information
from the display.
MIX
Superimpose the teletext over the TV program
or return to normal teletext mode.
CANCEL
Return to TV program temporarily while
searching for a Teletext page. When the search
is done, the page number will be displayed
on the upper left of the screen. Press again to
return to the Teletext page.

9
ENG
HOW TO USE THE MANUAL
Operating instructions are built into your TV and can be displayed on the screen. To learn
more about your TV features, access your E-Manual by referring to below information.
1. Press MENU button to access the menu list. There is a display " E-Manual" at the bottom.
2. Press Blue button to access the e-Manual interface.
3. Remote control buttons in the e-Manual are described by words instead of icons, refer to
below information to help you operate the TV.
0-9 Number Buttons Select Page
Go to page
Press to the previous page.
Press to the next page.
Blue button Enter or exit the E-manual interface.

10
ENG
Picture and Sound
Issues Solutions and Explanations
No picture, no sound.
1. Check the signal source.
2. Plug another electrical device into the outlet to
make sure it is working or turned on.
3. Power plug is bad contact with the outlet.
4. Check the signal.
Abnormal picture
1. For no color or bad picture quality, you may:
1) Adjust the color option in menu settings.
2) Keep the TV at a sufficient distance from other electronic
products.
3) Try another channel, maybe exist broadcasting signal problem.
2. Bad TV signal (Display mosaic or snowflakes)
1) Check the signal cable and adjust the antenna.
2) Fine tune the channel.
3) Try another channel.
Normal picture, no
sound
1. If no sound, unmute or increase the sound volume.
2. Open the sound menu and adjust "Balance".
3. Check if a headphone has been inserted in, if so, pull out the
headphone.
TROUBLESHOOTING
Note: Below troubleshooting list is only for reference, some models may not have all functions
and the actual problem may differ from it. If the problem persists after solutions, please contact
your local support center.
General Problem
Issues Solutions and Explanations
Remote control does
not work.
1. Check the remote sensor on the remote control.
2. Change the batteries.
3. Batteries are not installed correctly.
4. Main power is not connected.
Poor signal
This is usually caused by interference from cell phones, walkie-talkie,
automotive ignition system; neon, electric drill or other electronic
equipment or radio interference sources.
Multimedia Player
Issues Solutions and Explanations
Audio is normal but
video is abnormal.
1. The media file maybe damaged, Check if the file can be played
on the PC.
2. Check if video and audio codec is supported.
Video is normal but
audio is abnormal.
1. The media file maybe damaged, Check if the file can be played
on the PC.
2. Check if video and audio codec is supported.

11
ENG
SAFETY INFORMATION
Note: Read all of the instructions before operating the set. Keep these instructions well for
later use.
• Read these instructions -All the safety and operating instructions should be read before this
product is operated.
• Keep these instructions - The safety and operating instructions should be retained for future
reference.
• Heed all warnings - All warnings on the appliance and in the operating instructions should
be adhered to.
• Follow all instructions- All operating and use instructions should be followed.
• Do not use this apparatus near water - The appliance should not be used
near water or moisture - for example, in a wet basement or near a swimming pool, and the
like.
• Clean only with dry cloth.
• Do not block any ventilation openings. Install in accordance with the manufacturer's
instructions.
• Do not install near any heat sources such as radiators, heat registers, stoves, or other
apparatus (Including amplifiers) that produce heat.
• Do not defeat the safety purpose of the polarized or grounding plug. A polarized plug
has two blades with one wider than the other. A grounding plug has two blades and a
third grounding prong. The wide blade or the third prong is provided for your safety. If the
provided plug does not fit into your outlet, consutt an electrician for replacement of the
obsolete outlet.
• Protect the power cord from being walked on or pinched particularly at the plugs,
convenience receptacles, and at the point where they exit from the apparatus. Only use
attachments/accessories specified by the manufacturer.
• Use only with the cart, stand, tripod, bracket, or table specified by the manufacturer,
or sold with the apparatus. When a cart or rack is used, use caution when moving the
cart/apparatus combination to avoid injury from tip-over.
• Unplug the apparatus during lightning storms or when unused for long periods of time.
• Refer all servicing to qualified personnel. Servicing is required when the apparatus has
been damaged in any way, such as power supply cord or plug is damaged, liquid has been
spilled or objects have fallen into the apparatus, the apparatus has been exposed to rain or
moisture, does not operate normally, or has been dropped.
• CAUTION: These servicing instructions are for use by qualified service personnel only. To
reduce the risk of electric shock, do not perform any servicing other than that contained in
the operating instructions unless you are qualified to do so.
• Do not install this equipment in a confined or building-in space such as a book case or
similar unit, and remain a well ventilation conditions at open site. The ventilation should not
be impeded by covering the ventilation openings with items such as newspaper, table-
cloths, curtains etc.
• Caution – To prevent electric shock hazard, replace grille.
• Please refer the information on rear enclosure for electrical and safety information before
installing or operating the apparatus.
• To reduce the risk of fire or electric shock, do not expose this apparatus to rain or moisture.

12
ENG
• The apparatus shall not be exposed to dripping or splashing and that no objects filled with
liquids, such as vases, shall be placed on the apparatus.
• For the terminals marked with symbol of " " may be of sufficient magnitude to constitute a
risk of electric shock. The external wiring connected to the terminals requires Installation by
an instructed person or the used of ready-made leads or cords.
• To prevent injury, this apparatus must be securely attached to the floor/wall in accordance
with the installation instructions.
• Danger of explosion if battery is incorrectly replaced. Replace only with the same or
equivalent type.
• The battery (battery or batteries or battery pack) shall not be exposed to excessive heat such
as sunshine, fire or the like.
• Excessive sound pressure from earphones and headphones can cause hearing loss.
Listening to music at high volume levels and for extended durations can damage one's
hearing. In order to reduce the risk of damage to hearing, one should lower the volume to
a safe, comfortable level, and reduce the amount of time listening at high levels. (Only for
German).
• The mains plug/appliance coupler/direct plug-in adapter is used as disconnect device, the
disconnect device shall remain readily operable.
• When not in use and during movement, please take care of the power cordset, e.g. tie up
the power cordset with cable tie or something like that. It shall be free from sharp edges
and the like that can cause abrasion of the power cordset. When put into use again, please
make sure the power cord set being not damaged, If any damages found, please look for
the service person to replace the power cord set specified by the manufacturer or have the
same characteristics as the original one.
• Attention should be drawn to environmental aspects of battery disposal.
• No naked flame sources, such as lighted candles, should be placed on the apparatus. To
prevent the spread of fire, keep candles or other open flames away from the apparatus at all
times.
• If the apparatus have the symbol in its rating label and the power cord has two pins, it
means that the equipment is a Class II or double insulated electrical appliance. It has been
designed in such a way that it does not require a safety connection to electrical earth.
• The following information are recommended to be included as far as applicable where
applicable:
Refers to alternating current (AC)
Refers to direct current (DC)
Refers to ClassII equipment
Refers to stand-by
Refers to pow er ON.
Refers to dangerous voltage
• Warning for Apparatus containing COIN/BUTTON CELL BATTERIES (Below instruction only
used for the apparatus containing a user-replaceable coin/button cell battery)

13
ENG
WARNING
Do not ingest the battery, Chemical Bum Hazard (The remote control supplied with) This
product contains a coin/button cell battery. If the coin/button cell battery is swallowed, it
can cause severe Internal burns in just 2 hours and can lead to death.Keep new and used
batteries away from children. If the battery compartment does not close securely, stop
using the product and keep it away from children .If you think batteries might have been
swallowed or placed inside any part of the body, seek immediate medical attention.
WEEE Directive
Correct Disposal of this product. This marking indicates that this product should not
be disposed with other household wastes throughout the EU. To prevent possible harm to
the environment or human health from uncontrolled waste disposal, recycle it responsibly
to promote the sustainable reuse of material resources. To return your used device,
please use the return and collection systems or contact the retailer where the product was
purchased. They can taka this product for environmental safe recycling.
CAUTION
RISK OF ELECTRIC SHOCK
DO NOT OPEN
This lightning flash with arrowhead symbol within an equilateral triangle is intended to
alert the user to the presence of non-insulated "dangerous voltage" within the product's
enclosure that may be of sufficient magnitude to constitute a risk of electric shock. To
reduce the risk of electric shock. Do not remove cover (or back). No user serviceable parts
inside. Refer to qualified service personnel. The exclamation point within an equilateral
triangle is intended to alert the user to the presence of important operating and
maintenance instructions in the literature accompanying the appliance.
Licences
Manufactured under license from Dolby Laboratories.
Dolby, Dolby Audio and the double-D symbol are DOLBY AUDIO trademarks of
Dolby Laboratories.
The terms HDMI and HDMI High-Definition Multimedia Interface,
and the HDMI Iogo are trademarks or registered trademarks of HDMI
Licensing LLC in the United States and other countries.

EU DECLARATION OF CONFORMITY
For the following equipment:
LED-TV
______________________________________________________________________________________________
(Product Name)
______________________________________________________________________________________________
(Model name/Brand name)
is herewith confirmed to comply with the requirements set out in the Council Directive on the
Approximation of the Laws of the Members states relating to Radio Equipment Directive(2014/53/EU),Erp
Directive(2009/125/EC) and RoHS(2011/65/EU).For the evaluation regarding the Directive,the following
standarda were applied:
The following manufacturer is responsible for this declaration:
______________________________________________________________________________________________
(Company Name)
______________________________________________________________________________________________
(Company Adress)
______________________________________________________________________________________________
(Contract Name)
______________________________________________________________________________________________
(Position/Title)
__________________________
Place of issue
_______________________
Date of issue
____________________________________
Signature of Authorized Person
Type Standards
Safety EN 60065:2014
EMC EN55020:2007+A11:2011; EN55024:2010+A1:2015;
EN55032:2012; EN61000-3-2:2014; EN61000-3-3:2013
Radio Spectrum ETSI EN 303 340 V1.1.2
ETSI EN 303 372-2 V1.1.1
Health EN 62479:2010
Erp EN 50564:2011; EN 62087:2012;
IEC 62087:2011; IEC 62301:2011
RoHS EN 50581: 2012

15
ALB
AKSESORË
SPECIFIKACIONET
• Telekomandës
• Bateria (AAA madhësi, 2 copë)
• Udhëzues për fillim të shpejtë
• Kartela e garancionit
• Mbajtëse bazë (2 copë)
• Vidha (2 copë) 32”
• Vidha (4 copë) 40”-55”
• Kordoni i rrymës AC x 1
Shënim: Në disa modele, kordoni i rrymës është i lidhur tashmë me njësinë dhe nuk mund
të hiqet.
Shënim
1. Grafika në këtë skedar është vetëm për qëllime reference.
2. Televizori juaj mund të jetë pak më i ndryshëm nga ai që tregohet këtu.
3. Informacioni në këtë dokument mund të ndryshojë pa paralajmërim. Prodhuesi nuk mban
përgjegjësi për dëmtimet që rezultojnë në mënyrë të drejtpërdrejtë ose të tërthortë nga
defektet, informatat e paplota ose mospërputhjet midis manualit të përdoruesit dhe
produktit të përshkruar.
4. Në një mjedis të thatë, për shkak të energjisë elektrike statike, produkti mund të rifillohet
dhe të kthehet në ndërfaqen kryesore OSD, ndërfaqen e lojtarit USB ose në modalitetin e
burimit të mëparshëm. Ju lutemi vazhdoni ta përdorni televizorin.
32”
49”
40”
50”
Tensioni punues 100-240V~ 50/60Hz
Përmasat pa qëndrim
(L x H x D mm) 733.4x438.5x85.1 906.5x525.9x84.9 974.5x575.6x85.8
Pesha neto pa mbajtëset (kg) 3.9 6.6 8.8
Tensioni punues 100-240V~ 50/60Hz
Përmasat pa qëndrim
(L x H x D mm) 1240x145x762 1129.5x663.6x92.2 1242.9x727.9x90.1
Pesha neto pa mbajtëset (kg) 11.5 12.2 14.4
43”
55”

16
ALB
POZICIONI I TV-SË
• Vendosni Ekranin mbi sipërfaqe të ngurtë horizontale siç është tabloja ose tavolina. Për
ajrosje, lini një hapësirë të lire prej 10 cm rreth pajisjes. Për të parandaluar ndonjë situatë të
pakëndshme, ju lutemi mos vendosni mjete mbi televizorin. Ky mund të përdoret në klimë
tropikale ose të moderuar
• Pjesën e pasme ne mur. (vetëm për tregun e AU)
Mos e vendos asnjëherë televizorin në një lokacion jo stabël. Televizori ndoshta mund të
rrëzohet dhe mund të shkaktojë lëndime serioze trupore dhe vdekje. Shumë lëndime,
kryesisht të fëmijëve, mund të shmangen duke marrë masa paraprake të thjeshta si:
• Përdorimi i kabineteve ose stendave te rekomanduara nga prodhuesi I televizorit.
• Përdorim të mobiljeve që sigurt e mbajnë televizorin.
• Duke u siguruar që televizori nuk është mbi ose buzë mobiljeve mbështetëse.
• Mos e vendosni televizorin në mobilje të larta (për shembull, dollapë ose arkiva) pa
ankorimin e mobiljeve dhe televizorit në një mbështetje të përshtatshme.
• Mos e vendosni televizorin në rroba apo materiale të tjera që mund të vendosen midis
televizorit dhe mobiljeve mbështetëse.
• Duke edukuar fëmijët rreth rreziqeve gjatë ngjitjes në mobilje për të arritur televizorin ose
kontrollet e tij.
Nëse pajisja e telvizorit tuaj të mëparshën ruhet dhe zhvendoset, duhet të zbatohen të njëjtat
përmasa si më sipër (vetëm për TV me masë të tejkalojë 7 kg).
• Mjedisi
(vetëm për zonat me klima tropikale):
Temperatura punuese: 5°C-45°C
Lagështia punuese: 20%-80%
Temperatura e ruajtjes: -15°C-50°C
Lagështia e ruajtjes: 10%-90%
• Mjedisi
(vetëm për zonat me klima tropikale):
Temperatura punuese: 5°C-35°C
Lagështia punuese: 20%-80%
Temperatura e ruajtjes: -15°C-45°C
Lagështia e ruajtjes: 10%-90%

17
ALB
• “Një montim në mur shtesë mund të përdoret me televizorin tend. Konsultohuni me shitësin
tuaj lokal për një montim në mur që mbështet standardin VESA të përdorur nga TV modeli
juaj. Vendosni me kujdes mbërthesen e montimir në mur në pjesën e pasme të televizorit.
Instaloni majtësen e montimir në një mur të ngurtë pingul në dysheme. Nëse e ngjitni
televizorin me material tjera ndërtimore, ju lutemi kontaktoni stafin e kualifikuar për instalime
në mur. Udhëzime të hollësishme do të përfshihen me montimin në mur. Ju lutemi përdorni
një mbajtës për montim në mur ku pajisja është siguruar në mënyrë adekuate në mur me
hapësirë të mjaftueshme për të lejuar lidhjen me pajisjet e jashtme.
Model Size: 32" Top Down
Screw
Diameter (mm) "E" M4 M4
Depth (mm)
“D”
Max 9 9
Min 6 6
Quantity 2 2
VESA (AxBxC) 100x100x100
Shënim:
1) Fotot janë vetëm për referencë.
2) Për TV-të me terminale drejt murit, me qëllim të lënit hapësirë të mjaftueshme për
terminalet, një gomë është e nevojshme bashkë më vidhën për të rregulluar montimin në
mur. Ka një shtyllë e vogël e hollë, diametri i brendshëm i së cilës është 8 mm, i jashtmi
18mm dhe lartësia 30mm.
• Ndaleni rrymën para se të lëvizni ose instaloni televizorin. Përdnryshe mund të ndodh shoku
elektrik.
• Hiqni pajisjen para se të instaloni televizorin në një mbajtëse në mur, duke venosur
mbështetësen në pjesën e pasme.
• Nëse instaloni TV-në një tavan ose mur të pjerrët, mund të bjerë dhe të shkaktojë lëndime të
rënda.Përdorni një mbajtëse muri të autorizuar dhe kontaktoni shitësin local ose personelin
e kualifikuar, përndryshe nuk mbulohet nga garancioni.
• Mos i shtrëngoni vidhat shumë sepse kjo mund të dëmtojë TV-në dhe të anulojë
garancionin tuaj.
• Për të parandaluar dëmtime, ky aparat duhe të lidhet mire me dyshemenë/murin në
përputhje me udhëzimet e instalimit.
• Përdorni vidha dhe montime muri që plotësojnë specifikacionet e mëposhtme. Çdo dëmtim
ose lëndim nga keqpërdorimi i pavëmendshëm nuk mbulohet nga garancioni.
KUJDES

18
ALB
BUTONI
Shënim: Grafikonet janë vetëm për prezantim.
TERMINALET
Shënim: Terminalet mund të ndryshojnë sipas modelit ose rajonit, dhe ju lutemi zgjidhni
terminalet sipas TV-së aktuale që keni.
1Cl Cl port kartë.
2AVIN Lidhni audio /osevideo sinjalinnga burimi i
sinjaleve si në DVD.
3HDMI1/2 Lidhni sinjal inputin HDMI nga burimi i sinjaleve si
në DVD.
4DIGITAL AUDIO OUT Përdor një kabllo SPDIF për të lidhur TV-në tuaj në
një audio resiver të duhur.
5EARPHONE Dalja e audios, altoparlantët do të shuhen kur
kufjet vendosen.
6USB USB porti
7ANTENNA IN (ANT.) Lidhni një kabllo koaksiale për të fituar sinjalet nga
antenna kabllore ose satelitore.
8SERVICE MIIdentifikoni interfejsin vetëm për teknik
profeisionist.
Pamja nga pas
Shtyp butonin e mesëm:
1. No gjendjen e pushimit, shtype për ta ndezur TV-në;
2. Pa OSD, shtpeni pak për ty hyrë në menunë kryesore; shtypeni më gjatë për të kthyer TV-në në
gjednje pushimi;
3. Pa OSD, shtype shkurt për të konfirmuar seleksionimin; shtypeni më gjatë për t’u kthyer ose dalë
Push left: decrease volume or go to left.
Push right: increase volume or go to right.
Push forward: channel up or go to above.
Push backward: channel down or go to below.
Rocker Butoni
Para
Majtas Djathtas
Pas

19
ALB
TELEKOMANDA
Shënim: Disa butone mund të mos punojnë, kur i shtypni këto butone, ekrani I TV-së nuk do të
përgjigjet ose do të shfaqet një mesazh për të treguar se ky funksion nuk ekziston.
1. NDIZ ( ) Shtyp për të ndezur ose fikur TV-në.
2. MULA ( ) Shtyp për të shuar ose për të
rivendosur volumin.
3. Numrat e butonave Zgjish kanalin drejt për së
drejti.
4. LISTA E KANALEVE Shtyp për të hyrë në listën
e kanaleve.
5. KTHEHU PËRSËRI (PRAPA) Shtyp për të kthyer
kanalin e shikuar më parë.
6. MENU Hap opsionet e menusë.
7. BURIMI Zgjidh mënyrën e burimit të hyrjes.
8. Lartë/Poshtë/Majtas/Djathtas (///)
Navigo menunë.
9. OK Konfirmo zgjidhjen.
10. TV/RADIO Shtyp për t’u lidhur me mes TV dhe
Radios.
11. EXIT (DIL) Dil nga menuja aktuale.
12. SHPEJT Qasje në menunë e shpejt.
13. INFO Shfaq informacion rreth burimit aktual.
14. VolumiLartë/Poshtë(VOL+NOL-) Rregullo
volumin lartë ose poshtë.
15. ProgramiLartë/Poshtë(PR+/PR·) Ndrysho
programet lartë dhe poshtë.
16. EPG Shtyp për të shfaqur EPG informatën
aktuale në DTV formën.
17. REC(Incizo) Shtyp për të incizuar programin
aktual (Punon vetëm në formën DTV).
18. NICAM (1/11) Shtyo për të fituar peodhimin
e dëshiruar të zërit në varësi prej kanalit të
transmetimit.
19. AD Shtyp për të aktivizuar përshkrimin audio,
një narrator do të përshkruaj se çfarë ndodh në
erkan për shikuesit e verbër ose me shikim të
dëmtuar. Shtyp përsëri të fiket (E disponueshme
vetëm në formatin DTV).
20. FAV Shtypni për të parë kanalet tuaja të
preferuara. Shtypni butonatlart/Poshtëpër të
kaluar kanalet tuaja të përzgjedhura, shtypni OK
për të konfirmuar.

20
ALB
21. BLLOKO Blloko ose çblloko foton në ekran (Nuk
është e disponueshme në formën USB).
22. Butonat me ngjyrë Shtypni për të ekzekutuar
funksionin në formënTV oseDTV.
23. Butonat USB Play Control
Play & Pause ( )
Shtyp për të pauzuar ripdrodhimin shtyp përsëri
për të vazhduar riprodhimin.
Stop ( )
Shtyp për të stopuar riprodhimin.
ButoniKthim pas shpejt (Backward Button )
Shtyp për kthim të shpejt.
Para shpejt ( )
Shtyp për të shkuar para shpejt.
24. BUTONAT E TELETEKSTIT
TEKST
Shtyp për të hyrë ose dalur nga menuja e
teletekstit.
MADHËSIA
Zmadho ekranin e teletekstit: Shtyp njëherë këtë
buton për të zmadhuar gjysmën e sipërme të
ekranit. Shtyp përsëri këtë buton për të zmadhuar
gjysmën e poshtme të ekranit. Shtyp përsëri këtë
buton për të sjellë në normal madhësinë e ekranit.
MBA
Shtyp për të mbajtur faqen e teletekstit në ekran
pa azhurime dhe ndryshime. Shtyp përsëri për të
çliruar gjendjen e mbajtjes.
NËN.FAQE
Shtyp këtë buton për të hyrë ose dale formën e
nën faqes (nëse nën-faqja është e disponueshme).
Shtyp butonin e Kuq dhe Gjelbër për të selektuar
nën-faqen e dëshiruar.
INDEKSI
Shfaq faqen e indeksin.
ZBULO
Shfaq informacione të fshehura të tilla si solucione
të riddles ose puzzles ose hiqni informacionin nga
ekrani.
MIX
Mbivendosni teletekstin mbi programin televiziv
ose të ktheheni në formën normal të teletekstit.
ANULLO
Kthehu në TV programet përkohësisht deri sa
kërkoni një faqe Teleteksti. Kur kërkimi ka mbaruar
numri I faqes do të shfaqet në anën e majtë lartë
ekranit. Shtyp përsëri për t’u kthyer në faqen e
Teletekstit.
Other manuals for Series 3
10
This manual suits for next models
6
Table of contents
Languages:
Other Tesla LED TV manuals

Tesla
Tesla 40E635BFS User manual

Tesla
Tesla 43E635BFS User manual

Tesla
Tesla S24D302B2 User manual

Tesla
Tesla Q55K925SUS User manual

Tesla
Tesla 40E320BF User manual

Tesla
Tesla 32S625SHS User manual

Tesla
Tesla M610BUS User manual

Tesla
Tesla 32M320BH User manual

Tesla
Tesla Series 3 User manual

Tesla
Tesla T606 Series User manual

Tesla
Tesla 65Q615BUS User manual

Tesla
Tesla 32S605BHS User manual

Tesla
Tesla 32S307WH User manual

Tesla
Tesla 6 SERIES User manual

Tesla
Tesla Series 3 User manual

Tesla
Tesla 9 series User manual

Tesla
Tesla 43E635SUS User manual

Tesla
Tesla 32E620BHS User manual

Tesla
Tesla Series 3 User manual

Tesla
Tesla 42Q310BF User manual