TESTO 870 User manual

Contents
Contents
1Safety and waste disposal ................................................................... 3
1.1 About this document..............................................................................3
1.2 Safety.....................................................................................................3
1.3 Waste disposal.......................................................................................5
2Technical data ..................................................................................... 5
3Description of the instrument ............................................................... 7
3.1 Use.........................................................................................................7
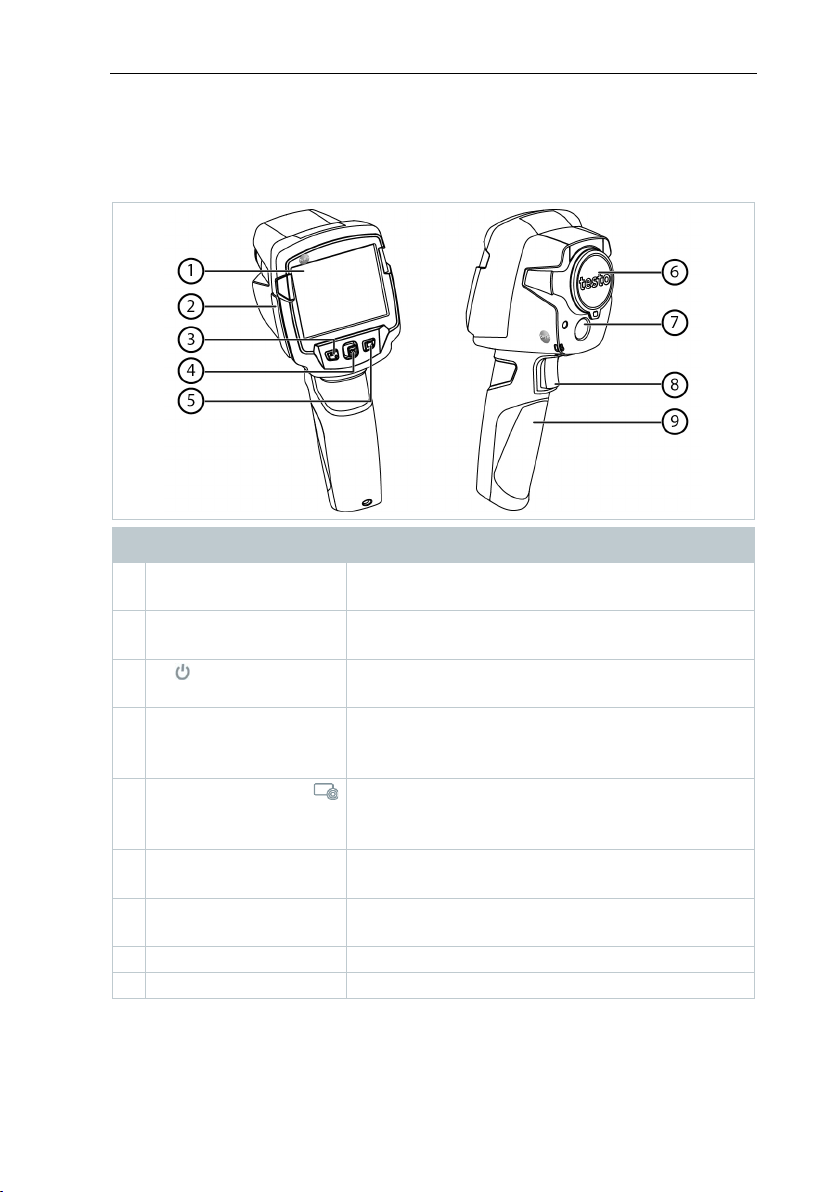
3.1 Instrument / operating elements overview .............................................8
3.1 Displays overview...................................................................................9
3.2 Power supply .......................................................................................10
4Operation........................................................................................... 10
4.1 Initial operation.....................................................................................10
4.2 Switching instrument on and off ..........................................................10
4.3 Getting to know the menu....................................................................11
4.4 Colour palette quick change ................................................................12
4.5 Quick select button ..............................................................................12
5Performing the measurement ............................................................. 14
5.1 Saving an image...................................................................................14
5.2 Setting measuring functions ................................................................15
5.3 Image gallery........................................................................................16
5.4 Image type ...........................................................................................19
5.5 Setting the scale ..................................................................................19
5.6 Setting emissivity and reflected temperature.......................................20
5.7 Selecting the colour palette .................................................................22
5.8 Configuration........................................................................................23
6Maintenance ...................................................................................... 27
6.1 Charging the rechargeable battery.......................................................27
6.2 Changing the rechargeable battery......................................................27
6.3 Cleaning the instrument .......................................................................29
7Tips and assistance ........................................................................... 30
7.1 Questions and answers........................................................................30
7.2 Accessories and spare parts................................................................31

1Safety and waste disposal
3
1Safety and waste disposal
1.1 About this document
•The instruction manual is an integral part of the instrument.
•Keep this document throughout the entire operating life of the instrument.
•Always use the complete original instruction manual.
•Please read this instruction manual through carefully and familiarise yourself
with the product before putting it to use.
•Pass this instruction manual on to any additional or subsequent users of the
product.
•Pay particular attention to the safety instructions and warning advice in
order to prevent injury and damage to the product.
1.2 Safety
General safety instructions
•Only operate this instrument in the proper manner, for its intended purpose
and within the parameters specified in the technical data.
•Do not apply any force to open the instrument.
•Do not operate the instrument if there are signs of damage on the housing,
mains unit or connected cables.
•Always comply with the locally valid safety regulations when carrying out
measurements. Dangers may also arise from objects to be measured or the
measuring environment.
•Do not store the product together with solvents.
•Do not use any desiccants.
•Only perform maintenance and repair work on this instrument that is
described in this documentation. Follow the prescribed steps exactly.
•Use only original spare parts from Testo.
•During operation, this instrument must not be pointed at the sun or other
intensive sources of radiation (e.g. objects with temperatures exceeding
500 °C). This can lead to serious damage to the detector. The manufacturer
does not provide any warranty for any such damage to the microbolometer
detector.

1Safety and waste disposal
4
Batteries
•Improper use of batteries may cause the batteries to be destroyed, or lead
to injury due to current surges, fire or escaping chemicals.
•Only use the batteries supplied in accordance with the instructions in the
instruction manual.
•Do not short-circuit the batteries.
•Do not take the batteries apart and do not modify them.
•Do not expose the batteries to heavy impacts, water, fire or temperatures in
excess of 60 °C.
•Do not store the batteries in the proximity of metal objects.
•In the event of contact with battery acid: rinse affected areas thoroughly
with water, and if necessary consult a doctor.
•Do not use any leaky or damaged batteries.
•Only charge the rechargeable battery in the instrument or in the
recommended charging station.
•Immediately stop the charging process if this is not completed in the given
time.
•Take the rechargeable battery out of the instrument or the charging station
immediately if it is not functioning properly or if it shows signs of
overheating. Rechargeable battery may be hot!
•When not in use for a long period of time, take the rechargeable battery out
of the instrument to prevent exhaustive discharge.
Warnings
Always pay attention to any information denoted by the following warnings.
Implement the precautionary measures specified!
Display Explanation
WARNING
Indicates possible serious injury.
CAUTION
Indicates possible minor injury.
ATTENTION
Indicates possible damage to equipment.

2Technical data
5
1.3 Waste disposal
•Dispose of faulty rechargeable batteries and spent batteries in accordance
with the valid legal specifications.
•At the end of its useful life, dispose of the instrument via separate collection
for electrical and electronic devices. Please observe local regulations
regarding waste disposal, or alternatively return the product to Testo for
disposal.
2Technical data
Image output
Feature Values
Infrared resolution 160 x 120 pixels (FPA, amorphous silicon)
Thermal sensitivity (NETD) <100 mK @ 30 °C
Field of view (FOV) / min.
focusing distance
34° x 26°/ < 0.5 m (fixed-focus lens)
Geometric resolution (IFOV) 3.68 mrad
SuperResolution (optional
function)
320 x 240 pixels / 2.3 mrad
IR image refresh rate 9 Hz
Spectral range 7.5 - 14 µm
Image presentation
Feature Values
Display 8.9 cm (3.5") TFT, QVGA (320 x 240 pixels)
Display options •Infrared image
•Real image (only for testo 870-2)
Interface USB 2.0 micro B
Colour palettes 4 options: iron, rainbow HC, grey, cold-hot
Measuring
Feature Values
Measurement range -20 to 280 °C
Accuracy Information valid for specified measurement
range + tolerance
±2 °C , ±2 % of reading (higher value applies)

2Technical data
6
Feature Values
Extended display range Values with no guarantee of accuracy, prefixed
with a tilde (
~…
) on the display.
-40 to -22 °C
286 to 290 °C
Measurement •Single point measurement
•Coldspot
•Hotspot
Digital camera (only testo 870-2)
Feature Values
File format .jpg
Lens 34° x 26°
Image storage
Feature Values
File format •.bmt and .jpg
•Export options in .bmp, .jpg, .png, .xls., csv
Memory capacity Internal mass storage 1.6 GB,
> 2000 images (without SuperResolution)
Power supply
Feature Values
Battery type Li-Ion rechargeable battery 2500 mAh / 3.7 V
Operating time 4 h @ 20 °C
Charging option In instrument/in charging station (optional)
Charging time approx. 5 h via mains unit
approx. 8 h via a PC's USB interface
Ambient conditions
Feature Values
Operating temperature -15 to 50 °C
Storage temperature -30 to 60 °C
Humidity 20 - 80 %RH, not condensing

3Description of the instrument
7
Physical features
Feature Values
Weight 550 g (including battery)
Dimensions 96 x 95 x 219 mm
Housing PC/ABS
Protection class (IEC 60529) IP 54
Vibration (IEC 60068-2-6) 2 G
Standards, tests, warranty
Feature Values
EU Directive 2004/108/EC
Warranty 2 years
3Description of the instrument
3.1 Use
The testo 870 is a handy, robust thermal imager. You can use it to undertake
the non-contact measurement and display of surface temperature distribution.
Areas of application
•Building inspection: Energy efficiency rating of buildings (heating,
ventilation, air-conditioning trade, building engineers, engineering firms,
experts)
•Production monitoring / quality assurance: monitoring of production
processes
•Preventive maintenance / servicing: Electrical and mechanical inspection of
systems and machines

3Description of the instrument
8
3.1 Instrument / operating elements
overview
Element Function
1
Display
Displays infrared and real images, menus and
functions
2
Interface terminal Contains micro USB interface for power supply
and connection to the computer
3
- button
-
Esc
button
- Switch camera on and off
- Cancel action
4
-
OK
button
- Joystick
- Open menu, select function, confirm setting
- Navigate within the menu, select function,
select colour palette
5
Quick select button Opens the function assigned to the quick select
button; the icon for the selected function is
displayed bottom right
6
Infrared camera lens;
protective cap
Takes infrared images; protects the lens
7
Digital camera (only
testo 870-2)
Takes real images
8
Trigger
Saves the displayed image
9
Battery compartment Contains the rechargeable battery

3Description of the instrument
9
3.1 Displays overview
Element Function
1
Battery capacity / charge status:
: Battery operation, capacity 75-100%
: Battery operation, capacity 50-75%
: Battery operation, capacity 25-50%
: Battery operation, capacity 10-25%
: Battery operation, capacity 0-10%
- - - - (animated): Mains
operation, battery is charging
: Mains operation, battery fully charged
2
Image display
IR image or real image display (only testo 870-2)
3
or Unit set for reading and scale displays
4
Scale - Temperature unit
- Grey characters: Measurement range
- Black characters: temperature margin of the
image displayed, showing the
minimum/maximum reading (with automatic
scale adjustment) or the selected
minimum/maximum display value (with
manual scale adjustment)
5
or Automatic or manual scale adjustment activated
6
Emissivity set

4Operation
10
3.2 Power supply
The power is supplied to the instrument via a replaceable rechargeable battery
or the mains unit provided (battery must be inserted).
With an attached mains unit, power is supplied automatically via the mains unit
and the rechargeable battery is charged (only at ambient temperatures from 0
to 40°C).
If the instrument is switched off when connected to a PC via the USB interface,
the rechargeable battery is charged via the USB interface.
It is also possible to charge the battery using a charging station (accessory).
The instrument is equipped with a buffer battery to maintain the system data
during an interruption in the power supply (e.g. when the battery is changed).
4Operation
4.1 Initial operation
Please read the testo 870 1st steps commissioning instructions supplied
(0970 8702).
4.2 Switching instrument on and off
Switching on the camera
1
- Remove protective cap from the
lens.
2
- Press .
The camera starts.
The start screen appears on the
display.

4Operation
11
The camera carries out automatic zeroing approx. every 60 seconds in
order to guarantee measuring accuracy. A "click" is heard when this
happens. The image freezes briefly when this occurs. Zeroing is carried
out more frequently during the camera warm-up period (takes
approx. 90 seconds).
During the warm-up period no measuring accuracy is guaranteed. The
image can already be used for indication purposes and saved.
Switching off the camera
1
- Press and hold down until the
progress bar is complete.
The display goes off.
The camera is switched off.
4.3 Getting to know the menu
1
- Press
OK
to open the menu.

4Operation
12
2
-
Move the
Joystick
down/up to
highlight a function (orange border).
3
-
Press
OK
to select the function.
3.1
-
Move the
Joystick
to the right to open the submenu (indicated with
►).
- Move the
Joystick
to the left to go back to the main menu.
4.4 Colour palette quick change
testo 870-2: this function is only available if the Image type is set to infrared
image.
1
- Move the
Joystick
down/up to switch between the colour
palettes.
4.5 Quick select button
The quick select button is another navigation option that you can use to call up
certain functions simply at the touch of a button.
Quick select menu items
Menu item Function
Image type
(only testo 870-2) Alternately switches the image
display between infrared and real
image.
Image gallery
Opens an overview of saved
images.
Scale
(testo 870-2: this function is only
available if the
Image type
is set to
infrared)
Set scale limits.

4Operation
13
Menu item Function
Emissivity
(testo 870-2: this function is
only available if the
Image type
is set to
infrared)
Set emissivity (
E
) and reflected
temperature (
RTC
).
Adjustment
(testo 870-2: this function
is only available if the
Image type
is set to
infrared)
Carries out manual zeroing.
Changing assignment
1
-
Move the
Joystick
to the right.
The
Configure key
selection menu
appears.
The activated function is marked with
a tick ( ).
2
- Move the
Joystick
up/down until the
orange box appears around the
required menu item.
- Press
OK
The quick select button is assigned
to the selected menu item.
The icon for the selected function is
displayed bottom right.
Using the quick select button
1
- Press .
The function assigned to the quick
select button is carried out.

5Performing the measurement
14
5Performing the measurement
CAUTION
High thermal radiation (e.g. due to sun, fire, furnaces)
Detector may be damaged!
-
Do not point the camera at objects with temperatures exceeding
500 °C.
Ideal framework conditions
•Building thermography, investigating the building shell:
Considerable temperature difference between inside and outside required
(ideal: ≥ 15 °C /≥27 °F).
•Consistent weather conditions, no intensive sunlight, no precipitation, no
strong wind.
•To ensure maximum accuracy, the camera requires an adjustment time of
10 minutes after it is switched on.
Important camera settings
•Emissivity and reflected temperature must be set correctly in order to
precisely determine the temperature. Subsequent adjustment is possible via
the PC software, if required.
•When auto-scaling is activated, the colour scale is continuously adjusted to
the min./max. values of the current measurement image. This means that
the colour assigned to a specific temperature is changing constantly! To be
able to compare multiple images based on the assigned colour, scaling
must be set manually to fixed values, or must be subsequently adjusted to
uniform values using the PC software.
5.1 Saving an image
1
- Press
trigger
.
The image is automatically saved.
testo 870-2: regardless of the image
type set, an infrared image is saved
with an attached real image.

5Performing the measurement
15
If a higher resolution is required: in the menu under
Configuration
select
SuperResolution
(optional function), for four times as many
readings.
5.2 Setting measuring functions
1
-
Open the
Measurement
submenu. Procedure: see
Getting to
know the menu, page
11
.
The submenu opens with the measuring functions:
•
Single point measurement
: the temperature measuring point
in the centre of the image is marked with white crosshairs and
the value is displayed. In saved images the crosshairs can be
moved using the joystick, in order to read the value of other
measuring points.
•
Coldspot
: the lowest temperature measuring point is marked
with blue crosshairs and the value is displayed.
•
Hotspot
: the highest temperature measuring point is marked
with red crosshairs and the value is displayed.
•
Measurement range
: temperature range of the readings
displayed (for info).
2
- Move the
Joystick
up/down to select the required function and
then press
OK
.

5Performing the measurement
16
5.3 Image gallery
Saved images can be displayed, analysed or deleted.
File names
Designation Explanation
1
- Infrared preview
2
IR
000000
Infrared image, testo 870-2: with attached real image
Consecutive number
File names can be changed via the PC, e.g. in Windows Explorer.

5Performing the measurement
17
Displaying a saved image
Saved images can be viewed and analysed in the image gallery.
1
- Select
Image gallery
function. For
how to proceed: see
Getting to know
the menu, page
11
.
All saved images are displayed in the
form of an infrared preview.
2
- Move
Joystick
to select an image.
3
- Press
OK
to open the selected image.
The image is displayed.
Analysing an image
Saved images can be analysed using the Single point measurement, Hotspot
and Coldspot measuring functions. In saved images the crosshairs, which mark
the measuring point, can be moved using the joystick.
For a description of the individual functions, please read the information in the
relevant sections.

5Performing the measurement
18
Deleting an image
1
-
Select
Image gallery
function, see
Getting to know the menu, page
11
.
All saved images are displayed in the
form of an infrared preview.
2
- Move
Joystick
to select an image.
3
-
Press .
Delete image?
is displayed.
4
- Press
OK
to delete the image.
4.1
-
Press
Esc
to cancel the process.

5Performing the measurement
19
5.4 Image type
This function is only available for the testo 870-2 version.
The display can be switched between infrared image and real image (digital
camera).
1
- Select
Image type
function. For how to proceed: see
Getting to know
the menu, page
11
.
The image type displayed switches alternately between the infrared
image view and real image view.
5.5 Setting the scale
Manual scaling can be activated instead of automatic scaling (continuous
automatic adjustment to the current min./max. values). The scale limits can be
set within the measurement range.
The activated mode is displayed bottom right: automatic scaling, manual
scaling.
Auto-scaling continuously adjusts the scale to the readings presented,
and the colour assigned to a temperature value changes.
In manual scaling fixed limit values are defined, and the colour
assigned to a temperature value is fixed (important for visual image
comparisons).
The scaling affects how the infrared image appears on the display, but
has no effect on the recorded readings.
Setting automatic scaling
1
- Select
Scale
function. For how to proceed: see
Getting to know the
menu, page
11
.
2
- Move the
Joystick
to the left until
Auto
is selected and then press
OK
.
Automatic scaling is activated. is displayed bottom right.
Setting manual scaling
The lower limit value, the temperature range (upper and lower limit value
simultaneously) and the upper limit value can be set.
1
-
Select
Scale
function. For how to proceed see
Getting to know the
menu, page
11
.

5Performing the measurement
20
2
- Move the
Joystick
to the left/right until (lower limit value) is
selected.
- Move the
Joystick
up/down to set the value.
2.1
- Move the
Joystick
to the left/right until (lower limit value) and
(upper limit value) are selected.
- Move the
Joystick
up/down to set the values.
2.2
- Move the
Joystick
to the right until (upper limit value) is selected.
- Move the
Joystick
up/down to set the value.
3
- Press
OK
.
Manual scaling is activated. is displayed bottom right.
5.6 Setting emissivity and reflected
temperature
testo 870-2: this function is only available if the Image type is set to infrared
image.
You can choose between user-defined emissivity and 8 materials with
permanently set emissivity. The reflected temperature (RTC) can be set
individually.
Other materials can be imported into the instrument from an existing
list using the PC software.
Emissivity information:
The emissivity describes the capability of a body to emit electromagnetic
radiation. This is material-specific and must be adapted for correct
measurement results.
Non-metals (paper, ceramic, gypsum, wood, paints and coatings), plastics and
food have high emissivity, which means that the surface temperature can be
easily measured using infrared.
Because of their low or non-uniform emissivity, bright metals and metal oxides
only have limited suitability for infrared measurement. Highly inaccurate
measurements should be expected. A remedy for this is coatings that increase
emissivity, e.g. paint or emission adhesive (accessory: 0554 0051), which must
be applied to the object to be measured.
Other manuals for 870
2
Table of contents
Other TESTO Thermal Camera manuals